转自:https://www.cnblogs.com/helenMemery/p/8733960.html
最近公司新出了一个产品,需要搭建自动化测试框架,这是一个学以至用的好机会,跟上级申请后,决定搭建一个java自动化测试框架。
Java自动化测试对我来讲可以说不难不易,因为java是我大学在校四年学的主要开发语言,但是毕业这么多年没写了难免生疏。
weiUI自动化测试需要掌握以下几点:一是获取元素,java获取元素对象与python差不多,用的是findElement方法,不过我在搭建框架过程中为了实现PO模式,从万能的百度中获知还有个一更好的类FindBy,FindBy+PageFactory可以完美实现PO模式。二是测试框架,junit和testNG都是java方面的主流测试框架,这两个框架我都没有用过,不能比较二者优劣,不过看现在各公司的招聘要求基本都是写着要会testNG,所以选择testNG作为测试框架应该不会错。三是测试报告的展示,尝试过后,发现测试报告还是reportNG比testNG的原生测试报告好看,所以决定用reportNG代替testNG生成测试报告。最后就是项目的构建了,很久以前我也是用过maven的,觉得这个东西还是满好用的,所以框架中也加上吧。下面就一个个说一下我的代码结构。
以下是配置文件POM.xml,各依赖关系下面已经注析清楚。

<project xmlns="http://maven.apache.org/POM/4.0.0" xmlns:xsi="http://www.w3.org/2001/XMLSchema-instance"
    xsi:schemaLocation="http://maven.apache.org/POM/4.0.0 http://maven.apache.org/xsd/maven-4.0.0.xsd">
    <modelVersion>4.0.0</modelVersion>

    <groupId>myTest</groupId>
    <artifactId>mytest</artifactId>
    <version>0.0.1-SNAPSHOT</version>
    <packaging>jar</packaging>

    <name>mytest</name>
    <url>http://maven.apache.org</url>

    <properties>
        <project.build.sourceEncoding>UTF-8</project.build.sourceEncoding>
    </properties>
    <dependencies>
        <dependency>
            <groupId>org.testng</groupId>
            <artifactId>testng</artifactId>
            <version>6.14.2</version>
            <scope>test</scope>
        </dependency>
        <!-- 加入reportNG依赖,代替testNG测试报告 -->
        <dependency>
            <groupId>org.uncommons</groupId>
            <artifactId>reportng</artifactId>
            <version>1.1.4</version>
            <scope>test</scope>
            <exclusions>
                <exclusion>
                    <groupId>org.testng</groupId>
                    <artifactId>testng</artifactId>
                </exclusion>
            </exclusions>
        </dependency>
        <!-- 加入selenium做webUI测试,选用selenium2 -->
        <dependency>
            <groupId>org.seleniumhq.selenium</groupId>
            <artifactId>selenium-java</artifactId>
            <version>2.53.1</version>
        </dependency>
        <!-- 依赖Guice -->
        <dependency>
            <groupId>com.google.inject</groupId>
            <artifactId>guice</artifactId>
            <version>3.0</version>
            <scope>test</scope>
        </dependency>
    </dependencies>
    <build>
        <plugins>
            <!-- 加入maven-surefire-plugin插件用来使用maven执行用例,其中suiteXmlFile配置的就是testNG用例执行文件的地址 -->
            <plugin>
                <groupId>org.apache.maven.plugins</groupId>
                <artifactId>maven-surefire-plugin</artifactId>
                <version>2.21.0</version>
                <configuration>
                    <suiteXmlFiles>
                        <suiteXmlFile>src/test/java/myTest/mytest/testNG.xml</suiteXmlFile>
                    </suiteXmlFiles>
                    <!-- 加入编码设置,否则生成的报告会中文乱码 -->
                    <argLine>-Dfile.encoding=UTF-8</argLine>
                </configuration>
            </plugin>
            <!-- 添加插件,添加ReportNg的监听器,修改最后的TestNg的报告 -->
            <plugin>
                <groupId>org.apache.maven.plugins</groupId>
                <artifactId>maven-surefire-plugin</artifactId>
                <version>2.5</version>
                <configuration>
                    <properties>
                        <property>
                            <name>usedefaultlisteners</name>
                            <value>false</value>
                        </property>
                        <property>
                            <name>listener</name>
                            <value>org.uncommons.reportng.HTMLReporter</value>
                        </property>
                    </properties>
                    <workingDirectory>target/</workingDirectory>
                    <!-- <forkMode>always</forkMode> -->
                </configuration>
            </plugin>
        </plugins>
    </build>

</project>
接下来是代码实现,根据以往经验,UI自动化测试很容易出现找到不对象的情况,所以在操作之前必须判断对象是否存在,java和python一样有隐式等待和显式等待,我选择使用更加稳妥的显式等待。Java显式等待使用的是WebDriverWait+ExpectedConditions,使用方式如下:
| new WebDriverWait(driver,10).until( ExpectedConditions.presenceOfElementLocated(By.cssSelector("css locator"))); |
也就是说要在定位元素的时候加入这两个类作为等待条件,直到目标元素出现为止。但是如果每一个元素都这么写的话就有很多冗余代码了,所以我写了个公共类BasePage.java,重写了click事件和sendkeys事件,代码如下:
/**
 * @author:Helen
 * @date:2018年4月7日
 * @Description: 处理页面元素公共类,重写页面操作事件,为每个元素加入显式等待
 */
package myTest.mytest;

import org.openqa.selenium.WebDriver;
import org.openqa.selenium.WebElement;
import org.openqa.selenium.support.ui.ExpectedConditions;
import org.openqa.selenium.support.ui.WebDriverWait;

public class BasePage {
    WebDriver driver;
    private final int timeOut = 10;//等待时间

    public BasePage(WebDriver driver) {
        // TODO Auto-generated constructor stub
        this.driver = driver;
    }

    /* 重写senkeys方法 */
    void sendkeys(WebElement element, String s) {
        new WebDriverWait(driver, timeOut).until(ExpectedConditions.visibilityOf(element));// 加入显式等待
        element.clear();// 先清空输入框
        element.sendKeys(s);// 输入数据
    }

    /* 重写click方法 */
    void click(WebElement element) {
        new WebDriverWait(driver, timeOut).until(ExpectedConditions.visibilityOf(element));// 加入显式等待
        element.click();
    }
}
接下来就是实现页面对象获取了,下面以百度页面为示例
/**
 * @author:Helen
 * @date:2018年4月7日
 * @Description: 百度页面,对象定位和操作,继承BasePage
 */
package myTest.mytest;

import org.openqa.selenium.WebDriver;
import org.openqa.selenium.WebElement;
import org.openqa.selenium.support.FindBy;

public class MyPage extends BasePage{
    public MyPage(WebDriver driver) {
        super(driver);
        // TODO Auto-generated constructor stub
    }

    //关键词输入框
    @FindBy(id="kw")
    private WebElement kw_Element;

    //“搜索”按钮
    @FindBy(id="su")
    private WebElement su_Element;

    //输入关键词
    public void kw_sendkes(String s){
        this.sendkeys(kw_Element, s);
    }

    //点击“搜索”按钮
    public void su_click() {
        this.click(su_Element);
    }

}
接下来是写测试业务内容,加载页面的时候加入PageFactory,代码如下:
/**
 * @author:Helen
 * @date:2018年4月7日
 * @Description: 百度搜索测试
 */
package myTest.mytest;

import org.testng.annotations.AfterMethod;
import org.testng.annotations.Test;
import org.testng.Assert;
import org.openqa.selenium.WebDriver;
import org.openqa.selenium.firefox.FirefoxDriver;
import org.openqa.selenium.support.PageFactory;


public class myTestNg {
    private WebDriver driver = new FirefoxDriver();

    @Test
    public void baidu_search() {
        MyPage myPage = PageFactory.initElements(driver, MyPage.class);
        driver.get("https://www.baidu.com");
        driver.manage().window().maximize();//窗口最大化
        myPage.kw_sendkes("helenMemery");
        myPage.su_click();
    }

    @Test
    public void f2() {
        Assert.assertEquals("b", "b");
    }

    @AfterMethod
    public void close(){
        //driver.close();
    }

}
最后是配置testNG.xml文件,内容如下:
<?xml version="1.0" encoding="UTF-8"?>
<!DOCTYPE suite SYSTEM "http://testng.org/testng-1.0.dtd">
<suite name="百度搜索">
    <test name="搜索业务">
        <classes>
            <class name="myTest.mytest.NewTest"></class>
            <class name="myTest.mytest.myTestNg"></class>
        </classes>
    </test>
</suite>
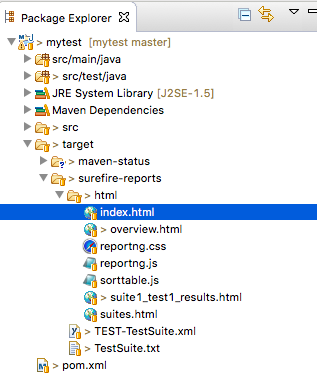
接下来就是执行测试了,选中pom.xml右键-Run As-maven test

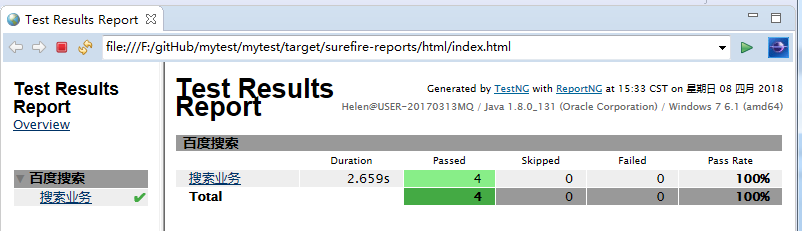
最后生成HTML 测试报告,如下图所示: