HashMap源码剖析
源码jdk版本使用:1.8
了解HashMap的朋友都会知道其数据结构是数据和链表,可能再接着深聊就无从下手,今天带着各位深入研究HashMap源码。
(转发请声明)
action
- 在代码开始之前,我们先熟悉一些变量和内部类相关的内容
//default_initial_capacity指该容器的默认容量是16
//1<<4比直接写16效率高。
static final int DEFAULT_INITIAL_CAPACITY = 1 << 4; // aka 16

//该容器最大容量
static final int MAXIMUM_CAPACITY = 1 << 30;

//加载因子。0.5资源太浪费,如果空间太多,查询效率会变慢
static final float DEFAULT_LOAD_FACTOR = 0.75F;

//容器和加载因子的结果是threshold,即达到threshold就会开始扩容
int threshold;

//树结构转变的阈值(默认值),数据达到指定的数量要数据结构转变
static final int TREEIFY_THRESHOLD = 8;

//取消树结构的阈值(默认值),容器中数据低于指定数量要数据结构转变
static final int UNTREEIFY_THRESHOLD = 6;

//容器中存储数据的数量
transient int size;

//容器数组table
 transient HashMap.Node<K, V>[] table;
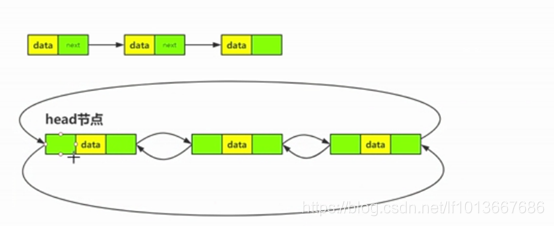
- 静态内部类(单向链表)
单向链表和双向链表展示图
 static class Node<K,V> implements Map.Entry<K,V> {
        final int hash; //在数组中的位置,存储结点的去处
        final K key; //存储的key value中的key
        V value;//存储的key value中的value
        Node<K,V> next; //可以得知是链表,而且是单向链表
        ......
        }
- 进行解读
package com.csj;

import java.util.HashMap;
/**
 1.
 2. @author 春申君
 3.  */
public class HashMapGuider {

	public static void main(String[] args) {
		HashMap<Integer,String> maps = new HashMap<>();
		maps.put(1, "春申君");
		maps.put(2, "平原君");
		maps.put(3, "信陵君");
		maps.put(4, "孟尝君");
		System.out.println(maps);
	}

}
//{1=春申君, 2=平原君, 3=信陵君, 4=孟尝君}
我们在操作HashMap的时候内部做了什么现在开始。
进入构造
复制成员变量loadFactor因为默认DEFAULT_LOAD_FACTOR是静态常量不能改变,扩容的时候加载因子也会变
在进行put的时候进行的操作


//maps.put(1, "春申君"); 此处key是1,value是春申君
//hash方法
static final int hash(Object key) {
        int h;
        //取出key的hashCode结果异或其结果无符号右移16位
        //其就是高16位异或低16位 比如:hashCode值为
        //0101010101010111101010101001101
        //(胡乱输的)
        //000000000000000010101010101011进行异或(自行百度)
        return (key == null) ? 0 : (h = key.hashCode()) ^ (h >>> 16);

    }
//putVal(...)方法代码展示
 final V putVal(int hash, K key, V value, boolean onlyIfAbsent,
                   boolean evict) {
        Node<K,V>[] tab; Node<K,V> p; int n, i;

        //在第一次进行put操作的时候table为null所以执行该步骤进行resize分配空间
        //其resize方法会进行一系列判断是否超过threshold是要扩容,不是则进行添加数据,扩容后会不会超过最大空间,是否第一次创建更新threshold阈值,如果不是的话就返回等等操作
        if ((tab = table) == null || (n = tab.length) == 0)
            n = (tab = resize()).length;
        //让其hash方法的返回值(高16异或低16)&容器空间长度-1(即16-1,和%16同样的结果,
        //只是这样更高效),得出的结果也就是其Node结点的hash坑的位置,
        //会判断是否为null,为null则代表无数据直接添加即可
        if ((p = tab[i = (n - 1) & hash]) == null)
            tab[i] = newNode(hash, key, value, null);
        else {
        //else则代表当前数组坑的位置有数据,是key值相同,
        //采取覆盖操作,还是链表添加,或者是红黑树方式添加数据。
            Node<K,V> e; K k;
            //盘点key是不是完全相同,相同则引用交给e
            if (p.hash == hash &&
                ((k = p.key) == key || (key != null && key.equals(k))))
                e = p;
               //如果其数据结构是红黑树,则进行红黑树的形式进行添加数据
            else if (p instanceof TreeNode)
                e = ((TreeNode<K,V>)p).putTreeVal(this, tab, hash, key, value);
            else {
            //否则呢就是给其链表结构添加值
                for (int binCount = 0; ; ++binCount) {
                    if ((e = p.next) == null) {
                        p.next = newNode(hash, key, value, null);
                        //TREEIFY_THRESHOLD之前定义的是8向红黑树进化
                        //UNTREEIFY_THRESHOLD定义的是6 红黑树向链表转化
                        //即长度为7的时候带上我们的新数据为8个长度的时候转换结构红黑树
                        if (binCount >= TREEIFY_THRESHOLD - 1) // -1 for 1st
                            treeifyBin(tab, hash);
                        break;
                    }
                    //如果key值相同,我们就跳出循环
                    if (e.hash == hash &&
                        ((k = e.key) == key || (key != null && key.equals(k))))
                        break;
                    p = e;
                }
            }
            //存在的key进行value赋盖,并把我们的旧value返回
            if (e != null) { // existing mapping for key
                V oldValue = e.value;
                if (!onlyIfAbsent || oldValue == null)
                    e.value = value;
                afterNodeAccess(e);
                return oldValue;
            }
        }
        //修改次数加1
        ++modCount;
        //添加后长度大于我们的加载因子相关的阈值,则进行重新扩容
        if (++size > threshold)
            resize();
        afterNodeInsertion(evict);
        //没有key值相同的情况,没有产生覆盖,则返回null
        return null;
    }
关于hashMap扩容这一块单独拿出来讲
扩容会在之前提到过的resize方法中进行
//截图hashMap中resize方法的部分代码
//在此之前已经创建好新数组的大小空间和新数组加载因子相关的threshold
 if (oldTab != null) {
            for (int j = 0; j < oldCap; ++j) {
                Node<K,V> e;
                //把当前数组元素赋值给e
                if ((e = oldTab[j]) != null) {
                //避免内存泄漏使其为Null
                    oldTab[j] = null;
                    //即当前数组的该节点没有next没有链表结构
                    if (e.next == null)
                    //让其hash和新数组的长度进行取模
                        newTab[e.hash & (newCap - 1)] = e;
                    else if (e instanceof TreeNode)
                    //如果是红黑树结构则进行切割
                        ((TreeNode<K,V>)e).split(this, newTab, j, oldCap);
                    else { // preserve order
                        Node<K,V> loHead = null, loTail = null;
                        Node<K,V> hiHead = null, hiTail = null;
                        Node<K,V> next;
                        do {
                        //如果是有链表的数据
                            next = e.next;
                            //让其和oldArray进行&oldCap即%oldCap+1
                            if ((e.hash & oldCap) == 0) {
                                if (loTail == null)
                                    loHead = e;
                                else
                                    loTail.next = e;
                                loTail = e;
                            }
                            else {
                                if (hiTail == null)
                                    hiHead = e;
                                else
                                    hiTail.next = e;
                                hiTail = e;
                            }
                        } while ((e = next) != null);
                        if (loTail != null) {
                            loTail.next = null;
                            newTab[j] = loHead;
                        }
                        if (hiTail != null) {
                            hiTail.next = null;
                            newTab[j + oldCap] = hiHead;
                        }
                    }
                }
            }
        }
如需转载,请链接。
hashMap源码差不多就到这里结束,如果不理解再追问。