html中列表元素的一些应用
1.导航栏的制作
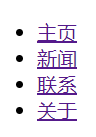
导航栏基本每一个网站都会用到,那么我们就可以使用html中的列表元素ul来制作一个简单的导航栏。
        <ul class="topmenu">
                <li><a href="#home" class="active">主页</a></li>
                <li><a href="#other">新闻</a></li>
                <li><a href="#other">联系</a></li>
                <li><a href="#other">关于</a></li>
        </ul>
再使用一些简单的CSS就可以转换成好看的导航栏而不是枯燥的HTML菜单。
.topmenu {
      list-style-type: none;
      margin: 1;
      padding: 0;
      overflow: hidden;
      background-color:#666;
  }
  .topmenu li {
      float:left;
  }
  .topmenu li a {
      display: inline-block;
      color: white;
      text-align: center;
      padding: 25px;
      text-decoration: none;
  }
  .topmenu li a:hover {
      background-color:darkorange;
  }
  .topmenu li a.active {
      color: white;
      background-color:darkcyan;
  }

2.排行榜的制作
也可以使用列表元素ol来制作排行榜的展示,例如某站:

代码写起来应该不算困难,本菜等以后用到之后再去实践了。
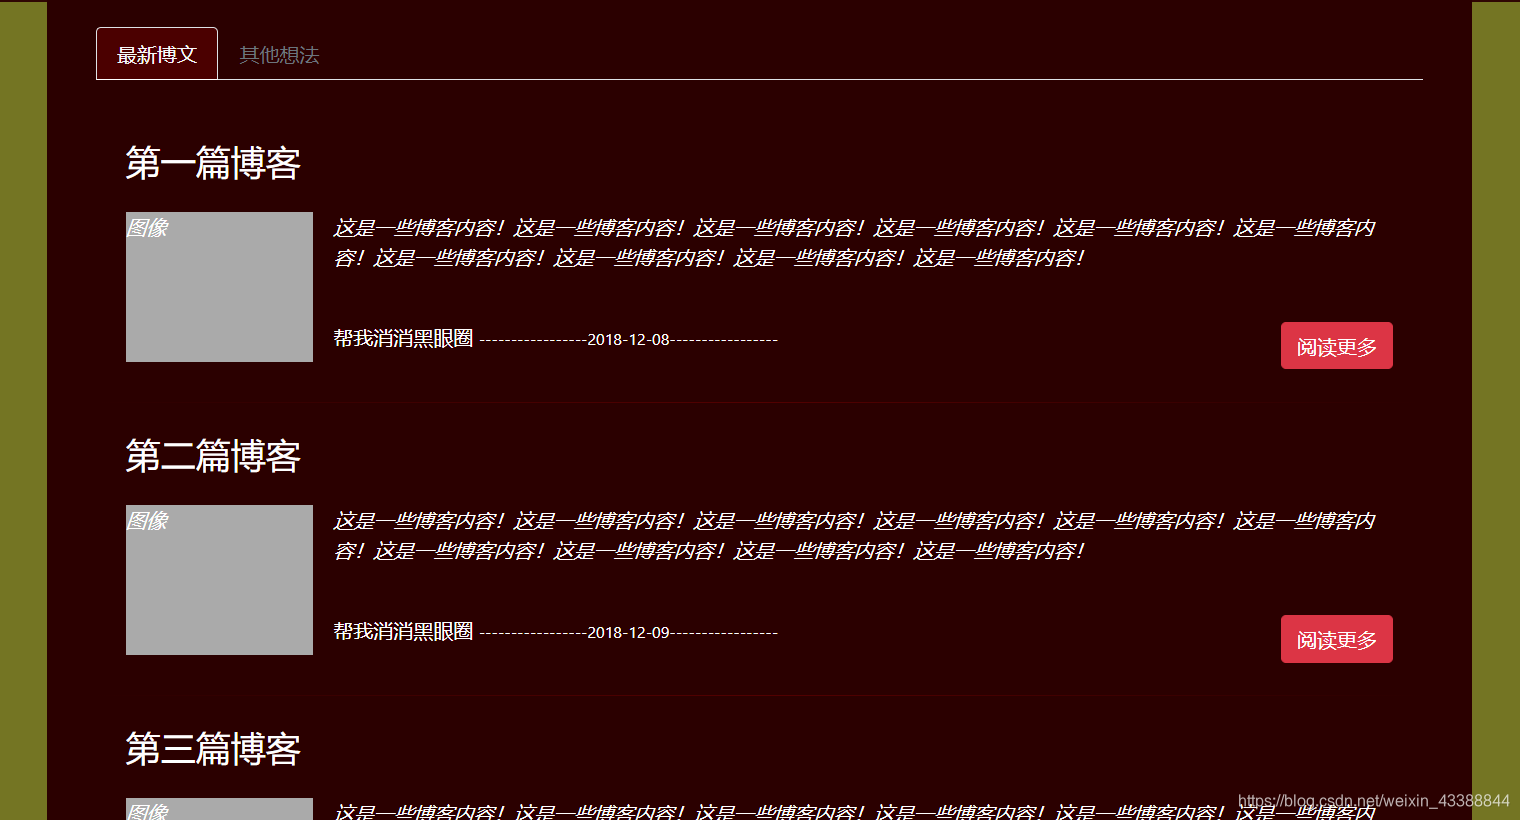
3.文章板块化,格式化版面等具有相同文体特征的内容的制作
比如一个网页有一列相同板块的内容等,如文章列表:
代码部分:
    <section class="bottomsection">
        <div class="container aftercontain">
            <div class="row">
                <div class="col-12">
                    <ul class="nav nav-tabs m-4">
                        <li class="nav-item"><a href="#" class="nav-link text-light active">最新博文</a></li>
                        <li class="nav-item"><a href="#" class="nav-link disabled">其他想法</a></li>
                    </ul>
                    <ul class="m-4  ul_notecontain">
                        <li class="p-4">
                            <h3 class="mb-4">第一篇博客</h3>
                            <i>
                                <div class="fakeimg mr-3" style="float: left">图像</div>
                                这是一些博客内容!这是一些博客内容!这是一些博客内容!这是一些博客内容!这是一些博客内容!这是一些博客内容!这是一些博客内容!这是一些博客内容!这是一些博客内容!这是一些博客内容!
                            </i>
                            <p style="margin-top:40px;">
                                <span>帮我消消黑眼圈</span>
                                <span><small>-----------------2018-12-08-----------------</small></span>
                                <a href="#" class="btn btn-danger" style="float: right">阅读更多</a>
                            </p>
                        </li>
                        <div style="background:linear-gradient(to left,#2b0000,#530000,#2b0000);height:1px;"></div>
                        <li class="p-4">
                            <h3 class="mb-4">第二篇博客</h3>
                            <i>
                                <div class="fakeimg mr-3" style="float: left">图像</div>
                                这是一些博客内容!这是一些博客内容!这是一些博客内容!这是一些博客内容!这是一些博客内容!这是一些博客内容!这是一些博客内容!这是一些博客内容!这是一些博客内容!这是一些博客内容!
                            </i>
                            <p style="margin-top:40px;">
                                <span>帮我消消黑眼圈</span>
                                <span><small>-----------------2018-12-09-----------------</small></span>
                                <a href="#" class="btn btn-danger" style="float: right">阅读更多</a>
                            </p>
                        </li>
                        <div style="background:linear-gradient(to left,#2b0000,#530000,#2b0000);height:1px;"></div>
                        <li class="p-4">
                            <h3 class="mb-4">第三篇博客</h3>
                            <i>
                                <div class="fakeimg mr-3" style="float: left">图像</div>
                                这是一些博客内容!这是一些博客内容!这是一些博客内容!这是一些博客内容!这是一些博客内容!这是一些博客内容!这是一些博客内容!这是一些博客内容!这是一些博客内容!这是一些博客内容!
                            </i>
                            <p style="margin-top:40px;">
                                <span>帮我消消黑眼圈</span>
                                <span><small>-----------------2018-12-10-----------------</small></span>
                                <a href="#" class="btn btn-danger" style="float: right">阅读更多</a>
                            </p>
                        </li>
                    </ul>
                </div>
            </div>
        </div>
    </section>
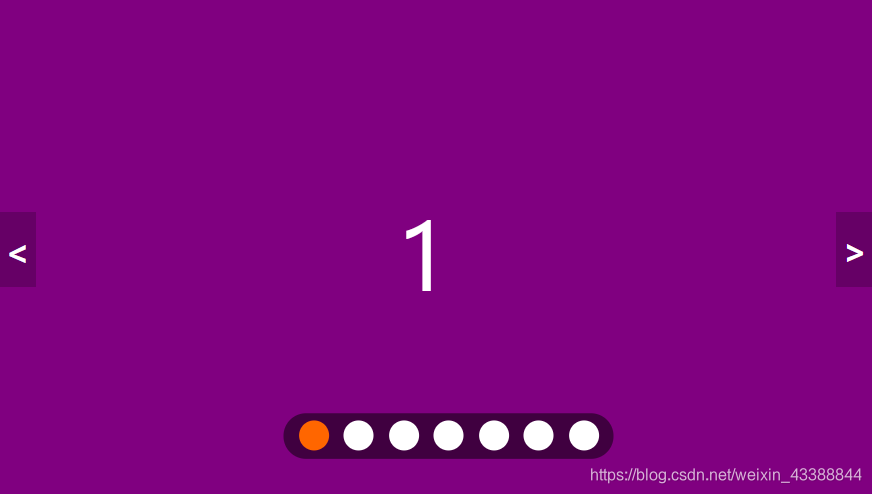
4.轮播图,全屏焦点图的制作
代码部分
html:
<div id="wrap">
<ul class="pic">
<li style="background:purple">1
<a href="#"><img src="" alt=""></a>
</li>
<li style="background:deeppink">2
<a href="#"><img src="" alt=""></a>
</li>
<li style="background:blue">3
<a href="#"><img src="" alt=""></a>
</li>
<li style="background:#00ae9d">4
<a href="#"><img src="" alt=""></a>
</li>
<li style="background:yellow">5
<a href="#"><img src="" alt=""></a>
</li>
<li style="background:skyblue">6
<a href="#"><img src="" alt=""></a>
</li>
<li style="background:orange">7
<a href="#"><img src="" alt=""></a>
</li>
</ul>
<ul class="tab">
<li class="on"></li>
<li></li>
<li></li>
<li></li>
<li></li>
<li></li>
<li></li>
</ul>
<p href="#" class="prev">
<</p>
<p href="#" class="next">></p>
</div>
css:
<style>
* {
	margin:0;
	padding:0;
}
a {
	text-decoration:none;
}
li {
	list-style:none;
}
#wrap {
	position:relative;
	width:700px;
	height:400px;
	margin:50px auto;
	overflow:hidden;
}
#wrap .pic {
	position:absolute;
	top:0;
	left:0;
	width:1000%;
	height:100%;
}
.pic li {
	float:left;
	width:700px;
	height:400px;
	color:#fff;
	font-size:80px;
	text-align:center;
	line-height:400px;
}
.pic li img {
	border:0;
	vertical-align:middle;
	/*width:700px;
	height:400px;
	*/
}
.tab {
	position:absolute;
	bottom:20px;
	left:50%;
	margin-left:-100px;
	height:30px;
	padding-left:10px;
	background:rgba(0,0,0,.2);
	border-radius:15px;
	transition:0.5s;
}
.tab:hover {
	background:rgba(0,0,0,.5);
	transform:scale(1.2);
}
.tab li {
	width:20px;
	height:20px;
	float:left;
	background:#fff;
	border-radius:50%;
	margin:5px 10px 0 0;
	/*opacity:0.35;
	*/
			cursor:pointer;
}
.tab li.on {
	/*position:absolute;
	top:0;
	*/
			background:#f60;
	/*opacity:1;
	z-index:99;
	*/
}
p {
	position:absolute;
	top:50%;
	margin-top:-30px;
	width:30px;
	background:rgba(0,0,0,0.2);
	text-align:center;
	font-size:28px;
	font-weight:bold;
	line-height:60px;
	color:#fff;
	cursor:pointer;
}
p:hover {
	background:rgba(0,0,0,0.5);
}
.prev {
	left:0;
}
.next {
	right:0;
}

</style>
js:
$(function() {
    var $wrap = $('#wrap'),
        $picUl = $('.pic'),
        $tabLi = $('.tab li'),
        $prev = $('.prev'),
        $next = $('.next'),
        widLi = $picUl.children().eq(0).width(),
        len = $tabLi.length,
        idx = 0,
        timer = null;

    //get first; set all
    $tabLi.click(function() {
        $(this).addClass("on").siblings().removeClass("on")
        idx = $(this).index();

        $picUl.animate({
            left: -idx * widLi
        }, 500)
    })
    // 点击下一张
    $next.click(function() {
        idx++;
        idx %= len; // 序号为小圆按钮的长度时到达第一张
        $tabLi.eq(idx).addClass("on").siblings().removeClass("on")
        $picUl.animate({
            left: -idx * widLi
        }, 500)
    })

    $prev.click(function() {
        idx--;
        if (idx < 0) {
            idx = len - 1
        };

        $tabLi.eq(idx).addClass("on").siblings().removeClass("on")
        $picUl.animate({
            left: -idx * widLi
        }, 500)
    })

    // 自动轮播
    auto();

    function auto() {
        timer = setInterval(function() {
            $next.trigger("click") // 触发click
        }, 3000)
    }

    $wrap.hover(function() {
        clearInterval(timer);
    }, function() {
        auto();
    })
})
5.遇到再来补充
还有什么欢迎各位大佬补充