版权声明:本文为博主原创文章,未经博主允许不得转载。 https://blog.csdn.net/sky_long_fly/article/details/86702587
前言
关于 UIImageView 部分圆角 先扔代码吧,具体的我这里就不讲了。(本文重点不在这里)
/**
 *  设置部分圆角(绝对布局)
 *
 *  @param corners 需要设置为圆角的角 UIRectCornerTopLeft | UIRectCornerTopRight | UIRectCornerBottomLeft | UIRectCornerBottomRight | UIRectCornerAllCorners
 *  @param radii   需要设置的圆角大小 例如 CGSizeMake(20.0f, 20.0f)
 */
- (void)addRoundedCorners:(UIRectCorner)corners withRadii:(CGSize)radii {
    CAShapeLayer* shape = [CAShapeLayer layer];
    shape.path = [UIBezierPath bezierPathWithRoundedRect:self.bounds byRoundingCorners:corners cornerRadii:radii].CGPath;
    self.layer.mask = shape;
}
但是问题来了如果我们加上 borderWidth、borderColor会是什么样子呢?(代码、效果图如下)
   UIImageView *imageView = [[UIImageView alloc] init];
    imageView.layer.borderColor = [UIColor redColor].CGColor;
    imageView.layer.borderWidth = 2;
    imageView.frame = CGRectMake(100, 200, 80, 80);
    [self.view addSubview:imageView];
    [imageView addRoundedCorners:UIRectCornerTopLeft | UIRectCornerTopRight withRadii:CGSizeMake(20, 20)];
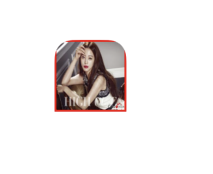
可以看到效果图边框效果真的差,如果交付会被打死的。
那怎么处理呢,先上代码吧。
   UIImageView *imageView = [[UIImageView alloc] init];
    imageView.frame = CGRectMake(100, 200, 80, 80);
    [self.view addSubview:imageView];
    [imageView addRoundedCorners:UIRectCornerTopLeft | UIRectCornerTopRight withRadii:CGSizeMake(20, 20)];

    CAShapeLayer* shape = [CAShapeLayer layer];
    shape.path = ((CAShapeLayer *)imageView.layer.mask).path;//path 取- (void)addRoundedCorners:(UIRectCorner)corners withRadii:(CGSize)radii 函数中的 path
    shape.strokeColor = [UIColor redColor].CGColor;//边框色
    shape.lineWidth = 2*2;//2*边框宽度
    shape.fillColor = [UIColor clearColor].CGColor;//填充色
    [imageView.layer addSublayer:shape];//addSublayer
    [imageView sd_setImageWithURL:[NSURL URLWithString:@"https://images2.bestjlb.com/jlboss7370d8b2315203cfd4fdff617fd6013215427879667496070.jpg"]];
效果图
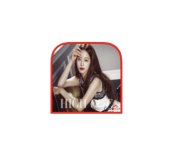
这个效果应该可以交付了吧,如果有什么疑问大家考虑下图层应该就明白了。