学习了一段时间的caffe ,虽然对于这个深度学习平台有了一点认识,基本上也可以从网上download下别人训练好的模型来fine tuning (原谅我真的无法从头来训练,单位给我配的渣渣电脑),但是想要成为一名老司机,这远远是不够的
 ,所以本司机打算从头好好系统的学习下,整理成博客的形式.作为一个新手,对caffe的认识肯定有很多的不足之处,有不到位的地方,希望各位老司机轻拍
 .
.
因为接触caffe时间不长,对caffe的印象是,这个深度学习框架,天生就是为了VC而生的,据说也可以用于NLP等其他的领域,但是需要对架构改动,新手表示还搞不了.
至于caffe的安装与配置,就不讲了,不过吐槽下,caffe的确比较不好安装,按照网上的教程也很少一次成功的.我安装了两天,哎,不说了,都是泪.安装教程网上很多,大家可以自行百度了.例如ubuntu14.0.4+CPU+caffe.YY一下, 啥时候可以pip install caffe就好了网上caffe的学习教程太多了,当然对于一个新手,拿caffe自带的例子来上手真是再好不过了.
所谓mnist,就是手写数字数据集,由于起采用的lenet模型比较简单,一般的深度学习框架都拿来作为入门教程.如caffe,tensorflow等(原谅我只熟悉这俩个深度学习框架)
caffe是啥玩意?coffee? 据说caffe名字的由来,是因为贾杨清团队成员喜欢喝coffee,厉害了,我的偶像.
caffe自带的模型有lenet,Alexnet,googlenet,caffenet,rcnn
mnist模型的训练
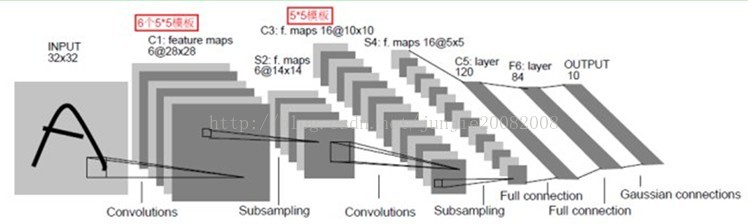
网络层定义
name: "LeNet" //网络名称是LeNet
layer {
name: "mnist" //数据层名称是mnist,可以随意取
type: "Data" //类型是数据,表示数据来源于leveldb或者lmdb
top: "data" //输出数据到两个Blob,分别是data和label
top: "label"
include {
phase: TRAIN //说明该层只在训练过程中调用,如果没有include参数,说明该层既在训练模型中,又在测试模型中
}
transform_param {
scale: 0.00390625 //确保输出数据在[0,1)之间,所以乘以1/256
}
data_param {
source: "examples/mnist/mnist_train_lmdb" //从这里获得数据
batch_size: 64 //每次读取数据个数
backend: LMDB //数据类型,level还是lmdb,默认是level
}
}
layer {
name: "mnist"
type: "Data"
top: "data"
top: "label"
include {
phase: TEST
}
transform_param {
scale: 0.00390625
}
data_param {
source: "examples/mnist/mnist_test_lmdb"
batch_size: 100 //每次处理的数据个数
backend: LMDB
}
}
其他集中数据层:
1.数据来自于内存
层类型:MemoryData
必须设置的参数:
batch_size:每一次处理的数据个数,比如2
channels:通道数
height:高度
width: 宽度
示例:
layer {
top: "data"
top: "label"
name: "memory_data"
type: "MemoryData"
memory_data_param{
batch_size: 2
height: 100
width: 100
channels: 1
}
transform_param {
scale: 0.0078125
mean_file: "mean.proto"
mirror: false
}
}
2、数据来自于HDF5
层类型:HDF5Data
必须设置的参数:
source: 读取的文件名称
batch_size: 每一次处理的数据个数
示例:
layer {
name: "data"
type: "HDF5Data"
top: "data"
top: "label"
hdf5_data_param {
source: "examples/hdf5_classification/data/train.txt"
batch_size: 10
}
}
3、数据来自于图片
层类型:ImageData
必须设置的参数:
source: 一个文本文件的名字,每一行给定一个图片文件的名称和标签(label)
batch_size: 每一次处理的数据个数,即图片数
可选参数:
rand_skip: 在开始的时候,路过某个数据的输入。通常对异步的SGD很有用。
shuffle: 随机打乱顺序,默认值为false
new_height,new_width: 如果设置,则将图片进行resize
示例:
layer {
name: "data"
type: "ImageData"
top: "data"
top: "label"
transform_param {
mirror: false
crop_size: 227
mean_file: "data/ilsvrc12/imagenet_mean.binaryproto"
}
image_data_param {
source: "examples/_temp/file_list.txt"
batch_size: 50
new_height: 256
new_width: 256
}
}
4、数据来源于Windows
层类型:WindowData
必须设置的参数:
source: 一个文本文件的名字
batch_size: 每一次处理的数据个数,即图片数
示例:
layer {name: "data"
type: "WindowData"
top: "data"
top: "label"
include {
phase: TRAIN
}
transform_param {
mirror: true
crop_size: 227
mean_file: "data/ilsvrc12/imagenet_mean.binaryproto"
}
window_data_param {
source: "examples/finetune_pascal_detection/window_file_2007_trainval.txt"
batch_size: 128
fg_threshold: 0.5
bg_threshold: 0.5
fg_fraction: 0.25
context_pad: 16
crop_mode: "warp"
}
}
然后是第一个卷积层和下采样层:
layer {
name: "conv1"
type: "Convolution" // layer: "Convolution" layers:CONVOLUTION
bottom: "data" //以下层传输过来的data Blob作为输入
top: "conv1" //这层数据输出到Blob conv1
param {
lr_mult: 1 //lr为learning rate,学习率
}
param {
lr_mult: 2 //bias的学习率是weight的两倍
}
convolution_param {
num_output: 20 //输出有20个channel,说明有20个卷积核与data数据层卷积
kernel_size: 5 //卷积核大小为5
stride: 1 //卷积步长为1
weight_filler {
type: "xavier" //使用xavier algorithm,根据输入和输出神经元的数目,自动确定初始化权重的范围
}
bias_filler {
type: "constant" //将偏置初始化为常数,且为0
}
}
}
layer {
name: "pool1"
type: "Pooling" //层的类型是Pooling,layers对应的是POOLING
bottom: "conv1" //输入是conv1 Blob
top: "pool1" //输出是pool1 Blob
pooling_param {
pool: MAX //下采样方式是最大值采样
kernel_size: 2 //在2*2的区域内选择最大值
stride: 2 //步长为2,防止区域有重叠
}
}
第二个卷积层和下采样层也都是类似的,就不再赘述了,下面是两个全连接层:
layer {
name: "ip1"
type: "InnerProduct" //Fully Connection Layer在caffe中也叫Inner Product
bottom: "pool2" //输入是pool2 Blob
top: "ip1" //输出是ip1 Blob
param {
lr_mult: 1
}
param {
lr_mult: 2
}
inner_product_param {
num_output: 500 //输出的神经元个数为500
weight_filler {
type: "xavier"
}
bias_filler {
type: "constant"
}
}
}
layer {
name: "relu1"
type: "ReLU"
bottom: "ip1" //把输入和输出的Blob设为同一个名字,可以是对单个元素操作的relu节省存储空间
top: "ip1"
}
然后是另一个全连接层,不过只有10个输出,对应10个数字。接下来就是Loss层(和Accuracy层,只在test阶段使用):
layer {
name: "loss"
type: "SoftmaxWithLoss"
bottom: "ip2" //将全连接层的prediction和data层输出的label作为输入
bottom: "label"
top: "loss"
}
这一层没有进一步的输出,只计算损失函数值,当BP开始时将loss 报告出来。这个网络的定义就到此结束了。
此外,还有一点需要注意的是,当如下的格式出现时,
layer {
// ...layer definition...
include: { phase: TRAIN }
}
说明这一层只在TRAIN阶段出现在网络中,当处在TEST阶段时,这一层不出现在网络中。没有这个标志的层始终出现在网络当中。所以在以上的定义中,DATA层以不同的BATCH出现了两次,分别是TRAIN和TEST阶段。另外在测试阶段还有一个Accuracy层,每100次迭代就计算一下准确率。
参数配置
net: "examples/mnist/lenet_train_test.prototxt"//网络模型文件
# test_iter specifies how many forward passes the test should carry out.
# In the case of MNIST, we have test batch size 100 and 100 test iterations,
# covering the full 10,000 testing images.这个要与test_layer中的batch_size结合起来理解。batch_size为100,需要迭代100次才能将10000个数据全#部执行完,因此test_iter设置为100,执行完一次全部的数据为一个epoch
test_iter: 100
# Carry out testing every 500 training iterations.测试间隔,即每训练500次,才测试一次
test_interval: 500
# The base learning rate, momentum and the weight decay of the network.学习率,
base_lr: 0.01 #基础学习率
momentum: 0.9 #梯度更新的权重
weight_decay: 0.0005 #权重衰减项,防止过拟合
# The learning rate policy学习率策略,有六种。详见http://stackoverflow.com/questions/30033096/what-is-lr-policy-in-caffe
lr_policy: "inv"
gamma: 0.0001
power: 0.75
# Display every 100 iterations 每训练100次在屏幕上显示一次,0不显示
display: 100
# The maximum number of iterations最大迭代次数
max_iter: 10000
# snapshot intermediate results每5000次迭代,保存一次模型参数
snapshot: 5000
snapshot_prefix: "examples/mnist/lenet" #保存路径,lenet应该是保存文件的前缀,如lenet_iter_5000.caffemodel
# solver mode: CPU or GPU运行模式
solver_mode: GPU
训练网络
依然在CAFFE_ROOT根目录下
./examples/mnist/train_lenet.sh
我的渣渣电脑,CPU训练,需要1个小时45分钟,伤不起