表单应用
表单3个组成部分
- 表单标签
- 表单域
- 表单按钮
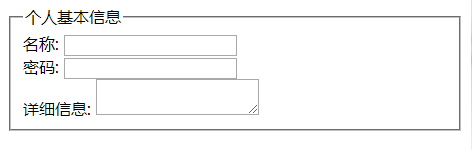
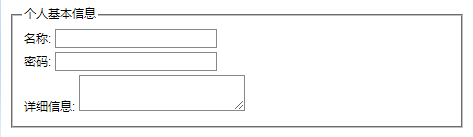
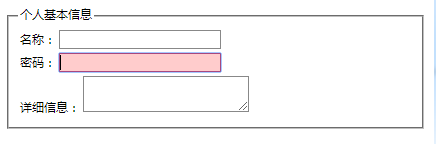
单行文本框应用
获取和失去焦点改变样式。
示例:
HTML
<form action="#" method="post" id="regForm">
	<fieldset>
		<legend>个人基本信息</legend>
			<div>
				<label  for="username">名称:</label>
				<input id="username" type="text" />
			</div>
               <div>
				<label for="pass">密码:</label>
				<input id="pass" type="password" />
			</div>
               <div>
				<label for="msg">详细信息:</label>
				<textarea id="msg" rows="2" cols="20"></textarea>
			</div>
	</fieldset>
</form>
CSS:
body{
  font:normal 12px/17px Arial;
}
div{
    padding:2px;
}
input, textarea {
     width: 12em;
     border: 1px solid #888;
}
.focus {
     border: 1px solid #f00;
     background: #fcc;
}
jQuery
$(function(){
	$(":input").focus(function(){
	  	$(this).addClass("focus");
	}).blur(function(){
	  	$(this).removeClass("focus");
	});
})
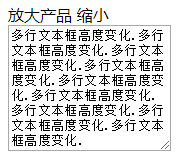
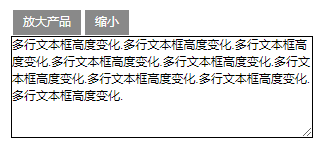
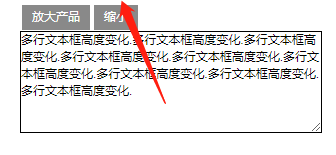
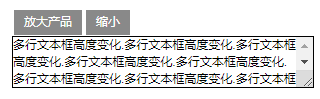
多行文本框应用
1.高度变化
HTML
<form action="#" method="post">
	<div class="msg">
		<div class="msg_caption">
			<span class="bigger" >放大</span>
			<span class="smaller" >缩小</span>
		</div>
		<div>
			<textarea id="comment" rows="8" cols="20">多行文本框高度变化.多行文本框高度变化.多行文本框高度变化.多行文本框高度变化.多行文本框高度变化.多行文本框高度变化.多行文本框高度变化.多行文本框高度变化.多行文本框高度变化.</textarea>
		</div>
	</div>
</form>
CSS
* {
	margin:0;
	padding:0;
	font:normal 12px/17px Arial;
}

.msg {
	width:300px;
	 margin:100px;
}

.msg_caption {
	width:100%;
	overflow:hidden;
	margin-bottom:1px;
}

.msg_caption span {
	display:block;
	float:left;
	margin:0 2px;
	padding:4px 10px;
	background:#898989;
	cursor:pointer;
	color:white;
}

.msg textarea{
	width:300px;
	height:80px;
	height:100px;
	border:1px solid #000;
}
jQuery
$(function(){
   var $comment = $('#comment');  //获取评论框
   $('.bigger').click(function(){ //放大按钮绑定单击事件
       if(!$comment.is(":animated")){ //判断是否处于动画
           if( $comment.height() < 500 ){
               $comment.animate({ height : "+=50" },400); //重新设置高度,在原有的基础上加50
           }
       }
   });
   $('.smaller').click(function(){//缩小按钮绑定单击事件
       if(!$comment.is(":animated")){//判断是否处于动画
           if( $comment.height() > 50 ){
               $comment.animate({ height : "-=50" },400); //重新设置高度,在原有的基础上减50
           }
      	}
   });
});
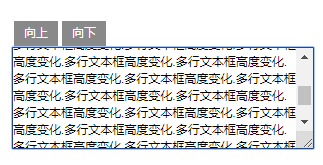
2.滚动条高度变化
HTML
<form action="" method="post">
	<div class="msg">
		<div class="msg_caption">
			<span class="up" >向上</span>
			<span class="down" >向下</span>
		</div>
		<div>
			<textarea id="comment" rows="8" cols="20">
				多行文本框高度变化.多行文本框高度变化.多行文本框高度变化.多行文本框高度变化.多行文本框高度变化.多行文本框高度变化.多行文本框高度变化.多行文本框高度变化.多行文本框高度变化.多行文本框高度变化.多行文本框高度变化.多行文本框高度变化.多行文本框高度变化.多行文本框高度变化.多行文本框高度变化.多行文本框高度变化.多行文本框高度变化.多行文本框高度变化.多行文本框高度变化.多行文本框高度变化.多行文本框高度变化.多行文本框高度变化.多行文本框高度变化.多行文本框高度变化.多行文本框高度变化.多行文本框高度变化.多行文本框高度变化.多行文本框高度变化.多行文本框高度变化.多行文本框高度变化.多行文本框高度变化.多行文本框高度变化.多行文本框高度变化.多行文本框高度变化.多行文本框高度变化.多行文本框高度变化.
			</textarea>
		</div>
	</div>
</form>
jQuery
$(function(){
    var $comment = $('#comment');//获取评论框
    $('.up').click(function(){ //向上按钮绑定单击事件
	   if(!$comment.is(":animated")){//判断是否处于动画
			$comment.animate({ scrollTop  : "-=50" } , 400);
		}
	})
	$('.down').click(function(){//向下按钮绑定单击事件
	   if(!$comment.is(":animated")){
			$comment.animate({ scrollTop  : "+=50" } , 400);
		}
	});
});
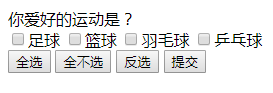
复选框应用
最基本应用:全选、反选和全不选。
HTML
<form method="post" action="">
   你爱好的运动是?
   <br/>
	    <input type="checkbox" name="items" value="足球"/>足球
		<input type="checkbox" name="items" value="篮球"/>篮球
		<input type="checkbox" name="items" value="羽毛球"/>羽毛球
		<input type="checkbox" name="items" value="乒乓球"/>乒乓球
   <br/>
	    <input type="button" id="CheckedAll" value="全 选"/>
	    <input type="button" id="CheckedNo" value="全不选"/>
	    <input type="button" id="CheckedRev" value="反 选"/>

		<input type="button" id="send" value="提 交"/>
</form>
jQuery
 $(function(){
     //全选
     $("#CheckedAll").click(function(){
	     $('[name=items]:checkbox').attr('checked', true);
	 });
	 //全不选
	    $("#CheckedNo").click(function(){
	    $('[type=checkbox]:checkbox').attr('checked', false);
	 });
	 //反选
	    $("#CheckedRev").click(function(){
		  $('[name=items]:checkbox').each(function(){
			//此处用JQ写法颇显啰嗦。体现不出JQ飘逸的感觉。
			//$(this).attr("checked", !$(this).attr("checked"));
			//$(this).prop("checked", !$(this).prop("checked"));

			//直接使用JS原生代码,简单实用
			this.checked=!this.checked;
		  });
	 });
	 //输出值
	 $("#send").click(function(){
		var str="你选中的是:\r\n";
		$('[name=items]:checkbox:checked').each(function(){
			str+=$(this).val()+"\r\n";
		})
		alert(str);
	 });
});

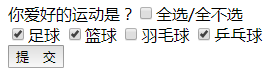
示例2:使用一个复选框控制全选/全不选
HTML
<form method="post" action="">
   你爱好的运动是?<input type="checkbox" id="CheckedAll" />全选/全不选<br/>
    <input type="checkbox" name="items" value="足球"/>足球
	<input type="checkbox" name="items" value="篮球"/>篮球
	<input type="checkbox" name="items" value="羽毛球"/>羽毛球
	<input type="checkbox" name="items" value="乒乓球"/>乒乓球<br/>
	<input type="button" id="send" value="提 交"/>
</form>
jQuery
$(function(){
     //全选
     $("#CheckedAll").click(function(){
		//所有checkbox跟着全选的checkbox走。
		$('[name=items]:checkbox').attr("checked", this.checked );
	 });
	 $('[name=items]:checkbox').click(function(){
		//定义一个临时变量,避免重复使用同一个选择器选择页面中的元素,提升程序效率。
		var $tmp=$('[name=items]:checkbox');
		//用filter方法筛选出选中的复选框。并直接给CheckedAll赋值。
		$('#CheckedAll').attr('checked',$tmp.length==$tmp.filter(':checked').length);

		/*
			//一行做过多的事情需要写更多注释。复杂选择器还可能影响效率。因此不推荐如下写法。
			$('#CheckedAll').attr('checked',!$('[name=items]:checkbox').filter(':not(:checked)').length);
		*/
	 });
	  //输出值
	$("#send").click(function(){
		var str="你选中的是:\r\n";
		$('[name=items]:checkbox:checked').each(function(){
			str+=$(this).val()+"\r\n";
		})
		alert(str);
	});
});
jQuery为disabled="disabled"这类属性(不同浏览器只写disabled和写disabled="disabled"使用attr()方法获取时会出问题)设置了一个prop()方法。只会返回Boolean值。赋值的时候也是如此。
下拉框应用
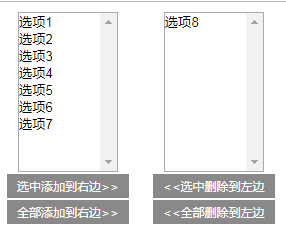
示例:添加和移除内容
HTML
<div class="centent">
<select multiple="multiple" id="select1" style="width:100px;height:160px;">
<option value="1">选项1</option>
<option value="2">选项2</option>
<option value="3">选项3</option>
<option value="4">选项4</option>
<option value="5">选项5</option>
<option value="6">选项6</option>
<option value="7">选项7</option>
</select>
<div>
<span id="add" >选中添加到右边>></span>
<span id="add_all" >全部添加到右边>></span>
</div>
</div>
<div class="centent">
<select multiple="multiple" id="select2" style="width: 100px;height:160px;">
<option value="8">选项8</option>
</select>
<div>
<span id="remove"><<选中删除到左边</span>
<span id="remove_all"><<全部删除到左边</span>
</div>
</div>
CSS
* {
	margin:0;
	padding:0;
	}

div.centent {
   float:left;
   text-align: center;
   margin: 10px;
}

span {
	display:block;
	margin:2px 2px;
	padding:4px 10px;
	background:#898989;
	cursor:pointer;
	font-size:12px;
	color:white;
}
jQuery
$(function(){
	//移到右边
	$('#add').click(function() {
	//获取选中的选项,删除并追加给对方
		$('#select1 option:selected').appendTo('#select2');
	});
	//移到左边
	$('#remove').click(function() {
		$('#select2 option:selected').appendTo('#select1');
	});
	//全部移到右边
	$('#add_all').click(function() {
		//获取全部的选项,删除并追加给对方
		$('#select1 option').appendTo('#select2');
	});
	//全部移到左边
	$('#remove_all').click(function() {
		$('#select2 option').appendTo('#select1');
	});
	//双击选项
	$('#select1').dblclick(function(){ //绑定双击事件
		//获取全部的选项,删除并追加给对方
		$("option:selected",this).appendTo('#select2'); //追加给对方
	});
	//双击选项
	$('#select2').dblclick(function(){
	   $("option:selected",this).appendTo('#select1');
	});
});
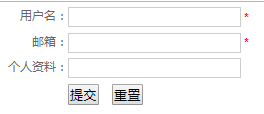
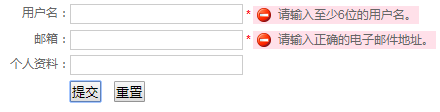
表单验证
HTML
<form method="post" action="">
<div class="int">
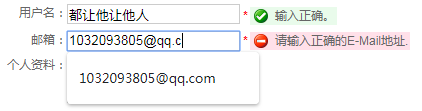
<label for="username">用户名:</label>
<input type="text" id="username" class="required" />
</div>
<div class="int">
<label for="email">邮箱:</label>
<input type="text" id="email" class="required" />
</div>
<div class="int">
<label for="personinfo">个人资料:</label>
<input type="text" id="personinfo" />
</div>
<div class="sub">
<input type="submit" value="提交" id="send"/>
<input type="reset" id="res"/>
</div>
</form>
CSS
* {
    margin: 0;
    padding: 0;
}

body {
    font:12px/19px Arial, Helvetica, sans-serif;
    color:#666;
}

form div {
    margin:5px 0;
}

.int label {
    float:left;
    width:100px;
    text-align:right;
}

.int input {
    padding:1px 1px;
    border:1px solid #ccc;
    height:16px;
}

.sub {
    padding-left:100px;
}

.sub input {
    margin-right:10px;
}

.formtips{
    width: 200px;
    margin:2px;
    padding:2px;
}

.onError{
    background:#FFE0E9 url(../img/reg3.gif) no-repeat 0 center;
    padding-left:25px;
}

.onSuccess{
    background:#E9FBEB url(../img/reg4.gif) no-repeat 0 center;
    padding-left:25px;
}

.high{
    color:red;
}

jQuery
1.必填后面加小红点提醒。
$(function(){
//如果是必填的,则加红星标识.
	$("form :input.required").each(function(){
		var $required = $("<strong class='high'> *</strong>"); //创建元素
		$(this).parent().append($required); //然后将它追加到文档中
	});
});
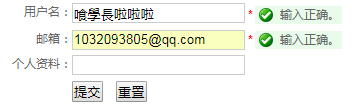
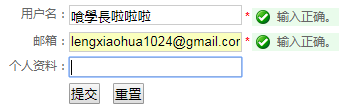
2.检验输入的内容是否不为空和准确。
 //文本框失去焦点后
$('form :input').blur(function(){  // 为表单元素添加失去焦点事件
	 var $parent = $(this).parent();
	 $parent.find(".formtips").remove(); //去掉先前的提醒
	 //验证用户名
	 if( $(this).is('#username') ){
			if( this.value=="" || this.value.length	< 6	){
				var errorMsg = '请输入至少6位的用户名.';
				$parent.append('<span class="formtips onError">'+errorMsg+'</span>');
			}else{
				var okMsg =	'输入正确.';
				$parent.append('<span class="formtips onSuccess">'+okMsg+'</span>');
			}
	 }
	 //验证邮件
	 if( $(this).is('#email') ){
		if( this.value=="" || ( this.value!="" && !/^[\w]+@.+\.[a-zA-Z]{2,4}$/.test(this.value) ) ){
			  var errorMsg = '请输入正确的E-Mail地址.';
			  $parent.append('<span class="formtips onError">'+errorMsg+'</span>');
		}else{
			  var okMsg = '输入正确.';
			  $parent.append('<span class="formtips onSuccess">'+okMsg+'</span>');
		}
	 }
})

3.需要在提交时再检验一次,以免用户忽略提示直接提交。
//提交,最终验证。
 $('#send').click(function(){
	$("form :input.required").trigger('blur');
	var numError = $('form .onError').length;
	if(numError){
		return false;
	}
	alert("注册成功,密码已发到你的邮箱,请查收.");
 });

//重置
 $('#res').click(function(){
	$(".formtips").remove();
 });

4.实时提醒
$(function(){
		//如果是必填的,则加红星标识.
		$("form :input.required").each(function(){
			var $required = $("<strong class='high'> *</strong>"); //创建元素
			$(this).parent().append($required); //然后将它追加到文档中
		});
         //文本框失去焦点后
	    $('form :input').blur(function(){
			 var $parent = $(this).parent();
			 $parent.find(".formtips").remove();
			 //验证用户名
			 if( $(this).is('#username') ){
					if( this.value=="" || this.value.length < 6 ){
					    var errorMsg = '请输入至少6位的用户名.';
                        $parent.append('<span class="formtips onError">'+errorMsg+'</span>');
					}else{
					    var okMsg = '输入正确.';
					    $parent.append('<span class="formtips onSuccess">'+okMsg+'</span>');
					}
			 }
			 //验证邮件
			 if( $(this).is('#email') ){
				if( this.value=="" || ( this.value!="" && !/.+@.+\.[a-zA-Z]{2,4}$/.test(this.value) ) ){
                      var errorMsg = '请输入正确的E-Mail地址.';
					  $parent.append('<span class="formtips onError">'+errorMsg+'</span>');
				}else{
                      var okMsg = '输入正确.';
					  $parent.append('<span class="formtips onSuccess">'+okMsg+'</span>');
				}
			 }
		}).keyup(function(){
		   $(this).triggerHandler("blur");
		}).focus(function(){
	  	   $(this).triggerHandler("blur");
		});//end blur


		//提交,最终验证。
		 $('#send').click(function(){
				$("form :input.required").trigger('blur');
				var numError = $('form .onError').length;
				if(numError){
					return false;
				}
				alert("注册成功,密码已发到你的邮箱,请查收.");
		 });

		//重置
		 $('#res').click(function(){
				$(".formtips").remove();
		 });
})
使用triggerHandler()方法不直接用trigger()方法是因为trigger()方法除了触发为元素绑定的事件外,还会触发默认事件,就是让光标从input框移除,这样输入不便。
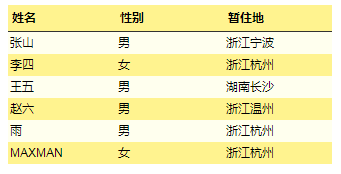
表格应用
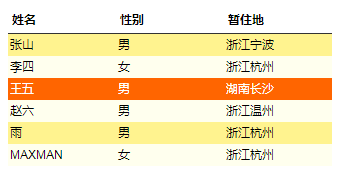
1.表格变色
HTML
<table>
    <thead>
        <tr>
            <th>姓名</th>
            <th>性别</th>
            <th>暂住地</th>
        </tr>
        <tbody>
            <tr>
                <td>张山</td>
                <td>男</td>
                <td>浙江宁波</td>
            </tr>
            <tr>
                <td>李四</td>
                <td>女</td>
                <td>浙江杭州</td>
            </tr>
            <tr>
                <td>王五</td>
                <td>男</td>
                <td>湖南长沙</td>
            </tr>
            <tr>
                <td>赵六</td>
                <td>男</td>
                <td>浙江温州</td>
            </tr>
            <tr>
                <td>Rain</td>
                <td>男</td>
                <td>浙江杭州</td>
            </tr>
            <tr>
                <td>MAXMAN</td>
                <td>女</td>
                <td>浙江杭州</td>
            </tr>
        </tbody>
    </thead>
</table>
CSS
table{
    border:0;
    border-collapse:collapse;
}

td {
    font:normal 12px/17px Arial;
    padding:2px;
    width:100px;
}

th {
    font:bold 12px/17px Arial;
    text-align:left;
    padding:4px;
    border-bottom:1px solid #333;
    width:100px;
}

.parent {
    background:#FFF38F;
    cursor:pointer;
}

.even {
	background:#FFF38F;
}
 /* 偶数行样式*/

.odd {
     background:#FFFFEE;
}
/* 奇数行样式*/

.selected {
    background:#FF6500;
    color:#fff;
}
一个比较不常见的CSS属性


jQuery
1.普通的隔行变色
$(function(){
    $("tr:odd").addClass("odd");    //给奇数行添加样式
    $("tr:even").addClass("even");  //给偶数行添加样式
})
把表头除外
$(function(){
    $("tbody>tr:odd").addClass("odd");    //给tobody中的奇数行添加样式
    $("tbody>tr:even").addClass("even");  //给tobody中的偶数行添加样式
})
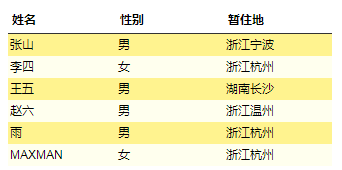
若需要将某一行变为高亮显示状态:用contains选择器实现。
$("tr:contains('王五')").addClass("selected");
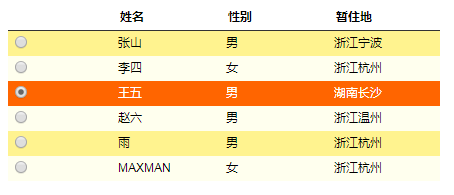
2.单选框控制表格行高亮
HTML
<table>
    <thead>
        <tr>
            <th> </th>
            <th>姓名</th>
            <th>性别</th>
            <th>暂住地</th>
        </tr>
        <tbody>
            <tr>
                <td>
                    <input type="radio" name="choice" value="" />
                </td>
                <td>张山</td>
                <td>男</td>
                <td>浙江宁波</td>
            </tr>
            <tr>
                <td>
                    <input type="radio" name="choice" value="" />
                </td>
                <td>李四</td>
                <td>女</td>
                <td>浙江杭州</td>
            </tr>
            <tr>
                <td>
                    <input type="radio" name="choice" value="" />
                </td>
                <td>王五</td>
                <td>男</td>
                <td>湖南长沙</td>
            </tr>
            <tr>
                <td>
                    <input type="radio" name="choice" value="" />
                </td>
                <td>赵六</td>
                <td>男</td>
                <td>浙江温州</td>
            </tr>
            <tr>
                <td>
                    <input type="radio" name="choice" value="" />
                </td>
                <td>Rain</td>
                <td>男</td>
                <td>浙江杭州</td>
            </tr>
            <tr>
                <td>
                    <input type="radio" name="choice" value="" />
                </td>
                <td>MAXMAN</td>
                <td>女</td>
                <td>浙江杭州</td>
            </tr>
        </tbody>
    </thead>
</table>
jQuery
$(function () {
	$("tbody>tr:odd").addClass("odd");    //给tobody中的奇数行添加样式
        $("tbody>tr:even").addClass("even");  //给tobody中的偶数行添加样式
	$('tbody>tr').click(function () {
		$(this)
			.addClass('selected')
			.siblings().removeClass('selected')
			.end()
			.find(':radio').attr('checked', true);
	});
	// 初始化表格的时候,如果默认已经有单选框被选中,需要处理。
	//通过parent()方法逐步向父节点获取相应的元素
	// $('table :radio:checked').parent().parent().addClass('selected');
	//使用parents()方法直接获取:
	$('table :radio:checked').parents("tr").addClass('selected');
	//通过has选择器可以进一步简化:
	//$('tbody>tr:has(:checked)').addClass('selected');

})
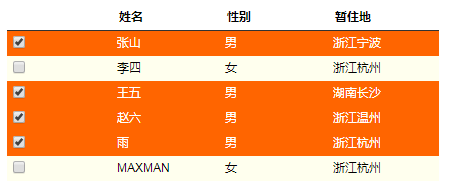
3.复选框控制表格行高亮
实现多选
<!DOCTYPE html>
<html lang="en">

<head>
    <meta charset="UTF-8">
    <meta name="viewport" content="width=device-width, initial-scale=1.0">
    <meta http-equiv="X-UA-Compatible" content="ie=edge">
    <title>change color table</title>
    <style>
        table{
            border:0;
            border-collapse:collapse;
        }

        td {
            font:normal 12px/17px Arial;
            padding:2px;
            width:100px;
        }

        th {
            font:bold 12px/17px Arial;
            text-align:left;
            padding:4px;
            border-bottom:1px solid #333;
            width:100px;
        }

        .parent {
            background:#FFF38F;
            cursor:pointer;
        }

        .even {
            background:#FFF38F;
        }
         /* 偶数行样式*/

        .odd {
             background:#FFFFEE;
        }
        /* 奇数行样式*/

        .selected {
            background:#FF6500;
            color:#fff;
        }
    </style>
</head>

<body>
    <table>
        <thead>
            <tr>
                <th> </th>
                <th>姓名</th>
                <th>性别</th>
                <th>暂住地</th>
            </tr>
            <tbody>
                <tr>
                    <td>
                        <input type="checkbox" name="choice" value="" />
                    </td>
                    <td>张山</td>
                    <td>男</td>
                    <td>浙江宁波</td>
                </tr>
                <tr>
                    <td>
                        <input type="checkbox" name="choice" value="" />
                    </td>
                    <td>李四</td>
                    <td>女</td>
                    <td>浙江杭州</td>
                </tr>
                <tr>
                    <td>
                        <input type="checkbox" name="choice" value="" />
                    </td>
                    <td>王五</td>
                    <td>男</td>
                    <td>湖南长沙</td>
                </tr>
                <tr>
                    <td>
                        <input type="checkbox" name="choice" value="" />
                    </td>
                    <td>赵六</td>
                    <td>男</td>
                    <td>浙江温州</td>
                </tr>
                <tr>
                    <td>
                        <input type="checkbox" name="choice" value="" />
                    </td>
                    <td>Rain</td>
                    <td>男</td>
                    <td>浙江杭州</td>
                </tr>
                <tr>
                    <td>
                        <input type="checkbox" name="choice" value="" />
                    </td>
                    <td>MAXMAN</td>
                    <td>女</td>
                    <td>浙江杭州</td>
                </tr>
            </tbody>
        </thead>
    </table>
    <script src="../scripts/jquery.js"></script>
    <script>
       $(function () {
			$("tbody>tr:odd").addClass("odd");    //给tobody中的奇数行添加样式
            $("tbody>tr:even").addClass("even");  //给tobody中的偶数行添加样式
			$('tbody>tr').click(function () {
				if ($(this).hasClass('selected')) {
					$(this)
						.removeClass('selected')
						.find(':checkbox').attr('checked', false);
				} else {
					$(this)
						.addClass('selected')
						.find(':checkbox').attr('checked', true);
				}
			});
			// 通过parent()方法逐步向父节点获取相应的元素
			// $('table :checkbox:checked').parent().parent().addClass('selected');
			//使用parents()方法直接获取:
			$('table :checkbox:checked').parents("tr").addClass('selected');
			//$('tbody>tr:has(:checked)').addClass('selected');
		})
    </script>
</body>

</html>
简化
$(function () {
	$("tbody>tr:odd").addClass("odd");
	$("tbody>tr:even").addClass("even");
	$('tbody>tr').click(function () {
		//判断当前是否选中
		var hasSelected = $(this).hasClass('selected');
		//如果选中,则移出selected类,否则就加上selected类
		$(this)[hasSelected ? "removeClass" : "addClass"]('selected')
			//查找内部的checkbox,设置对应的属性
			.find(':checkbox').attr('checked', !hasSelected);
	});
	// 当用户刚进入页面时,也要处理已经被选中的表格行。
	$('tbody>tr:has(:checked)').addClass('selected');
})
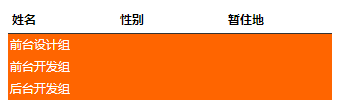
表格展开关闭
HTML和CSS
<!DOCTYPE html>
<html lang="en">
<head>
<meta charset="UTF-8">
<meta name="viewport" content="width=device-width, initial-scale=1.0">
<meta http-equiv="X-UA-Compatible" content="ie=edge">
<title>show and close table</title>
<style>
table {
border: 0;
border-collapse: collapse;
}
td {
font: normal 12px/17px Arial;
padding: 2px;
width: 100px;
}
th {
font: bold 12px/17px Arial;
text-align: left;
padding: 4px;
border-bottom: 1px solid #333;
width: 100px;
}
.parent {
background: #FFF38F;
cursor: pointer;
}
.even {
background: #FFF38F;
}
/* 偶数行样式*/
.odd {
background: #FFFFEE;
}
/* 奇数行样式*/
.selected {
background: #FF6500;
color: #fff;
}
</style>
</head>
<body>
<table>
<thead>
<tr>
<th>姓名</th>
<th>性别</th>
<th>暂住地</th>
</tr>
</thead>
<tbody>
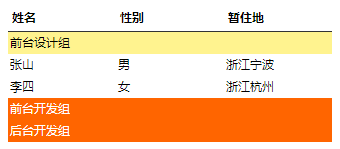
<tr class="parent" id="row_01">
<td colspan="3">前台设计组</td>
</tr>
<tr class="child_row_01">
<td>张山</td>
<td>男</td>
<td>浙江宁波</td>
</tr>
<tr class="child_row_01">
<td>李四</td>
<td>女</td>
<td>浙江杭州</td>
</tr>
<tr class="parent" id="row_02">
<td colspan="3">前台开发组</td>
</tr>
<tr class="child_row_02">
<td>王五</td>
<td>男</td>
<td>湖南长沙</td>
</tr>
<tr class="child_row_02">
<td>赵六</td>
<td>男</td>
<td>浙江温州</td>
</tr>
<tr class="parent" id="row_03">
<td colspan="3">后台开发组</td>
</tr>
<tr class="child_row_03">
<td>Rain</td>
<td>男</td>
<td>浙江杭州</td>
</tr>
<tr class="child_row_03">
<td>MAXMAN</td>
<td>女</td>
<td>浙江杭州</td>
</tr>
</tbody>
</table>
<script src="../scripts/jquery.js"></script>
<script>
</script>
</body>
</html>

单击组,组员信息收缩
$(function () {
	$('tr.parent').click(function () { // 获取所谓的父行
		$(this)
			.toggleClass("selected") // 添加/删除高亮
			.siblings('.child_' + this.id).toggle(); // 隐藏/显示所谓的子行
	}).click();
})
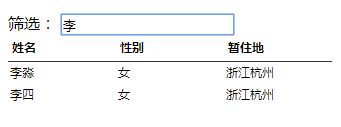
表格内容筛选
contains选择器。
利用该选择器再结合jQuery的filter()筛选方法,可以实现表格内容的过滤。
示例:筛选出含有文本“李”的表格行。
$(function () {
	$("table tbody tr")
		.hide()
		.filter(":contains('李')")
		.show();
})

根据用户输入筛选
HTML和CSS
<!DOCTYPE html>
<html lang="en">

<head>
    <meta charset="UTF-8">
    <meta name="viewport" content="width=device-width, initial-scale=1.0">
    <meta http-equiv="X-UA-Compatible" content="ie=edge">
    <title>filter Text</title>
    <style>
        table {
            border: 0;
            border-collapse: collapse;
        }

        td {
            font: normal 12px/17px Arial;
            padding: 2px;
            width: 100px;
        }

        th {
            font: bold 12px/17px Arial;
            text-align: left;
            padding: 4px;
            border-bottom: 1px solid #333;
            width: 100px;
        }

        .parent {
            background: #FFF38F;
            cursor: pointer;
        }

        .even {
            background: #FFF38F;
        }

        /* 偶数行样式*/

        .odd {
            background: #FFFFEE;
        }

        /* 奇数行样式*/

        .selected {
            background: #FF6500;
            color: #fff;
        }
    </style>
</head>

<body>
    <div>
        <br />
        筛选:
        <input id="filterName" />
        <br />
    </div>
    <table>
        <thead>
            <tr>
                <th>姓名</th>
                <th>性别</th>
                <th>暂住地</th>
            </tr>
        <tbody>
            <tr>
                <td>张达</td>
                <td>男</td>
                <td>浙江宁波</td>
            </tr>
            <tr>
                <td>李淼</td>
                <td>女</td>
                <td>浙江杭州</td>
            </tr>
            <tr>
                <td>王七</td>
                <td>男</td>
                <td>湖南长沙</td>
            </tr>
            <tr>
                <td>赵豆腐乳</td>
                <td>男</td>
                <td>浙江温州</td>
            </tr>
            <tr>
                <td>Rainylu</td>
                <td>男</td>
                <td>浙江杭州</td>
            </tr>
            <tr>
                <td>MAXMANHNFRT</td>
                <td>女</td>
                <td>浙江杭州</td>
            </tr>
            <tr>
                <td>张山</td>
                <td>男</td>
                <td>浙江宁波</td>
            </tr>
            <tr>
                <td>李四</td>
                <td>女</td>
                <td>浙江杭州</td>
            </tr>
            <tr>
                <td>王五</td>
                <td>男</td>
                <td>湖南长沙</td>
            </tr>
            <tr>
                <td>赵六</td>
                <td>男</td>
                <td>浙江温州</td>
            </tr>
            <tr>
                <td>Rain</td>
                <td>男</td>
                <td>浙江杭州</td>
            </tr>
            <tr>
                <td>MAXMAN</td>
                <td>女</td>
                <td>浙江杭州</td>
            </tr>
        </tbody>
        </thead>
    </table>
    <script src="../scripts/jquery.js"></script>
    <script>

    </script>
</body>

</html>

jQuery
 $(function () {
    $("#filterName").keyup(function () {
        $("table tbody tr")
            .hide()
            .filter(":contains('" + ($(this).val()) + "')")
            .show();
    }).keyup(); //DOM加载完毕时,绑定事件完成之后立即触发
})
其他应用
1.网页字体大小
放大和缩小
HTML
<div class="msg">
	<div class="msg_caption">
		<span class="bigger" >放大</span>
		<span class="smaller" >缩小</span>
	</div>
	<div>
		<p id="para" >
		This is some text. This is some text. This is some text. This is some text. This
		is some text. This is some text. This is some text. This is some text. This is some
		text. This is some text. This is some text. This is some text. This is some text.
		This is some text. This is some text. This is some text. This is some text. This
		is some text. This is some text.
		</p>
	</div>
</div>
CSS
* {
    margin: 0;
    padding: 0;
}

.msg {
    width: 300px;
    margin: 100px;
}

.msg_caption {
    width: 100%;
    overflow: hidden;
    margin-bottom: 1px;
}

.msg_caption span {
    display: block;
    float: left;
    margin: 0 2px;
    padding: 4px 10px;
    background: #898989;
    cursor: pointer;
    font-size: 12px;
    color: white;
}

.msg textarea {
    width: 300px;
    height: 80px;
    height: 100px;
    border: 1px solid #000;
}

jQuery
$(function () {
	$("span").click(function () {
		var thisEle = $("#para").css("font-size");
		var textFontSize = parseInt(thisEle, 10);
		var unit = thisEle.slice(-2); //获取单位
		var cName = $(this).attr("class");
		if (cName == "bigger") {
			textFontSize += 2;
		} else if (cName == "smaller") {
			textFontSize -= 2;
		}
		$("#para").css("font-size", textFontSize + unit);
	});
});
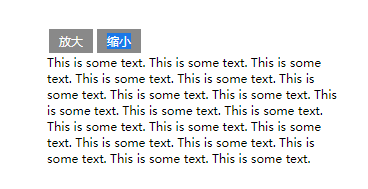

注释:
1.parseInt()方法去掉单位。
2.parseInt()方法第二个参数是传进制。
无限放大和缩小不合适
$(function () {
	$("span").click(function () {
		var thisEle = $("#para").css("font-size");
		var textFontSize = parseInt(thisEle, 10);
		var unit = thisEle.slice(-2); //获取单位
		var cName = $(this).attr("class");
		if (cName == "bigger") {
			if (textFontSize <= 22) {
				textFontSize += 2;
			}
		} else if (cName == "smaller") {
			if (textFontSize >= 12) {
				textFontSize -= 2;
			}
		}
		$("#para").css("font-size", textFontSize + unit);
	});
});
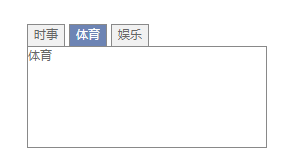
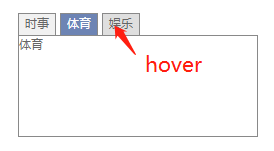
2.网页选项卡
通过隐藏和显示来切换不同的内容。
<!DOCTYPE html>
<html lang="en">

<head>
    <meta charset="UTF-8">
    <meta name="viewport" content="width=device-width, initial-scale=1.0">
    <meta http-equiv="X-UA-Compatible" content="ie=edge">
    <title>Web Select Card</title>
    <style>
        * {
            margin: 0;
            padding: 0;
        }

        body {
            font: 12px/19px Arial, Helvetica, sans-serif;
            color: #666;
        }

        .tab {
            width: 240px;
            margin: 50px;
        }

        .tab_menu {
            clear: both;
        }

        .tab_menu li {
            float: left;
            text-align: center;
            cursor: pointer;
            list-style: none;
            padding: 1px 6px;
            margin-right: 4px;
            background: #F1F1F1;
            border: 1px solid #898989;
            border-bottom: none;
        }

        .tab_menu li.hover {
            background: #DFDFDF;
        }

        .tab_menu li.selected {
            color: #FFF;
            background: #6D84B4;
        }

        .tab_box {
            clear: both;
            border: 1px solid #898989;
            height: 100px;
        }

        .hide {
            display: none
        }
    </style>
</head>

<body>
    <div class="tab">
        <div class="tab_menu">
            <ul>
                <li class="selected">时事</li>
                <li>体育</li>
                <li>娱乐</li>
            </ul>
        </div>
        <div class="tab_box">
            <div>时事</div>
            <div class="hide">体育</div>
            <div class="hide">娱乐</div>
        </div>
    </div>
    <script src="../scripts/jquery.js"></script>
    <script>
        $(function () {
            var $div_li = $("div.tab_menu ul li");
            $div_li.click(function () {
                $(this).addClass("selected") //当前<li>元素高亮
                    .siblings().removeClass("selected"); //去掉其他同辈<li>元素的高亮
                var index = $div_li.index(this); // 获取当前单击的<li>元素在全部<li>元素中的索引
                $("div.tab_box > div") //选取子节点
                    .eq(index).show() //显示<li>元素对应的<div>元素
                    .siblings().hide(); //隐藏其他几个同辈的<div>元素
            }).hover(function () {
                $(this).addClass("hover");
            }, function () {
                $(this).removeClass("hover");
            })
        })
    </script>
</body>

</html>
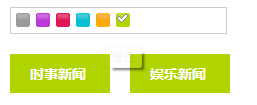
3.网页换肤
原理:通过调用不同的样式表文件来实现不同皮肤的切换。
需要将换好的皮肤记入Cookie中。
示例
HTML
<ul id="skin">
	<li id="skin_0" title="灰色" class="selected">灰色</li>
	<li id="skin_1" title="紫色">紫色</li>
	<li id="skin_2" title="红色">红色</li>
	<li id="skin_3" title="天蓝色">天蓝色</li>
	<li id="skin_4" title="橙色">橙色</li>
	<li id="skin_5" title="淡绿色">淡绿色</li>
</ul>
<div id="div_side_0">
	<div id="news">
		<h1 class="title">时事新闻</h1>
	</div>
</div>
<div id="div_side_1">
	<div id="game">
		<h1 class="title">娱乐新闻</h1>
	</div>
</div>
多套CSS
default.css
*{
    margin:0px;
    padding:0px;
}
body {
	font-family: Verdana, Arial, Helvetica, sans-serif;
	font-size: 12px;
}
#div_side_0,#div_side_1
{
    float:left;
    width:120px;
    height:450px;
    }
#skin
{
    margin:10px;
    padding:5px;
	width:210px;
    padding-right:0px;
	list-style:none;
    border: 1px solid #CCCCCC;
	overflow:hidden;
    }
#skin li{
	float:left;
    margin-right:5px;
    width:15px;
    height:15px;
	text-indent:-999px;
	overflow:hidden;
	display:block;
	cursor:pointer;
	background-image:url(theme.gif);
}
#skin_0{
	background-position:0px 0px;
}
#skin_1{
	background-position:15px 0px;
}
#skin_2{
	background-position:35px 0px;
}
#skin_3{
	background-position:55px 0px;
}
#skin_4{
	background-position:75px 0px;
}
#skin_5{
	background-position:95px 0px;
}
#skin_0.selected{
	background-position:0px 15px !important;
}
#skin_1.selected{
	background-position:15px 15px !important;
}
#skin_2.selected{
	background-position:35px 15px !important;
}
#skin_3.selected{
	background-position:55px 15px !important;
}
#skin_4.selected{
	background-position:75px 15px !important;
}
#skin_5.selected{
	background-position:95px 15px !important;
}

.title
{
	cursor:pointer;
}

h1{
   margin:10px;
   padding:10px 20px;
   width:60px;
   color:#ffffff;
   font-size:14px;
}
a:link {
	text-decoration: none;
	color: #333333;
}
a:visited {
	color: #333333;
	text-decoration: none;
}
a:hover {
	color: #000000;
	text-decoration: underline;
}
skin_0
h1{
   background:#999999;
}
skin_1
h1{
   background:#BB3BD9;
}
skin_2
h1{
   background:#E31559;
}
skin_3
h1{
   background:#08BECE;
}
skin_4
h1{
   background:#FBA60A;
}
skin_5
h1{
   background:#AFD400;
}
jQuery
需要下载一个jquery.cookie.js的文件。
$(function () {

	var $li = $("#skin li");
	$li.click(function () {
		$("#" + this.id).addClass("selected") //当前<li>元素选中
			.siblings().removeClass("selected"); //去掉其他同辈<li>元素的选中
		$("#cssfile").attr("href", "css/" + this.id + ".css"); //设置不同皮肤

		$.cookie("MyCssSkin", this.id, {
			path: '/',
			expires: 10
		});			//计入Cookie
	});
	var cookie_skin = $.cookie("MyCssSkin");		//获取Cookie的值
	if (cookie_skin) {			//如果确实存在Cookie
		$("#" + cookie_skin).addClass("selected") //当前<li>元素被选中
			.siblings().removeClass("selected"); //去掉其他同辈<li>元素的选中
		$("#cssfile").attr("href", "css/" + cookie_skin + ".css"); //设置不同皮肤
		$.cookie("MyCssSkin", cookie_skin, {
			path: '/',
			expires: 10
		});
	}
})
代码简化
click事件中的函数内容与if(cookie_skin){}内的判断内容类似,只是有一个变量不同,因此可以通过给函数传递不同的参数,这样就可以多次调用(抽象化)。
$(function () {
	var $li = $("#skin li");
	$li.click(function () {
		switchSkin(this.id);
	});
	var cookie_skin = $.cookie("MyCssSkin");
	if (cookie_skin) {
		switchSkin(cookie_skin);
	}
});

function switchSkin(skinName) {
	$("#" + skinName).addClass("selected") //当前<li>元素选中
		.siblings().removeClass("selected"); //去掉其他同辈<li>元素的选中
	$("#cssfile").attr("href", "css/" + skinName + ".css"); //设置不同皮肤
	$.cookie("MyCssSkin", skinName, {
		path: '/',
		expires: 10
	});
}