文章目录
1、综述
在实际环境中实现IoC容器的方式主要分为两大类,一类是依赖查找,依赖查找是通过资源定位,把赌赢的资源查找回来;另一种是依赖注入,而Spring主要使用的是依赖注入(DI)。一般而言,依赖注入可以分为3中方式:
- 构造器注入
- setter注入
- 接口注入
构造器注入和setter注入是主要的方式,而接口注入是从别的地方注入的方式,比如在Web工程中,配置的数据源往往是通过服务器(比如Tomcat)去配置的,这个时候可以用JNDI的形式通过接口将它注入Spring IoC容器中来。下面对它们进行详细讲解。
2、演示项目搭建
该演示项目开发环境为IDEA,Project名为“Spring Demo”。
首先,创建名为“SpringDIWays”的Spring Module,具体过程如下:
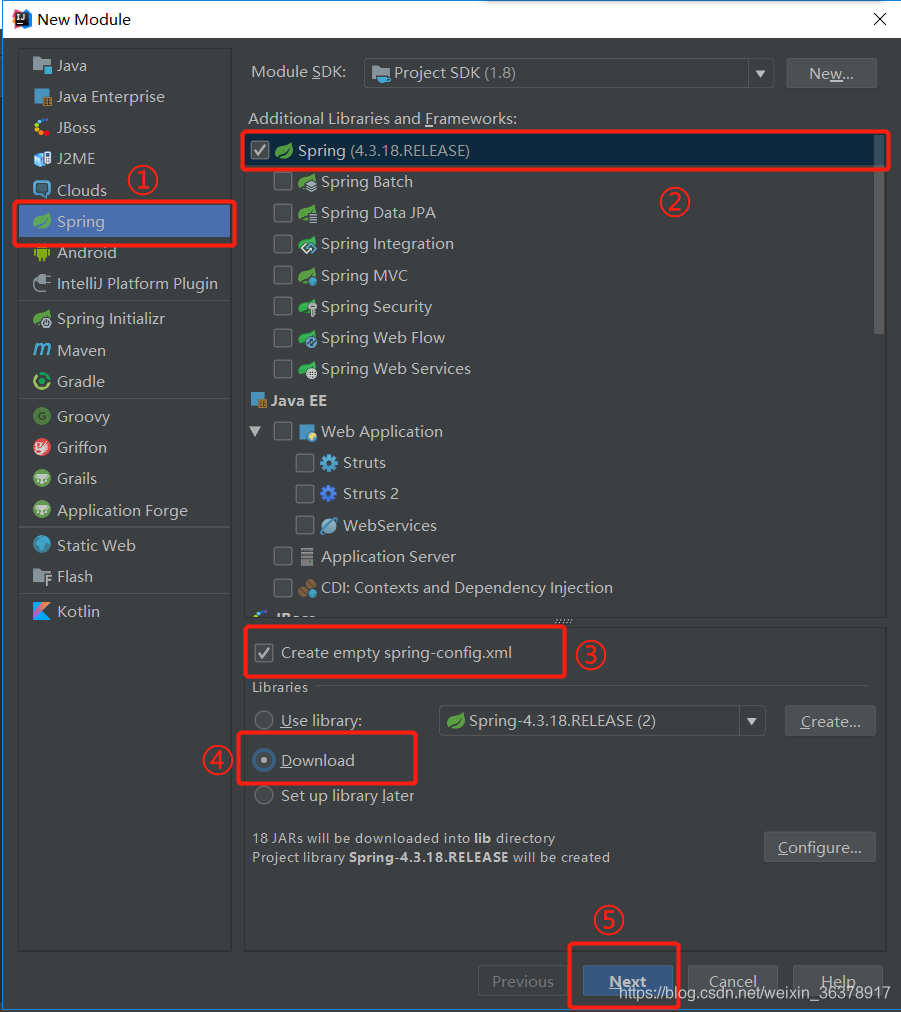
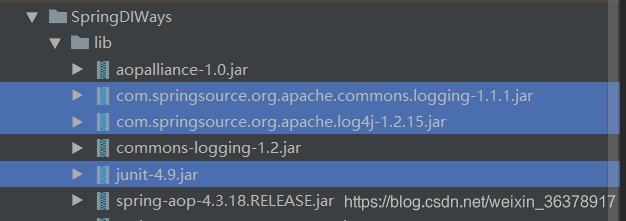
通过该种方式即可在IDEA中快速构建Spring开发环境。然后在lib文件夹中补充导入测试及日志jar包如下:
在com.ccff.spring.di.ways.pojo包下创建名为“Student”的POJO类,具体代码如下所示:
package com.ccff.spring.di.ways.pojo;

public class Student {
    private String name;
    private String sex;
    private String studentNo;
    private Integer age;

    @Override
    public String toString() {
        return "Student{" +
                "name='" + name + '\'' +
                ", sex='" + sex + '\'' +
                ", studentNo='" + studentNo + '\'' +
                ", age=" + age +
                '}';
    }

    public String getName() {
        return name;
    }

    public void setName(String name) {
        this.name = name;
    }

    public String getSex() {
        return sex;
    }

    public void setSex(String sex) {
        this.sex = sex;
    }

    public String getStudentNo() {
        return studentNo;
    }

    public void setStudentNo(String studentNo) {
        this.studentNo = studentNo;
    }

    public Integer getAge() {
        return age;
    }

    public void setAge(Integer age) {
        this.age = age;
    }
}
在com.ccff.spring.di.ways.test包下创建名为“StudentTest”的测试类,具体代码如下:
package com.ccff.spring.di.ways.test;

import com.ccff.spring.di.ways.pojo.Student;
import org.junit.Before;
import org.junit.Test;
import org.springframework.context.ApplicationContext;
import org.springframework.context.support.ClassPathXmlApplicationContext;

public class StudentTest {
    private ApplicationContext context;

    @Before
    public void getContainer(){
        context = new ClassPathXmlApplicationContext("spring-config.xml");
    }
}
3、构造器注入
构造器注入依赖于构造方法实现,而构造方法可以是有参数的或者是无参数的。在大部分的情况下,我们都是通过类的构造方法来创建类对象,Spring也可以采用反射的方式,通过构造方法来完成注入,这就是构造器注入的原理。
为了让Spring完成对应的构造注入,我们有必要去描述具体的类、构造方法并设置对应的参数,这样Spring就会通过对应的信息用反射的形式来创建对象。
根据常见的场景,将分为如下几种情况进行测试:
3.1 只有无参构造方法(显式无参构造方法或隐士构造方法)。
初始的Student类中并没有显式地给出构造方法,因此该类具有默认的无参构造方法。在spring-config.xml进行如下配置,实现采用无参构造器注入Student bean。具体配置如下:
<?xml version="1.0" encoding="UTF-8"?>
<beans xmlns="http://www.springframework.org/schema/beans"
       xmlns:xsi="http://www.w3.org/2001/XMLSchema-instance"
       xsi:schemaLocation="http://www.springframework.org/schema/beans http://www.springframework.org/schema/beans/spring-beans.xsd">
    <!--采用无参构造器注入-->
    <bean id="student_noneParam_construction" class="com.ccff.spring.di.ways.pojo.Student">
    </bean>
</beans>
在StudentTest测试类中添加名为“TestDIByConstruction”的测试方法,用来测试通过无参构造方法是否注入bean成功,具体代码如下:
package com.ccff.spring.di.ways.test;

import com.ccff.spring.di.ways.pojo.Student;
import org.junit.Before;
import org.junit.Test;
import org.springframework.context.ApplicationContext;
import org.springframework.context.support.ClassPathXmlApplicationContext;

public class StudentTest {
    private ApplicationContext context;

    @Before
    public void getContainer(){
        context = new ClassPathXmlApplicationContext("spring-config.xml");
    }

    @Test
    public void TestDIByConstruction(){
        Student student_noneParam_construction = (Student) context.getBean("student_noneParam_construction");
        System.out.println("通过无参构造器创建的Student Bean对象:");
        System.out.println(student_noneParam_construction);
    }
运行该测试是方法后,查看输出到控制台的日志信息如下,则说明Student类的bean对象构建成功。只不过此时的该bean对象的属性值均为null。

3.2 只有有参构造方法。
修改Student类,增加一个有参构造方法,具体代码如下:
public Student(String name, String sex, String studentNo, Integer age) {
    this.name = name;
    this.sex = sex;
    this.studentNo = studentNo;
    this.age = age;
}
这里值得注意的是:当类中显式地具有有参构造方法时,若无显式地具有无参构造方法,则此时没有办法利用无参构造方法去创建对象的。
若想要创建对象,则修改spring-config.xml中的配置如下:
<?xml version="1.0" encoding="UTF-8"?>
<beans xmlns="http://www.springframework.org/schema/beans"
       xmlns:xsi="http://www.w3.org/2001/XMLSchema-instance"
       xsi:schemaLocation="http://www.springframework.org/schema/beans http://www.springframework.org/schema/beans/spring-beans.xsd">

    <!--采用有参构造器注入-->
    <bean id="student_Param_construction" class="com.ccff.spring.di.ways.pojo.Student">
        <constructor-arg index="0" value="学生1" />
        <constructor-arg index="1" value="男" />
        <constructor-arg index="2" value="S001" />
        <constructor-arg index="3" value="24" />
    </bean>
</beans>
通过上面的配置可以看出,可以使用bean标签中的constructor-arg子标签来将有参构造方法中的形参配置到bean中。上面的配置中采用了index-value的形式,其中index中配置的为有参构造方法中形参的序号(从0开始),value中配置的是该形参的值。可以看出,无论形参是什么类型,在value中均以String的形式进行配置。
在constructor-arg子标签中还可以使用name-value的形式进行配置,其中name中配置的是该形参的参数名,value仍为该形参的值(String形式)。该种配置方法如下所示:
<?xml version="1.0" encoding="UTF-8"?>
<beans xmlns="http://www.springframework.org/schema/beans"
       xmlns:xsi="http://www.w3.org/2001/XMLSchema-instance"
       xsi:schemaLocation="http://www.springframework.org/schema/beans http://www.springframework.org/schema/beans/spring-beans.xsd">

    <!--采用有参构造器注入-->
    <bean id="student_Param_construction" class="com.ccff.spring.di.ways.pojo.Student">
        <constructor-arg name="name" value="学生1" />
        <constructor-arg name="sex" value="男" />
        <constructor-arg name="studentNo" value="S001" />
        <constructor-arg name="age" value="24" />
    </bean>
</beans>
最后修改StudentTest测试类中的TestDIByConstruction方法,具体代码如下:
package com.ccff.spring.di.ways.test;

import com.ccff.spring.di.ways.pojo.Student;
import org.junit.Before;
import org.junit.Test;
import org.springframework.context.ApplicationContext;
import org.springframework.context.support.ClassPathXmlApplicationContext;

public class StudentTest {
    private ApplicationContext context;

    @Before
    public void getContainer(){
        context = new ClassPathXmlApplicationContext("spring-config.xml");
    }

    @Test
    public void TestDIByConstruction(){
        System.out.println(student_noneParam_construction);
		Student student_Param_construction = (Student) context.getBean("student_Param_construction");
        System.out.println("通过有参构造器创建的Student Bean对象:");
        System.out.println(student_Param_construction);
    }
运行该测试是方法后,查看输出到控制台的日志信息如下,则说明Student类的bean对象构建成功。

3.3 只有有参构造方法,且有参构造方法有多个。
在3.2小节的Student类基础上,再增加一个构造方法,此时Student类中具有两个有参构造方法,且参数个数不同。具体代码如下:
public Student(String name, String sex, String studentNo, Integer age) {
    this.name = name;
    this.sex = sex;
    this.studentNo = studentNo;
    this.age = age;
}

public Student(String name, String studentNo) {
    this.name = name;
    this.studentNo = studentNo;
}
此时在spring-config配置文件中配置Student类的bean时,可以根据传入的形参的不同,决定选用哪个有参构造方法来创建对象,修改配置如下:
<?xml version="1.0" encoding="UTF-8"?>
<beans xmlns="http://www.springframework.org/schema/beans"
       xmlns:xsi="http://www.w3.org/2001/XMLSchema-instance"
       xsi:schemaLocation="http://www.springframework.org/schema/beans http://www.springframework.org/schema/beans/spring-beans.xsd">

    <!--采用有参构造器注入-->
    <bean id="student_Param_construction" class="com.ccff.spring.di.ways.pojo.Student">
        <constructor-arg name="name" value="学生1" />
        <constructor-arg index="1" value="男" />
        <constructor-arg index="2" value="S001" />
        <constructor-arg index="3" value="24" />
    </bean>

    <bean id="student_Param_construction2" class="com.ccff.spring.di.ways.pojo.Student">
        <constructor-arg name="name" value="学生1" />
        <constructor-arg name="studentNo" value="S001" />
    </bean>
</beans>
然后修改测试类中的TestDIByConstruction方法如下:
package com.ccff.spring.di.ways.test;

import com.ccff.spring.di.ways.pojo.Student;
import org.junit.Before;
import org.junit.Test;
import org.springframework.context.ApplicationContext;
import org.springframework.context.support.ClassPathXmlApplicationContext;

public class StudentTest {
    private ApplicationContext context;

    @Before
    public void getContainer(){
        context = new ClassPathXmlApplicationContext("spring-config.xml");
    }

    @Test
    public void TestDIByConstruction(){
        Student student_Param_construction = (Student) context.getBean("student_Param_construction");
        System.out.println("通过第一个有参构造器创建的Student Bean对象:");
        System.out.println(student_Param_construction);

        Student student_Param_construction2 = (Student) context.getBean("student_Param_construction2");
        System.out.println("通过第二个有参构造器创建的Student Bean对象:");
        System.out.println(student_Param_construction2);
    }
}
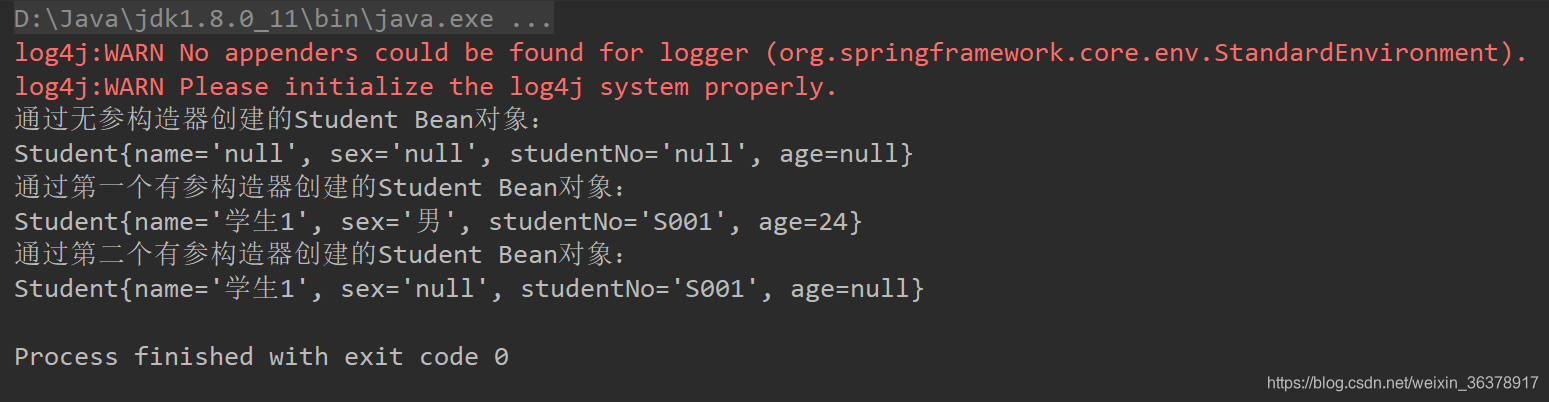
运行该测试是方法后,查看输出到控制台的日志信息如下,则说明Student类的bean对象构建成功。

注意:如果有多个构造方法,每个构造方法只有参数的顺序不同,那通过构造方法注入多个参数会注入到第一个出现的构造方法中,即哪个构造方法在前就注入哪一个,这种情况下就与构造方法顺序有关。
3.4 无参构造方法与有参构造方法并存。
在3.3小节的Student类基础上显式地增加Student类的无参构造方法,使得Student类的无参构造方法与有参构造方法显式并存。在此种情况下,即可通过无参构造方法创建对象,也可以通过有参构造方法创建对象,仅是根据在spring-config中对bean的配置有关,具体而配置如下:
<?xml version="1.0" encoding="UTF-8"?>
<beans xmlns="http://www.springframework.org/schema/beans"
       xmlns:xsi="http://www.w3.org/2001/XMLSchema-instance"
       xsi:schemaLocation="http://www.springframework.org/schema/beans http://www.springframework.org/schema/beans/spring-beans.xsd">

    <!--采用有参构造器注入-->
    <bean id="student_Param_construction" class="com.ccff.spring.di.ways.pojo.Student">
        <constructor-arg name="name" value="学生1" />
        <constructor-arg index="1" value="男" />
        <constructor-arg index="2" value="S001" />
        <constructor-arg index="3" value="24" />
    </bean>
    <bean id="student_Param_construction2" class="com.ccff.spring.di.ways.pojo.Student">
        <constructor-arg name="name" value="学生1" />
        <constructor-arg name="studentNo" value="S001" />
    </bean>

    <!--采用无参构造器注入-->
    <bean id="student_noneParam_construction" class="com.ccff.spring.di.ways.pojo.Student">
    </bean>
</beans>
修改StudentTest测试类中的TestDIByConstruction测试方法如下:
package com.ccff.spring.di.ways.test;

import com.ccff.spring.di.ways.pojo.Student;
import org.junit.Before;
import org.junit.Test;
import org.springframework.context.ApplicationContext;
import org.springframework.context.support.ClassPathXmlApplicationContext;

public class StudentTest {
    private ApplicationContext context;

    @Before
    public void getContainer(){
        context = new ClassPathXmlApplicationContext("spring-config.xml");
    }

    @Test
    public void TestDIByConstruction(){
        Student student_noneParam_construction = (Student) context.getBean("student_noneParam_construction");
        System.out.println("通过无参构造器创建的Student Bean对象:");
        System.out.println(student_noneParam_construction);

        Student student_Param_construction = (Student) context.getBean("student_Param_construction");
        System.out.println("通过第一个有参构造器创建的Student Bean对象:");
        System.out.println(student_Param_construction);

        Student student_Param_construction2 = (Student) context.getBean("student_Param_construction2");
        System.out.println("通过第二个有参构造器创建的Student Bean对象:");
        System.out.println(student_Param_construction2);
    }
}
运行该测试是方法后,查看输出到控制台的日志信息如下,则说明Student类的bean对象构建成功。
4、使用setter注入
setter注入是Spring中最主流的注入方式,它利用Java Bean规范定义的setter方法来完成注入,灵活且可读性高。它消除了使用构造方法注入时出现多个参数的可能性,首先可以把构造方法声明为无参的,然后使用setter注入为其设置对应的值,其实也是通过Java反射技术得以实现的。
首先,将此前在Student类中出现的构造方法全部去掉,具体代码为:
package com.ccff.spring.di.ways.pojo;

public class Student {
    private String name;
    private String sex;
    private String studentNo;
    private Integer age;

    @Override
    public String toString() {
        return "Student{" +
                "name='" + name + '\'' +
                ", sex='" + sex + '\'' +
                ", studentNo='" + studentNo + '\'' +
                ", age=" + age +
                '}';
    }

    public String getName() {
        return name;
    }

    public void setName(String name) {
        this.name = name;
    }

    public String getSex() {
        return sex;
    }

    public void setSex(String sex) {
        this.sex = sex;
    }

    public String getStudentNo() {
        return studentNo;
    }

    public void setStudentNo(String studentNo) {
        this.studentNo = studentNo;
    }

    public Integer getAge() {
        return age;
    }

    public void setAge(Integer age) {
        this.age = age;
    }
}
然后,在spring-config配置文件中使用setter方法注入进行配置,具体配置如下:
<?xml version="1.0" encoding="UTF-8"?>
<beans xmlns="http://www.springframework.org/schema/beans"
       xmlns:xsi="http://www.w3.org/2001/XMLSchema-instance"
       xsi:schemaLocation="http://www.springframework.org/schema/beans http://www.springframework.org/schema/beans/spring-beans.xsd">

    <!--采用setter方法注入-->
    <bean id="student_setter" class="com.ccff.spring.di.ways.pojo.Student">
        <property name="name" value="学生2" />
        <property name="sex" value="女" />
        <property name="studentNo" value="S002" />
        <property name="age" value="23" />
    </bean>

</beans>
注意:在配置文件中name属性的值的首字母大写或小写,Spring均可以通过setter方法完成bean的注入。因为spring会将name值的每个单词首字母转换成大写,然后再在前面拼接上"set"构成一个方法名,然后去对应的类中查找该方法,通过反射调用,实现注入。
接着,修改StudentTest测试类,在测试类中创建名为“TestDIBySetter”的测试方法,具体代码如下:
package com.ccff.spring.di.ways.test;

import com.ccff.spring.di.ways.pojo.Student;
import org.junit.Before;
import org.junit.Test;
import org.springframework.context.ApplicationContext;
import org.springframework.context.support.ClassPathXmlApplicationContext;

public class StudentTest {
    private ApplicationContext context;

    @Before
    public void getContainer(){
        context = new ClassPathXmlApplicationContext("spring-config.xml");
    }

    @Test
    public void TestDIBySetter(){
        Student student = (Student) context.getBean("student_setter");
        System.out.println("通过setter方法创建的Student Bean对象:");
        System.out.println(student);
    }
}
运行该测试是方法后,查看输出到控制台的日志信息如下,则说明Student类的bean对象构建成功。

5、接口注入
有些时候资源并非来自于自生系统,而是来自于外界,比如数据库连接资源完全可以在Tomcat下配置,然后通过JNDI的形式去获取它,这样数据库连接资源是属于开发工程外的资源,这个时候我们可以采用接口注入的形式来获取它。
由于该部分并不会在该篇文章中作为重点讲解,因此不再赘述,若日后再有涉及,再次介绍。