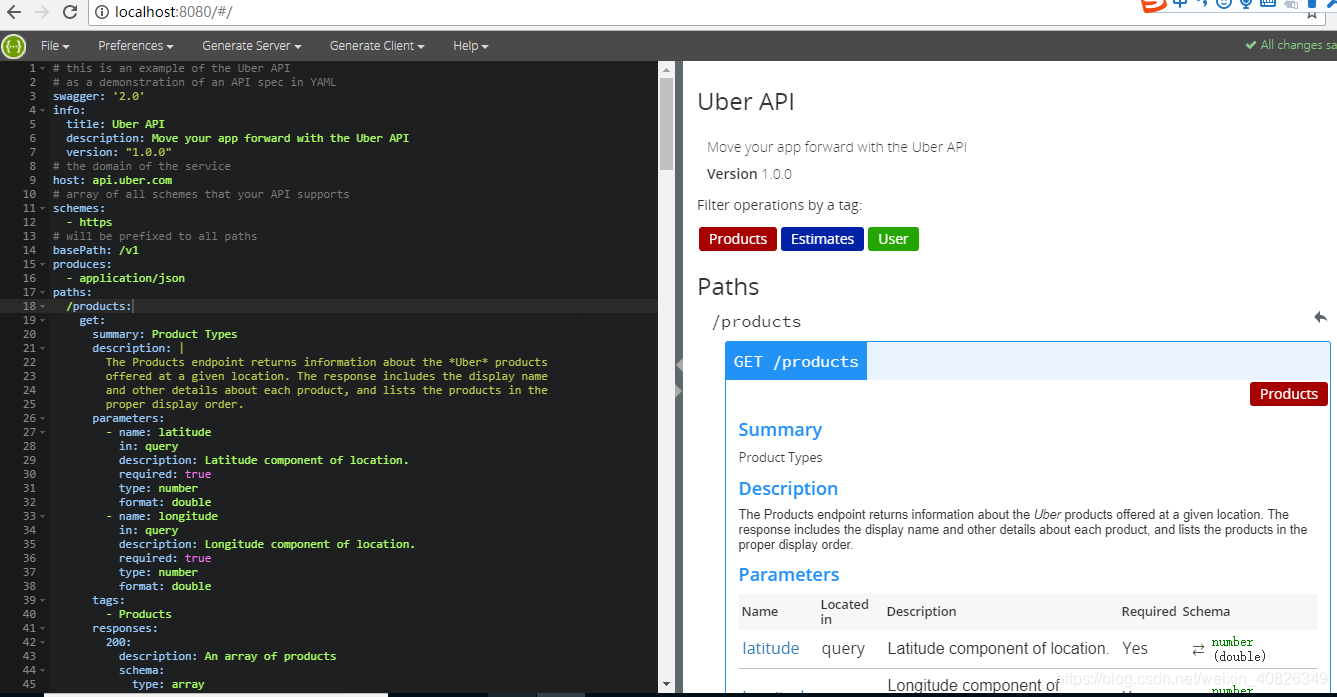
1 运用Swagger编写API文档
1.1 Swagger
1.1.1什么是Swagger
随着互联网技术的发展,现在的网站架构基本都由原来的后端渲染,变成了:前端渲染、先后端分离的形态,而且前端技术和后端技术在各自的道路上越走越远。
前端和后端的唯一联系,变成了API接口;API文档变成了前后端开发人员联系的纽带,变得越来越重要,swagger就是一款让你更好的书写API文档的框架。
1.1.2 SwaggerEditor安装与启动
(2)解压swagger-editor,
(3)全局安装http-server(http-server是一个简单的零配置命令行http服务器)
npm install -g http-server
(4)启动swagger-editor
http-server swagger-editor
(5)浏览器打开: http://localhost:8080

1.1.3 语法规则
(1)固定字段
| 字段名 | 类型 | 描述 |
|---|---|---|
| swagger | string | 必需的。使用指定的规范版本。 |
| info | Info Object | 必需的。提供元数据API。 |
| host | string | 主机名或ip服务API。 |
| basePath | string | API的基本路径 |
| schemes | [string] | API的传输协议。 值必须从列表中:“http”,“https”,“ws”,“wss”。 |
| consumes | [string] | 一个MIME类型的api可以使用列表。值必须是所描述的Mime类型。 |
| produces | [string] | MIME类型的api可以产生的列表。 值必须是所描述的Mime类型。 |
| paths | 路径对象 | 必需的。可用的路径和操作的API。 |
| definitions | 定义对象 | 一个对象数据类型生产和使用操作。 |
| parameters | 参数定义对象 | 一个对象来保存参数,可以使用在操作。 这个属性不为所有操作定义全局参数。 |
| responses | 反应定义对象 | 一个对象响应,可以跨操作使用。 这个属性不为所有操作定义全球响应。 |
| externalDocs | 外部文档对象 | 额外的外部文档。 |
| summary | string | 什么操作的一个简短的总结。 最大swagger-ui可读性,这一领域应小于120个字符。 |
| description | string | 详细解释操作的行为。GFM语法可用于富文本表示。 |
| operationId | string | 独特的字符串用于识别操作。 id必须是唯一的在所有业务中所描述的API。 工具和库可以使用operationId来唯一地标识一个操作,因此,建议遵循通用的编程的命名约定。 |
| deprecated | boolean | 声明该操作被弃用。 使用声明的操作应该没有。 默认值是false。 |
(2)字段类型与格式定义
| 普通的名字 | type | format | 说明 |
|---|---|---|---|
| integer | integer | int32 | 签署了32位 |
| long | integer | int64 | 签署了64位 |
| float | number | float | |
| double | number | double | |
| string | string | ||
| byte | string | byte | base64编码的字符 |
| binary | string | binary | 任何的八位字节序列 |
| boolean | boolean | ||
| date | string | date | 所定义的full-date- - - - - -RFC3339 |
| dateTime | string | date-time | 所定义的date-time- - - - - -RFC3339 |
| password | string | password | 用来提示用户界面输入需要模糊。 |
1.2 基础模块-城市API文档
1.2.1 新增城市
编写新增城市的API , post提交城市实体
URL: /city
Method: post
编写后的文档内容如下:

代码如下:
swagger: '2.0'
info:
  version: "1.0.0"
  title: 基础模块-城市API
basePath: /base
host: api.tensquare.com
paths:
  /city:
    post:
      summary: 新增城市
      parameters:
        - name: "body"
          in: "body"
          description: 城市实体类
          required: true
          schema:
            $ref: '#/definitions/City'
      responses:
        200:
          description: 成功
          schema:
            $ref: '#/definitions/ApiResponse'
definitions:
  City:
    type: object
    properties:
      id:
        type: string
        description: "ID"
      name:
        type: string
        description: "名称"
      ishot:
        type: string
        description: 是否热门
  ApiResponse:
    type: object
    properties:
      flag:
        type: boolean
        description: 是否成功
      code:
        type: integer
        format: int32
        description: 返回码
      message:
        type: string
        description: 返回信息
编辑后可以在右侧窗口看到显示的效果
1.2.2 修改城市
URL: /city/{cityId}
Method: put
编写后的文档内容如下:

代码如下:
  /city/{cityId}:
    put:
      summary: 修改城市
      parameters:
        - name: cityId
          in: path
          description: 城市ID
          required: true
          type: string
        - name: body
          in: body
          description: 城市
          schema:
            $ref: '#/definitions/City'
      responses:
        200:
          description: 成功响应
          schema:
            $ref: '#/definitions/ApiResponse'
1.2.3 删除城市
删除城市地址为/city/{cityId} ,与修改城市的地址相同,区别在于使用delete方法提交请求

代码如下: (/city/{cityId} 下增加delete)
    delete:
      summary: 根据ID删除
      description: 返回是否成功
      parameters:
        - name: cityId
          in: path
          description: 城市ID
          required: true
          type: string
      responses:
        '200':
          description: 成功
          schema:
            $ref: '#/definitions/ApiResponse'
1.2.4 根据ID查询城市
URL: /city/{cityId}
Method: get
返回的内容结构为: {flag:true,code:20000, message:“查询成功”,data: {…} }
data属性返回的是city的实体类型

代码实现如下:
(1)在definitions下定义城市对象的响应对象
  ApiCityResponse:
    type: "object"
    properties:
      code:
        type: "integer"
        format: "int32"
      flag:
        type: "boolean"
      message:
        type: "string"
      data:
        $ref: '#/definitions/City'
(2)/city/{cityId} 下新增get方法API
    get:
      summary: 根据ID查询
      description: 返回一个城市
      parameters:
        - name: cityId
          in: path
          description: 城市ID
          required: true
          type: string
      responses:
        '200':
          description: 操作成功
          schema:
            $ref: '#/definitions/ApiCityResponse'
1.2.5 城市列表
URL: /city
Method: get
返回的内容结构为: {flag:true,code:20000, message:“查询成功”,data:[{…},{…},{…}] }
data属性返回的是city的实体数组

实现步骤如下:
(1)在definitions下定义城市列表对象以及相应对象
  CityList:
    type: "array"
    items:
      $ref: '#/definitions/City'
  ApiCityListResponse:
    type: "object"
    properties:
      code:
        type: "integer"
        format: "int32"
      flag:
        type: "boolean"
      message:
        type: "string"
      data:
        $ref: '#/definitions/CityList'
(2)在/city增加get
    get:
      summary: "城市全部列表"
      description: "返回城市全部列表"
      responses:
        200:
          description: "成功查询到数据"
          schema:
            $ref: '#/definitions/ApiCityListResponse'
1.2.6 根据条件查询城市列表
实现API效果如下:

代码如下:
  /city/search:
    post:
      summary: 城市列表(条件查询)
      parameters:
        - name: body
          in: body
          description: 查询条件
          required: true
          schema:
            $ref: "#/definitions/City"
      responses:
        200:
          description: 查询成功
          schema:
            $ref: '#/definitions/ApiCityListResponse'
1.2.7 城市分页列表
实现API效果如下:

实现如下:
(1)在definitions下定义城市分页列表响应对象
  ApiCityPageResponse:
    type: "object"
    properties:
      code:
        type: "integer"
        format: "int32"
      flag:
        type: "boolean"
      message:
        type: "string"
      data:
        properties:
          total:
            type: "integer"
            format: "int32"
          rows:
            $ref: '#/definitions/CityList'
(2)新增节点
  /city/search/{page}/{size}:
    post:
      summary: 城市分页列表
      parameters:
        - name: page
          in: path
          description: 页码
          required: true
          type: integer
          format: int32
        - name: size
          in: path
          description: 页大小
          required: true
          type: integer
          format: int32
        - name: body
          in: body
          description: 查询条件
          required: true
          schema:
            $ref: "#/definitions/City"
      responses:
        200:
          description: 查询成功
          schema:
            $ref: '#/definitions/ApiCityPageResponse'
1.3 批量生成API文档
我们使用《黑马程序员代码生成器》自动生成所有表的yml文档
自动生成的文档中类型均为string ,我们这里需要再对类型进行修改即可。
步骤:
(1)执行建表脚本
(2)使用《黑马程序员代码生成器》生成脚本
1.4 其它模块API
请学员参见本章的扩展文档来实现部分功能。
1.5 SwaggerUI
SwaggerUI是用来展示Swagger文档的界面,以下为安装步骤
(1)在本地安装nginx
(2)下载SwaggerUI源码 https://swagger.io/download-swagger-ui/
(3)解压,将dist文件夹下的全部文件拷贝至 nginx的html目录
(4)启动nginx
(5)浏览器打开页面 http://localhost即可看到文档页面

(6)我们将编写好的yml文件也拷贝至nginx的html目录,这样我们就可以加载我们的swagger文档了
