Swagger主要是用于前后端分离开发的时候,快速方便的输出API文档。
并且,为了方便进行测试后台的restful形式的接口,实现动态的更新,当我们在后台的接口修改了后,swagger可以实现自动的更新,而不需要认为的维护这个接口进行测试。
优点
- 前后端分离开发
- API文档非常明确
- 测试的时候不需要再使用URL输入浏览器的方式来访问Controller
- 传统的输入URL的测试方式对于post请求的传参比较麻烦(当然,可以使用postman这样的浏览器插件)
- spring-boot与swagger的集成灰常简单
注解
- @Api,是标注一个Controller(Class)为一个swagger资源(API)。
- @ApiOperation,对一个操作或HTTP方法进行描述
- @ApiImplicitParams:用在方法上包含一组参数说明
- @ApiImplicitParam:用在@ApiImplicitParams注解中,指定一个请求参数的各个方面
- paramType:参数放在哪个地方
- header–>请求参数的获取:@RequestHeader
- query–>请求参数的获取:@RequestParam
- path(用于restful接口)–>请求参数的获取:@PathVariable
- body(不常用)
- form(不常用)
- name:参数名
- dataType:参数类型
- required:参数是否必须传
- value:参数的意思
- defaultValue:参数的默认值
- @ApiResponses:用于表示一组响应
- @ApiResponse:用在@ApiResponses中,一般用于表达一个错误的响应信息
- code:数字,例如400
- message:信息,例如"请求参数没填好"
- response:抛出异常的类
- @ApiModel:描述一个Model的信息(这种一般用在post创建的时候,使用@RequestBody这样的场景,请求参数无法使用@ApiImplicitParam注解进行描述的时候)
- @ApiModelProperty:描述一个model的属性
以上这些就是最常用的几个注解了。
其他注解详见:
https://github.com/swagger-api/swagger-core/wiki/Annotations#apimodel
response code 各个代表什么
1xx(临时响应)
2xx (成功)
3xx (重定向)
4xx(请求错误)
5xx(服务器错误)
还有就是项目中自定义的返回码等
整合过程
- pom.xml文件中引入swagger依赖:
  <dependency>
            <groupId>io.springfox</groupId>
            <artifactId>springfox-swagger2</artifactId>
            <version>2.7.0</version>
        </dependency>
       <dependency>
            <groupId>io.springfox</groupId>
            <artifactId>springfox-swagger-ui</artifactId>
            <version>2.7.0</version>
        </dependency>
- 在SpringBoot启动类同目录下加上Swagger的config文件:
package com.martina.my_swagger;

import org.springframework.context.annotation.Bean;
        import org.springframework.context.annotation.Configuration;

        import springfox.documentation.builders.ApiInfoBuilder;
        import springfox.documentation.builders.PathSelectors;
        import springfox.documentation.builders.RequestHandlerSelectors;
        import springfox.documentation.service.ApiInfo;
        import springfox.documentation.service.Contact;
        import springfox.documentation.spi.DocumentationType;
        import springfox.documentation.spring.web.plugins.Docket;
        import springfox.documentation.swagger2.annotations.EnableSwagger2;


/**
 * @author Martina
 * @create 2018年1/23
 * @version 1.0
 *
 * */

@Configuration
@EnableSwagger2
public class SwaggerConfig {
    //swagger2的配置文件,这里可以配置swagger2的一些基本的内容,比如扫描的包等等
    @Bean
    public Docket createRestApi() {
        return new Docket(DocumentationType.SWAGGER_2)
                .apiInfo(apiInfo())
                .select()
                // 指定controller存放的目录路径
                .apis(RequestHandlerSelectors.basePackage("com.martina.my_swagger.controller"))
                .paths(PathSelectors.any())
                .build();
    }

    private ApiInfo apiInfo() {
        return new ApiInfoBuilder()
                //标题
                .title("swaggerDemo")
                .description("更多详情访问我的github:https://github.com/Martina001/")

                .termsOfServiceUrl("https://github.com/Martina001/")

                //创建人
                .contact(new Contact("Martina", "http://www.baidu.com", ""))
                .version("1.0")
                .build();
    }
}
- 在项目的controller中加上swagger的相关注解“:
/**\
 *
 * @Api,是标注一个Controller(Class)为一个swagger资源(API)。
 * @ApiOperation,对一个操作或HTTP方法进行描述
 */
@Api("swagger测试")
@RestController
@RequestMapping(value="/")
public class UserController {
    @Autowired
    private UserService userService;

    @ApiOperation(value="方法测试",notes="根据传参返回对应的值")
    @RequestMapping(value="/test",method= RequestMethod.GET)
    public String word( @RequestParam("word") String word){
        return word;
    }

    /**
     * 练手@RequestParam
     * @param userId
     * @return
     */
    @ApiOperation(value="方法测试",notes="根据传参返回对应的值")
    @RequestMapping(value="/getUser",method= RequestMethod.GET)
    public List<User01> getUser(@RequestParam("userId") int userId){
        return userService.getUserById(userId);
    }

    /**
     * 练手@PathVariable
     * @param userId
     * @return
     */
    @ApiOperation(value="方法测试",notes="根据传参返回对应的值")
    @RequestMapping(value="/getUserById/{userId}",method= RequestMethod.GET)
    public List<User01> getUserById(@PathVariable("userId") int userId){
        return userService.getUserById(userId);
    }


    @ApiOperation(value="方法测试",notes="根据传参返回对应的值")
    @RequestMapping(value="/getAllUsers",method= RequestMethod.GET)
    public List<User01> getAllUsers(){
        return userService.getAllUsers();
    }

   @ApiOperation(value="方法测试",notes="根据传参返回对应的值")
    @RequestMapping(value="/addUser",method= RequestMethod.POST)
    public  User01  addUser(User01 user01){
        return userService.addUser(user01);
    }
}
- 启动项目,在浏览器中输入 http://localhost:端口号/swagger-ui.html。
结果展示:


点击tryout:


错误记录
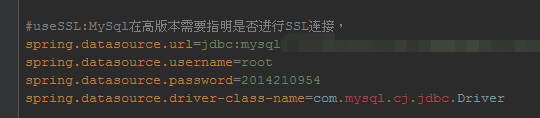
首先,mysql的连接,spring.datasource.driver-class-name=com.mysql.jdbc.Driver已经过时,使用新版的:
spring.datasource.driver-class-name=com.mysql.cj.jdbc.Driver
一直项目中显示红色,但是却不影响,原因未知:
然后注意@Mapper,不要忘了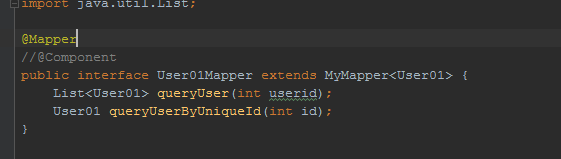
虽然还是会显示红色,但是运行也没有影响,奇怪。


补充:
- 如果出现This application has no explicit mapping for /error, so you are seeing this as a fallback. 的异常,尝试在SwaggerConfig中,将该类继承自WebMvcConfigurationSupport,并且重写addResourceHandlers函数:
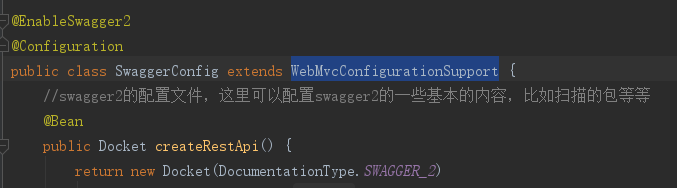

代码如下:
@EnableSwagger2
@Configuration
public class SwaggerConfig extends WebMvcConfigurationSupport {
    //swagger2的配置文件,这里可以配置swagger2的一些基本的内容,比如扫描的包等等
    @Bean
    public Docket createRestApi() {
        return new Docket(DocumentationType.SWAGGER_2)
                .apiInfo(apiInfo())
                .select()
                // 指定controller存放的目录路径
                .apis(RequestHandlerSelectors.basePackage("com.martina.test01.controller"))
                .paths(PathSelectors.any())
                .build();
    }

    private ApiInfo apiInfo() {
        return new ApiInfoBuilder()
                //标题
                .title("swaggerDemo")
                .description("更多详情访问我的github:https://github.com/Martina001/")
                //
                .termsOfServiceUrl("https://github.com/Martina001/")

                //创建人
                .contact(new Contact("Martina", "http://www.baidu.com", ""))
                .version("1.0")
                .build();
    }
   /**
     * 防止@EnableMvc把默认的静态资源路径覆盖了,手动设置的方式
     * @param registry
     */
    @Override
    protected void addResourceHandlers(ResourceHandlerRegistry registry) {
        registry.addResourceHandler("/**").addResourceLocations("classpath:/META-INF/resources/").setCachePeriod(0);
    }
}
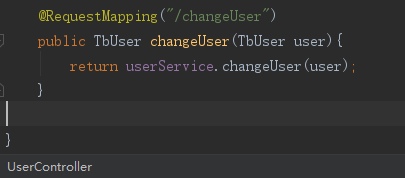
- 在Controller层中,我们必须在方法之前的@RequestMapping中加上RequestMethod(POST、delete、GET等),否则会出现如下所示情况: