为了防止服务消费链(多级服务之间的调用)上因某个服务出现故障,而导致级联故障,进而造成整个系统不可用(简称为:雪崩效应),推出了熔断、降级的处理方式:Hystrix断路器(类似生活中电路保险丝)来解决这些潜在问题。
熔断、降级是两个概念,网上也有很多相关的说明,我这里简单通俗说明一下:
熔断:当服务消费链上,下游服务因访问压力过大而出现响应变慢或失败不可用,上游服务为了保护系统整体的可用性(避免无效重试及长时等待等情况),可以暂时切断对下游服务的调用,直接快速返回错误的响应信息,当检测到该下游服务节点调用响应正常后再恢复消费链路。这个过程可以通过如下图形象说明:(图片来自http://www.ityouknow.com/springcloud/2017/05/16/springcloud-hystrix.html,文中也有说明)
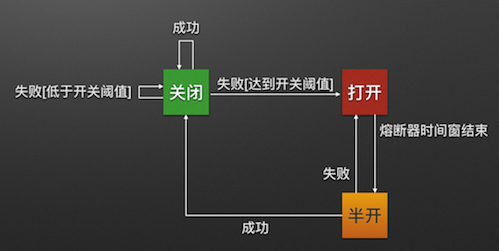
熔断关闭状态(Closed):服务没有故障时,熔断器所处的状态,对调用方的调用不做任何限制。
熔断开启状态(Open):在固定时间窗口内(Hystrix默认是10秒),接口调用出错比率达到一个阈值(Hystrix默认为50%),会进入熔断开启状态。进入熔断状态后,后续对该服务接口的调用不再经过网络,直接执行本地的fallback方法。
半熔断(半开启)状态(Half-Open):在进入熔断开启状态一段时间之后(Hystrix默认是5秒),熔断器会进入半熔断状态。所谓半熔断就是尝试恢复服务调用,允许有限的流量调用该服务,并监控调用成功率。如果成功率达到预期,则说明服务已恢复,进入熔断关闭状态;如果成功率仍旧很低,则重新进入熔断关闭状态。
降级:降低服务标准以满足核心重要服务正常运转,详情的说明请参见:https://blog.51cto.com/8132260/2133705
Hystrix是什么,具体工作原理请参见:Netflix Hystrix断路器简介与工作原理
Tips:我们在项目中经常需要添加很多的maven依赖,依赖组件(或称类库)的名字可能各不相同,我们可以通过如下方式查询相关的maven依赖包及其依赖包本身的内部依赖详情
通过官网:http://mvnrepository.com/,或者:https://search.maven.org/
扫描二维码关注公众号,回复: 5293649 查看本文章
一、搭建服务消费者项目,并集成 Hystrix环境
请参见上篇《玩转Spring Cloud之服务注册发现(eureka)及负载均衡消费(ribbon、feign)》搭建注册中心,服务提供者,服务消费者,本文仍然使用上篇文章中所创建的服务消费者demo项目:eurekaclientconsumer
1.1.在POM XML中添加Hystrix依赖(spring-cloud-starter-netflix-hystrix),配置如下:
<!-- 这里dependencyManagement附带贴出来,目的是说明如果不输version,想实现依赖继承,就需要这个,如果PMO中已经有则可不必再重复添加-->
<dependencyManagement>
        <dependencies>
            <dependency>
                <groupId>org.springframework.cloud</groupId>
                <artifactId>spring-cloud-dependencies</artifactId>
                <version>${spring-cloud.version}</version>
                <type>pom</type>
                <scope>import</scope>
            </dependency>
        </dependencies>
    </dependencyManagement>

        <dependency>
            <groupId>org.springframework.cloud</groupId>
            <artifactId>spring-cloud-starter-netflix-hystrix</artifactId>
        </dependency>
1.2.采用Ribbon + Hystrix的方式,在spring boot启动类(EurekaclientconsumerApplication)上添加@EnableHystrix,并修改远程服务调用类(HelloService),在相应的方法中添加@HystrixCommand注解并配置相关参数,具体实现代码如下:
//spring boot启动类:

package cn.zuowenjun.cloud;

import org.springframework.boot.SpringApplication;
import org.springframework.boot.autoconfigure.SpringBootApplication;
import org.springframework.cloud.client.circuitbreaker.EnableCircuitBreaker;
import org.springframework.cloud.client.discovery.EnableDiscoveryClient;
import org.springframework.cloud.client.loadbalancer.LoadBalanced;
import org.springframework.cloud.netflix.hystrix.EnableHystrix;
import org.springframework.cloud.openfeign.EnableFeignClients;
import org.springframework.context.annotation.Bean;
import org.springframework.web.client.RestTemplate;

@EnableHystrix
@EnableDiscoveryClient
@SpringBootApplication
class EurekaclientconsumerApplication {

    public static void main(String[] args) {
        SpringApplication.run(EurekaclientconsumerApplication.class, args);
    }

    @LoadBalanced
    @Bean
    public RestTemplate restTemplate(){
        return  new RestTemplate();
    }

}


//HelloService:远程服务调用类

package cn.zuowenjun.cloud.service;


import com.netflix.hystrix.contrib.javanica.annotation.HystrixCommand;
import com.netflix.hystrix.contrib.javanica.annotation.HystrixProperty;
import org.springframework.beans.factory.annotation.Autowired;
import org.springframework.beans.factory.annotation.Value;
import org.springframework.stereotype.Service;
import org.springframework.web.client.RestTemplate;

import java.util.HashMap;
import java.util.Map;

@Service
public class HelloService {

    @Autowired
    private RestTemplate restTemplate;

    @Value("${spring.application.helloServiceProvider}")
    private String  helloServiceName;

    @HystrixCommand(fallbackMethod = "multiplyFallback",
            commandProperties ={
                    @HystrixProperty(name = "execution.isolation.strategy", value = "SEMAPHORE"),
                    @HystrixProperty(name = "execution.isolation.semaphore.maxConcurrentRequests", value = "3")
            } )
    public Object multiply(int a,int b){
        String url="http://"+ helloServiceName +"/multiply/" + a +"/" + b;
        return restTemplate.getForObject(url,String.class);

//        throw new RuntimeException("consumer exception");
    }

    private  Object multiplyFallback(int x,int y,Throwable e){

        //TODO:额外增加的Throwable e,以便可以根据throwable的不同执行不同的逻辑
        Map<String,Object> result=new HashMap<String, Object>();
        result.put("from","multiply Fallback method");
        result.put("a",x);
        result.put("b",y);
        result.put("ex",e.getMessage());

        return  result;

    }


}
如上代码,我先屏蔽掉了有关Feign的相关配置及代码(其实可以兼容并存,这里只是为了大家好理解才去掉的),然后启动类添加了@EnableHystrix、远程服务类相关方法添加@HystrixCommand,并设置相关参数,其中fallbackMethod是比较重要的,它指示当出现熔断后降级回调的方法名(注意该方法需与被标注@HystrixCommand接口方法签名相同,但如果需要根据异常情况执行不同的降级处理逻辑则可如demo中multiplyFallback额外添加一个Throwable 参数),commandProperties是比较复杂的,可以包含很多的设置,如代码中设置了资源隔离方式为信号量并指定并发请求数,更多参数配置说明可参见:https://blog.csdn.net/tongtong_use/article/details/78611225,资源隔离策略说明参见:https://blog.csdn.net/liuchuanhong1/article/details/73718794,有信号量、线程池两种隔离方式,默认是线程池隔离,两者的区别如下图示:(图片来源:前面给出的链接文章,这里重点贴出说明)

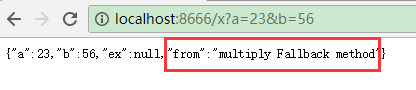
最后直接启动运行,如访问:http://localhost:8666/x?a=23&b=56
当注册中心、服务提供者都正常情况下,能正常返回结果:

当注册中心(消费者无法从注册中心获取服务实例信息时)或服务提供者关闭掉,模拟网络不可达,服务不可用的情况,再次请求,返回熔断降级回调方法的结果:
1.3.采用Feign + Hystrix方式
1.3.1首先定义一个实现自被@FeignClient标注的远程调用服务接口类(HelloRemoteService)的Hystrix降级回调实现类:HelloRemoteServiceFallbackImpl,实现接口里的相关方法,这里的方法是与接口里的同名方法有本质不同,接口里的方法是映射请求远程服务,而降级回调类中的方法是当接口中的同名方法调用失败后触发降级回调这些方法,所以这些是对应接口的降级方法。然后在远程调用服务接口类(HelloRemoteService)的@FeignClient注解中添加相关的参数配置,其中很重要的依然是:fallback,这个是指定Hystrix降级回调实现类(即:HelloRemoteServiceFallbackImpl),最后确保spring boot启动类上添加了@EnableFeignClients(这个是上篇就说过的,要想启用Feign就得添加),具体代码实现如下:
//HelloRemoteServiceFallbackImpl 降级回调实现类:
package cn.zuowenjun.cloud.service;

import org.springframework.stereotype.Component;
import org.springframework.web.bind.annotation.PathVariable;

import java.util.HashMap;
import java.util.Map;

@Component
public class HelloRemoteServiceFallbackImpl implements HelloRemoteService{

    @Override
    public Object multiply(@PathVariable("a") int x, @PathVariable("b") int y) {
        Map<String,Object> result=new HashMap<>();
        result.put("from","multiply Fallback method");
        result.put("a",x);
        result.put("b",y);

        return  result;
    }
}


//HelloRemoteService远程调用服务类:

package cn.zuowenjun.cloud.service;


import org.springframework.cloud.openfeign.FeignClient;
import org.springframework.web.bind.annotation.PathVariable;
import org.springframework.web.bind.annotation.RequestMapping;


@FeignClient(name= "helloservice",fallback =HelloRemoteServiceFallbackImpl.class )
public interface HelloRemoteService {

    @RequestMapping("/multiply/{a}/{b}")
    Object  multiply(@PathVariable("a") int x, @PathVariable("b") int y);

}


//spring boot启动类:
package cn.zuowenjun.cloud;

import org.springframework.boot.SpringApplication;
import org.springframework.boot.autoconfigure.SpringBootApplication;
import org.springframework.cloud.client.circuitbreaker.EnableCircuitBreaker;
import org.springframework.cloud.client.discovery.EnableDiscoveryClient;
import org.springframework.cloud.client.loadbalancer.LoadBalanced;
import org.springframework.cloud.netflix.hystrix.EnableHystrix;
import org.springframework.cloud.openfeign.EnableFeignClients;
import org.springframework.context.annotation.Bean;
import org.springframework.web.client.RestTemplate;


@EnableDiscoveryClient
@SpringBootApplication
@EnableFeignClients(basePackages = "cn.zuowenjun.cloud.service") // 如果启动类不在根目录需要指定basePackages,否则不需要
class EurekaclientconsumerApplication {

    public static void main(String[] args) {
        SpringApplication.run(EurekaclientconsumerApplication.class, args);
    }


}
1.3.2.Feign虽然集成了Hystrix,但默认并未开启,需要在配置文件中显示配置开启,application.yml配置如下:(当然我这里依然如1.2一样改变了默认的资源隔离方为信号量)
server:
  port: 8666

spring:
  application:
    name: ribbonclient
    helloServiceProvider: helloservice #自定义配置,指定访问远程服务名称,当然也可以写死在代码中

eureka:
  client:
    serviceUrl:
      defaultZone: http://localhost:8800/eureka/ #指向eureka server


feign:
  hystrix:
    enabled: true #启用hystrix
    command:
      default:
        execution:
          isolation:
            strategy: #默认是THREAD,这里演示改成了信号量隔离模式
              semaphore:
                maxConcurrentRequests: 3
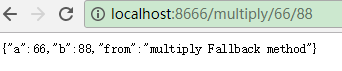
通过如上两步即完成了Feign集成Hystrix,启动项目,如在注册中心、服务提供者都正常的情况下访问:http://localhost:8666/multiply/66/88,就能得到正常结果,否则当注册中心(消费者无法从注册中心获取服务实例信息时)、服务提供者任意节点出问题,则会执行降级回调方法,如下图示:
 、
、
虽然当服务提供者不可用时,通过fallback能够直接熔断降级回调相关的方法,但有时如果我们需要根据不同的异常执行不同的降级处理逻辑呢,该如何办?这个时候可以使用fallbackFactory来实现自定义的降级回调实例创建过程,从而可以在create降级回调实现类时增加额外逻辑。实现步骤是:先创建实现自FallbackFactory的自定义降级回调工厂类:HystrixClientFallbackFactory,然后@FeignClient注解的fallbackFactory参数指向HystrixClientFallbackFactory.class即可,具体实现代码如下:
package cn.zuowenjun.cloud.service;

import feign.hystrix.FallbackFactory;
import org.springframework.stereotype.Component;

import java.util.HashMap;
import java.util.Map;

@Component
public class HystrixClientFallbackFactory implements FallbackFactory<HelloRemoteService> {

    public HelloRemoteService create(Throwable throwable) {
        //TODO:这里可以根据throwable的不同生成不同的HelloRemoteService的Fallback的实例
        return  new HelloRemoteService() {//这里是匿名实现接口,也可以用lambda表达式或具体的接口实现类,如:HelloRemoteServiceFallbackImpl

            @Override
            public Object multiply(int x, int y) {
                //TODO:这里可以根据throwable的不同执行不同的逻辑
                Map<String,Object> result=new HashMap<>();
                result.put("from","multiply FallbackFactory method");
                result.put("a",x);
                result.put("b",y);
                result.put("ex",throwable.getMessage());
                return  result;
            }
        };
    }
}


package cn.zuowenjun.cloud.service;


import org.springframework.cloud.openfeign.FeignClient;
import org.springframework.web.bind.annotation.PathVariable;
import org.springframework.web.bind.annotation.RequestMapping;


//@FeignClient(name= "helloservice",fallback =HelloRemoteServiceFallbackImpl.class )
@FeignClient(name= "helloservice",fallbackFactory = HystrixClientFallbackFactory.class)
public interface HelloRemoteService {

    @RequestMapping("/multiply/{a}/{b}")
    Object  multiply(@PathVariable("a") int x, @PathVariable("b") int y);

}
最后重新启动项目,并仍然访问:http://localhost:8666/multiply/66/88,正常情况都是OK的,当服务提供者不可用时,则会通过HystrixClientFallbackFactory工厂类创建降级回调实现类,并执行对应的降级方法,这里可以看到Throwable是create方法的入参,我们可以根据入参创建不同的降级回调实现类或实现不同的处理逻辑,这里DEMO演示的降级回调结果如下图示:

二、集成Hystrix-dashboard熔断监控面板
如上第一部份演示效果,通过在服务消费者项目中集成Hystrix可以做到依赖隔离、熔断、降级处理等操作,但如果没有有效的监控途径,那么我们就无法及时发现问题,及早预防,及早处理,只能等到出现大量的服务熔断降级后才知道问题,然后就是漫漫排查路。这样显然是不行的,故有了Hystrix Dashboard组件为我们解决这个监控的问题。集成Hystrix Dashboard很简单,我们在第一节服务消费者项目的基础上按照如下步骤操作,即可实现:
2.1.在POM XML中添加Hystrix Dashboard依赖、actuator依赖,具体如下:
        <dependency>
            <groupId>org.springframework.boot</groupId>
            <artifactId>spring-boot-starter-actuator</artifactId>
        </dependency>

        <dependency>
            <groupId>org.springframework.cloud</groupId>
            <artifactId>spring-cloud-starter-netflix-hystrix-dashboard</artifactId>
        </dependency>
2.2.在spring boot启动类上再添加:@EnableHystrixDashboard注解,然后添加注册HystrixMetricsStreamServlet的方法(servletRegistrationBean),并指定映射URL为:/actuator/hystrix.stream,如果不指定就会导致报:Unable to connect to Command Metric Stream,因为http://hystrix-app:port/actuator/hystrix.stream无法访问404,代码如下:(注意这里面同时包含了使用:ribbon、FeignClient两种消费方式)
package cn.zuowenjun.cloud;

import com.netflix.hystrix.contrib.metrics.eventstream.HystrixMetricsStreamServlet;
import org.springframework.boot.SpringApplication;
import org.springframework.boot.autoconfigure.SpringBootApplication;
import org.springframework.boot.web.servlet.ServletRegistrationBean;
import org.springframework.cloud.client.discovery.EnableDiscoveryClient;
import org.springframework.cloud.client.loadbalancer.LoadBalanced;
import org.springframework.cloud.netflix.hystrix.EnableHystrix;
import org.springframework.cloud.netflix.hystrix.dashboard.EnableHystrixDashboard;
import org.springframework.cloud.openfeign.EnableFeignClients;
import org.springframework.context.annotation.Bean;
import org.springframework.web.client.RestTemplate;

@EnableHystrixDashboard
@EnableHystrix
@EnableDiscoveryClient
@SpringBootApplication
@EnableFeignClients(basePackages = "cn.zuowenjun.cloud.service") // 如果启动类不在根目录需要指定basePackages,否则不需要
class EurekaclientconsumerApplication {

    public static void main(String[] args) {
        SpringApplication.run(EurekaclientconsumerApplication.class, args);
    }

    @LoadBalanced
    @Bean
    public RestTemplate restTemplate(){
        return  new RestTemplate();
    }


    @Bean(name = "hystrixRegistrationBean")
    public ServletRegistrationBean servletRegistrationBean() {
        ServletRegistrationBean registration = new ServletRegistrationBean(
                new HystrixMetricsStreamServlet(), "/actuator/hystrix.stream");
        registration.setName("HystrixMetricsStreamServlet");
        registration.setLoadOnStartup(1);
        return registration;
    }

}
完成上述2步后,重新启动项目,然后访问:http://localhost:8666/hystrix,出现如下画面即为成功:
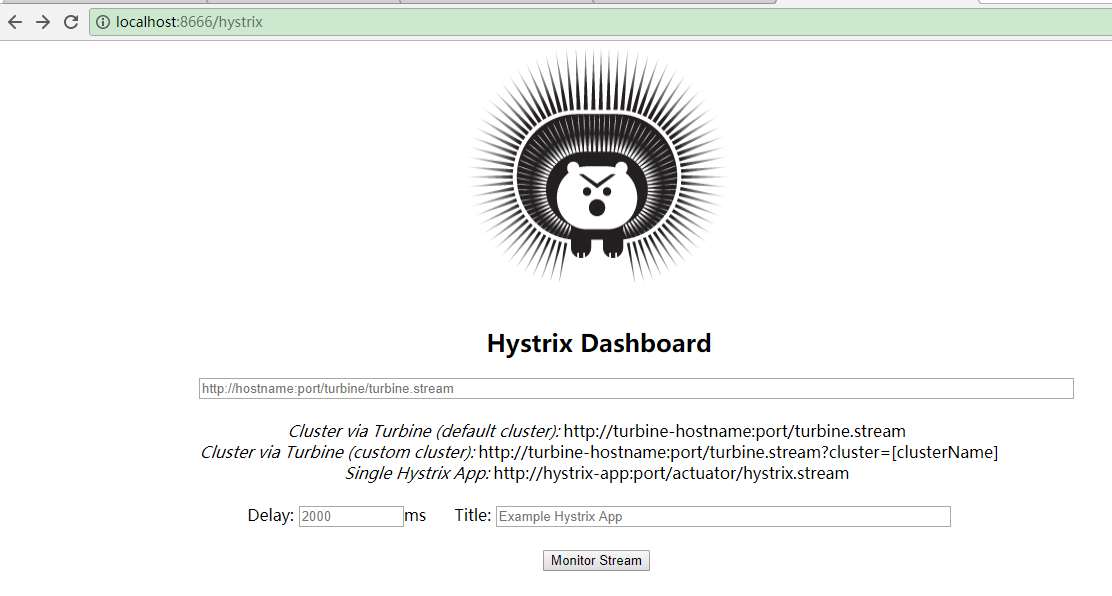
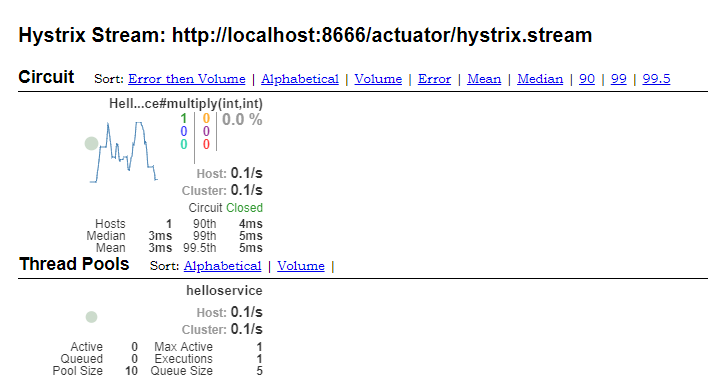
我们按照提示(查看单个服务项目),输入:http://localhost:8666/actuator/hystrix.stream,然后点击Monitor Stream按钮,即可进入监控查看界面,刚进行可能没有数据只是loading...,当通过ribbon、FeignClient两种方式进行服务消费后(即:请求远程服务API),则监控面板的数据会实时更新,效果如下图示:(至于具体参数各代表什么意思请上网查看相关资料,有很多介绍的)
2.3.除了在服务消费者项目中集成Hystrix Dashboard外,如果我们需要专门搞一个项目来查看各个服务消者,是否可以单独搭建呢?答案是肯定的,我们可以搭建一个专门用于查询每个项目监控数据的项目(直接使用spring initializer,然后只添加eureka client、Hystrix Dashboard即可),然后仍然按照搭建服务消费者的方式添加相关依赖,但不需要编写服务消费代码(比如:上文中的HelloService,HelloRemoteService),因为我们只需要保证能够与注册中心、服务提供者通讯并开启Hystrix Dashboard即可。我这里就做了一个演示DEMO,完整依赖如下:


<?xml version="1.0" encoding="UTF-8"?>
<project xmlns="http://maven.apache.org/POM/4.0.0" xmlns:xsi="http://www.w3.org/2001/XMLSchema-instance"
         xsi:schemaLocation="http://maven.apache.org/POM/4.0.0 http://maven.apache.org/xsd/maven-4.0.0.xsd">
    <modelVersion>4.0.0</modelVersion>
    <parent>
        <groupId>org.springframework.boot</groupId>
        <artifactId>spring-boot-starter-parent</artifactId>
        <version>2.1.3.RELEASE</version>
        <relativePath/> <!-- lookup parent from repository -->
    </parent>
    <groupId>cn.zuowenjun.cloud</groupId>
    <artifactId>hystrixdashboard</artifactId>
    <version>0.0.1-SNAPSHOT</version>
    <name>hystrixdashboard</name>
    <url>http://www.zuowenjun.cn</url>
    <description>Demo project for Spring Boot</description>

    <properties>
        <java.version>1.8</java.version>
        <spring-cloud.version>Greenwich.RELEASE</spring-cloud.version>
    </properties>

    <dependencies>
        <dependency>
            <groupId>org.springframework.boot</groupId>
            <artifactId>spring-boot-starter-actuator</artifactId>
        </dependency>
        <dependency>
            <groupId>org.springframework.cloud</groupId>
            <artifactId>spring-cloud-starter-netflix-eureka-client</artifactId>
        </dependency>
        <dependency>
            <groupId>org.springframework.cloud</groupId>
            <artifactId>spring-cloud-starter-netflix-hystrix-dashboard</artifactId>
        </dependency>
        <dependency>
            <groupId>org.springframework.boot</groupId>
            <artifactId>spring-boot-starter-test</artifactId>
            <scope>test</scope>
        </dependency>
    </dependencies>

    <dependencyManagement>
        <dependencies>
            <dependency>
                <groupId>org.springframework.cloud</groupId>
                <artifactId>spring-cloud-dependencies</artifactId>
                <version>${spring-cloud.version}</version>
                <type>pom</type>
                <scope>import</scope>
            </dependency>
        </dependencies>
    </dependencyManagement>

    <build>
        <plugins>
            <plugin>
                <groupId>org.springframework.boot</groupId>
                <artifactId>spring-boot-maven-plugin</artifactId>
            </plugin>
        </plugins>
    </build>

    <repositories>
        <repository>
            <id>spring-milestones</id>
            <name>Spring Milestones</name>
            <url>https://repo.spring.io/milestone</url>
        </repository>
    </repositories>

</project>
然后在spring boot启动类添加如下代码:
package cn.zuowenjun.cloud.dashboard;

import com.netflix.hystrix.contrib.metrics.eventstream.HystrixMetricsStreamServlet;
import org.springframework.boot.SpringApplication;
import org.springframework.boot.autoconfigure.SpringBootApplication;
import org.springframework.boot.web.servlet.ServletRegistrationBean;
import org.springframework.cloud.client.discovery.EnableDiscoveryClient;
import org.springframework.cloud.netflix.hystrix.dashboard.EnableHystrixDashboard;
import org.springframework.context.annotation.Bean;


@EnableHystrixDashboard
//@EnableDiscoveryClient
@SpringBootApplication
public class HystrixdashboardApplication {

    public static void main(String[] args) {
        SpringApplication.run(HystrixdashboardApplication.class, args);
    }


    @Bean(name = "hystrixRegistrationBean")
    public ServletRegistrationBean servletRegistrationBean() {
        ServletRegistrationBean registration = new ServletRegistrationBean(
                new HystrixMetricsStreamServlet(), "/actuator/hystrix.stream");
        registration.setName("hystrixServlet");
        registration.setLoadOnStartup(1);
        return registration;
    }

}
最后在application.yml添加如下配置即可:
server:
  port: 8999

spring:
  application:
    name: hystrixdashboard

eureka:
  client:
    serviceUrl:
      defaultZone: http://localhost:8800/eureka/ #指向eureka server


feign:
  hystrix:
    enabled: true #启用hystrix
访问:http://localhost:8999/hystrix,熟悉的界面又出来了,这时就可以输入其它某个服务消费者的项目:http://localhost:8666/actuator/hystrix.stream,点击Monitor Stream按钮即可正常查看监控。这里就不在贴图了。
三、通过引入Turbine聚合熔断监控数据以便统一集中查看
在这里我基于上面2.3单独搭建的监控面板项目(hystrixdashboard) 基础上按如下简单的几个步骤,即完成聚合熔断监控数据了。
3.1.在POM XML添加如下turbine依赖:
        <dependency>
            <groupId>org.springframework.cloud</groupId>
            <artifactId>spring-cloud-starter-netflix-turbine</artifactId>
        </dependency>
3.2 在spring boot启动类上标注@EnableTurbine,并再添加注册HystrixMetricsStreamServlet的方法(如:servletTurbineRegistrationBean),这里映射URL为:/turbine.stream
package cn.zuowenjun.cloud.dashboard;

import com.netflix.hystrix.contrib.metrics.eventstream.HystrixMetricsStreamServlet;
import org.springframework.boot.SpringApplication;
import org.springframework.boot.autoconfigure.SpringBootApplication;
import org.springframework.boot.web.servlet.ServletRegistrationBean;
import org.springframework.cloud.client.discovery.EnableDiscoveryClient;
import org.springframework.cloud.netflix.hystrix.dashboard.EnableHystrixDashboard;
import org.springframework.cloud.netflix.turbine.EnableTurbine;
import org.springframework.context.annotation.Bean;


@EnableHystrixDashboard
@EnableDiscoveryClient
@EnableTurbine
@SpringBootApplication
public class HystrixdashboardApplication {

    public static void main(String[] args) {
        SpringApplication.run(HystrixdashboardApplication.class, args);
    }


    @Bean(name = "hystrixRegistrationBean")
    public ServletRegistrationBean servletRegistrationBean() {
        ServletRegistrationBean registration = new ServletRegistrationBean(
                new HystrixMetricsStreamServlet(), "/actuator/hystrix.stream");
        registration.setName("hystrixServlet");
        registration.setLoadOnStartup(1);
        return registration;
    }

    @Bean(name = "hystrixForTurbineRegistrationBean")
    public ServletRegistrationBean servletTurbineRegistrationBean() {
        ServletRegistrationBean registration = new ServletRegistrationBean(
                new HystrixMetricsStreamServlet(), "/turbine.stream");
        registration.setName("hystrixForTurbineServlet");
        registration.setLoadOnStartup(1);
        return registration;
    }

}
3.3.在application.yml配置中增加turbine相关的参数设置,如下:
server:
  port: 8999

spring:
  application:
    name: hystrixdashboard

eureka:
  client:
    serviceUrl:
      defaultZone: http://localhost:8800/eureka/ #指向eureka server


turbine:
  app-config: helloservice #指定需要监控的servicename,多个service以,间隔
  cluster-name-expression: new String("default") #指定集群名称,默认为default,当设立了多个集群时,可以在Hystrix指定集群名称来查看监控
  combine-host-port: true #合并同一个host多个端口的数据
完成上面3个步骤后即OK,启动项目,然后访问:http://localhost:8999/hystrix,如果配置OK就又出现监控主界面,然后这里根据提示输入集群的监控查询URL,如:http://localhost:8999/turbine.stream,然后点击Monitor Stream按钮即可正常查看集群中各服务的监控实时数据了。这里就不在贴图了。
好了本文就总结到这里,若有不足之处欢迎指出,谢谢!