创建服务注册中心
在这里,我还是采用Eureka作为服务注册与发现的组件
- 首先创建一个maven主工程。
首先创建一个主Maven工程,在其pom文件引入依赖,spring Boot版本为2.1.3.RELEASE,Spring Cloud版本为Greenwich.RELEASE。这个pom文件作为父pom文件,起到依赖版本控制的作用,其他module工程继承该pom。这一系列文章全部采用这种模式,其他文章的pom跟这个pom一样。再次说明一下,以后不再重复引入。代码如下:
<?xml version="1.0" encoding="UTF-8"?>

<project xmlns="http://maven.apache.org/POM/4.0.0" xmlns:xsi="http://www.w3.org/2001/XMLSchema-instance"
  xsi:schemaLocation="http://maven.apache.org/POM/4.0.0 http://maven.apache.org/xsd/maven-4.0.0.xsd">
  <modelVersion>4.0.0</modelVersion>

  <groupId>com.qh</groupId>
  <artifactId>springcloud-parent</artifactId>
  <version>1.0-SNAPSHOT</version>
  <packaging>pom</packaging>

  <name>springcloud-parent</name>
  <!-- FIXME change it to the project's website -->
  <url>http://www.example.com</url>

  <parent>
    <groupId>org.springframework.boot</groupId>
    <artifactId>spring-boot-starter-parent</artifactId>
    <version>2.1.3.RELEASE</version>
    <relativePath/> <!-- lookup parent from repository -->
  </parent>

  <properties>
    <project.build.sourceEncoding>UTF-8</project.build.sourceEncoding>
    <project.reporting.outputEncoding>UTF-8</project.reporting.outputEncoding>
    <java.version>1.8</java.version>
    <spring-cloud.version>Greenwich.RELEASE</spring-cloud.version>
  </properties>

  <dependencies>
    <dependency>
      <groupId>org.springframework.boot</groupId>
      <artifactId>spring-boot-starter-test</artifactId>
      <scope>test</scope>
    </dependency>
  </dependencies>

  <dependencyManagement>
    <dependencies>
      <dependency>
        <groupId>org.springframework.cloud</groupId>
        <artifactId>spring-cloud-dependencies</artifactId>
        <version>${spring-cloud.version}</version>
        <type>pom</type>
        <scope>import</scope>
      </dependency>
    </dependencies>
  </dependencyManagement>

  <build>
    <plugins>
      <plugin>
        <groupId>org.springframework.boot</groupId>
        <artifactId>spring-boot-maven-plugin</artifactId>
      </plugin>
    </plugins>
  </build>
</project>
- 然后创建2个model工程:**一个model工程作为服务注册中心,即Eureka Server,另一个作为Eureka Client。
下面以创建server为例子,详细说明创建过程:
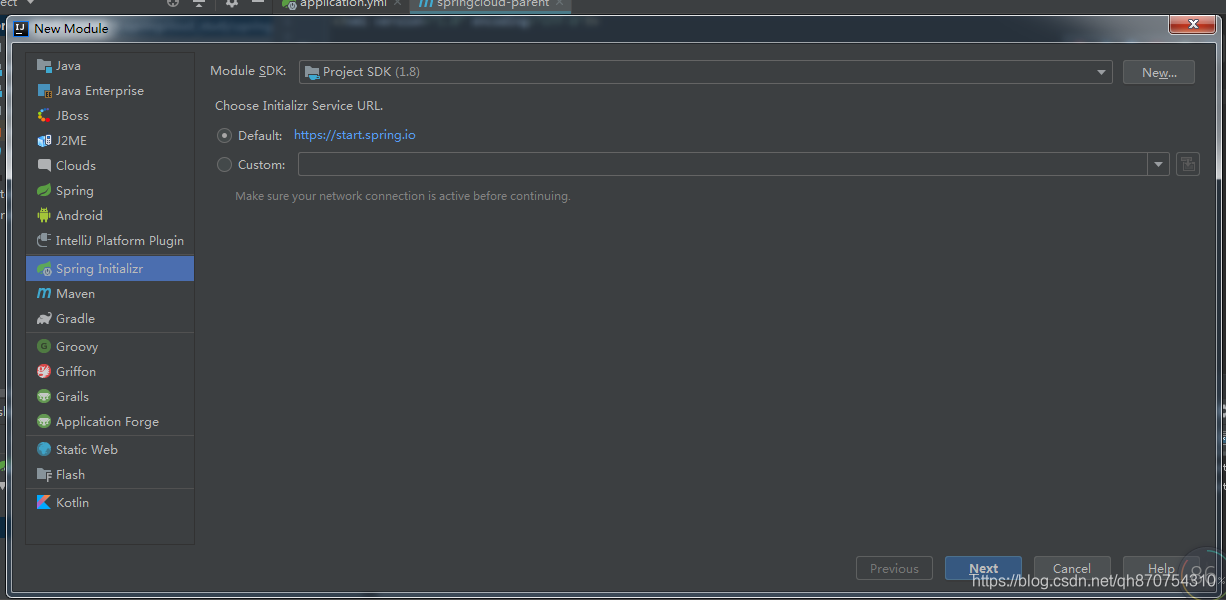
右键工程->创建model-> 选择spring initialir 如下图:
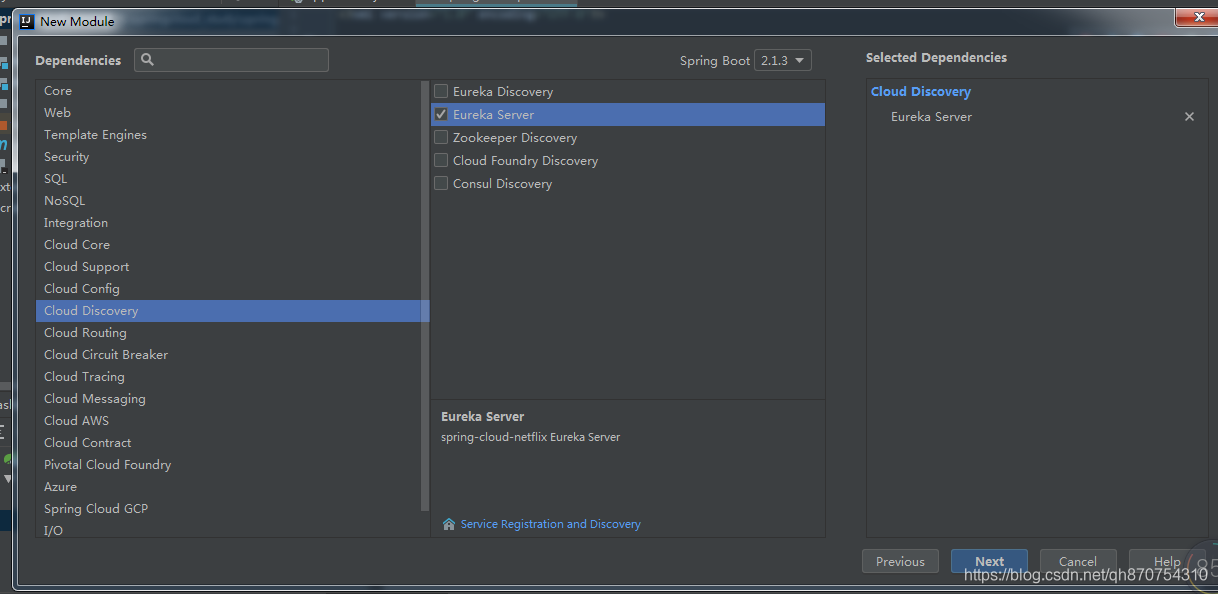
 下一步->选择cloud discovery->eureka server ,然后一直下一步就行了。
 创建完后的工程,其pom.xml继承了父pom文件,并引入spring-cloud-starter-netflix-eureka-server的依赖,代码如下:
<?xml version="1.0" encoding="UTF-8"?>
<project xmlns="http://maven.apache.org/POM/4.0.0" xmlns:xsi="http://www.w3.org/2001/XMLSchema-instance"
         xsi:schemaLocation="http://maven.apache.org/POM/4.0.0 http://maven.apache.org/xsd/maven-4.0.0.xsd">
    <modelVersion>4.0.0</modelVersion>
    <groupId>com.qh</groupId>
    <artifactId>euraka-server</artifactId>
    <version>0.0.1-SNAPSHOT</version>
    <packaging>jar</packaging>
    <name>euraka-server</name>
    <description>Demo project for Spring Boot</description>

    <parent>
        <groupId>com.qh</groupId>
        <artifactId>springcloud-parent</artifactId>
        <version>1.0-SNAPSHOT</version>
    </parent>

    <dependencies>
        <dependency>
            <groupId>org.springframework.cloud</groupId>
            <artifactId>spring-cloud-starter-netflix-eureka-server</artifactId>
        </dependency>
    </dependencies>

</project>
启动一个服务注册中心,只需要一个注解@EnableEurekaServer,这个注解需要在springboot工程的启动application类上加:
package com.qh.eurakaserver;

import org.springframework.boot.SpringApplication;
import org.springframework.boot.autoconfigure.SpringBootApplication;
import org.springframework.cloud.netflix.eureka.server.EnableEurekaServer;

/**
 * 文档地址: http://cloud.spring.io/spring-cloud-static/Finchley.RELEASE/single/spring-cloud.html
 */
@SpringBootApplication
@EnableEurekaServer
public class EurakaServerApplication {

    public static void main(String[] args) {
        SpringApplication.run(EurakaServerApplication.class, args);
    }

}
eureka是一个高可用的组件,它没有后端缓存,每一个实例注册之后需要向注册中心发送心跳(因此可以在内存中完成),在默认情况下erureka server也是一个eureka client ,必须要指定一个 server。eureka server的配置文件appication.yml:
server:
  port: 8090

eureka:
  instance:
    hostname: localhost
  client:
    register-with-eureka: false   #通过eureka.client.registerWithEureka:false和fetchRegistry:false来表明自己是一个eureka server.
    fetch-registry: false
    serviceUrl:
      defaultZone: http://${eureka.instance.hostname}:${server.port}/eureka/

spring:
  application:
    name: eureka-server
通过eureka.client.registerWithEureka:false和fetchRegistry:false来表明自己是一个eureka server.
eureka server 是有界面的,启动工程,打开浏览器访问:
localhost:8090 , 界面如下:

No application available 没有服务被发现
因为没有注册服务当然不可能有服务被发现了。
创建一个服务提供者 (eureka client)
当client向server注册时,它会提供一些元数据,例如主机和端口,URL,主页等。Eureka server 从每个client实例接收心跳消息。 如果心跳超时,则通常将该实例从注册server中删除。
创建过程同server类似,创建完pom.xml如下:
<?xml version="1.0" encoding="UTF-8"?>
<project xmlns="http://maven.apache.org/POM/4.0.0" xmlns:xsi="http://www.w3.org/2001/XMLSchema-instance"
         xsi:schemaLocation="http://maven.apache.org/POM/4.0.0 http://maven.apache.org/xsd/maven-4.0.0.xsd">
    <modelVersion>4.0.0</modelVersion>
    <groupId>com.qh</groupId>
    <artifactId>eureka-client</artifactId>
    <version>0.0.1-SNAPSHOT</version>
    <packaging>jar</packaging>

    <name>eureka-client</name>
    <description>Demo project for Spring Boot</description>

    <parent>
        <groupId>com.qh</groupId>
        <artifactId>springcloud-parent</artifactId>
        <version>1.0-SNAPSHOT</version>
    </parent>

    <dependencies>
        <dependency>
            <groupId>org.springframework.cloud</groupId>
            <artifactId>spring-cloud-starter-netflix-eureka-client</artifactId>
        </dependency>
        <dependency>
            <groupId>org.springframework.boot</groupId>
            <artifactId>spring-boot-starter-web</artifactId>
        </dependency>
    </dependencies>

    <build>
        <plugins>
            <plugin>
                <groupId>org.springframework.boot</groupId>
                <artifactId>spring-boot-maven-plugin</artifactId>
            </plugin>
        </plugins>
    </build>

</project>
通过注解@EnableEurekaClient 表明自己是一个eurekaclient.
package com.qh.eurekaclient;

import org.springframework.beans.factory.annotation.Value;
import org.springframework.boot.SpringApplication;
import org.springframework.boot.autoconfigure.SpringBootApplication;
import org.springframework.cloud.netflix.eureka.EnableEurekaClient;
import org.springframework.web.bind.annotation.RequestMapping;
import org.springframework.web.bind.annotation.RequestParam;
import org.springframework.web.bind.annotation.RestController;

@SpringBootApplication
@EnableEurekaClient
@RestController
public class EurekaClientApplication {

    public static void main(String[] args) {
        SpringApplication.run(EurekaClientApplication.class, args);
    }

    @Value("${server.port}")
    String port;

    @RequestMapping(value = "/index")
    public String home(@RequestParam(value = "name", defaultValue = "qh") String name) {
        return "hi " + name + " , i am from port: " + port;
    }

}
仅仅@EnableEurekaClient是不够的,还需要在配置文件中注明自己的服务注册中心的地址,application.yml配置文件如下:
server:
  port: 8085

spring:
  application:
    name: eureka-client

eureka:
  client:
    serviceUrl:
      defaultZone: http://localhost:8090/eureka/
需要指明spring.application.name,这个很重要,这在以后的服务与服务之间相互调用一般都是根据这个name 。
启动工程,打开http://localhost:8085 ,即eureka server 的网址:
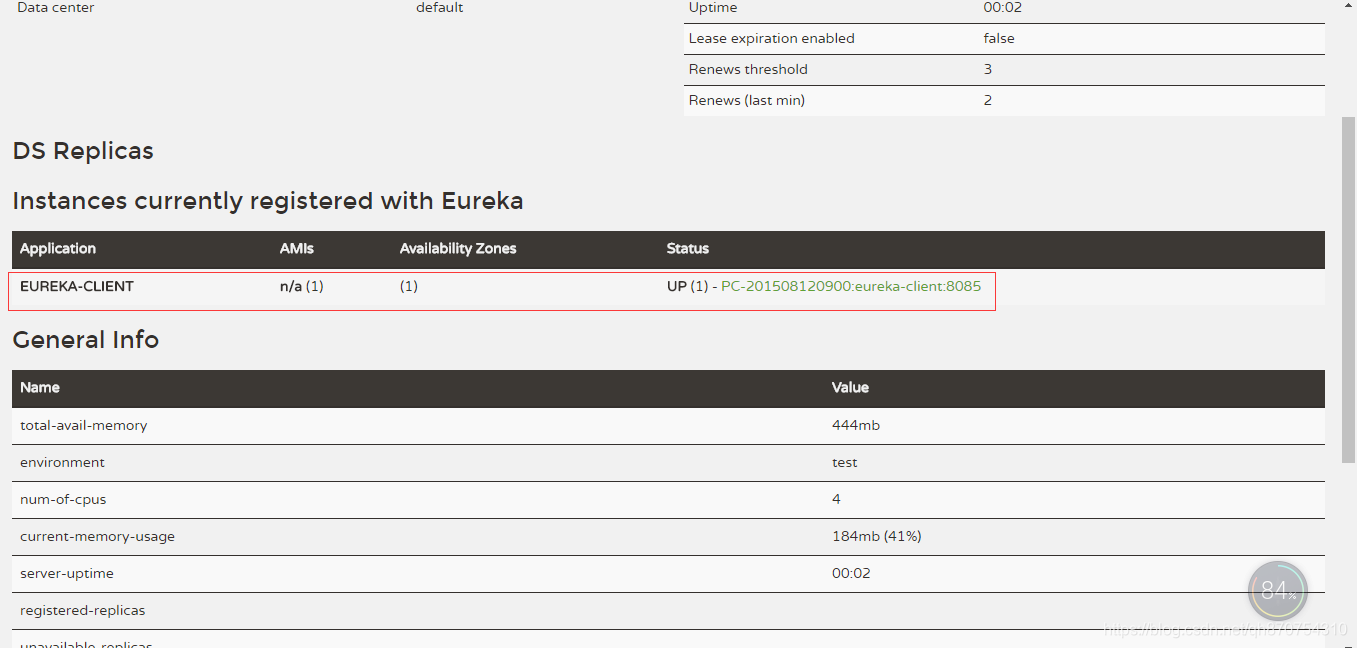 你会发现一个服务已经注册在服务中了,服务名为SERVICE-HI ,端口为8085
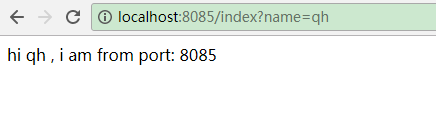
这时打开 http://localhost:8085/index?name=qh ,你会在浏览器上看到 :
原文:https://blog.csdn.net/forezp/article/details/81040925