本节示例只提供服务注册,消费服务在后面的章节中
Eureka的原理就不介绍了,直接写代码。
编写Eureka Service
新建一个spring boot Maven项目,添加如下依赖
<dependency>
    <groupId>org.springframework.cloud</groupId>
    <artifactId>spring-cloud-starter-netflix-eureka-server</artifactId>
</dependency>
启动类添加@EnableEurekaServer注解,声明是一个Eureka Server。
@SpringBootApplication
@EnableEurekaServer
public class EurekaApplication {

	public static void main(String[] args) {
		SpringApplication.run(EurekaApplication.class, args);
	}
}
配置文件
server:
  port: 8761
eureka:
  instance:
    hostname: localhost
  client:
    registerWithEureka: false
    fetchRegistry: false
    serviceUrl:
      defaultZone: http://${eureka.instance.hostname}:${server.port}/eureka/
eureka.client.registerWithEureka 表示是否将自己注册到Eureka Service,默认为true。由于自己本身就是Eureka Service,所以设置为false。
eureka.client.fetchRegistry 表示是否从Eureka Service获取注册信息,默认为true。因为这是一个单点Eureka Service,不需要同步其他的Eureka Service节点,所以设置为false。
eureka.client.serviceUrl.defaultZone 设置与Eureka Service的交互地址,查询服务和注册服务都依赖这个地址,默认是http://localhost:8761/eureka ,多个地址可以使用逗号分隔。
将服务注册到Eureka Service上
新建一个spring boot Maven项目,添加如下依赖
<dependency>
    <groupId>org.springframework.cloud</groupId>
    <artifactId>spring-cloud-starter-netflix-eureka-client</artifactId>
</dependency>
启动类添加@EnableDiscoveryClient注解,也可以使用@EnableEurekaClient,声明是一个Eureka Client。
@EnableDiscoveryClient
@SpringBootApplication
public class ProviderUserApplication {

    public static void main(String[] args) {
        SpringApplication.run(ProviderUserApplication.class, args);
    }
}
配置文件
server:
  port: 8080
spring:
  application:
    name: provider-user
eureka:
  client:
    service-url:
      defaultZone: http://localhost:8761/eureka/
  instance:
    prefer-ip-address: true
spring.application.name 用于指定注册到Eureka Service上的应用名称。
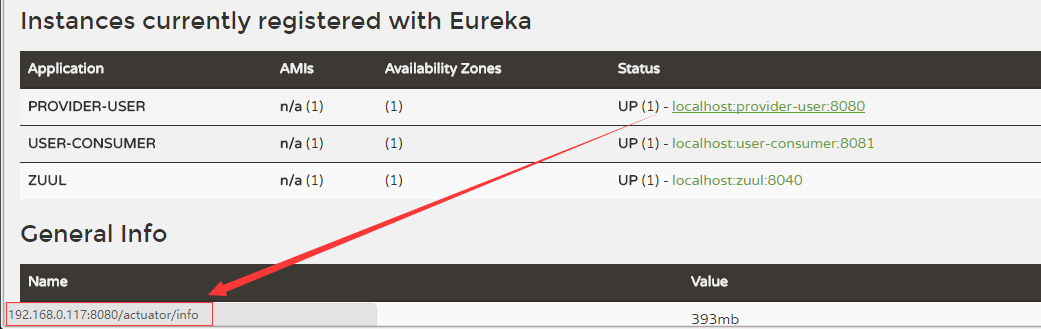
eureka.instance.prefer-ip-address=true 表示将自己的IP(下图中的192.168.0.117)注册到Eureka Service。如不配置或者设为false,表示注册服务所在操作系统的hostname(localhost)到Eureka Service。显示为ip后面再做。
Eureka Service的高可用
Eureka Service 可以通过运行多个实例并相互注册的方式实现高可用部署,Eureka Service 实例会彼此增量的同步信息,从而确保所有节点数据一致。
先修改hosts文件文件位置:C:\Windows\System32\drivers\etc\hosts 加上一行
127.0.0.1 peer1 peer2将Eureka Service 的配置文件application.yml修改如下:让两个节点的Eureka Service 相互注册。
端口是8761的Eureka Service 的配置文件:
spring:
  application:
    name: eurka
server:
  port: 8761
eureka:
  instance:
    hostname: peer1
  client:
    serviceUrl:
      #将自己注册到端口号是8762这个eureka上面去
      defaultZone: http://peer2:8762/eureka/
端口是8762的Eureka Service 的配置文件:
spring:
  application:
    name: eurka
server:
  port: 8762
eureka:
  instance:
    hostname: peer2
  client:
    serviceUrl:
      #将自己注册到端口号是8761这个eureka上面去
      defaultZone: http://peer1:8761/eureka/
运行两个Eureka Service 稍等一会儿访问 http://127.0.0.1:8761/ 或者 http://127.0.0.1:8762/ 结果如下:

将服务注册到Eureka Service 集群上
Eureka Service 客户端配置文件如下:
server:
  port: 8080
spring:
  application:
    name: provider-user
eureka:
  client:
    service-url:
      defaultZone: http://peer1:8761/eureka/,http://peer2:8762/eureka/
  instance:
prefer-ip-address: true为Eureka Service 添加用户认证
前面的配置允许匿名访问,通过spring security 可以设置登陆才能访问。
引入spring security
<dependency>
    <groupId>org.springframework.boot</groupId>
    <artifactId>spring-boot-starter-security</artifactId>
</dependency>
由于本项目springboot版本是2.0.0.RELEASE,spring-cloud.version是Finchley.M9,配置要麻烦些
创建一个spring security配置类SecurityConfiguration.java 作为配置类,要能够被springboot启动类扫描到,放在启动类同级目录或者下级目录,文件内容如下:
package com.dcssn.eurka2.config;

import org.springframework.context.annotation.Bean;
import org.springframework.context.annotation.Configuration;
import org.springframework.security.config.annotation.authentication.builders.AuthenticationManagerBuilder;
import org.springframework.security.config.annotation.web.builders.HttpSecurity;
import org.springframework.security.config.annotation.web.configuration.EnableWebSecurity;
import org.springframework.security.config.annotation.web.configuration.WebSecurityConfigurerAdapter;
import org.springframework.security.core.userdetails.User;
import org.springframework.security.core.userdetails.UserDetailsService;
import org.springframework.security.crypto.bcrypt.BCryptPasswordEncoder;
import org.springframework.security.provisioning.InMemoryUserDetailsManager;

@Configuration
@EnableWebSecurity
public class SecurityConfiguration extends WebSecurityConfigurerAdapter {

    @Override
    protected void configure(AuthenticationManagerBuilder auth) throws Exception {
        auth.userDetailsService(userDetailsService()).passwordEncoder(new BCryptPasswordEncoder());
    }

    @Override
    protected void configure(HttpSecurity http) throws Exception {
        super.configure(http);
        http.csrf().disable()
                .authorizeRequests()
                .anyRequest().authenticated()
                .antMatchers("/**").hasRole("user");
    }

    @Bean
    public UserDetailsService userDetailsService() {
        InMemoryUserDetailsManager manager = new InMemoryUserDetailsManager();
        manager.createUser(User.withUsername("user").password(new BCryptPasswordEncoder().encode("password"))
                .roles("USER").build());
        return manager;
    }
}
看不明白的可以去补习spring security。
Eureka Service 集群或者 Eureka Client 修改defaultZone 格式如下
eureka.client.service-url.defaultZone=http://user:password@peer1:8761/eureka/