文章目录
OpenCV中的轮廓
1.初识轮廓
1.1 原理
轮廓可以简单认为成将连续的点(连着边界)连在一起的曲线,具有相同的颜色或者灰度。
- 使用二值化图像可以更准确识别轮廓。寻找轮廓之前要进行阈值化处理或Canny边界检测;
- 查找轮廓会修改原始图像;
- OpenCV中查找轮廓类似于在黑色背景中找白色物体。背景是黑色,物体是白色。
1.2 常用函数
- 查找轮廓:cv2.findContours()。第一个是输入图像,第二个是轮廓检索模式,第三个是轮廓近似方法。
- 绘制轮廓:cv2.drawContours()。第一个参数是原始图像,第二个参数是轮廓,第三个是轮廓的索引(-1表示绘制所有轮廓)。
- 轮廓的近似方法:
- cv2.CHAIN_APPROX_NONE,存储所有边界点;
- cv2.CHAIN_APPROX_SIMPLE,只存储有用的点,去掉冗余点,压缩轮廓。
#!/usr/bin/env python
# -*- coding:utf-8 -*-
import cv2
img = cv2.imread("/Users/~~/img.png")
imgray = cv2.cvtColor(img, cv2.COLOR_BGR2GRAY)
ret, thresh = cv2.threshold(imgray, 127, 255, 0)
# 查找轮廓
contours, hierarchy = cv2.findContours(thresh, cv2.RETR_TREE, cv2.CHAIN_APPROX_SIMPLE)
# 绘制轮廓
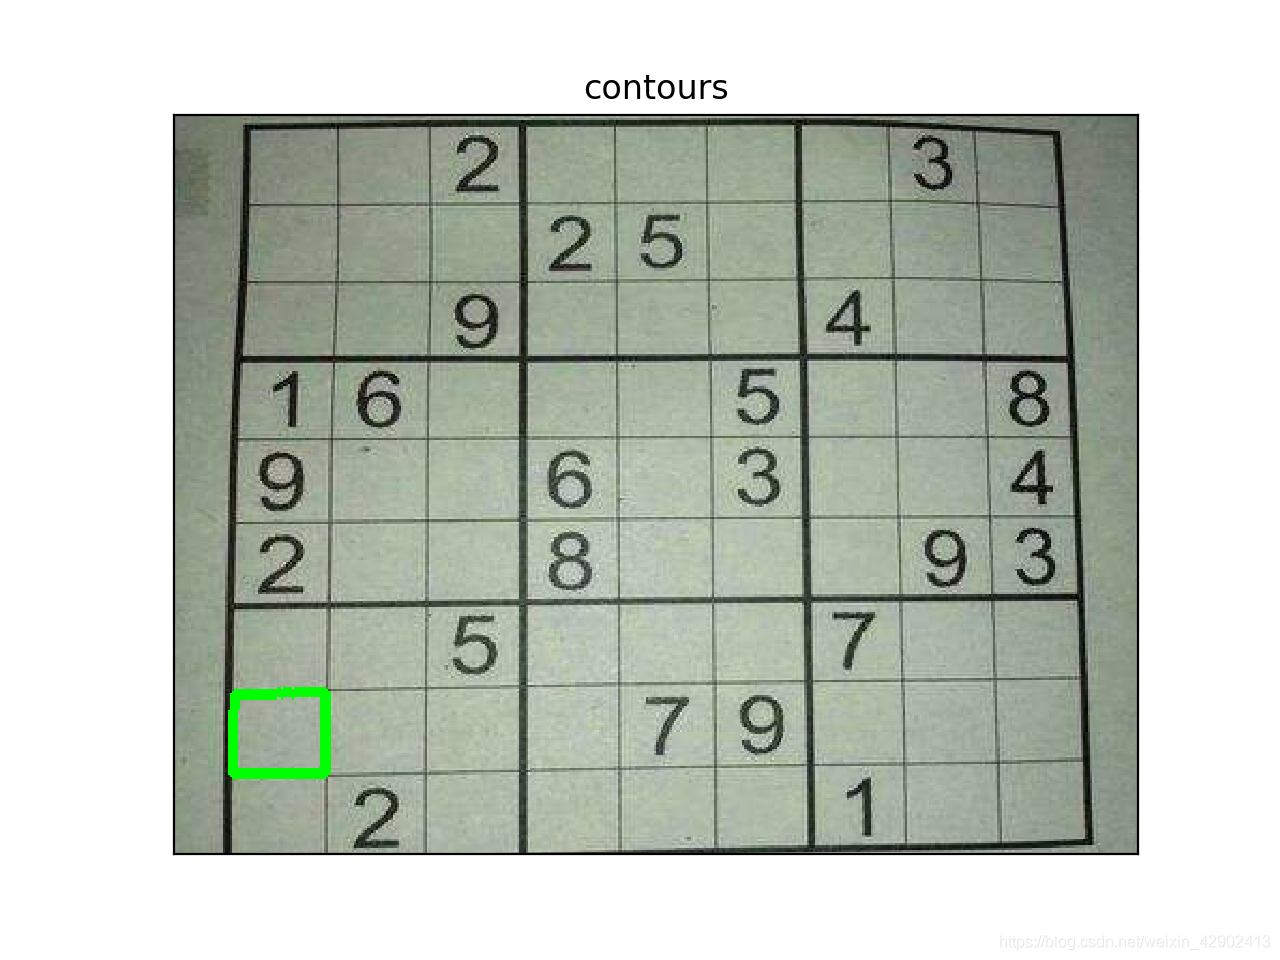
img = cv2.drawContours(img, contours, 50, (0, 255, 0), 3)
plt.imshow(img, cmap='gray')
plt.title('Original'), plt.xticks([]), plt.yticks([])
结果:
2.轮廓的特征
2.1 矩
图像的矩可以用来计算图像的质心,面积等。
#!/usr/bin/env python
# -*- coding:utf-8 -*-
import cv2
img = cv2.imread("/~~/ig.png", 0)
ret, thresh = cv2.threshold(imgray, 127, 255, 0)
contours, hierarchy = cv2.findContours(thresh, 1, 2)
cnt = contours[0]
M = cv2.moments(cnt)
print(M)
# 绘制轮廓
# 重心
cx = int(M['m10']/M['m00']) #255
cy = int(M['m01']/M['m00']) #480
#面积‘
area = cv2.contourArea(cnt) #30700
#周长
#  cv2.arcLength()的第二个参数用来指定对象的形状是闭合(True)的还是打开的(一条曲线)。
perimeter = cv2.arcLength(cnt, True) #1162.97
2.2 轮廓近似
将轮廓近似到另一种由更少点组成的轮廓形状。
approx = cv2.approxPolyDP(cnt,epsilon,True)
epsilon:原始轮廓到近似轮廓的最大距离;
True:弧线是否闭合。
# epsilon = 10% 时的近似轮廓
epsilon = 0.1*cv2.arcLength(cnt,True)
approx = cv2.approxPolyDP(cnt,epsilon,True)
2.3 凸包
凸包与轮廓近似相似,但不同,虽然有些情况它们给出的结果是一样的。
cv2.convexHull():可以用来检测曲线是否具有凸性缺陷,并纠正。
hull = cv2.convexHull(points[, hull[, clockwise[, returnPoints]]])
参数:
- points:需要传入的轮廓
- hull:输出,通常不需要
- clockwise:方向标志。True表示输出的凸包是顺时针方向的,否则逆时针。
- returnPoints:默认True,返回凸包上点的坐标;False,返回与凸包点对应的轮廓上的点。
2.4 边界
- 直边界矩形
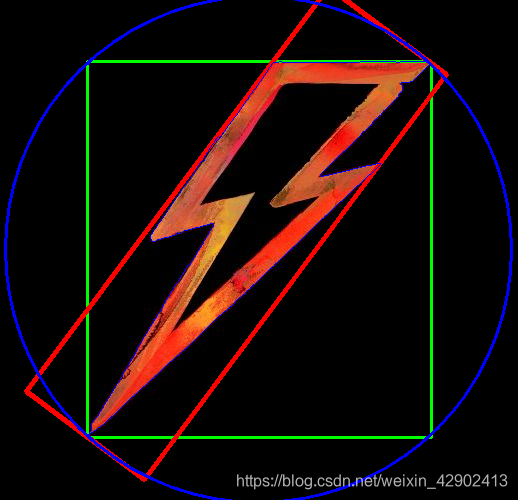
一个没有旋转的矩形。不会考虑对象是否旋转,所以得到的边界矩形的面积不是最小的。函数:cv2.boundingRect()。(下图中共绿色框)
- 旋转边界矩形
因为考虑了对象的旋转,所以这个矩形的面积是最小的。函数:cv2.minAreaRect()。(下图中红色框)
3.最小外接圆
函数cv2.minEnclosingCircle()可以帮我们找到一个对象的最小外切圆。它是能包括对象的圆中面积最小的一个。(下图中蓝色框)
img = cv2.imread("/Users/~/flash.jpg")
# 将图片转化为灰度,再进行二值化
ret, thresh = cv2.threshold(cv2.cvtColor(img.copy(), cv2.COLOR_BGR2GRAY), 127, 255, cv2.THRESH_BINARY)
contours, hier = cv2.findContours(thresh, cv2.RETR_EXTERNAL, cv2.CHAIN_APPROX_SIMPLE)
for c in contours:
    # 边界框:
    # find bounding box coordinates
    # boundingRect()将轮廓转化成(x,y,w,h)的简单边框,cv2.rectangle()画出矩形[绿色(0, 255, 0)]
    x, y, w, h = cv2.boundingRect(c)
    cv2.rectangle(img, (x, y), (x + w, y + h), (0, 255, 0), 2)

    # 最小矩形区域:
    # 1 计算出最小矩形区域 2 计算这个的矩形顶点 3 由于计算出来的是浮点数,而像素是整型,所以进行转化 4 绘制轮廓[红色(0, 0, 255)]
    # find minimum area
    rect = cv2.minAreaRect(c)
    # calculate coordinates of the minimum area rectangle
    box = cv2.boxPoints(rect)
    # normalize coordinates to integers
    box = np.int0(box)
    # draw contours
    cv2.drawContours(img, [box], 0, (0, 0, 255), 3)

    # 最小闭圆的轮廓:
    # calculate center and radius of minimum enclosing circle[蓝色(255, 0, 0)]
    (x, y), radius = cv2.minEnclosingCircle(c)
    # cast to integers
    center = (int(x), int(y))
    radius = int(radius)
    # draw the circle
    img = cv2.circle(img, center, radius, (255, 0, 0), 2)

# 轮廓检测:绘制轮廓
cv2.drawContours(img, contours, -1, (255, 0, 0), 1)
cv2.imshow("contours", img)
cv2.waitKey()
cv2.destroyAllWindows()
结果:
2.5 拟合
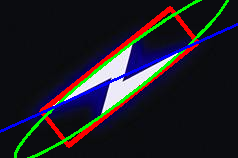
- 椭圆拟合
使用函数cv2.ellipse(),返回值其实是旋转边界矩形的内切圆
- 直线拟合
可以根据一组点拟合出一条直线,同样可以为图中白色点拟合出一条直线
#椭圆拟合,绿色
ellipse = cv2.fitEllipse(c)
img = cv2.ellipse(img, ellipse,(0,255,0),2)

#直线拟合,蓝色线
rows, cols = img.shape[:2]
    [vx, vy, x, y] = cv2.fitLine(c, cv2.DIST_L2, 0, 0.01, 0.01)
    lefty = int((-x * vy / vx) + y)
    righty = int(((cols-x)*vy/vx)+y)
    cv2.line(img, (cols - 1, righty), (0, lefty), (255, 0, 0), 2)
2.6 极点
一个图像的最上面、最下面、最左边、最右边的点
    leftmost = tuple(c[c[:,:,0].argmin()][0])
    rightmost = tuple(c[c[:,:,0].argmax()][0])
    topmost = tuple(c[c[:,:,1].argmin()][0])
    bottommost = tuple(c[c[:,:,1].argmax()][0])
3. 形状匹配
函数cv2.matchShape()可以比较两个形状或轮廓的相似度。如果返回值越小,匹配度越好。
import cv2
import numpy as np
img1 = cv2.imread("/Users/~/star.jpg", 0)
img2 = cv2.imread("/Users/~/star2.jpg", 0)
img = cv2.imread("/Users/~/black_flash.jpg", 0)

# 二值化
ret, thresh = cv2.threshold(img1, 175, 255, 0)
ret, thresh2 = cv2.threshold(img2, 175, 255, 0)
# 轮廓
contours, hier = cv2.findContours(thresh, 2, 1)
cnt1 = contours[0]
contours, hier = cv2.findContours(thresh2, 2, 1)
cnt2 = contours[0]
#求匹配度
ret = cv2.matchShapes(cnt1, cnt2, 1, 0.0)
print(ret)
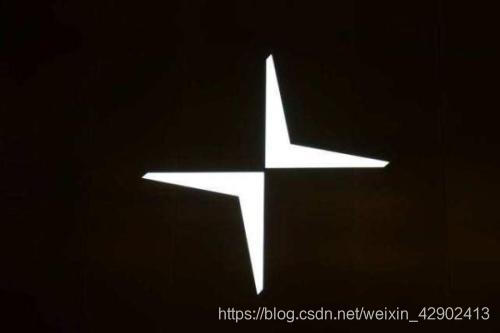
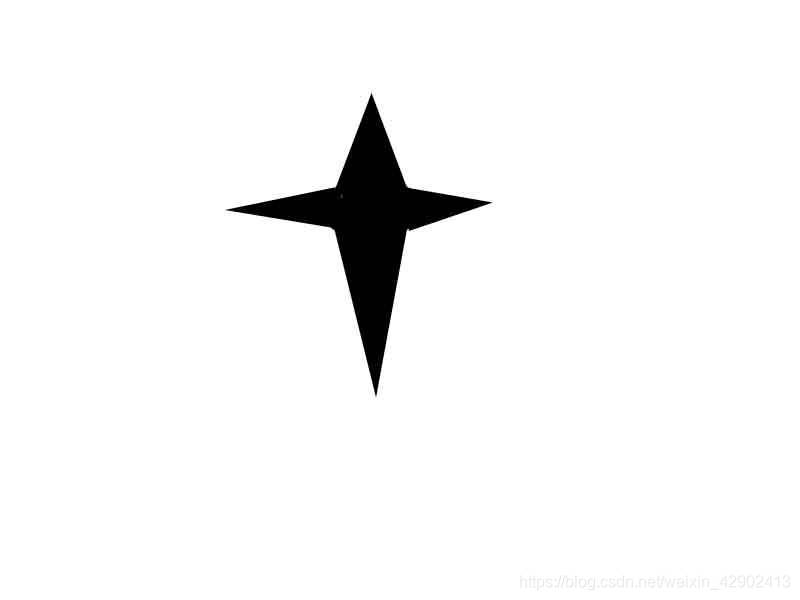

上左图和中间图的匹配度是3.39
上左图和右图的匹配度是3.99
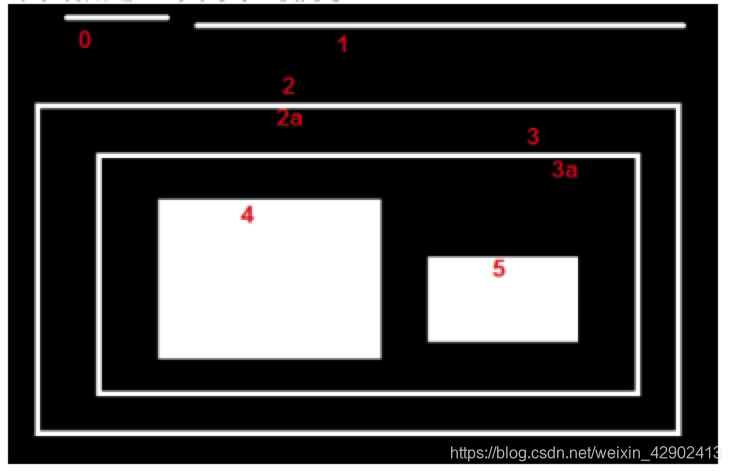
4. 轮廓的层次结构
4.1 轮廓的层级结构
- Next:同一级组织结构中的下一个轮廓,没有的话next = -1;下图中0的Next是1;
- Previous:同一级结构中的前一个轮廓,没有的话为-1;1的Previous是0;
- First_Chid:便是它的第一个子轮廓,按从上到下,从左到右的顺序排序;没有的话为-1;3a的First_Chid是4;
- Parents:表示它的父轮廓,没有的话为-1;5的Parents是3a。
4.2 轮廓的检索形式
- RETR_LIST:提取所有轮廓,不创建任何父子关系,属于同一级组织轮廓;(不关心轮廓关系的时候用)
- RETR_EXTERNAL:返回最外边的轮廓,所有的子轮廓会被忽略;(只想要最外边的轮廓时用)
- RETR_CCOMP:返回所有的轮廓,并分为两级组织结构。图中红色字体代表轮廓的编号,绿色代表轮廓的组织层级。
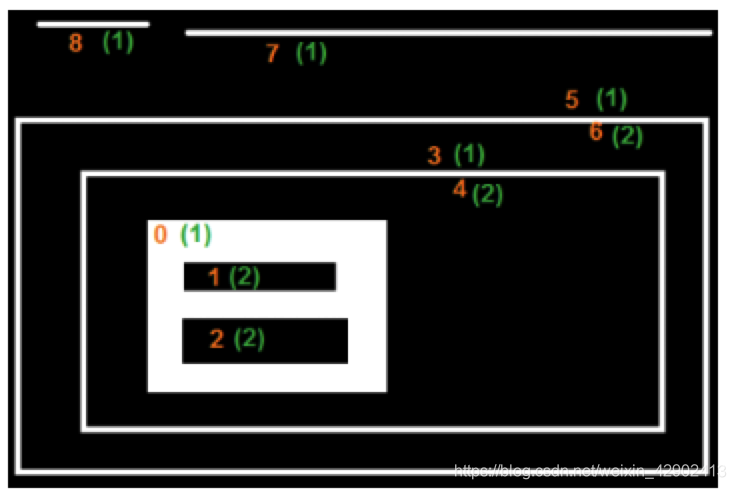
结果:
>>> hierarchy
array([[[ 3, -1,  1, -1],
		[2,-1,-1, 0],
		[-1, 1, -1, 0],
		[ 5, 0, 4, -1],
		[-1, -1, -1, 3],
		[ 7, 3, 6, -1],
		[-1, -1, -1, 5],
		[8, 5,-1,-1],
		[-1, 7, -1, -1]]])
- RETR_TREE:最完美的一个,返回所有轮廓,并创建一个完整的组织列表结构。
结果:
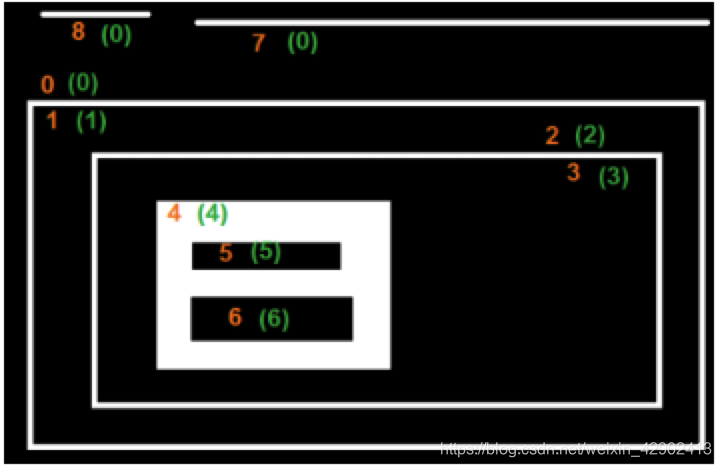
>>> hierarchy
array([[[ 7, -1,  1, -1],
		[-1, -1, 2, 0],
		[-1, -1, 3, 1],
		[-1, -1, 4, 2],
		[-1, -1, 5, 3],
		[6,-1,-1, 4],
		[-1, 5, -1, 4],
		[8, 0,-1,-1],
		[-1, 7, -1, -1]]])