极坐标想必学过高中数学的人都听过,一般的坐标系中用(x, y)值来描述一个点的位置,而在极坐标系中,则使用到原点的距离ρ和夹角θ来描述该点的位置。
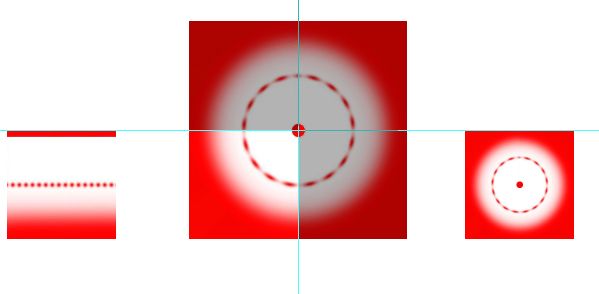
我很早就接触了Photoshop,知道Photoshop里面有个极坐标的扭曲滤镜,如下图:

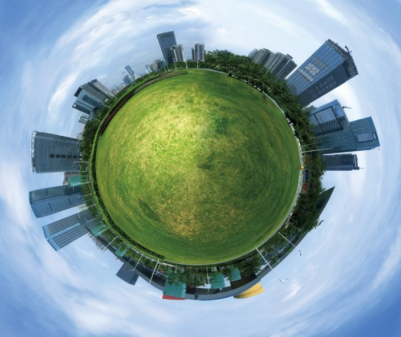
明白了极坐标(正向、反向)的大致效果是:能将矩形图案变成圆形(环形)图案,或者反过来。
例如制作这种超现实的特效:
Photoshop中的“极坐标”滤镜的原理是:以右上角为圆心,旋转以后生成的是一个长宽都是画布两倍的图形,然后将此图形压缩至二分之一,最后将圆心移到画面中央。(注意下面三个图形之间的相对位置)
Halcon中极坐标的处理可能为了使用方便,将内部算法经过了优化,所以外在表现形式略有不同。
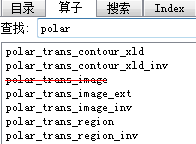
Halcon中与极坐标变换相关的算子共有7个,不过polar_trans_image已经过时,官方不建议使用,可以看到Halcon对Image、Region、XLD都可以运用极坐标变换和反变换。
Halcon示例程序中关于极坐标的例子有: inspect_bottle_mouth.hdev。下面的代码亦是根据这个例子精简而来,完整代码如下(注意看注释):
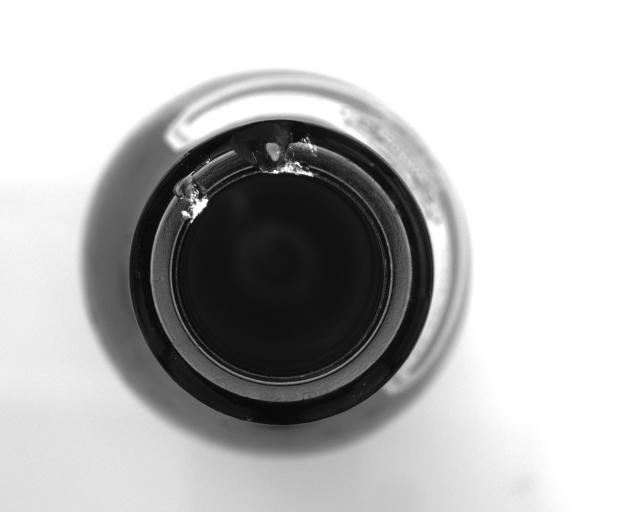
 1 *说明:本例由Halcon示例程序 inspect_bottle_mouth.hdev 精简而成,可先参考示例程序再阅读本代码。
 2
 3 dev_set_draw ('margin')
 4 dev_set_line_width (2)
 5 set_font (3600, '-Courier New-16-*-*-*-*-1-')
 6
 7 list_files ('C:/Users/Administrator/Desktop/bottle', ['files','follow_links','recursive'], ImageFiles)
 8 tuple_regexp_select (ImageFiles, ['\\.(tif|tiff|gif|bmp|jpg|jpeg|jp2|png|pcx|pgm|ppm|pbm|xwd|ima|hobj)$','ignore_case'], ImageFiles)
 9
10 for Index := 1 to |ImageFiles| - 1 by 1
11     read_image (Image, ImageFiles[Index])
12     get_image_size (Image, Width, Height)
13     threshold (Image, Region, 0, 60)
14     fill_up (Region, RegionFillUp)
15     opening_circle (RegionFillUp, RegionOpening, 8.5)
16     smallest_circle (RegionOpening, Row0, Column0, Radius0)
17
18     *下面这个函数是自己写的抓圆的函数,细节不表。你也可以用fit_circle_contour_xld 和 gen_circle_contour_xld实现类似功能
19     find_circle (Image, PartCircleXLD, Regions, Cross, Circle, Row0, Column0, Radius0 + 10, 0, 360, 30, 70, 20, 1, 50, 'negative', 'first', 'inner', 10, 'circle', RowCenter, ColCenter, Radius)
20     dev_display (Image)
21     dev_display (Circle)
22
23     *该算子对一个图像的圆弧区域进行极坐标变换,圆弧外径是Radius,内径是Radius - 100,即圆弧厚度是100
24     *同理,圆弧展开成矩形后,矩形宽度应该是外弧圆圈的周长,即6.28319 * Radius(周长 = 2π × r) ;矩形高度应该是圆弧厚度,即100
25     polar_trans_image_ext (Image, PolarTransImage, RowCenter, ColCenter, 0, 6.28319, Radius - 100, Radius, 6.28319 * Radius, 100, 'nearest_neighbor')
26
27     *下面这句仅用于观察image的反向极坐标变换,生成的图片的宽高还是设置为最原始图像的Width, Height
28     polar_trans_image_inv  (PolarTransImage, XYTransImage, RowCenter, ColCenter, 0, 6.28319, Radius - 100, Radius, Width, Height, 'nearest_neighbor')
29
30     *mean_image选择主要沿水平方向进行模糊,动态阈值的'not_equal'参数同时筛选出了跟周围比过亮和过暗的区域(因为过暗和过亮都是缺陷)
31     mean_image (PolarTransImage, ImageMean, 500, 3)
32     dyn_threshold (PolarTransImage, ImageMean, Region1, 30, 'not_equal')
33
34     fill_up_shape (Region1, RegionFillUp1, 'area', 1, 100)
35     *开运算去掉细小干扰
36     opening_circle (RegionFillUp1, RegionOpening1, 1.5)
37     connection (RegionOpening1, ConnectedRegions)
38
39     *之所以要进行极坐标转换,就是为了这里用'height'来筛选,这是本例使用极坐标变换最关键的原因
40     select_shape (ConnectedRegions, SelectedRegions, 'height', 'and', 10, 99999)
41     polar_trans_region_inv (SelectedRegions, XYTransRegion, RowCenter, ColCenter, 0, 6.28319, Radius - 100, Radius, 6.28319 * Radius, 100, Width, Height, 'nearest_neighbor')
42     dev_display (Image)
43     dev_display (XYTransRegion)
44
45     stop ()
46 endfor
虽然极坐标变换是本例中的核心思路,但是仍有三句非常巧妙的代码,仔细想想为什么这三句代码很巧妙:

31     mean_image (PolarTransImage, ImageMean, 500, 3)
32     dyn_threshold (PolarTransImage, ImageMean, Region1, 30, 'not_equal')
40 select_shape (ConnectedRegions, SelectedRegions, 'height', 'and', 10, 99999)
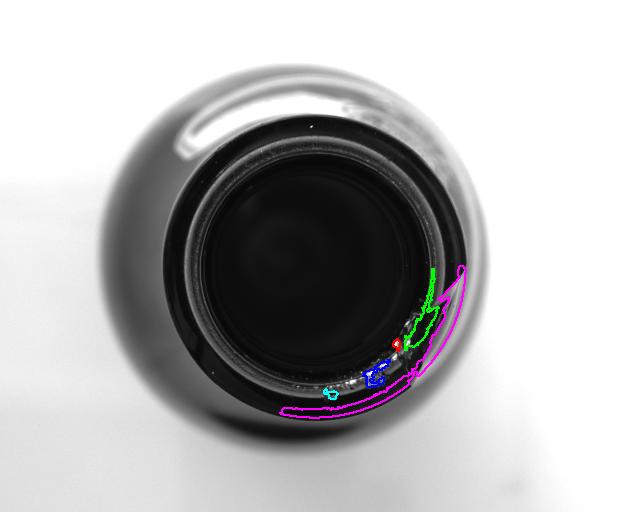
部分处理效果图如下: