版权声明:本文为博主原创文章,未经博主允许不得转载。 https://blog.csdn.net/HouszChina/article/details/85564025
环境:Ubuntu 16.04,Python 3,Tensoflow-gpu v1.9.0 ,CUDA 9.0
1. 张量(Tensor)
张量(tensor):多维数组(列表)
阶:张量的维数
例如:
| 阶 | 名称 | 例子 |
|---|---|---|
| 0 | 标量(scalar) | s = 123 |
| 1 | 向量(vector) | s = [1, 2, 3] |
| 2 | 矩阵(matrix) | s = [[1, 2, 3], [4, 5, 6]] |
| n | 张量(tensor) | t = [[[ … |
实例:张量的加法
实现两个张量a和b的加法:
import tensorflow as tf

# tf.constant()表示定义常量
a = tf.constant([1.0, 2.0])
b = tf.constant([3.0, 4.0])

result = a + b
print(result)
输出result:
Tensor("add:0", shape=(2,), dtype=float32)
各部分解释:
add:add节点0:第0个输出shape:维度2:一维数组的长度为2dtype=float32:数据类型为32位浮点数
2. 计算图(Graph)
上述代码描述的其实是一个计算过程,也称计算图。
运行结果是一个张量,并不实际运算其具体值。
计算图(Graph):搭建神经网络的计算过程,只搭建,不运算。
下图表示一个计算节点,节点中y = X1 * w1 + X2 * w2,w即是权重(weight)。
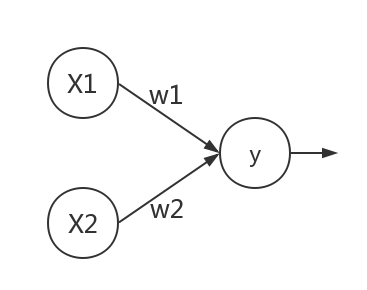
计算图就是承载一个或多个计算节点的计算过程。计算节点也正是神经元的基本抽象。
举例如下:
import tensorflow as tf

x = tf.constant([[1.0, 2.0]]) # 1行2列
w = tf.constant([[3.0], [4.0]]) # 2行1列

y = tf.matmul(x, w) # 矩阵乘法,结果为1行1列
print(y)
输出为一个1行1列的向量:
Tensor("MatMul:0", shape=(1, 1), dtype=float32)
3. 会话(Session)
想要得到运算结果,就要使用会话模块。
会话(Session):执行计算图中的节点运算。
基本用法:
with tf.Session() as sess:
    print sess.run(y)
计算上例中的节点y:
import tensorflow as tf

x = tf.constant([[1.0, 2.0]])
w = tf.constant([[3.0], [4.0]])

y = tf.matmul(x, w)
print(y)

with tf.Session() as sess:
    print sess.run(y)
结果:
Tensor("MatMul:0", shape=(1, 1), dtype=float32)
[[11.]]
P.S. 输出结果中会有几个warning,是因为运算加速指令没有开启。
可以暂时降低提示等级:在~/.bashrc尾部加入一句:export TF_CPP_MIN_LOG_LEVEL=2,然后终端source ~/.bashrc使配置生效。