关于Linux中 Wireguard客户端的介绍积极稀少,大多都是关于服务端的讲解!所以我现在用Ubuntu18.04的系统介绍一下Linux下Wireguard客户端的安装。
1、首先你要有个Linux的实例,虚拟机,工控机,Vps都行,
2、你还需要一个Wireguard的服务端,
说明一下以下操作设置只使用与Ubuntu18.04以上系统。
设置部分:
1、服务端略过。。。可参考,这篇文章:挖掘WireGuard的潜在功能及实际应用
2、客户端这里我已Ubuntu18.04为实例进行介绍,
2-1:、进去Wireguard官网的安装页面介绍:链接【需要FQ】 这里提一下Shadowsocks是无法访问这个页面的,打开后如下图:
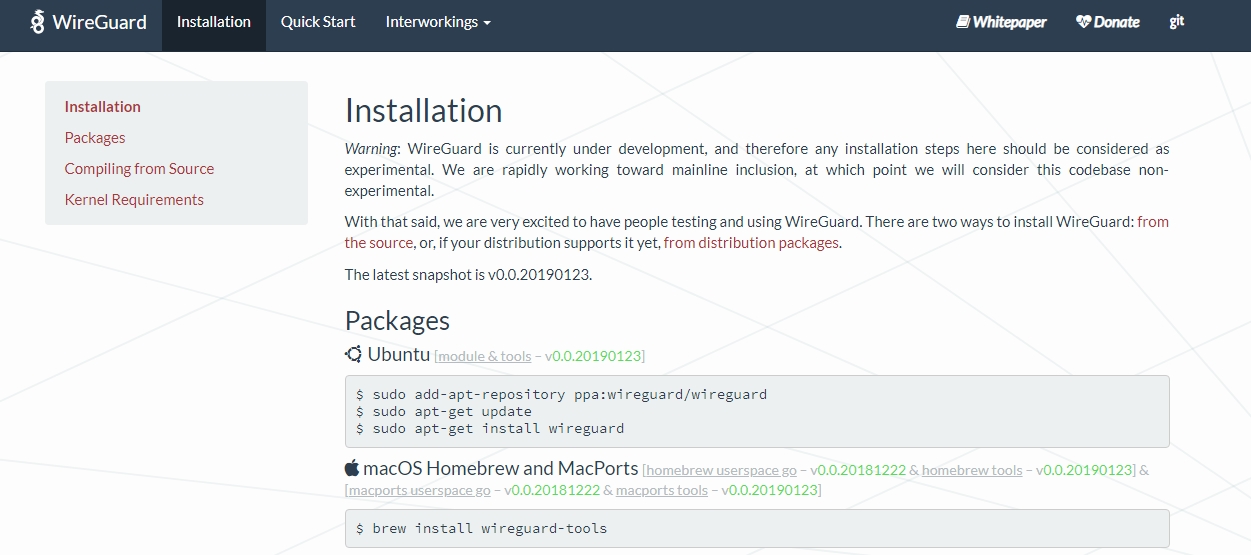
当然页面底下还有很多系统的应用链接及代码这里不一一展示
在这里我们可以看见Ubuntu的客户端写入代码,这里我们会用用到,这里我们点击Ubuntu 图标旁边的[module & tools -0.0.20190123]这个链接 进入后如下图

我们要用的安装代码基本都在这里了,网页链接:点击这里
2-2、这里要注意一下,如果你是新安装的系统或者是新的VPS实例,首先先要确认你的系统是否安装有PPA如果没有就要如图倒着往上以次执行命令。
2-2-1:、执行 命令结束后 如下:
1 root@test-server:/# sudo apt-get update
2 Hit:1 http://archive.ubuntu.com/ubuntu bionic InRelease
3 Get:2 http://archive.ubuntu.com/ubuntu bionic-updates InRelease [88.7 kB]
4 Get:3 http://archive.ubuntu.com/ubuntu bionic-backports InRelease [74.6 kB]
5 Get:4 http://archive.ubuntu.com/ubuntu bionic-security InRelease [88.7 kB]
6 Fetched 252 kB in 4s (69.4 kB/s)
7 Reading package lists... Done
8 root@test-server:/#
2-2-2、执行 命令 结束后 如下:
 1 root@test-server:/# sudo add-apt-repository ppa:wireguard/wireguard
 2  WireGuard is a novel VPN that runs inside the Linux Kernel. This is the Ubuntu packaging for WireGuard. More info may be found at its website, listed below.
 3
 4 More info: https://www.wireguard.com/
 5 Packages: wireguard wireguard-tools wireguard-dkms
 6
 7 Install with: $ apt install wireguard
 8
 9 For help, please contact <email address hidden>
10  More info: https://launchpad.net/~wireguard/+archive/ubuntu/wireguard
11 Press [ENTER] to continue or Ctrl-c to cancel adding it.
这里的第11条问你是否要安装还是结束,我们按回车继续安装。
2-2-3、执行 命令 结束后 如下:
 1 root@test-server:/# apt install wireguard
 2 Reading package lists... Done
 3 Building dependency tree
 4 Reading state information... Done
 5 The following additional packages will be installed:
 6   binutils binutils-common binutils-x86-64-linux-gnu build-essential cpp cpp-7 dkms dpkg-dev fakeroot g++ g++-7 gcc gcc-7 gcc-7-base gcc-8-base libalgorithm-diff-perl
 7   libalgorithm-diff-xs-perl libalgorithm-merge-perl libasan4 libatomic1 libbinutils libc-dev-bin libc6-dev libcc1-0 libcilkrts5 libdpkg-perl libfakeroot
 8   libfile-fcntllock-perl libgcc-7-dev libgcc1 libgomp1 libisl19 libitm1 liblsan0 libmpc3 libmpx2 libquadmath0 libstdc++-7-dev libstdc++6 libtsan0 libubsan0
 9   linux-libc-dev make manpages-dev wireguard-dkms wireguard-tools
10 Suggested packages:
11   binutils-doc cpp-doc gcc-7-locales menu debian-keyring g++-multilib g++-7-multilib gcc-7-doc libstdc++6-7-dbg gcc-multilib autoconf automake libtool flex bison gdb
12   gcc-doc gcc-7-multilib libgcc1-dbg libgomp1-dbg libitm1-dbg libatomic1-dbg libasan4-dbg liblsan0-dbg libtsan0-dbg libubsan0-dbg libcilkrts5-dbg libmpx2-dbg
13   libquadmath0-dbg glibc-doc bzr libstdc++-7-doc make-doc
14 The following NEW packages will be installed:
15   binutils binutils-common binutils-x86-64-linux-gnu build-essential cpp cpp-7 dkms dpkg-dev fakeroot g++ g++-7 gcc gcc-7 gcc-7-base libalgorithm-diff-perl
16   libalgorithm-diff-xs-perl libalgorithm-merge-perl libasan4 libatomic1 libbinutils libc-dev-bin libc6-dev libcc1-0 libcilkrts5 libdpkg-perl libfakeroot
17   libfile-fcntllock-perl libgcc-7-dev libgomp1 libisl19 libitm1 liblsan0 libmpc3 libmpx2 libquadmath0 libstdc++-7-dev libtsan0 libubsan0 linux-libc-dev make
18   manpages-dev wireguard wireguard-dkms wireguard-tools
19 The following packages will be upgraded:
20   gcc-8-base libgcc1 libstdc++6
21 3 upgraded, 44 newly installed, 0 to remove and 109 not upgraded.
22 Need to get 38.3 MB of archives.
23 After this operation, 166 MB of additional disk space will be used.
24 Do you want to continue? [Y/n]
这里的第24条问你是否继续安装,我们选择y 继续回车 这里安装需要一定的时间更具你客户端的配置网速而定。
安装完成接下来不急着测试,开始配置Wireguard客户端。
3、配置客户端文件,
3-1:进入Wireguard目录
1 cd /etc/wireguard/
进入后你会发现里面空无一物。这里我们要手动添加一个wg0.conf 的网卡配置文件,
1 vim /etc/wireguard/wg0.conf
进入后 根据自己服务器wireguad的配置情况来设置自己的客户端配置文件。
[Interface]
ListenPort = 1194 # 服务器端口号
PrivateKey = ewejWA3uAYAZc+TUvr6PcTA5SVQnt+aSVkdlZhlg1Hk= # 客户端私钥

[Peer]
PublicKey = awryxIgfp++iFBj6vmDr27tAXfgYsppn/wyUJRcFgUc= # 服务器公钥
AllowedIPs = 0.0.0.0/0 # 全局上网、所有网段
Endpoint = 12.34.56.78:1194 # 服务器IP及端口号
PersistentKeepalive = 25
这里要说一句,我在测试时发现Ubuntu的的客户端信息极少,它不需要MTU和IP及DNS的配置,当然DNS在系统中整体调整,稍后会提及。
4,、配置挂在虚拟网卡wg0,根据自己的VPS的配置逐条添加
1 sudo ip link add dev wg0 type wireguard # 挂载wg0虚拟网卡
2 sudo ip address add dev wg0 10.100.0.101/24 # Wireguard内网地址及网段
3 sudo ip link set wg0 up # 启动 wg0 网卡
4 sudo wg setconf wg0 /etc/wireguard/wg0.conf # wg0网卡配置信息链路
5 sudo ip route add 12.34.56.78 via 192.168.1.1 # 去VPS的路由信息
6 sudo ip route del default
7 sudo ip route add default dev wg0
完成以后可以用ping 试一下,
 1 ping 10.100.0.1
 2
 3 PING 10.100.0.1 (10.100.0.1) 56(84) bytes of data.
 4 64 bytes from 10.100.0.1: icmp_seq=1 ttl=44 time=103.50 ms
 5 64 bytes from 10.100.0.1: icmp_seq=2 ttl=44 time=103.50 ms
 6 64 bytes from 10.100.0.1: icmp_seq=3 ttl=44 time=103.50 ms
 7 64 bytes from 10.100.0.1: icmp_seq=4 ttl=44 time=103.50 ms
 8 64 bytes from 10.100.0.1: icmp_seq=5 ttl=44 time=103.50 ms
 9 64 bytes from 10.100.0.1: icmp_seq=6 ttl=44 time=103.50 ms
10 64 bytes from 10.100.0.1: icmp_seq=7 ttl=44 time=103.50 ms
11 64 bytes from 10.100.0.1: icmp_seq=8 ttl=44 time=103.50 ms
12 ^C
13 --- 10.100.0.1 ping statistics ---
14 8 packets transmitted, 8 received, 0% packet loss, time 828ms
15 rtt min/avg/max/mdev = 103.50/103.50/103.50/0.00 ms
如果通了即可,但DNS还未配置所以去GOOGLE或者Youtube是无法测试通的,
5、DNS的配置:
1 vim /etc/systemd/resolved.conf
进入DNS配置文件修改DNS选项将#符号删除
 1 #  This file is part of systemd.
 2 #
 3 #  systemd is free software; you can redistribute it and/or modify it
 4 #  under the terms of the GNU Lesser General Public License as published by
 5 #  the Free Software Foundation; either version 2.1 of the License, or
 6 #  (at your option) any later version.
 7 #
 8 # Entries in this file show the compile time defaults.
 9 # You can change settings by editing this file.
10 # Defaults can be restored by simply deleting this file.
11 #
12 # See resolved.conf(5) for details
13
14 [Resolve]
15 DNS=8.8.8.8
16 #FallbackDNS=
17 #Domains=
18 #LLMNR=no
19 #MulticastDNS=no
20 #DNSSEC=no
21 #Cache=yes
22 #DNSStubListener=yes
23 ~
24 ~
25 ~
26 ~
27 ~
28 ~
29 ~
30 ~
31 "/etc/systemd/resolved.conf" 22L, 607C
ESC 后wq保存,然后执行:
1 systemctl restart systemd-resolved.service
重启DNS之后,可以试着ping一下Google或者是YouTube 正确内容如下:
 1 root@test-server:/# ping www.google.com
 2 PING www.google.com (172.217.6.68) 56(84) bytes of data.
 3 64 bytes from sfo07s17-in-f68.1e100.net (172.217.6.68): icmp_seq=1 ttl=54 time=187 ms
 4 64 bytes from sfo07s17-in-f68.1e100.net (172.217.6.68): icmp_seq=2 ttl=54 time=186 ms
 5 64 bytes from sfo07s17-in-f68.1e100.net (172.217.6.68): icmp_seq=3 ttl=54 time=187 ms
 6 64 bytes from sfo07s17-in-f68.1e100.net (172.217.6.68): icmp_seq=4 ttl=54 time=186 ms
 7 64 bytes from sfo07s17-in-f68.1e100.net (172.217.6.68): icmp_seq=5 ttl=54 time=187 ms
 8 64 bytes from sfo07s17-in-f68.1e100.net (172.217.6.68): icmp_seq=6 ttl=54 time=186 ms
 9 64 bytes from sfo07s17-in-f68.1e100.net (172.217.6.68): icmp_seq=7 ttl=54 time=186 ms
10 ^C
11 --- www.google.com ping statistics ---
12 7 packets transmitted, 7 received, 0% packet loss, time 6011ms
13 rtt min/avg/max/mdev = 186.163/186.886/187.515/0.563 ms
14 root@test-server:/# ping www.youtube.com
15 PING youtube-ui.l.google.com (172.217.0.46) 56(84) bytes of data.
16 64 bytes from lga15s43-in-f46.1e100.net (172.217.0.46): icmp_seq=1 ttl=54 time=186 ms
17 64 bytes from lga15s43-in-f46.1e100.net (172.217.0.46): icmp_seq=2 ttl=54 time=187 ms
18 64 bytes from lga15s43-in-f46.1e100.net (172.217.0.46): icmp_seq=3 ttl=54 time=186 ms
19 64 bytes from lga15s43-in-f46.1e100.net (172.217.0.46): icmp_seq=4 ttl=54 time=186 ms
20 64 bytes from lga15s43-in-f46.1e100.net (172.217.0.46): icmp_seq=5 ttl=54 time=186 ms
21 64 bytes from lga15s43-in-f46.1e100.net (172.217.0.46): icmp_seq=6 ttl=54 time=186 ms
22 64 bytes from lga15s43-in-f46.1e100.net (172.217.0.46): icmp_seq=7 ttl=54 time=186 ms
23 64 bytes from lga15s43-in-f46.1e100.net (172.217.0.46): icmp_seq=8 ttl=54 time=187 ms
24 ^C
25 --- youtube-ui.l.google.com ping statistics ---
26 8 packets transmitted, 8 received, 0% packet loss, time 7012ms
27 rtt min/avg/max/mdev = 186.310/186.887/187.436/0.599 ms
28 root@test-server:/#
弄到这里基本就算是客户端安装完成!
由于是命令模式下的设置,所以它自己是无法彻底断开服务端的,需要断开时逐条输入以下命令字符
1 sudo ip link del dev wg0
2 sudo ip route del 12.34.56.78 via 192.168.1.1
3 sudo ip route del default
4 sudo ip route add default via 192.168.1.1
这样基本能和服务端彻底断开回到自己网络,别忘了DNS要重新设置回来,有可能8.8.8.8 时有无法连接的时候!
若有其他更为简便或者优化的方法请指正!