1. 路由参数
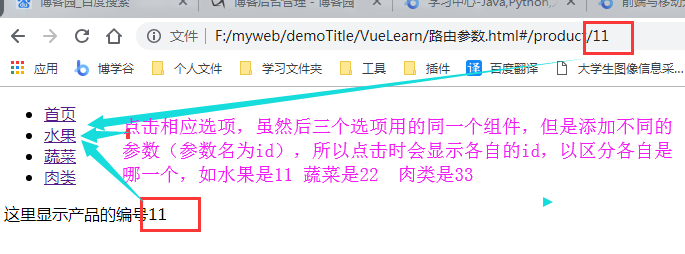
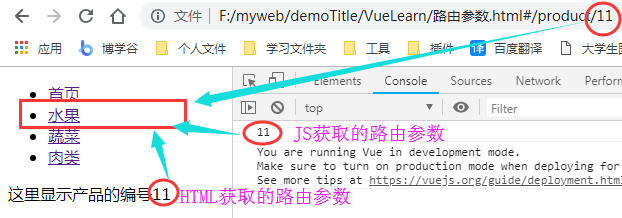
1.1 给路由添加参数的方法 :参数名 (方法名可以自定义)。
在HTML中获取路由的参数使用:$route.params.参数名;在JS中获取路由参数通过 this.$route.params.参数名
实例代码如下:
 1 <!DOCTYPE html>
 2 <html lang="en">
 3 <head>
 4   <meta charset="UTF-8">
 5   <meta name="viewport" content="width=device-width, initial-scale=1.0">
 6   <meta http-equiv="X-UA-Compatible" content="ie=edge">
 7   <title>路由初体验</title>
 8   <script src="./js/vue2.js"></script>
 9   <script src="./js/vue-router-3.0.1.js"></script>
10 </head>
11 <body>
12   <div id="app">
13     <ul>
14       <li><router-link to="/index">首页</router-link></li>
15       <!-- 1. 因为一下三个选项应用用一个组件product,为了便于区分,为每一项加一个参数,分别为 11 22 33 -->
16       <li><router-link to="/product/11">水果</router-link></li>
17       <li><router-link to="/product/22">蔬菜</router-link></li>
18       <li><router-link to="/product/33">肉类</router-link></li>
19     </ul>
20     <router-view></router-view>
21   </div>
22   <script>
23     var index = Vue.component('index', {
24       template: '<div>首页</div>'
25     })
26     var product = Vue.component('product', {   //3. 在HTML中获取路由的参数使用:$route.params.参数名
27       template: `
28         <div> 这里显示产品的编号{{$route.params.id}}</div>
29       `,
30       mounted(){
31         //4. 在JS中获取路由参数通过 this.$route.params.参数名
32         console.log(this.$route.params.id)
33       }
34     })
35     var router = new VueRouter({
36       routes: [
37         {name: 'index', path:'/index', component: index},
38         //2. 给路由添加参数的方法  :参数名(参数名可以自定义,此处定义为id)
39         {name: 'product', path:'/product/:id', component: product}
40       ]
41     })
42     var vm = new Vue({
43       el: '#app',
44       router: router,
45       data: {
46
47       }
48     })
49   </script>
50 </body>
51 </html>
1.2 页面效果:
1.3 添加和获取 路由参数
给路由添加参数的方法 :参数名
{name: 'product', path:'/product/:id', component: product}
在HTML中获取路由的参数使用:$route.params.参数名
      template: `
        <div> 这里显示产品的编号{{$route.params.id}}</div>
      `,
在JS中获取路由参数通过 this.$route.params.参数名
mounted(){
        //4. 在JS中获取路由参数通过 this.$route.params.参数名
        console.log(this.$route.params.id)
      }
获取参数页面:
2. 监听路由参数的变化
组件复用时,相对路由参数的变化做出相应的话,可以通过 watch (检测变化)$route 对象。
$route 对象有两个参数,to和 from,to表示将要去的路由对象 from表示从哪个路由对象来
实例代码:
watch: {
          // 这里的to表示将要去的路由对象  from表示从哪个路由对象来
        '$route'(to, from){
          console.log(to);
          console.log(from);
          if(to.params.id === '11'){
            this.allProducts = '苹果、香蕉、桃子。。。。。。'
          }else if (to.params.id === '22'){
            this.allProducts = '白菜、青椒、胡萝卜。。。。。。'
          }else {
            this.allProducts = '猪肉、羊肉、牛肉。。。。。。'
          }
        }
      }
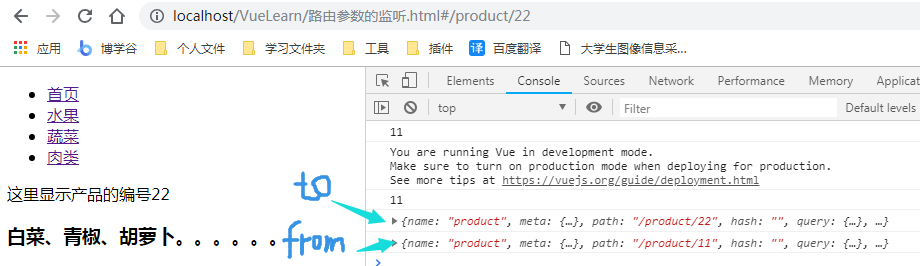
页面效果:
3. 嵌套路由和编程式导航
嵌套路由步骤: 1. 路由的嵌套通过 children 属性来创建,它也是一个数组,数组里面包含对象。每一个对象是一条路由规则
2. 创建子路由中的组件
3. 为创建好的子路由组件挖坑,使用router-view。 点击按钮显示router-view中的内容(编程式导航)
4. 通过$router来实现跳转,跳转到名为 name 值得路由规则的地方
示例如下:
 1 <!DOCTYPE html>
 2 <html lang="en">
 3 <head>
 4   <meta charset="UTF-8">
 5   <meta name="viewport" content="width=device-width, initial-scale=1.0">
 6   <meta http-equiv="X-UA-Compatible" content="ie=edge">
 7   <title>路由初体验</title>
 8   <script src="./js/vue2.js"></script>
 9   <script src="./js/vue-router-3.0.1.js"></script>
10 </head>
11 <body>
12   <div id="app">
13     <ul>
14       <li><router-link to="/index">首页</router-link></li>
15       <li><router-link to="/product/11">水果</router-link></li>
16       <li><router-link to="/product/22">蔬菜</router-link></li>
17       <li><router-link to="/product/33">肉类</router-link></li>
18     </ul>
19     <router-view></router-view>
20   </div>
21   <script>
22     var index = Vue.component('index', {
23       template: '<div>首页</div>'
24     })
25     //2. 创建子路由中的组件
26     var bookM = Vue.component('bookM', {
27       template: '<div>这里是详细的菜单,请查看</div>'
28     })
29     var product = Vue.component('product', {
30       //3. 为创建好的子路由组件挖坑,使用router-view。    点击按钮显示router-view中的内容(编程式导航)
31       template: `
32         <div>
33           这里显示产品的编号{{$route.params.id}}
34           <h3>{{allProducts}}<button @click="checkM">点击按钮查看</button></h3>
35           <router-view></router-view>
36         </div>
37       `,
38       data(){
39         return {
40           allProducts: ''
41         }
42       },
43       methods: {
44         checkM(){
45           //4. 通过$router来实现跳转,跳转到名为 name 值得路由规则的地方
46           this.$router.push({name: 'bookM'})
47         }
48       },
49       mounted(){
50         console.log(this.$route.params.id)
51       },
52       watch: {
53         '$route'(to, from){
54           console.log(to);
55           console.log(from);
56           if(to.params.id === '11'){
57             this.allProducts = '苹果、香蕉、桃子。。。。。。'
58           }else if (to.params.id === '22'){
59             this.allProducts = '白菜、青椒、胡萝卜。。。。。。'
60           }else {
61             this.allProducts = '猪肉、羊肉、牛肉。。。。。。'
62           }
63         }
64       }
65     })
66     var router = new VueRouter({
67       routes: [
68         {name: 'index', path:'/index', component: index},
69         //1. 路由的嵌套通过children属性来创建,它也是一个数组,数组里面包含对象。每一个对象是一条路由规则
70         {name: 'product', path:'/product/:id', component: product,
71           children: [  //注意:子路由的 path 中不能带有 /
72             {name: 'bookM', path: 'book_path', component: bookM}
73           ]
74         }
75       ]
76     })
77     var vm = new Vue({
78       el: '#app',
79       router: router,
80       data: {
81
82       }
83     })
84   </script>
85 </body>
86 </html>
页面显示:

4. 路由重定向
重定向也在 routes 配置中完成。通过 redirect 来实现。例如要重定向/a到/b:
var router = new VueRouter({
  routes: [
    { path: '/a', redirect: '/b' }
  ]
})
重定向也可以定位到命名路线:
var router = new VueRouter({
  routes: [
    { path: '/a', redirect: { name: 'foo' }}
  ]
})
甚至使用函数进行动态重定向:
var router = new VueRouter({
  routes: [
    { path: '/a', redirect: to => {
      // the function receives the target route as the argument
      // return redirect path/location here.
    }}
  ]
})
自己的示例:
 1 <!DOCTYPE html>
 2 <html lang="en">
 3 <head>
 4   <meta charset="UTF-8">
 5   <meta name="viewport" content="width=device-width, initial-scale=1.0">
 6   <meta http-equiv="X-UA-Compatible" content="ie=edge">
 7   <title>路由初体验</title>
 8   <script src="./js/vue2.js"></script>
 9   <script src="./js/vue-router-3.0.1.js"></script>
10 </head>
11 <body>
12   <div id="app">
13     <ul>
14       <li><router-link to="/index">首页</router-link></li>
15       <li><router-link to="/product/11">水果</router-link></li>
16       <li><router-link to="/product/22">蔬菜</router-link></li>
17       <li><router-link to="/product/33">肉类</router-link></li>
18     </ul>
19     <router-view></router-view>
20   </div>
21   <script>
22     var index = Vue.component('index', {
23       template: '<div>首页</div>'
24     })
25     var bookM = Vue.component('bookM', {
26       template: '<div>这里是详细的菜单,请查看</div>'
27     })
28     var product = Vue.component('product', {
29       template: `
30         <div>
31           这里显示产品的编号{{$route.params.id}}
32           <h3>{{allProducts}}<button @click="checkM">点击按钮查看</button></h3>
33           <router-view></router-view>
34         </div>
35       `,
36       data(){
37         return {
38           allProducts: ''
39         }
40       },
41       methods: {
42         checkM(){
43           this.$router.push({name: 'bookM'})
44         }
45       },
46       mounted(){
47         console.log(this.$route.params.id)
48       },
49       watch: {
50         '$route'(to, from){
51           console.log(to);
52           console.log(from);
53           if(to.params.id === '11'){
54             this.allProducts = '苹果、香蕉、桃子。。。。。。'
55           }else if (to.params.id === '22'){
56             this.allProducts = '白菜、青椒、胡萝卜。。。。。。'
57           }else {
58             this.allProducts = '猪肉、羊肉、牛肉。。。。。。'
59           }
60         }
61       }
62     })
63     var router = new VueRouter({
64       routes: [
65         {name: 'index', path:'/index', component: index},
66         {name: 'product', path:'/product/:id', component: product,
67           children: [
68             {name: 'bookM', path: 'book_path', component: bookM}
69           ]
70         },
71         //路由重定向  这里的 path: '*' 意思是除了上述定义的路径之外,输入任何其他的路径,都默认切换到index
72         {name: 'default', path: '*', redirect: '/index'}
73         // {name: 'default', path: '*', redirect: {name: '/index'}}  或者这种方法
74       ]
75     })
76     var vm = new Vue({
77       el: '#app',
78       router: router,
79       data: {
80
81       }
82     })
83   </script>
84 </body>
85 </html>
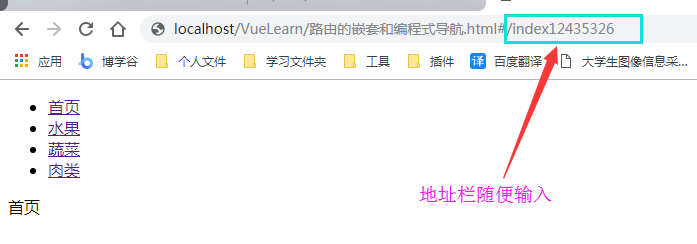
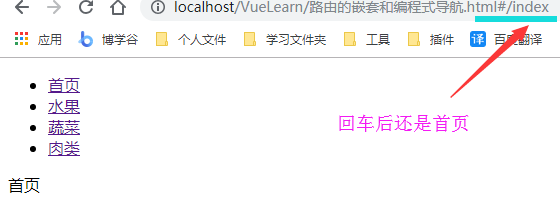
页面效果: 地址栏无论输入任何错误地址 都默认会首页页面 这就是重定向