首先让我想到的是spring的依赖注入,这里我们可以将yaml或者properties配置文件中的值注入到java bean中
配置文件
person:
    lastName: hello
    age: 18
    boss: false
    birth: 2017/12/12
    maps: {k1: v1,k2: 12}
    lists:
      - lisi
      - zhaoliu
    dog:
      name: 小狗
      age: 12
javaBean:
package com.atguigu.springboot.bean;


import org.hibernate.validator.constraints.Email;
import org.springframework.beans.factory.annotation.Value;
import org.springframework.boot.context.properties.ConfigurationProperties;
import org.springframework.context.annotation.PropertySource;
import org.springframework.stereotype.Component;
import org.springframework.validation.annotation.Validated;

import javax.validation.constraints.Null;
import java.util.Date;
import java.util.List;
import java.util.Map;


/**
 * 将配置文件中配置的每一个属性的值,映射到这个组件中
 * @ConfigurationProperties:告诉SpringBoot将本类中的所有属性和配置文件中相关的配置进行绑定;
 *      prefix = "person":配置文件中哪个下面的所有属性进行一一映射
 *
 * 只有这个组件是容器中的组件,才能容器提供的@ConfigurationProperties功能;
 *  @ConfigurationProperties(prefix = "person")默认从全局配置文件中获取值;
 *
 */
//@PropertySource(value = {"classpath:person.properties"})
@Component
@ConfigurationProperties(prefix = "person")
//@Validated
public class Person {

    /**
     * <bean class="Person">
     *      <property name="lastName" value="字面量/${key}从环境变量、配置文件中获取值/#{SpEL}"></property>
     * <bean/>
     */

   //lastName必须是邮箱格式
   // @Email
    //@Value("${person.last-name}")
    private String lastName;
    //@Value("#{11*2}")
    private Integer age;
    //@Value("true")
    private Boolean boss;

    private Date birth;
    //@Value("${person.maps}")
    private Map<String,Object> maps;
    private List<Object> lists;
    private Dog dog;

    @Override
    public String toString() {
        return "Person{" +
                "lastName='" + lastName + '\'' +
                ", age=" + age +
                ", boss=" + boss +
                ", birth=" + birth +
                ", maps=" + maps +
                ", lists=" + lists +
                ", dog=" + dog +
                '}';
    }

    public String getLastName() {
        return lastName;
    }

    public void setLastName(String lastName) {
        this.lastName = lastName;
    }

    public Integer getAge() {
        return age;
    }

    public void setAge(Integer age) {
        this.age = age;
    }

    public Boolean getBoss() {
        return boss;
    }

    public void setBoss(Boolean boss) {
        this.boss = boss;
    }

    public Date getBirth() {
        return birth;
    }

    public void setBirth(Date birth) {
        this.birth = birth;
    }

    public Map<String, Object> getMaps() {
        return maps;
    }

    public void setMaps(Map<String, Object> maps) {
        this.maps = maps;
    }

    public List<Object> getLists() {
        return lists;
    }

    public void setLists(List<Object> lists) {
        this.lists = lists;
    }

    public Dog getDog() {
        return dog;
    }

    public void setDog(Dog dog) {
        this.dog = dog;
    }
}
上面用到了两个注解@Component和@ConfigurationProperties
package com.atguigu.springboot.bean;

public class Dog {

    private String name;
    private Integer age;

    @Override
    public String toString() {
        return "Dog{" +
                "name='" + name + '\'' +
                ", age=" + age +
                '}';
    }

    public String getName() {
        return name;
    }

    public void setName(String name) {
        this.name = name;
    }

    public Integer getAge() {
        return age;
    }

    public void setAge(Integer age) {
        this.age = age;
    }
}
我们可以导入配置文件处理器,以后编写配置就有提示了
<!--导入配置文件处理器,配置文件进行绑定就会有提示-->
        <dependency>
            <groupId>org.springframework.boot</groupId>
            <artifactId>spring-boot-configuration-processor</artifactId>
            <optional>true</optional>
        </dependency>
运行springboot测试类
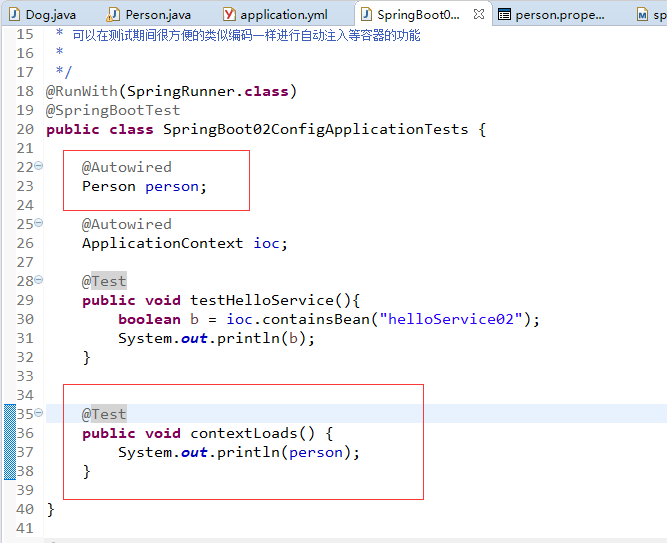


可见看到Person中的各种数据类型的值都获取到了