identiyt的使用可以看之前的文章:https://www.cnblogs.com/nsky/p/10323415.html
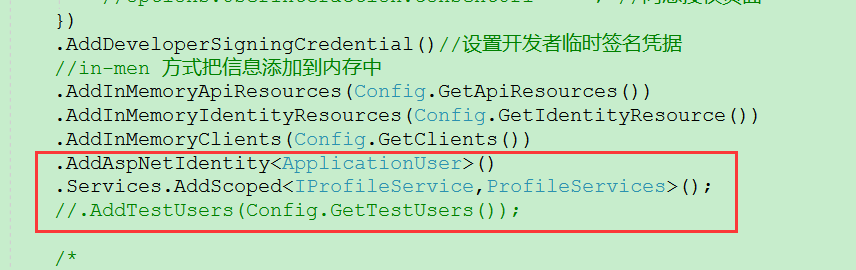
之前的ids4授权服务器都是用的in-men方式把数据添加到内存,
现在应该改成identity对接数据库操作,因为之前的代码有,就不一一创建了
nuget包:IdentityServer4.AspNetIdentity
那么之前的TestUser以及TestUserStore都要替换掉
AddAspNetIdentity<ApplicationUser>()
那么Profile是什么? Profile就是用户资料,ids 4里面定义了一个IProfileService的接口用来获取用户的一些信息,
主要是为当前的认证上下文绑定claims。我们可以实现IProfileService从外部创建claim扩展到ids4里面。
定义一个ProfileServices类继承IProfileService
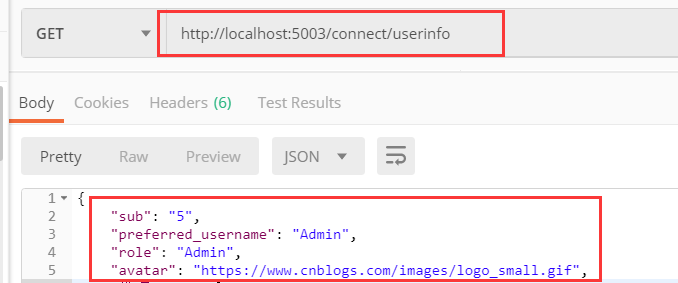
using AuthorizationServer.Models;
using IdentityModel;
using IdentityServer4.Models;
using IdentityServer4.Services;
using Microsoft.AspNetCore.Identity;
using System.Collections.Generic;
using System.Linq;
using System.Security.Claims;
using System.Threading.Tasks;

namespace AuthorizationServer.Services
{
    /// <summary>
    ///  Profile就是用户资料,ids 4里面定义了一个IProfileService的接口用来获取用户的一些信息
    ///  ,主要是为当前的认证上下文绑定claims。我们可以实现IProfileService从外部创建claim扩展到ids4里面。
    ///  然后返回
    /// </summary>
    public class ProfileServices : IProfileService
    {
        private readonly UserManager<ApplicationUser> _userManager;
        private readonly RoleManager<ApplicationRole> _roleManager;
        public ProfileServices(
            UserManager<ApplicationUser> userManager,
            RoleManager<ApplicationRole> roleManager)
        {
            _userManager = userManager;
            _roleManager = roleManager;
        }

        public async Task<List<Claim>> GetClaimsFromUserAsync(ApplicationUser user)
        {
            var claims = new List<Claim> {
                new Claim(JwtClaimTypes.Subject,user.Id.ToString()),
                new Claim(JwtClaimTypes.PreferredUserName,user.UserName)
            };

            var role = await _userManager.GetRolesAsync(user);
            role.ToList().ForEach(f =>
            {
                claims.Add(new Claim(JwtClaimTypes.Role, f));
            });

            if(!string.IsNullOrEmpty(user.Avatar))
            {
                claims.Add(new Claim("avatar", user.Avatar));
            }
            claims.Add(new Claim("姓名", "tom"));
            return claims;
        }

        /// <summary>
        /// 获取用户Claims
        /// 用户请求userinfo endpoint时会触发该方法
        /// http://localhost:5003/connect/userinfo
        /// </summary>
        /// <param name="context"></param>
        /// <returns></returns>
        public async Task GetProfileDataAsync(ProfileDataRequestContext context)
        {
            var subjectId = context.Subject.Claims.FirstOrDefault(c => c.Type == "sub").Value;
            var user = await _userManager.FindByIdAsync(subjectId);
            context.IssuedClaims =await GetClaimsFromUserAsync(user);
        }

        /// <summary>
        /// 判断用户是否可用
        /// Identity Server会确定用户是否有效
        /// </summary>
        /// <param name="context"></param>
        /// <returns></returns>
        public async Task IsActiveAsync(IsActiveContext context)
        {
            var subjectId = context.Subject.Claims.FirstOrDefault(c => c.Type == "sub").Value;
            var user = await _userManager.FindByIdAsync(subjectId);
            context.IsActive = user != null; //该用户是否已经激活,可用,否则不能接受token

            /*
             这样还应该判断用户是否已经锁定,那么应该IsActive=false
             */
        }
    }
}

ConfigureServices也要修改:
这样的话。配置基本上就完成了
接下来用Hybrid Flow实现试试
因为CodeIdToken 有2种方式返回profile
ResponseType改成 code id_token
options.ResponseType = OpenIdConnectResponseType.CodeIdToken;
//设置从UserInfoEndpoint获取claims信息
options.GetClaimsFromUserInfoEndpoint = true;
获取后映射到claims
options.GetClaimsFromUserInfoEndpoint = true;
options.ClaimActions.MapJsonKey("sub", "sub");
options.ClaimActions.MapJsonKey("preferred_username", "preferred_username");
options.ClaimActions.MapJsonKey("avatar", "avatar");
options.ClaimActions.MapCustomJson("role", job => job["role"].ToString());
这样会返回的access_token信息也包含了该信息,
但如果claims过大,那么access_token也会很大
授权成功了。在view页面
引入:@using Microsoft.AspNetCore.Authentication
并获取

这样就会有ProfileServices.cs类中获取的clsims了
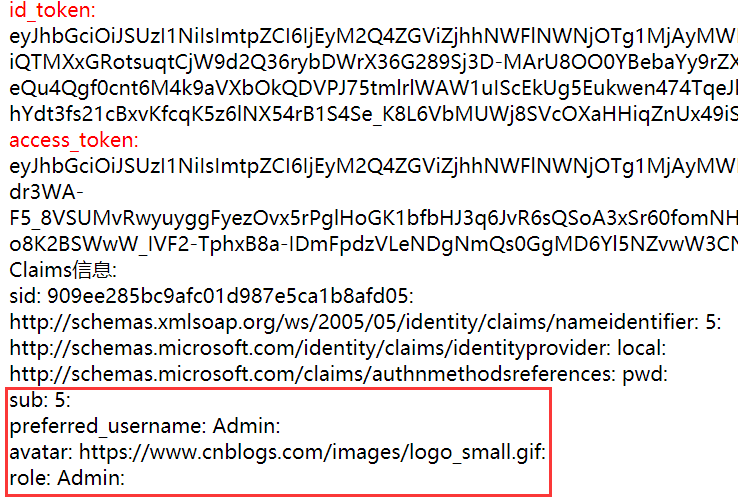
access_token中同样会有

id_token中是不会有的
上面说了,profile的cliams信息是通过access_token访问UserInfoEndpoint获取的
我们也可以通过postman试试
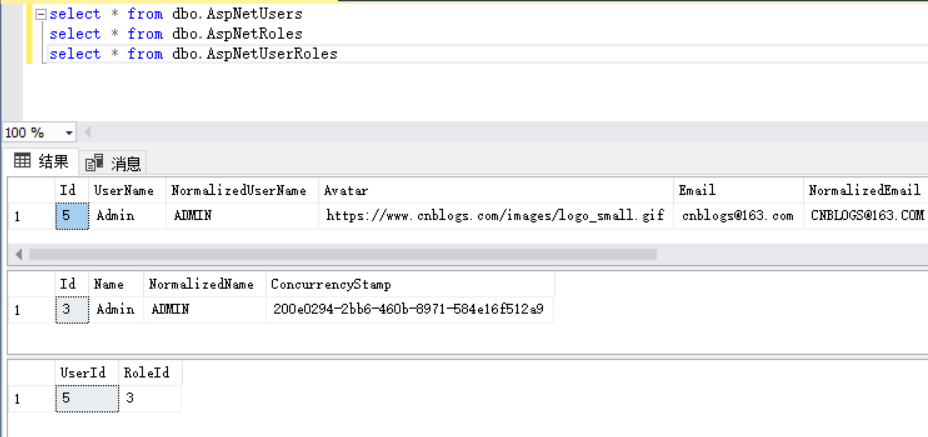
而这些信息都是从数据库读取出来的
如果不设置GetClaimsFromUserInfoEndpoint=true
它默认是false
那么我们想得到怎么办,
1:可以自己用access_token去获取一次
2:授权服务器client设置 AlwaysIncludeUserClaimsInIdToken=true
这样就会把返回的profile信息包含在idtoken中,好像idtoken也会有很大的可能
好了。试试效果,这样其实idtoken和access_token都返回了profile信息