有道云分享:《Service和Ingress》
一、Service的概念
Kubernetes Pod 是有生命周期的,它们可以被创建,也可以被销毁,然而一旦被销毁生命就永远结束。 通过 ReplicationController 能够动态地创建和销毁 Pod(例如,需要进行扩缩容,或者执行 滚动升级)。 每个 Pod 都会获取它自己的 IP 地址,即使这些 IP 地址不总是稳定可依赖的。 这会导致一个问题:在 Kubernetes 集群中,如果一组 Pod(称为 backend)为其它 Pod (称为 frontend)提供服务,那么那些 frontend 该如何发现,并连接到这组 Pod 中的哪些 backend 呢?
Kubernetes Service 定义了这样一种抽象:一个 Pod 的逻辑分组,一种可以访问它们的策略 —— 通常称为微服务。 这一组 Pod 能够被 Service 访问到,通常是通过 Label Selector(查看下面了解,为什么可能需要没有 selector 的 Service)实现的。
举个例子,考虑一个图片处理 backend,它运行了3个副本。这些副本是可互换的 —— frontend 不需要关心它们调用了哪个 backend 副本。 然而组成这一组 backend 程序的 Pod 实际上可能会发生变化,frontend 客户端不应该也没必要知道,而且也不需要跟踪这一组 backend 的状态。 Service 定义的抽象能够解耦这种关联。
对 Kubernetes 集群中的应用,Kubernetes 提供了简单的 Endpoints API,只要 Service 中的一组 Pod发生变更,应用程序就会被更新。 对非 Kubernetes 集群中的应用,Kubernetes 提供了基于 VIP 的网桥的方式访问 Service,再由 Service 重定向到 backend Pod。
二、Service的实现模型
在 Kubernetes 集群中,每个 Node 运行一个 kube-proxy 进程。kube-proxy 负责为 Service 实现了一种 VIP(虚拟 IP)的形式,而不是 ExternalName 的形式。 在 Kubernetes v1.0 版本,代理完全在 userspace。在 Kubernetes v1.1 版本,新增了 iptables 代理,但并不是默认的运行模式。 从 Kubernetes v1.2 起,默认就是 iptables 代理。在Kubernetes v1.8.0-beta.0中,添加了ipvs代理。在 Kubernetes v1.0 版本,Service 是 “4层”(TCP/UDP over IP)概念。 在 Kubernetes v1.1 版本,新增了 Ingress API(beta 版),用来表示 “7层”(HTTP)服务。
kube-proxy 这个组件始终监视着apiserver中有关service的变动信息,获取任何一个与service资源相关的变动状态,通过watch监视,一旦有service资源相关的变动和创建,kube-proxy都要转换为当前节点上的能够实现资源调度规则(例如:iptables、ipvs)

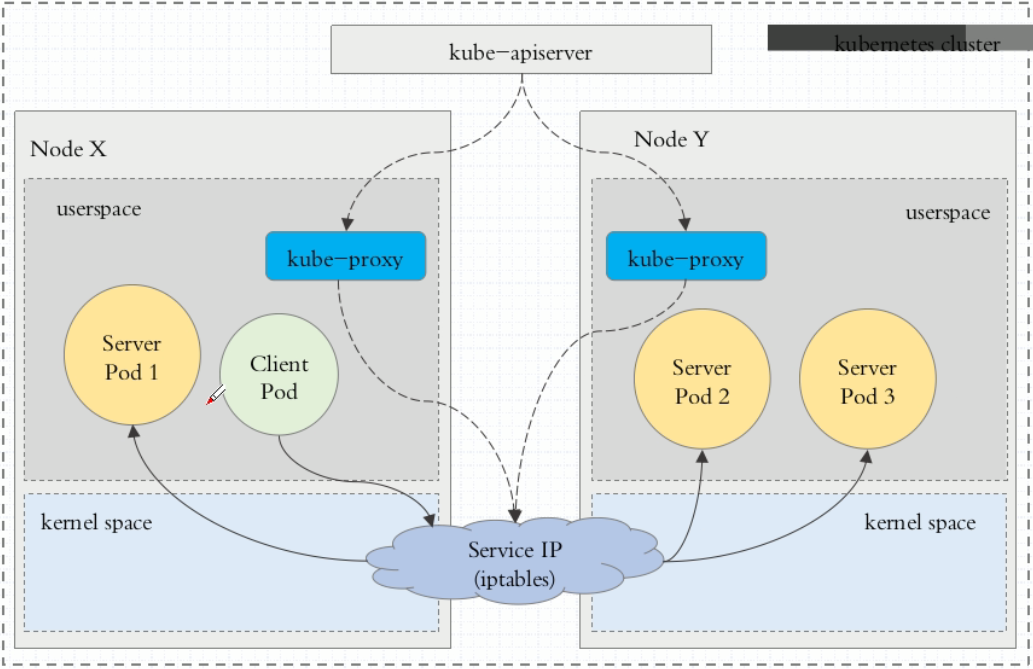
userspace代理模式
这种模式,当客户端Pod请求内核空间的service iptables后,把请求转到给用户空间监听的kube-proxy 的端口,由kube-proxy来处理后,再由kube-proxy将请求转给内核空间的 service ip,再由service iptalbes根据请求转给各节点中的的service pod。
由此可见这个模式有很大的问题,由客户端请求先进入内核空间的,又进去用户空间访问kube-proxy,由kube-proxy封装完成后再进去内核空间的iptables,再根据iptables的规则分发给各节点的用户空间的pod。这样流量从用户空间进出内核带来的性能损耗是不可接受的

iptables代理模式
客户端IP请求时,直接请求本地内核service ip,根据iptables的规则直接将请求转发到到各pod上,因为使用iptable NAT来完成转发,也存在不可忽视的性能损耗。另外,如果集群中存在上万的Service/Endpoint,那么Node上的iptables rules将会非常庞大,性能还会再打折扣。
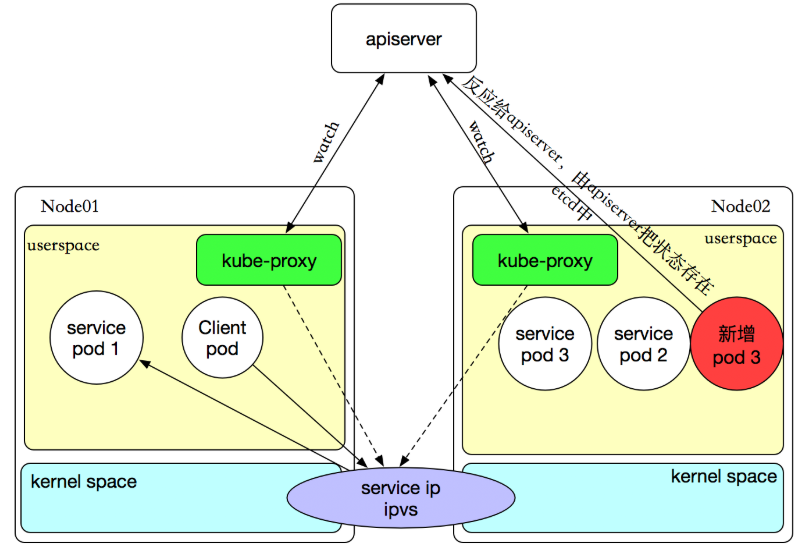
ipvs代理模式
客户端IP请求时到达内核空间时,根据ipvs的规则直接分发到各pod上。kube-proxy会监视Kubernetes Service对象和Endpoints,调用netlink接口以相应地创建ipvs规则并定期与Kubernetes Service对象和Endpoints对象同步ipvs规则,以确保ipvs状态与期望一致。访问服务时,流量将被重定向到其中一个后端Pod。
与iptables类似,ipvs基于netfilter 的 hook 功能,但使用哈希表作为底层数据结构并在内核空间中工作。这意味着ipvs可以更快地重定向流量,并且在同步代理规则时具有更好的性能。此外,ipvs为负载均衡算法提供了更多选项,例如:
- rr:
轮询调度 - lc:最小连接数
dh:目标哈希sh:源哈希sed:最短期望延迟nq:不排队调度
注意: ipvs模式假定在运行kube-proxy之前在节点上都已经安装了IPVS内核模块。当kube-proxy以ipvs代理模式启动时,kube-proxy将验证节点上是否安装了IPVS模块,如果未安装,则kube-proxy将回退到iptables代理模式。

如果某个服务后端pod发生变化,标签选择器适应的pod有多一个,适应的信息会立即反映到apiserver上,而kube-proxy一定可以watch到etc中的信息变化,而将它立即转为ipvs或者iptables中的规则,这一切都是动态和实时的,删除一个pod也是同样的原理。如图:
三、Service的定义
(1)清单创建Service
1 [root@k8s-master ~]# kubectl explain svc
 2 KIND:     Service
 3 VERSION:  v1
 4
 5 DESCRIPTION:
 6      Service is a named abstraction of software service (for example, mysql)
 7      consisting of local port (for example 3306) that the proxy listens on, and
 8      the selector that determines which pods will answer requests sent through
 9      the proxy.
10
11 FIELDS:
12    apiVersion    <string>
13      APIVersion defines the versioned schema of this representation of an
14      object. Servers should convert recognized schemas to the latest internal
15      value, and may reject unrecognized values. More info:
16      https://git.k8s.io/community/contributors/devel/api-conventions.md#resources
17
18    kind    <string>
19      Kind is a string value representing the REST resource this object
20      represents. Servers may infer this from the endpoint the client submits
21      requests to. Cannot be updated. In CamelCase. More info:
22      https://git.k8s.io/community/contributors/devel/api-conventions.md#types-kinds
23
24    metadata    <Object>
25      Standard object's metadata. More info:
26      https://git.k8s.io/community/contributors/devel/api-conventions.md#metadata
27
28    spec    <Object>
29      Spec defines the behavior of a service.
30      https://git.k8s.io/community/contributors/devel/api-conventions.md#spec-and-status
31
32    status    <Object>
33      Most recently observed status of the service. Populated by the system.
34      Read-only. More info:
35      https://git.k8s.io/community/contributors/devel/api-conventions.md#spec-and-status
其中重要的4个字段:
apiVersion:
kind:
metadata:
spec:
  clusterIP: 可以自定义,也可以动态分配
  ports:(与后端容器端口关联)
  selector:(关联到哪些pod资源上)
  type:服务类型
(2)service的类型
对一些应用(如 Frontend)的某些部分,可能希望通过外部(Kubernetes 集群外部)IP 地址暴露 Service。
Kubernetes ServiceTypes 允许指定一个需要的类型的 Service,默认是 ClusterIP 类型。
Type 的取值以及行为如下:
ClusterIP:通过集群的内部 IP 暴露服务,选择该值,服务只能够在集群内部可以访问,这也是默认的ServiceType。NodePort:通过每个 Node 上的 IP 和静态端口(NodePort)暴露服务。NodePort服务会路由到ClusterIP服务,这个ClusterIP服务会自动创建。通过请求<NodeIP>:<NodePort>,可以从集群的外部访问一个NodePort服务。LoadBalancer:使用云提供商的负载均衡器,可以向外部暴露服务。外部的负载均衡器可以路由到NodePort服务和ClusterIP服务。ExternalName:通过返回CNAME和它的值,可以将服务映射到externalName字段的内容(例如,foo.bar.example.com)。 没有任何类型代理被创建,这只有 Kubernetes 1.7 或更高版本的kube-dns才支持。
ClusterIP的service类型演示:
[root@k8s-master mainfests]# cat redis-svc.yaml
apiVersion: v1
kind: Service
metadata:
  name: redis
  namespace: default
spec:
  selector:  #标签选择器,必须指定pod资源本身的标签
    app: redis
    role: logstor
  type: ClusterIP  #指定服务类型为ClusterIP
  ports:   #指定端口
  - port: 6379  #暴露给服务的端口
  - targetPort: 6379  #容器的端口
[root@k8s-master mainfests]# kubectl apply -f redis-svc.yaml
service/redis created
[root@k8s-master mainfests]# kubectl get svc
NAME         TYPE        CLUSTER-IP       EXTERNAL-IP   PORT(S)    AGE
kubernetes   ClusterIP   10.96.0.1        <none>        443/TCP    36d
redis        ClusterIP   10.107.238.182   <none>        6379/TCP   1m

[root@k8s-master mainfests]# kubectl describe svc redis
Name:              redis
Namespace:         default
Labels:            <none>
Annotations:       kubectl.kubernetes.io/last-applied-configuration={"apiVersion":"v1","kind":"Service","metadata":{"annotations":{},"name":"redis","namespace":"default"},"spec":{"ports":[{"port":6379,"targetPort":6379}...
Selector:          app=redis,role=logstor
Type:              ClusterIP
IP:                10.107.238.182  #service ip
Port:              <unset>  6379/TCP
TargetPort:        6379/TCP
Endpoints:         10.244.1.16:6379  #此处的ip+端口就是pod的ip+端口
Session Affinity:  None
Events:            <none>

[root@k8s-master mainfests]# kubectl get pod redis-5b5d6fbbbd-v82pw -o wide
NAME                     READY     STATUS    RESTARTS   AGE       IP            NODE
redis-5b5d6fbbbd-v82pw   1/1       Running   0          20d       10.244.1.16   k8s-node01
从上演示可以总结出:service不会直接到pod,service是直接到endpoint资源,就是地址加端口,再由endpoint再关联到pod。
service只要创建完,就会在dns中添加一个资源记录进行解析,添加完成即可进行解析。资源记录的格式为:SVC_NAME.NS_NAME.DOMAIN.LTD.
默认的集群service 的A记录:svc.cluster.local.
redis服务创建的A记录:redis.default.svc.cluster.local.
NodePort的service类型演示:
[root@k8s-master mainfests]# kubectl get pods --show-labels |grep myapp-deploy
myapp-deploy-69b47bc96d-4hxxw   1/1       Running   0          12m       app=myapp,pod-template-hash=2560367528,release=canary
myapp-deploy-69b47bc96d-95bc4   1/1       Running   0          12m       app=myapp,pod-template-hash=2560367528,release=canary
myapp-deploy-69b47bc96d-hwbzt   1/1       Running   0          12m       app=myapp,pod-template-hash=2560367528,release=canary
myapp-deploy-69b47bc96d-pjv74   1/1       Running   0          12m       app=myapp,pod-template-hash=2560367528,release=canary
myapp-deploy-69b47bc96d-rf7bs   1/1       Running   0          12m       app=myapp,pod-template-hash=2560367528,release=canary

[root@k8s-master mainfests]# cat myapp-svc.yaml #为myapp创建service
apiVersion: v1
kind: Service
metadata:
  name: myapp
  namespace: default
spec:
  selector:
    app: myapp
    release: canary
  type: NodePort
  ports:
  - port: 80
    targetPort: 80
    nodePort: 30080
[root@k8s-master mainfests]# kubectl apply -f myapp-svc.yaml
service/myapp created
[root@k8s-master mainfests]# kubectl get svc
NAME         TYPE        CLUSTER-IP       EXTERNAL-IP   PORT(S)        AGE
kubernetes   ClusterIP   10.96.0.1        <none>        443/TCP        36d
myapp        NodePort    10.101.245.119   <none>        80:30080/TCP   5s
redis        ClusterIP   10.107.238.182   <none>        6379/TCP       28m

[root@k8s-master mainfests]# while true;do curl http://192.168.56.11:30080/hostname.html;sleep 1;done
myapp-deploy-69b47bc96d-95bc4
myapp-deploy-69b47bc96d-4hxxw
myapp-deploy-69b47bc96d-pjv74
myapp-deploy-69b47bc96d-rf7bs
myapp-deploy-69b47bc96d-95bc4
myapp-deploy-69b47bc96d-rf7bs
myapp-deploy-69b47bc96d-95bc4
myapp-deploy-69b47bc96d-pjv74
myapp-deploy-69b47bc96d-4hxxw
myapp-deploy-69b47bc96d-pjv74
myapp-deploy-69b47bc96d-pjv74
myapp-deploy-69b47bc96d-4hxxw
myapp-deploy-69b47bc96d-pjv74
myapp-deploy-69b47bc96d-pjv74
myapp-deploy-69b47bc96d-pjv74
myapp-deploy-69b47bc96d-95bc4
myapp-deploy-69b47bc96d-hwbzt

[root@k8s-master mainfests]# while true;do curl http://192.168.56.11:30080/;sleep 1;done
Hello MyApp | Version: v1 | <a href="hostname.html">Pod Name</a>
Hello MyApp | Version: v1 | <a href="hostname.html">Pod Name</a>
Hello MyApp | Version: v1 | <a href="hostname.html">Pod Name</a>
Hello MyApp | Version: v1 | <a href="hostname.html">Pod Name</a>
Hello MyApp | Version: v1 | <a href="hostname.html">Pod Name</a>
Hello MyApp | Version: v1 | <a href="hostname.html">Pod Name</a>
从以上例子,可以看到通过NodePort方式已经实现了从集群外部端口进行访问,访问链接如下:http://192.168.56.11:30080/
Pod的会话保持
[root@k8s-master mainfests]# kubectl explain svc.spec.sessionAffinity
KIND:     Service
VERSION:  v1

FIELD:    sessionAffinity <string>

DESCRIPTION:
     Supports "ClientIP" and "None". Used to maintain session affinity. Enable
     client IP based session affinity. Must be ClientIP or None. Defaults to
     None. More info:
     https://kubernetes.io/docs/concepts/services-networking/service/#virtual-ips-and-service-proxies
sessionAffinity支持ClientIP和None 两种方式,默认是None(随机调度) ClientIP是来自于同一个客户端的请求调度到同一个pod中
[root@k8s-master mainfests]# vim myapp-svc.yaml
apiVersion: v1
kind: Service
metadata:
  name: myapp
  namespace: default
spec:
  selector:
    app: myapp
    release: canary
  sessionAffinity: ClientIP
  type: NodePort
  ports:
  - port: 80
    targetPort: 80
    nodePort: 30080
[root@k8s-master mainfests]# kubectl apply -f myapp-svc.yaml
service/myapp configured
[root@k8s-master mainfests]# kubectl describe svc myapp
Name:                     myapp
Namespace:                default
Labels:                   <none>
Annotations:              kubectl.kubernetes.io/last-applied-configuration={"apiVersion":"v1","kind":"Service","metadata":{"annotations":{},"name":"myapp","namespace":"default"},"spec":{"ports":[{"nodePort":30080,"port":80,"ta...
Selector:                 app=myapp,release=canary
Type:                     NodePort
IP:                       10.101.245.119
Port:                     <unset>  80/TCP
TargetPort:               80/TCP
NodePort:                 <unset>  30080/TCP
Endpoints:                10.244.1.18:80,10.244.1.19:80,10.244.2.15:80 + 2 more...
Session Affinity:         ClientIP
External Traffic Policy:  Cluster
Events:                   <none>
[root@k8s-master mainfests]# while true;do curl http://192.168.56.11:30080/hostname.html;sleep 1;done
myapp-deploy-69b47bc96d-hwbzt
myapp-deploy-69b47bc96d-hwbzt
myapp-deploy-69b47bc96d-hwbzt
myapp-deploy-69b47bc96d-hwbzt
myapp-deploy-69b47bc96d-hwbzt
myapp-deploy-69b47bc96d-hwbzt
myapp-deploy-69b47bc96d-hwbzt
myapp-deploy-69b47bc96d-hwbzt
也可以使用打补丁的方式进行修改yaml内的内容,如下:
kubectl patch svc myapp -p '{"spec":{"sessionAffinity":"ClusterIP"}}'  #session保持,同一ip访问同一个pod

kubectl patch svc myapp -p '{"spec":{"sessionAffinity":"None"}}'    #取消session
四、Headless Service
有时不需要或不想要负载均衡,以及单独的 Service IP。 遇到这种情况,可以通过指定 Cluster IP(spec.clusterIP)的值为 "None" 来创建 Headless Service。
这个选项允许开发人员自由寻找他们自己的方式,从而降低与 Kubernetes 系统的耦合性。 应用仍然可以使用一种自注册的模式和适配器,对其它需要发现机制的系统能够很容易地基于这个 API 来构建。
对这类 Service 并不会分配 Cluster IP,kube-proxy 不会处理它们,而且平台也不会为它们进行负载均衡和路由。 DNS 如何实现自动配置,依赖于 Service 是否定义了 selector。
(1)编写headless service配置清单
[root@k8s-master mainfests]# cp myapp-svc.yaml myapp-svc-headless.yaml
[root@k8s-master mainfests]# vim myapp-svc-headless.yaml
apiVersion: v1
kind: Service
metadata:
  name: myapp-headless
  namespace: default
spec:
  selector:
    app: myapp
    release: canary
  clusterIP: "None"  #headless的clusterIP值为None
  ports:
  - port: 80
    targetPort: 80

(2)创建headless service
[root@k8s-master mainfests]# kubectl apply -f myapp-svc-headless.yaml
service/myapp-headless created
[root@k8s-master mainfests]# kubectl get svc
NAME             TYPE        CLUSTER-IP       EXTERNAL-IP   PORT(S)        AGE
kubernetes       ClusterIP   10.96.0.1        <none>        443/TCP        36d
myapp            NodePort    10.101.245.119   <none>        80:30080/TCP   1h
myapp-headless   ClusterIP   None             <none>        80/TCP         5s
redis            ClusterIP   10.107.238.182   <none>        6379/TCP       2h

(3)使用coredns进行解析验证
[root@k8s-master mainfests]# dig -t A myapp-headless.default.svc.cluster.local. @10.96.0.10

; <<>> DiG 9.9.4-RedHat-9.9.4-61.el7 <<>> -t A myapp-headless.default.svc.cluster.local. @10.96.0.10
;; global options: +cmd
;; Got answer:
;; ->>HEADER<<- opcode: QUERY, status: NOERROR, id: 62028
;; flags: qr aa rd ra; QUERY: 1, ANSWER: 5, AUTHORITY: 0, ADDITIONAL: 1

;; OPT PSEUDOSECTION:
; EDNS: version: 0, flags:; udp: 4096
;; QUESTION SECTION:
;myapp-headless.default.svc.cluster.local. IN A

;; ANSWER SECTION:
myapp-headless.default.svc.cluster.local. 5 IN A 10.244.1.18
myapp-headless.default.svc.cluster.local. 5 IN A 10.244.1.19
myapp-headless.default.svc.cluster.local. 5 IN A 10.244.2.15
myapp-headless.default.svc.cluster.local. 5 IN A 10.244.2.16
myapp-headless.default.svc.cluster.local. 5 IN A 10.244.2.17

;; Query time: 4 msec
;; SERVER: 10.96.0.10#53(10.96.0.10)
;; WHEN: Thu Sep 27 04:27:15 EDT 2018
;; MSG SIZE  rcvd: 349

[root@k8s-master mainfests]# kubectl get svc -n kube-system
NAME       TYPE        CLUSTER-IP   EXTERNAL-IP   PORT(S)         AGE
kube-dns   ClusterIP   10.96.0.10   <none>        53/UDP,53/TCP   36d

[root@k8s-master mainfests]# kubectl get pods -o wide -l app=myapp
NAME                            READY     STATUS    RESTARTS   AGE       IP            NODE
myapp-deploy-69b47bc96d-4hxxw   1/1       Running   0          1h        10.244.1.18   k8s-node01
myapp-deploy-69b47bc96d-95bc4   1/1       Running   0          1h        10.244.2.16   k8s-node02
myapp-deploy-69b47bc96d-hwbzt   1/1       Running   0          1h        10.244.1.19   k8s-node01
myapp-deploy-69b47bc96d-pjv74   1/1       Running   0          1h        10.244.2.15   k8s-node02
myapp-deploy-69b47bc96d-rf7bs   1/1       Running   0          1h        10.244.2.17   k8s-node02

(4)对比含有ClusterIP的service解析
[root@k8s-master mainfests]# dig -t A myapp.default.svc.cluster.local. @10.96.0.10

; <<>> DiG 9.9.4-RedHat-9.9.4-61.el7 <<>> -t A myapp.default.svc.cluster.local. @10.96.0.10
;; global options: +cmd
;; Got answer:
;; ->>HEADER<<- opcode: QUERY, status: NOERROR, id: 50445
;; flags: qr aa rd ra; QUERY: 1, ANSWER: 1, AUTHORITY: 0, ADDITIONAL: 1

;; OPT PSEUDOSECTION:
; EDNS: version: 0, flags:; udp: 4096
;; QUESTION SECTION:
;myapp.default.svc.cluster.local. IN    A

;; ANSWER SECTION:
myapp.default.svc.cluster.local. 5 IN    A    10.101.245.119

;; Query time: 1 msec
;; SERVER: 10.96.0.10#53(10.96.0.10)
;; WHEN: Thu Sep 27 04:31:16 EDT 2018
;; MSG SIZE  rcvd: 107

[root@k8s-master mainfests]# kubectl get svc
NAME             TYPE        CLUSTER-IP       EXTERNAL-IP   PORT(S)        AGE
kubernetes       ClusterIP   10.96.0.1        <none>        443/TCP        36d
myapp            NodePort    10.101.245.119   <none>        80:30080/TCP   1h
myapp-headless   ClusterIP   None             <none>        80/TCP         11m
redis            ClusterIP   10.107.238.182   <none>        6379/TCP       2h
从以上的演示可以看到对比普通的service和headless service,headless service做dns解析是直接解析到pod的,而servcie是解析到ClusterIP的,那么headless有什么用呢???这将在statefulset中应用到,这里暂时仅仅做了解什么是headless service和创建方法。
什么是Ingress?
从前面的学习,我们可以了解到Kubernetes暴露服务的方式目前只有三种:LoadBlancer Service、ExternalName、NodePort Service、Ingress;而我们需要将集群内服务提供外界访问就会产生以下几个问题:
1、Pod 漂移问题
Kubernetes 具有强大的副本控制能力,能保证在任意副本(Pod)挂掉时自动从其他机器启动一个新的,还可以动态扩容等,通俗地说,这个 Pod 可能在任何时刻出现在任何节点上,也可能在任何时刻死在任何节点上;那么自然随着 Pod 的创建和销毁,Pod IP 肯定会动态变化;那么如何把这个动态的 Pod IP 暴露出去?这里借助于 Kubernetes 的 Service 机制,Service 可以以标签的形式选定一组带有指定标签的 Pod,并监控和自动负载他们的 Pod IP,那么我们向外暴露只暴露 Service IP 就行了;这就是 NodePort 模式:即在每个节点上开起一个端口,然后转发到内部 Pod IP 上,如下图所示:
此时的访问方式:http://nodeip:nodeport/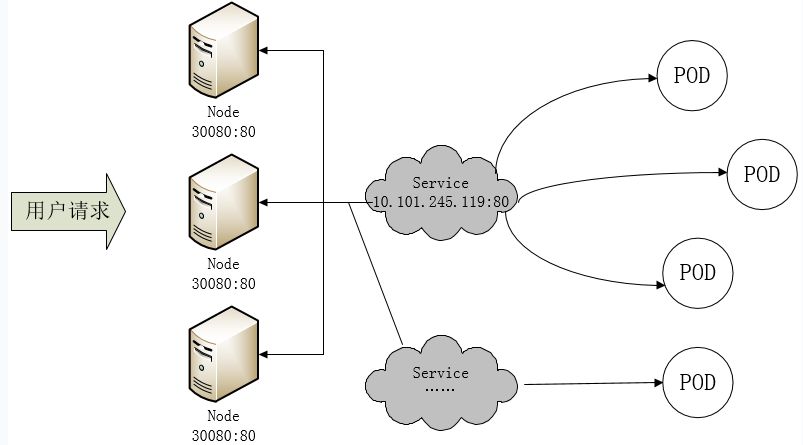
2、端口管理问题
采用 NodePort 方式暴露服务面临问题是,服务一旦多起来,NodePort 在每个节点上开启的端口会及其庞大,而且难以维护;这时,我们可以能否使用一个Nginx直接对内进行转发呢?众所周知的是,Pod与Pod之间是可以互相通信的,而Pod是可以共享宿主机的网络名称空间的,也就是说当在共享网络名称空间时,Pod上所监听的就是Node上的端口。那么这又该如何实现呢?简单的实现就是使用 DaemonSet 在每个 Node 上监听 80,然后写好规则,因为 Nginx 外面绑定了宿主机 80 端口(就像 NodePort),本身又在集群内,那么向后直接转发到相应 Service IP 就行了,如下图所示: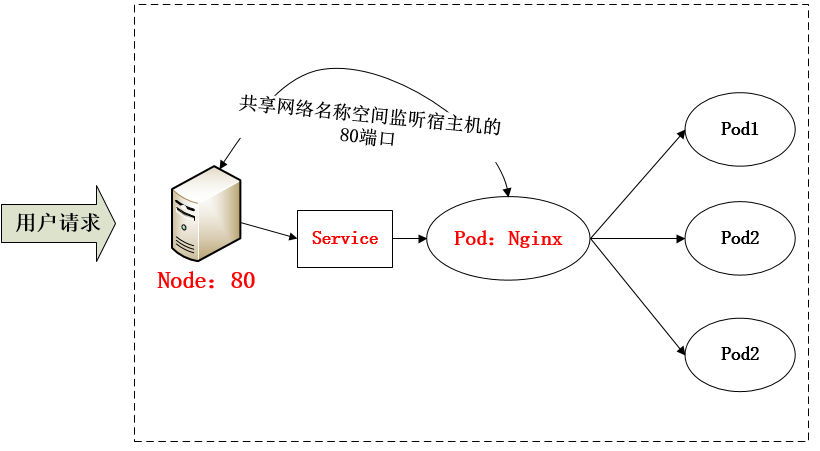
3、域名分配及动态更新问题
从上面的方法,采用 Nginx-Pod 似乎已经解决了问题,但是其实这里面有一个很大缺陷:当每次有新服务加入又该如何修改 Nginx 配置呢??我们知道使用Nginx可以通过虚拟主机域名进行区分不同的服务,而每个服务通过upstream进行定义不同的负载均衡池,再加上location进行负载均衡的反向代理,在日常使用中只需要修改nginx.conf即可实现,那在K8S中又该如何实现这种方式的调度呢???
假设后端的服务初始服务只有ecshop,后面增加了bbs和member服务,那么又该如何将这2个服务加入到Nginx-Pod进行调度呢?总不能每次手动改或者Rolling Update 前端 Nginx Pod 吧!!此时 Ingress 出现了,如果不算上面的Nginx,Ingress 包含两大组件:Ingress Controller 和 Ingress。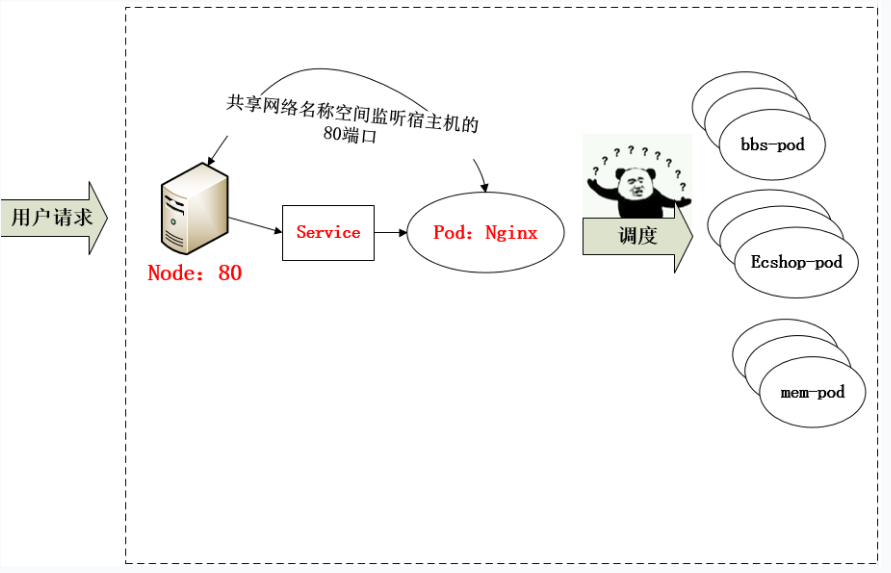
Ingress 简单的理解就是你原来需要改 Nginx 配置,然后配置各种域名对应哪个 Service,现在把这个动作抽象出来,变成一个 Ingress 对象,你可以用 yaml 创建,每次不要去改 Nginx 了,直接改 yaml 然后创建/更新就行了;那么问题来了:”Nginx 该怎么处理?”
Ingress Controller 这东西就是解决 “Nginx 的处理方式” 的;Ingress Controoler 通过与 Kubernetes API 交互,动态的去感知集群中 Ingress 规则变化,然后读取他,按照他自己模板生成一段 Nginx 配置,再写到 Nginx Pod 里,最后 reload 一下,工作流程如下图: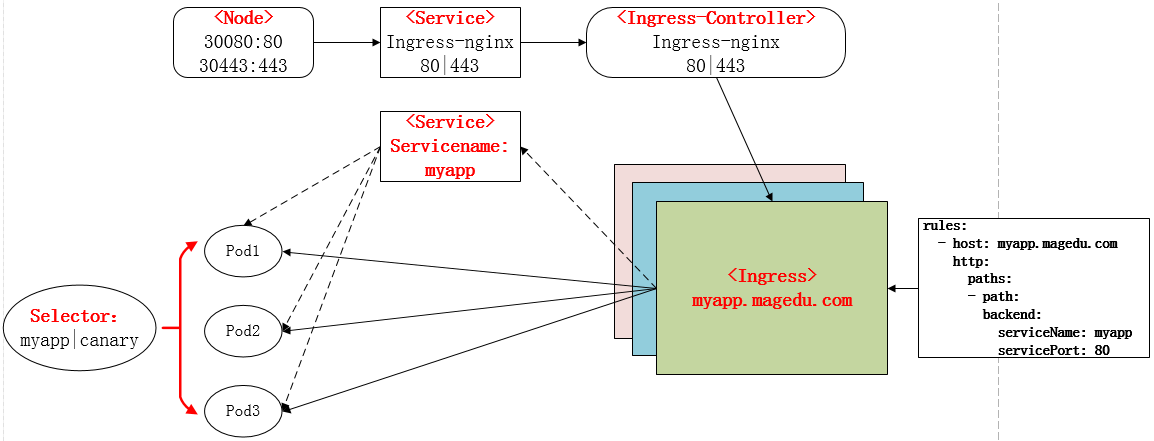
二、Ingress Nginx部署
使用Ingress功能步骤:
1、安装部署ingress controller Pod
2、部署后端服务
3、部署ingress-nginx service
4、部署ingress
从前面的描述我们知道,Ingress 可以使用 yaml 的方式进行创建,从而得知 Ingress 也是标准的 K8S 资源,其定义的方式,也可以使用 explain 进行查看:
[root@k8s-master ~]# kubectl explain ingress
KIND:     Ingress
VERSION:  extensions/v1beta1

DESCRIPTION:
     Ingress is a collection of rules that allow inbound connections to reach
     the endpoints defined by a backend. An Ingress can be configured to give
     services externally-reachable urls, load balance traffic, terminate SSL,
     offer name based virtual hosting etc.

FIELDS:
   apiVersion   <string>
     APIVersion defines the versioned schema of this representation of an
     object. Servers should convert recognized schemas to the latest internal
     value, and may reject unrecognized values. More info:
     https://git.k8s.io/community/contributors/devel/api-conventions.md#resources

   kind <string>
     Kind is a string value representing the REST resource this object
     represents. Servers may infer this from the endpoint the client submits
     requests to. Cannot be updated. In CamelCase. More info:
     https://git.k8s.io/community/contributors/devel/api-conventions.md#types-kinds

   metadata <Object>
     Standard object's metadata. More info:
     https://git.k8s.io/community/contributors/devel/api-conventions.md#metadata

   spec <Object>
     Spec is the desired state of the Ingress. More info:
     https://git.k8s.io/community/contributors/devel/api-conventions.md#spec-and-status

   status   <Object>
     Status is the current state of the Ingress. More info:
     https://git.k8s.io/community/contributors/devel/api-conventions.md#spec-and-status
1、部署Ingress controller
ingress-nginx在github上的地址
(1)下载ingress相关的yaml
[root@k8s-master ~]# mkdir ingress-nginx
[root@k8s-master ~]# cd ingress-nginx/
[root@k8s-master ingress-nginx]# for file in namespace.yaml configmap.yaml rbac.yaml tcp-services-configmap.yaml with-rbac.yaml udp-services-configmap.yaml default-backend.yaml;do wget https://raw.githubusercontent.com/kubernetes/ingress-nginx/master/deploy/$file;done
[root@k8s-master ingress-nginx]# ll
total 28
-rw-r--r-- 1 root root  199 Sep 29 22:45 configmap.yaml #configmap用于为nginx从外部注入配置的
-rw-r--r-- 1 root root 1583 Sep 29 22:45 default-backend.yaml   #配置默认后端服务
-rw-r--r-- 1 root root   69 Sep 29 22:45 namespace.yaml #创建独立的名称空间
-rw-r--r-- 1 root root 2866 Sep 29 22:45 rbac.yaml  #rbac用于集群角色授权
-rw-r--r-- 1 root root  192 Sep 29 22:45 tcp-services-configmap.yaml
-rw-r--r-- 1 root root  192 Sep 29 22:45 udp-services-configmap.yaml
-rw-r--r-- 1 root root 2409 Sep 29 22:45 with-rbac.yaml
(2)创建ingress-nginx名称空间
[root@k8s-master ingress-nginx]# cat namespace.yaml
apiVersion: v1
kind: Namespace
metadata:
  name: ingress-nginx

---
[root@k8s-master ingress-nginx]# kubectl apply -f namespace.yaml
namespace/ingress-nginx created
(3)创建ingress controller的pod
[root@k8s-master ingress-nginx]#  kubectl apply -f ./
configmap/nginx-configuration created
deployment.extensions/default-http-backend created
service/default-http-backend created
namespace/ingress-nginx configured
serviceaccount/nginx-ingress-serviceaccount created
clusterrole.rbac.authorization.k8s.io/nginx-ingress-clusterrole created
role.rbac.authorization.k8s.io/nginx-ingress-role created
rolebinding.rbac.authorization.k8s.io/nginx-ingress-role-nisa-binding created
clusterrolebinding.rbac.authorization.k8s.io/nginx-ingress-clusterrole-nisa-binding created
configmap/tcp-services created
configmap/udp-services created
deployment.extensions/nginx-ingress-controller created
[root@k8s-master ingress-nginx]# kubectl get pod -n ingress-nginx -w
NAME                                        READY     STATUS              RESTARTS   AGE
default-http-backend-7db7c45b69-gjrnl       0/1       ContainerCreating   0          35s
nginx-ingress-controller-6bd7c597cb-6pchv   0/1       ContainerCreating   0          34s
此处遇到一个问题,新版本的Kubernetes在安装部署中,需要从k8s.grc.io仓库中拉取所需镜像文件,但由于国内网络防火墙问题导致无法正常拉取。
docker.io仓库对google的容器做了镜像,可以通过下列命令下拉取相关镜像:
[root@k8s-node01 ~]# docker pull mirrorgooglecontainers/defaultbackend-amd64:1.5
1.5: Pulling from mirrorgooglecontainers/defaultbackend-amd64
9ecb1e82bb4a: Pull complete
Digest: sha256:d08e129315e2dd093abfc16283cee19eabc18ae6b7cb8c2e26cc26888c6fc56a
Status: Downloaded newer image for mirrorgooglecontainers/defaultbackend-amd64:1.5

[root@k8s-node01 ~]# docker tag mirrorgooglecontainers/defaultbackend-amd64:1.5 k8s.gcr.io/defaultbackend-amd64:1.5
[root@k8s-node01 ~]# docker image ls
REPOSITORY                                    TAG                 IMAGE ID            CREATED             SIZE
mirrorgooglecontainers/defaultbackend-amd64   1.5                 b5af743e5984        34 hours ago        5.13MB
k8s.gcr.io/defaultbackend-amd64               1.5                 b5af743e5984        34 hours ago        5.13MB
2、部署后端服务
(1)查看ingress的配置清单选项
[root@k8s-master ingress-nginx]# kubectl explain ingress.spec
KIND:     Ingress
VERSION:  extensions/v1beta1

RESOURCE: spec <Object>

DESCRIPTION:
     Spec is the desired state of the Ingress. More info:
     https://git.k8s.io/community/contributors/devel/api-conventions.md#spec-and-status

     IngressSpec describes the Ingress the user wishes to exist.

FIELDS:
   backend  <Object>     #定义后端有哪几个主机
     A default backend capable of servicing requests that don't match any rule.
     At least one of 'backend' or 'rules' must be specified. This field is
     optional to allow the loadbalancer controller or defaulting logic to
     specify a global default.

   rules    <[]Object>    #定义规则
     A list of host rules used to configure the Ingress. If unspecified, or no
     rule matches, all traffic is sent to the default backend.

   tls  <[]Object>
     TLS configuration. Currently the Ingress only supports a single TLS port,
     443. If multiple members of this list specify different hosts, they will be
     multiplexed on the same port according to the hostname specified through
     the SNI TLS extension, if the ingress controller fulfilling the ingress
     supports SNI.
(2)部署后端服务
[root@k8s-master ingress-nginx]# cd ../mainfests/
[root@k8s-master mainfests]# mkdir ingress && cd ingress
[root@k8s-master ingress]# cp ../deploy-demo.yaml .
[root@k8s-master ingress]# vim deploy-demo.yaml
#创建service为myapp
apiVersion: v1
kind: Service
metadata:
  name: myapp
  namespace: default
spec:
  selector:
    app: myapp
    release: canary
  ports:
  - name: http
    targetPort: 80
    port: 80
---
#创建后端服务的pod
apiVersion: apps/v1
kind: Deployment
metadata:
  name: myapp-backend-pod
  namespace: default
spec:
  replicas: 3
  selector:
    matchLabels:
      app: myapp
      release: canary
  template:
    metadata:
      labels:
        app: myapp
        release: canary
    spec:
      containers:
      - name: myapp
        image: ikubernetes/myapp:v2
        ports:
        - name: http
          containerPort: 80
[root@k8s-master ingress]# kubectl apply -f deploy-demo.yaml
service/myapp created
deployment.apps/myapp-backend-pod unchanged
(3)查看新建的后端服务pod
[root@k8s-master ingress]# kubectl get pods
NAME                                 READY     STATUS    RESTARTS   AGE
myapp-backend-pod-67f6f6b4dc-9jl9q   1/1       Running   0          7m
myapp-backend-pod-67f6f6b4dc-x5jsb   1/1       Running   0          7m
myapp-backend-pod-67f6f6b4dc-xzxbj   1/1       Running   0          7m
3、部署ingress-nginx service
通过ingress-controller对外提供服务,现在还需要手动给ingress-controller建立一个service,接收集群外部流量。方法如下:
(1)下载ingress-controller的yaml文件
[root@k8s-master ingress]# wget https://raw.githubusercontent.com/kubernetes/ingress-nginx/master/deploy/provider/baremetal/service-nodeport.yaml
[root@k8s-master ingress]# vim service-nodeport.yaml
apiVersion: v1
kind: Service
metadata:
  name: ingress-nginx
  namespace: ingress-nginx
  labels:
    app.kubernetes.io/name: ingress-nginx
    app.kubernetes.io/part-of: ingress-nginx
spec:
  type: NodePort
  ports:
    - name: http
      port: 80
      targetPort: 80
      protocol: TCP
      nodePort: 30080
    - name: https
      port: 443
      targetPort: 443
      protocol: TCP
      nodePort: 30443
  selector:
    app.kubernetes.io/name: ingress-nginx
    app.kubernetes.io/part-of: ingress-nginx

---
(2)创建ingress-controller的service,并测试访问
[root@k8s-master ingress]# kubectl apply -f service-nodeport.yaml
service/ingress-nginx created
[root@k8s-master ingress]# kubectl get svc -n ingress-nginx
NAME                   TYPE        CLUSTER-IP      EXTERNAL-IP   PORT(S)                      AGE
default-http-backend   ClusterIP   10.104.41.201   <none>        80/TCP                       45m
ingress-nginx          NodePort    10.96.135.79    <none>        80:30080/TCP,443:30443/TCP   11s
此时访问:192.168.56.12:30080
此时应该是404 ,调度器是正常工作的,但是后端服务没有关联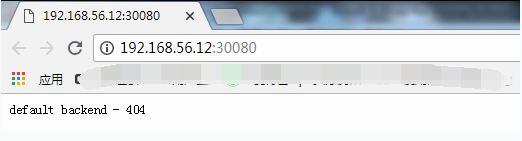
4、部署ingress
(1)编写ingress的配置清单
[root@k8s-master ingress]# vim ingress-myapp.yaml
apiVersion: extensions/v1beta1      #api版本
kind: Ingress       #清单类型
metadata:           #元数据
  name: ingress-myapp    #ingress的名称
  namespace: default     #所属名称空间
  annotations:           #注解信息
    kubernetes.io/ingress.class: "nginx"
spec:      #规格
  rules:   #定义后端转发的规则
  - host: myapp.magedu.com    #通过域名进行转发
    http:
      paths:
      - path:       #配置访问路径,如果通过url进行转发,需要修改;空默认为访问的路径为"/"
        backend:    #配置后端服务
          serviceName: myapp
          servicePort: 80
[root@k8s-master ingress]# kubectl apply -f ingress-myapp.yaml
[root@k8s-master ingress]# kubectl get ingress
NAME            HOSTS              ADDRESS   PORTS     AGE
ingress-myapp   myapp.magedu.com             80        46s
(2)查看ingress-myapp的详细信息
[root@k8s-master ingress]# kubectl describe ingress ingress-myapp
Name:             ingress-myapp
Namespace:        default
Address:
Default backend:  default-http-backend:80 (<none>)
Rules:
  Host              Path  Backends
  ----              ----  --------
  myapp.magedu.com
                       myapp:80 (<none>)
Annotations:
  kubectl.kubernetes.io/last-applied-configuration:  {"apiVersion":"extensions/v1beta1","kind":"Ingress","metadata":{"annotations":{"kubernetes.io/ingress.class":"nginx"},"name":"ingress-myapp","namespace":"default"},"spec":{"rules":[{"host":"myapp.magedu.com","http":{"paths":[{"backend":{"serviceName":"myapp","servicePort":80},"path":null}]}}]}}

  kubernetes.io/ingress.class:  nginx
Events:
  Type    Reason  Age   From                      Message
  ----    ------  ----  ----                      -------
  Normal  CREATE  1m    nginx-ingress-controller  Ingress default/ingress-myapp

[root@k8s-master ingress]# kubectl get pods -n ingress-nginx
NAME                                        READY     STATUS    RESTARTS   AGE
default-http-backend-7db7c45b69-fndwp       1/1       Running   0          31m
nginx-ingress-controller-6bd7c597cb-6pchv   1/1       Running   0          55m
(3)进入nginx-ingress-controller进行查看是否注入了nginx的配置
[root@k8s-master ingress]# kubectl exec -n ingress-nginx -it nginx-ingress-controller-6bd7c597cb-6pchv -- /bin/bash
www-data@nginx-ingress-controller-6bd7c597cb-6pchv:/etc/nginx$ cat nginx.conf
......
    ## start server myapp.magedu.com
    server {
        server_name myapp.magedu.com ;

        listen 80;

        set $proxy_upstream_name "-";

        location / {

            set $namespace      "default";
            set $ingress_name   "ingress-myapp";
            set $service_name   "myapp";
            set $service_port   "80";
            set $location_path  "/";

            rewrite_by_lua_block {

                balancer.rewrite()

            }

            log_by_lua_block {

                balancer.log()

                monitor.call()
            }
......
(4)修改本地host文件,进行访问
192.168.56.12 myapp.magedu.com
192.168.56.13 myapp.magedu.com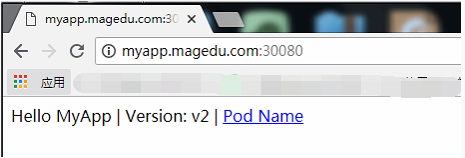
三、增加tomcat服务
(1)编写tomcat的配置清单文件
[root@k8s-master ingress]# cp deploy-demo.yaml tomcat-demo.yaml
[root@k8s-master ingress]# vim tomcat-demo.yaml
apiVersion: v1
kind: Service
metadata:
  name: tomcat
  namespace: default
spec:
  selector:
    app: tomcat
    release: canary
  ports:
  - name: http
    targetPort: 8080
    port: 8080
  - name: ajp
    targetPort: 8009
    port: 8009
---
apiVersion: apps/v1
kind: Deployment
metadata:
  name: tomcat-deploy
  namespace: default
spec:
  replicas: 3
  selector:
    matchLabels:
      app: tomcat
      release: canary
  template:
    metadata:
      labels:
        app: tomcat
        release: canary
    spec:
      containers:
      - name: tomcat
        image: tomcat:8.5.34-jre8-alpine
        #此镜像在dockerhub上进行下载,需要查看版本是否有变化,hub.docker.com
        ports:
        - name: http
          containerPort: 8080
          name: ajp
          containerPort: 8009
[root@k8s-master ingress]# kubectl get pods
NAME                                 READY     STATUS    RESTARTS   AGE
tomcat-deploy-6dd558cd64-b4xbm       1/1       Running   0          3m
tomcat-deploy-6dd558cd64-qtwpx       1/1       Running   0          3m
tomcat-deploy-6dd558cd64-w7f9s       1/1       Running   0          5m
(2)进入tomcat的pod中进行查看是否监听8080和8009端口,并查看tomcat的svc
[root@k8s-master ingress]# kubectl exec tomcat-deploy-6dd558cd64-b4xbm -- netstat -tnl
Active Internet connections (only servers)
Proto Recv-Q Send-Q Local Address           Foreign Address         State
tcp        0      0 127.0.0.1:8005          0.0.0.0:*               LISTEN
tcp        0      0 0.0.0.0:8009            0.0.0.0:*               LISTEN
tcp        0      0 0.0.0.0:8080            0.0.0.0:*               LISTEN

[root@k8s-master ingress]# kubectl get svc
NAME         TYPE        CLUSTER-IP       EXTERNAL-IP   PORT(S)             AGE
......
tomcat       ClusterIP   10.104.158.148   <none>        8080/TCP,8009/TCP   28m
(3)编写tomcat的ingress规则,并创建ingress资源
[root@k8s-master ingress]# cp ingress-myapp.yaml ingress-tomcat.yaml
[root@k8s-master ingress]# vim ingress-tomcat.yaml
apiVersion: extensions/v1beta1
kind: Ingress
metadata:
  name: tomcat
  namespace: default
  annotations:
    kubernetes.io/ingress.class: "nginx"
spec:
  rules:
  - host: tomcat.magedu.com    #主机域名
    http:
      paths:
      - path:
        backend:
          serviceName: tomcat
          servicePort: 8080
[root@k8s-master ingress]# kubectl apply -f ingress-tomcat.yaml
ingress.extensions/tomcat created
(4)查看ingress具体信息
[root@k8s-master ingress]# kubectl get ingress
NAME HOSTS ADDRESS PORTS AGE
ingress-myapp myapp.magedu.com 80 3h
tomcat tomcat.magedu.com 80 5s
[root@k8s-master ingress]# kubectl describe ingress
Name: ingress-myapp
Namespace: default
Address:
Default backend: default-http-backend:80 (<none>)
Rules:
Host Path Backends
---- ---- --------
myapp.magedu.com
myapp:80 (<none>)
Annotations:
kubectl.kubernetes.io/last-applied-configuration: {"apiVersion":"extensions/v1beta1","kind":"Ingress","metadata":{"annotations":{"kubernetes.io/ingress.class":"nginx"},"name":"ingress-myapp","namespace":"default"},"spec":{"rules":[{"host":"myapp.magedu.com","http":{"paths":[{"backend":{"serviceName":"myapp","servicePort":80},"path":null}]}}]}}
kubernetes.io/ingress.class: nginx
Events: <none>
Name: tomcat
Namespace: default
Address:
Default backend: default-http-backend:80 (<none>)
Rules:
Host Path Backends
---- ---- --------
tomcat.magedu.com
tomcat:8080 (<none>)
Annotations:
kubectl.kubernetes.io/last-applied-configuration: {"apiVersion":"extensions/v1beta1","kind":"Ingress","metadata":{"annotations":{"kubernetes.io/ingress.class":"nginx"},"name":"tomcat","namespace":"default"},"spec":{"rules":[{"host":"tomcat.magedu.com","http":{"paths":[{"backend":{"serviceName":"tomcat","servicePort":8080},"path":null}]}}]}}
kubernetes.io/ingress.class: nginx
Events:
Type Reason Age From Message
---- ------ ---- ---- -------
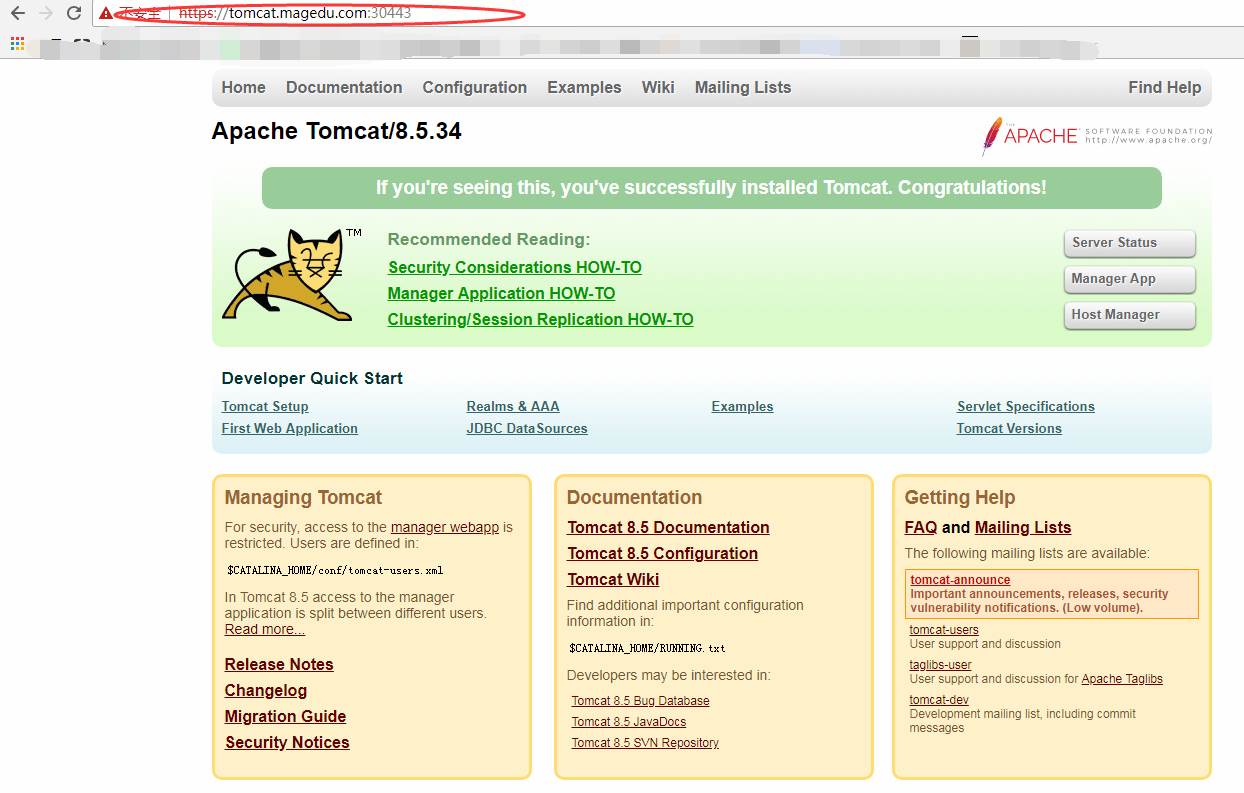
Normal CREATE 2m nginx-ingress-controller Ingress default/tomcat(5)测试访问:tomcat.mageud.com:30080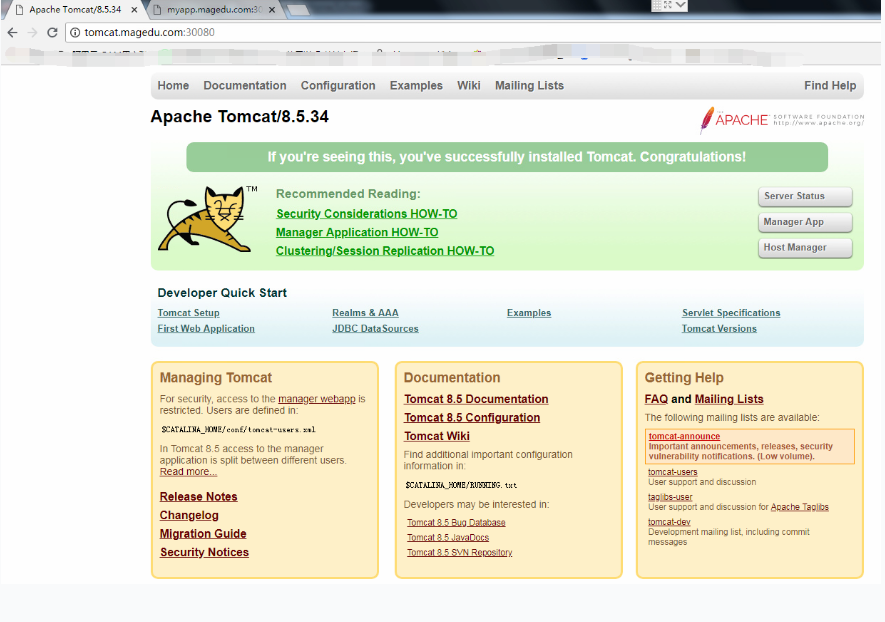
(6)总结
从前面的部署过程中,可以再次进行总结部署的流程如下:
①下载Ingress-controller相关的YAML文件,并给Ingress-controller创建独立的名称空间;
②部署后端的服务,如myapp,并通过service进行暴露;
③部署Ingress-controller的service,以实现接入集群外部流量;
④部署Ingress,进行定义规则,使Ingress-controller和后端服务的Pod组进行关联。
本次部署后的说明图如下: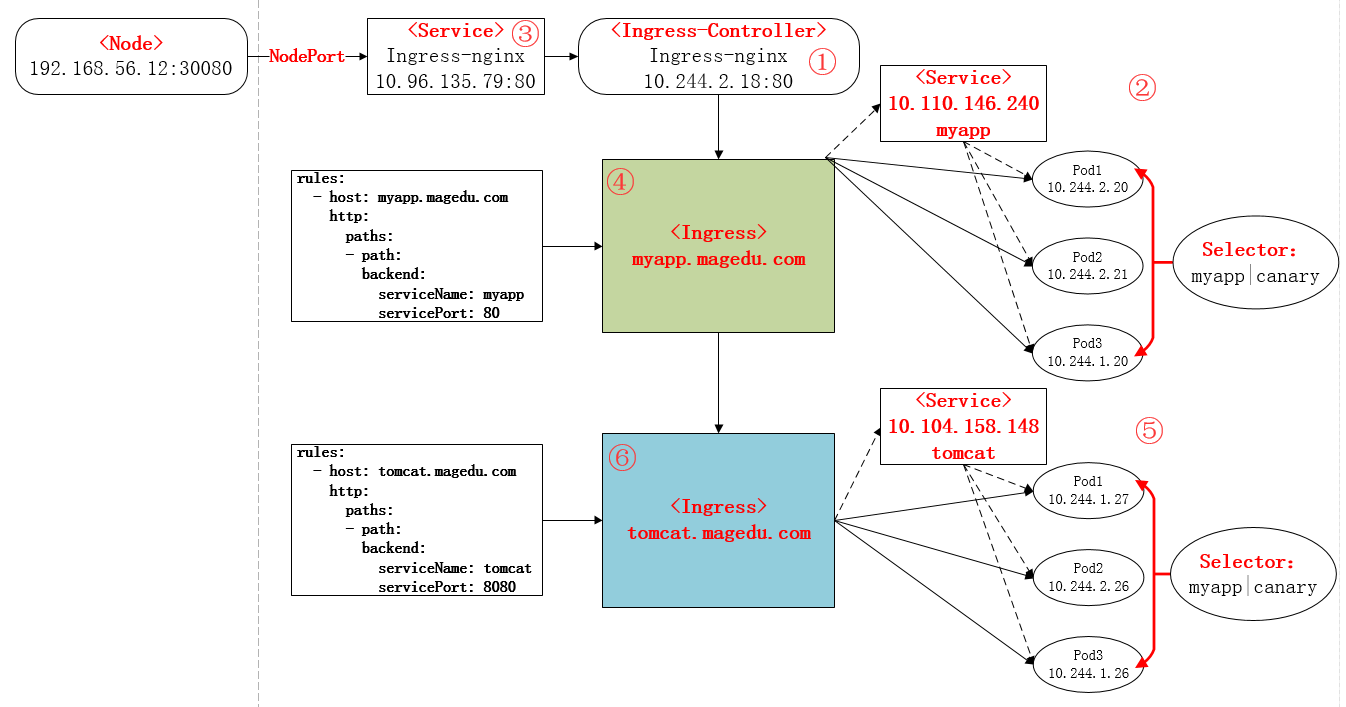
四、构建TLS站点
(1)准备证书
[root@k8s-master ingress]# openssl genrsa -out tls.key 2048
Generating RSA private key, 2048 bit long modulus
.......+++
.......................+++
e is 65537 (0x10001)

[root@k8s-master ingress]# openssl req -new -x509 -key tls.key -out tls.crt -subj /C=CN/ST=Beijing/L=Beijing/O=DevOps/CN=tomcat.magedu.com
(2)生成secret
[root@k8s-master ingress]# kubectl create secret tls tomcat-ingress-secret --cert=tls.crt --key=tls.key
secret/tomcat-ingress-secret created
[root@k8s-master ingress]# kubectl get secret
NAME                    TYPE                                  DATA      AGE
default-token-j5pf5     kubernetes.io/service-account-token   3         39d
tomcat-ingress-secret   kubernetes.io/tls                     2         9s
[root@k8s-master ingress]# kubectl describe secret tomcat-ingress-secret
Name:         tomcat-ingress-secret
Namespace:    default
Labels:       <none>
Annotations:  <none>

Type:  kubernetes.io/tls

Data
====
tls.crt:  1294 bytes
tls.key:  1679 bytes
(3)创建ingress
[root@k8s-master ingress]# kubectl explain ingress.spec
[root@k8s-master ingress]# kubectl explain ingress.spec.tls
[root@k8s-master ingress]# cp ingress-tomcat.yaml ingress-tomcat-tls.yaml
[root@k8s-master ingress]# vim ingress-tomcat-tls.yaml
apiVersion: extensions/v1beta1
kind: Ingress
metadata:
  name: ingress-tomcat-tls
  namespace: default
  annotations:
    kubernetes.io/ingress.class: "nginx"
spec:
  tls:
  - hosts:
    - tomcat.magedu.com
    secretName: tomcat-ingress-secret
  rules:
  - host: tomcat.magedu.com
    http:
      paths:
      - path:
        backend:
          serviceName: tomcat
          servicePort: 8080

[root@k8s-master ingress]# kubectl apply -f ingress-tomcat-tls.yaml
ingress.extensions/ingress-tomcat-tls created
[root@k8s-master ingress]# kubectl get ingress
NAME                 HOSTS               ADDRESS   PORTS     AGE
ingress-myapp        myapp.magedu.com              80        4h
ingress-tomcat-tls   tomcat.magedu.com             80, 443   5s
tomcat               tomcat.magedu.com             80        1h
[root@k8s-master ingress]# kubectl describe ingress ingress-tomcat-tls
Name:             ingress-tomcat-tls
Namespace:        default
Address:
Default backend:  default-http-backend:80 (<none>)
TLS:
  tomcat-ingress-secret terminates tomcat.magedu.com
Rules:
  Host               Path  Backends
  ----               ----  --------
  tomcat.magedu.com
                        tomcat:8080 (<none>)
Annotations:
  kubectl.kubernetes.io/last-applied-configuration:  {"apiVersion":"extensions/v1beta1","kind":"Ingress","metadata":{"annotations":{"kubernetes.io/ingress.class":"nginx"},"name":"ingress-tomcat-tls","namespace":"default"},"spec":{"rules":[{"host":"tomcat.magedu.com","http":{"paths":[{"backend":{"serviceName":"tomcat","servicePort":8080},"path":null}]}}],"tls":[{"hosts":["tomcat.magedu.com"],"secretName":"tomcat-ingress-secret"}]}}

  kubernetes.io/ingress.class:  nginx
Events:
  Type    Reason  Age   From                      Message
  ----    ------  ----  ----                      -------
  Normal  CREATE  20s   nginx-ingress-controller  Ingress default/ingress-tomcat-tls
(4)访问测试:https://tomcat.magedu.com:30443