先看效果:
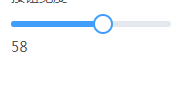
要想实现如上图的,进度跳效果,有两种方式,首先介绍第一种:
1、自己用 div 写一个,代码如下
<template>
    <div class="mfc-slider-runway" ref="runway">
        <div class="mfc-slider-bar" :style="{width:w}"></div>
        <div class="mfc-slider-button-wrap" :style="{left:w}"  ref="thumb">
            <div class="mfc-slider-button" ></div>
        </div>
    </div>
</template>
<script>
 export  default{
     props:{
         min:{  //最小值
             type:Number,
             default:0
         },
         max:{   //最大值
             type:Number,
             default:100
         },
         step:{      //每步的值为多少
             type:Number,
             default:1
         },
         value:{    // v-model  的初始值
             type:Number,
             default:0
         }
     },
     data(){
         return {
             startX:0,
             moveRun:false,
             maxWidth:0,
             left:0
         };
     },
     computed:{
       w(){
           if( this.maxWidth == 0){
                return 0;
           }
           var s =   ((this.value - this.step ) / (this.max - this.min))*this.maxWidth;  //上限
           var e = ((this.value + this.step ) / (this.max - this.min))*this.maxWidth;  //下限
           if(this.left < s || this.left > e){
               //说明value 的值,与 left 容差太大,需要调和,用于外部的 v-model 初始化
               this.left =  ( this.value / (this.max - this.min))*this.maxWidth;
           }
           return  (this.left / this.maxWidth)*100  + "%";
       }
     },

     mounted(){
         $(this.$refs.thumb).on("mousedown",this.mousedown.bind(this));
         $(window).on("mouseup",this.mouseup.bind(this));
         var maxWidth = $(this.$refs.runway).width();  //总共要走的 px 像素
         this.maxWidth =   maxWidth;
        //console.log(this.$refs.runway.offsetWidth)
     },
     methods:{
         mousedown(e){
             e.preventDefault();
             e.stopPropagation();
             this.startX =   e.clientX ;
             this.moveRun = true;
             $(window).on("mousemove",this.mousemove.bind(this))
         },
         mouseup(e){
             this.moveRun = false;
             $(window).off("mousemove",this.mousemove.bind(this))
         },
         mousemove(e){
             e.preventDefault();
             e.stopPropagation();
             if(this.moveRun){
                 var x = e.clientX;
                 var startX = this.startX;
                 this.slide(startX,x);
                 this.startX = x;
             }
         },
         slide(start,end){
             var miss = end - start;
             if(miss == 0){
                 return ;
             }
            var maxWidth = this.maxWidth;
             if(maxWidth == 0){
                return ;
             }
            var left = this.left;

            left = left + miss;
            if(left < 0){
                left = 0;
            }
            if(left >  maxWidth){
                left  = maxWidth;
            }

            this.left = left;
             //----根据  step 的大小,换算出最终的 value 值
             var value = (left / maxWidth) * (this.max - this.min) ;
             var v = Math.floor(value / this.step);
             value = v*this.step + Math.ceil(value  - v);
             this.$emit("input",value);
         }
     },
     destroyed(){
         $(this.$refs.thumb).off("mousedown",this.mousedown.bind(this));
         $(window).on("mouseup",this.mouseup.bind(this));
     }
 }
</script>
<style lang="less">
    div.mfc-slider-runway{
        width: 100%;
        height: 6px;
        margin: 10px 0;
        background-color: #e4e7ed;
        border-radius: 3px;
        position: relative;
        cursor: pointer;
        vertical-align: middle;
        div.mfc-slider-bar{
            height: 6px;
            background-color: #409eff;
            border-top-left-radius: 3px;
            border-bottom-left-radius: 3px;
            position: absolute;
            left: 0;
        }
        div.mfc-slider-button-wrap{
            height: 36px;
            width: 36px;
            text-align: center;
            position: absolute;
            z-index: 1001;
            top: -15px;
            transform: translateX(-50%) ;
            background-color: transparent;
            text-align: center;
            user-select: none;
            line-height: normal;
            div.mfc-slider-button{
                width: 16px;
                height: 16px;
                border: 2px solid #409eff;
                background-color: #fff;
                border-radius: 50%;
                transition: .2s;
                user-select: none;
                position: absolute;
                left: 0;
                right: 0;
                top:0;
                bottom: 0;
                margin: auto;
                &:hover{
                    transform: scale(1.2);
                    cursor: grab;
                 }
            }
        }

    }
</style>
使用:
   import rangeSlide from "./component/range-slide.vue";


                <range-slide v-model="test"></range-slide>
                <div>
                    {{test}}
                </div>
2、可以使用 input 的新属性 type=range , 然后通过css修改样式
css:
input[type=range] {
  box-sizing: border-box;
  -webkit-appearance: none;
  -moz-appearance: none;
  appearance: none;
  width: 100%;
  margin: 0;
  padding: 0 2px;
  /* Add some L/R padding to ensure box shadow of handle is shown */
  overflow: hidden;
  border: 0;
  border-radius: 1px;
  outline: none;
  background: -webkit-linear-gradient(#649efd, #649efd) no-repeat center;
  background: linear-gradient(#649efd, #649efd) no-repeat center;
  /* Use a linear gradient to generate only the 2px height background */
  background-size: 100% 2px;
  pointer-events: none;
  vertical-align: middle;
}
input[type=range]:active,
input[type=range]:focus {
  outline: none;
}
input[type=range]::-webkit-slider-thumb {
  height: 18px;
  width: 18px;
  border-radius: 18px;
  background-color: #fff;
  position: relative;
  margin: 5px 0;
  /* Add some margin to ensure box shadow is shown */
  cursor: pointer;
  -webkit-appearance: none;
  appearance: none;
  pointer-events: all;
  box-shadow: 0 1px 4px 0.5px rgba(0, 0, 0, 0.25);
}
input[type=range]::-webkit-slider-thumb::before {
  content: ' ';
  display: block;
  position: absolute;
  top: 13px;
  left: 100%;
  width: 2000px;
  height: 2px;
}
.multi-range {
  position: relative;
  height: 32px;
}
.multi-range input[type=range] {
  position: absolute;
}
.multi-range input[type=range]:nth-child(1)::-webkit-slider-thumb::before {
  background-color: red;
}
.multi-range input[type=range]:nth-child(2) {
  background: none;
}
.multi-range input[type=range]:nth-child(2)::-webkit-slider-thumb::before {
  background-color: grey;
}
使用:
              <div class="multi-range">
                  <input type="range">
              </div>
小结: 因为 input 的 range属性,兼容不是很好,所以,最好还是自己写,但是自己写会遇见很多坑,比如,value值和step的初始化设置,可能会将 value 设置为一个永远也取不到的值,比如 value初始化为 2 , step又为 5