update time :2019-1-24 author:要你命三千又三千 type :复习笔记摘录
文章目录
使用通知功能
使用场景:
某个应用程序希望向用户发出一些提示信息,而该应用程序又不在前台运行时,就可以借助通知来实现。
一般只有当程序进入到后台的时候我们才需要使用通知
使用实例
这里是sdk 28 的编译sdk ,使用sdk 28的模拟器来测试。
package com.example.administrator.notificationtest;

import android.app.Notification;
import android.app.NotificationChannel;
import android.app.NotificationManager;
import android.app.PendingIntent;
import android.content.Intent;
import android.os.Build;
import android.support.v4.app.NotificationCompat;
import android.support.v7.app.AppCompatActivity;
import android.os.Bundle;
import android.view.View;
import android.widget.Button;

/**
 * sdk 23以后的notification修改了原来notification使用方式。取消掉了setLatestEventInfo()方法
 * sdk 26 以后notification增加了channel来管理通知的行为
 */
public class MainActivity extends AppCompatActivity {
      private Button sendNotice;
    @Override
    protected void onCreate(Bundle savedInstanceState) {
        super.onCreate(savedInstanceState);
        setContentView(R.layout.activity_main);
       sendNotice=findViewById(R.id.send_notice)
               ;
       sendNotice.setOnClickListener(new View.OnClickListener() {
           @Override
           public void onClick(View v) {
               if (Build.VERSION.SDK_INT >26) {
                   /**
                    * channel 是一个通知行为的类别。在Manager 中添加或者创建类别。
                    */
                   NotificationChannel notificationChannel = new NotificationChannel("1", "notification", NotificationManager.IMPORTANCE_LOW);
                   notificationChannel.enableLights(true);//来通知时LED闪烁
                   notificationChannel.enableVibration(true);//来通知时震动
                   NotificationManager manager = (NotificationManager) getSystemService(NOTIFICATION_SERVICE);
                   manager.createNotificationChannel(notificationChannel);//添加channel
                   Intent intent=new Intent(MainActivity.this,Main2Activity.class);
                   PendingIntent pendingIntent=PendingIntent.getActivity(MainActivity.this,0,intent,PendingIntent.FLAG_CANCEL_CURRENT);

                   Notification.Builder builder = new Notification.Builder(MainActivity.this, "1")

                           .setTicker("this is a ticker ")  //当通知刚被创建的时
                           // 候,它会在系统的状态栏一闪而过,属于一种瞬时的提示信息
                           .setSmallIcon(R.drawable.ic_launcher_foreground)
                           .setContentTitle("small title")
                           .setContentText("just a small title")
                           .setContentIntent(pendingIntent)
                           .setWhen(System.currentTimeMillis());//通知的发送时间
                   Notification notification = builder.build();
                   manager.notify(1, notification);

               }else
               {
                    //sdk 低于26版本的Notification的创建,这里不一定对,使用NotificationCompat 来构建。
                   NotificationManager manager=(NotificationManager) getSystemService(NOTIFICATION_SERVICE);

                       Notification notification=new  NotificationCompat.Builder(MainActivity.this).setSmallIcon(R.drawable.ic_launcher_foreground)
                               .setContentText("just context")
                               .setTicker("this is a ticker")
                               .build();
                       manager.notify(1,notification);
               }
           }
       });
    }
}
问题:如何取消掉通知?
NotificationManager manager = (NotificationManager)
getSystemService(NOTIFICATION_SERVICE);
manager.cancel(1);//通知Id的取消
项目地址:https://github.com/Jfef/NotificationTest/tree/master
问题:如何接收和发送短信
原理:Android 还提供了一系列的 API,使得我们甚至可以在自己的应用程序里接收和发送短信。
一:如何接收短信
原理:当手机接收到一条短信的时候,系统会发出一条值为 android.provider.Telephony.SMS_RECEIVED 的广播,这条广播里携带着与短信相关的所有数据。每个应用程序都可以在广播接收器里对它进行监听,收到广
播时再从中解析出短信的内容即可。
关键字:接收广播,解析内容
举例:实现自定义一个广播接收器,接受 短信。
package com.example.administrator.smstest;

import android.app.Activity;
import android.content.BroadcastReceiver;
import android.content.Context;
import android.content.Intent;
import android.content.IntentFilter;
import android.support.v7.app.AppCompatActivity;
import android.os.Bundle;
import android.telephony.SmsMessage;
import android.util.Log;
import android.widget.TextView;

import org.w3c.dom.Text;

import java.util.logging.Logger;

public class MainActivity extends Activity {
 private TextView sender;
 private TextView content;
 private IntentFilter receiverFilter;
 private MessageReceiver messageReceiver;
    @Override
    protected void onCreate(Bundle savedInstanceState) {
        super.onCreate(savedInstanceState);
        setContentView(R.layout.activity_main);
        sender=findViewById(R.id.sender);
        content=findViewById(R.id.con);
          //动态注册广播接受器
        receiverFilter=new IntentFilter();
        receiverFilter.addAction("android.provider.Telephony.SMS_RECEIVED");
        messageReceiver=new MessageReceiver();
        registerReceiver(messageReceiver,receiverFilter);
    }
    class MessageReceiver extends BroadcastReceiver{
        @Override
        public void onReceive(Context context, Intent intent) {
            Bundle bundle=intent.getExtras();
            //intent 获取Bundle 数据对象
            Object[] pdus=(Object[]) bundle.get("pdus");//获取pdu的数组对象
            SmsMessage[] messages=new SmsMessage[pdus.length];
            for(int i=0;i<messages.length;i++)
                messages[i]=SmsMessage.createFromPdu((byte[])pdus[i]);//这里只有一个对象
            //每一个 pdu 字节数组转换为 SmsMessage 对象
      String address=messages[0].getOriginatingAddress();//发送信息的号码
      String fullMessage=messages[0].getMessageBody();//发送的信息

     /* int i=0;
      for (SmsMessage message:messages){
          i++;
          fullMessage+=message.getMessageBody();
          Log.d("Message", "onReceive: "+message.getMessageBody());

      }
            Log.d("i", "onReceive: i="+i);*/
      sender.setText(address);
      content.setText(fullMessage);
        }

    }

    @Override
    protected void onDestroy() {
        super.onDestroy();
        unregisterReceiver(messageReceiver);
    }
}
Android 3.2.1如何向模拟设备发送信息
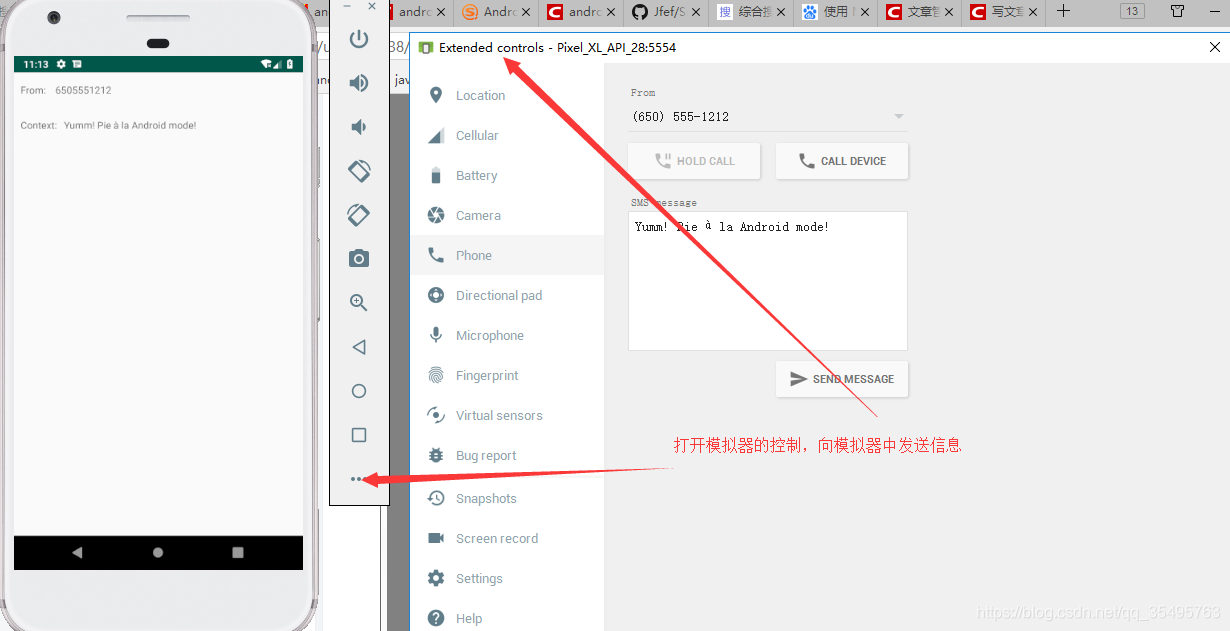
问题:实现发送信息的功能
package com.example.administrator.smstest;

import android.app.Activity;
import android.app.PendingIntent;
import android.content.BroadcastReceiver;
import android.content.Context;
import android.content.Intent;
import android.content.IntentFilter;
import android.support.v7.app.AppCompatActivity;
import android.os.Bundle;
import android.telephony.SmsManager;
import android.telephony.SmsMessage;
import android.util.Log;
import android.view.View;
import android.widget.Button;
import android.widget.EditText;
import android.widget.TextView;
import android.widget.Toast;

import org.w3c.dom.Text;

import java.util.ResourceBundle;
import java.util.logging.Logger;

public class MainActivity extends Activity {
 private TextView sender;
 private TextView content;
 private IntentFilter receiverFilter;
 private MessageReceiver messageReceiver;
 private EditText to;
 private EditText msginput;
 private Button send;
 private  IntentFilter sendFilter;
 private SendStatusReceiver sendStatusReceiver;
    @Override
    protected void onCreate(Bundle savedInstanceState) {
        super.onCreate(savedInstanceState);
        setContentView(R.layout.activity_main);
        sender=findViewById(R.id.sender);
        content=findViewById(R.id.con);
        //动态注册广播接受器
        receiverFilter=new IntentFilter();
        receiverFilter.addAction("android.provider.Telephony.SMS_RECEIVED");
        messageReceiver=new MessageReceiver();
        registerReceiver(messageReceiver,receiverFilter);
        /**
         * 建立广播接收器
         */
      sendFilter=new IntentFilter();
      sendFilter.addAction("SEND_SMS_ACTION");
      sendStatusReceiver=new SendStatusReceiver();
      registerReceiver(sendStatusReceiver,sendFilter);
      //实现广播的意图
      Intent sentIntent=new Intent("SEND_SMS_ACTION");
      //pendintIntent 可以理解为延迟的意图
      final PendingIntent pendingIntent=PendingIntent.getBroadcast(MainActivity.this,1,sentIntent,0
      );//延迟发送调用广播,同时这个广播带有sentIntent意图,然后由自己定义的广播接收器进行接收。

         //实现发送短信的功能
        to=findViewById(R.id.to);
        msginput=findViewById(R.id.msg_input);
        send=findViewById(R.id.send);
        send.setOnClickListener(new View.OnClickListener() {
            @Override
            public void onClick(View v) {
                /**
                 * 第一个参数用于指定接收人的手
                 * 机号码,第三个参数用于指定短信的内容,其他的几个参数我们暂时用不到,
                 */
                SmsManager smsManager=SmsManager.getDefault();
                smsManager.sendTextMessage(to.getText().toString(),
                        null,msginput.getText().toString(),pendingIntent
                        ,null
                );
            }
        });
    }

    /**
     * 广播接收器接受发送状态的广播
     */
    class   SendStatusReceiver extends BroadcastReceiver{
        @Override
        public void onReceive(Context context, Intent intent) {
            if (getResultCode()==RESULT_OK)
                Toast.makeText(context,"send Succeed",Toast.LENGTH_LONG).show();
            else
                Toast.makeText(context,"send failed ",Toast.LENGTH_LONG).show();
        }
    }
    class MessageReceiver extends BroadcastReceiver{
        @Override
        public void onReceive(Context context, Intent intent) {
            Bundle bundle=intent.getExtras();
            //intent 获取Bundle 数据对象
            Object[] pdus=(Object[]) bundle.get("pdus");//获取pdu的数组对象
            SmsMessage[] messages=new SmsMessage[pdus.length];
            for(int i=0;i<messages.length;i++)
                messages[i]=SmsMessage.createFromPdu((byte[])pdus[i]);//这里只有一个对象
            //每一个 pdu 字节数组转换为 SmsMessage 对象
          String address=messages[0].getOriginatingAddress();//发送信息的号码
         String fullMessage=messages[0].getMessageBody();//发送的信息
         sender.setText(address);
         content.setText(fullMessage);
        }

    }

    @Override
    protected void onDestroy() {
        super.onDestroy();
        unregisterReceiver(messageReceiver);
    }

}
<uses-permission android:name="android.permission.RECEIVE_SMS"/>
<uses-permission android:name="android.permission.SEND_SMS"/>
项目代码的位置:https://github.com/Jfef/SmsTeset
实现Android 调用系统的拍照功能和裁剪功能
package com.example.administrator.choosepictest;

import android.app.Activity;
import android.content.Intent;
import android.graphics.Bitmap;
import android.graphics.BitmapFactory;
import android.net.Uri;
import android.os.Bundle;
import android.os.Environment;
import android.os.StrictMode;
import android.provider.MediaStore;
import android.view.View;
import android.view.Window;
import android.widget.Button;
import android.widget.ImageView;
import java.io.File;
import java.io.FileNotFoundException;
import java.io.IOException;

public class MainActivity extends Activity {
 public  static final int TAKE_PHOTO=1;
    public  static final int CROP_PHOTO=2;
    private Button takePhoto;
    private ImageView picture;
    private Uri imageUri;

    @Override
    protected void onCreate(Bundle savedInstanceState) {
        super.onCreate(savedInstanceState);
        requestWindowFeature(Window.FEATURE_NO_TITLE);
        setContentView(R.layout.activity_main);

        /**
         * 以这种方式,VM会忽略文件URI曝光
         */
        StrictMode.VmPolicy.Builder builder = new StrictMode.VmPolicy.Builder();
        StrictMode.setVmPolicy(builder.build());


        takePhoto=findViewById(R.id.take_photo);
        picture=findViewById(R.id.Picture);
        takePhoto.setOnClickListener(new View.OnClickListener() {
            @Override
            public void onClick(View v) {
                //File(File parent, String child)
                //          根据 parent 抽象路径名和 child 路径名字符串创建一个新 File 实例
                File outputImage=new File(Environment.getExternalStorageDirectory(),"TempImage.jpg");
                if (outputImage.exists()) {
                    outputImage.delete();
                }

                try {
                    outputImage.createNewFile();
                } catch (IOException e) {
                    e.printStackTrace();
            }
                //调用 Uri 的
                //fromFile()方法将 File 对象转换成 Uri 对象
                //这个 Uri 对象标识着 output_image.jpg 这张图片
                //的唯一地址。
              imageUri =Uri.fromFile(outputImage);

                Intent intent=new Intent("android.media.action.IMAGE_CAPTURE");
                intent.putExtra(MediaStore.EXTRA_OUTPUT,imageUri);
                //Intent 的 putExtra()方法指定图片的输出地址
                startActivityForResult(intent,TAKE_PHOTO);

            }
        });
    }

    @Override
    protected void onActivityResult(int requestCode, int resultCode, Intent data) {
        switch (requestCode) {
            case TAKE_PHOTO:
                if (resultCode == RESULT_OK) {
                    //调用系统的图片裁剪功能
                    Intent intent = new Intent("com.android.camera.action.CROP");
                    intent.setDataAndType(imageUri, "image/*");
                    intent.putExtra("scale", true);
                    intent.putExtra(MediaStore.EXTRA_OUTPUT, imageUri);
                    //输出路径
                    startActivityForResult(intent, CROP_PHOTO);

                }
                break;
            case CROP_PHOTO:
                if (resultCode == RESULT_OK) {
                    Bitmap bitmap = null;
                    try {
                        bitmap = BitmapFactory.decodeStream(getContentResolver()
                                .openInputStream(imageUri)); //按照路径解析图片成BItmap对象
                    } catch (FileNotFoundException e) {
                        e.printStackTrace();
                    }
                    picture.setImageBitmap(bitmap); //添加到picture 中
                }
                break;
            default:
                break;
        }
        }
    }
项目的位置:https://github.com/Jfef/ChoosePicTest
实现播放音乐和视频的功能
实现播放音频
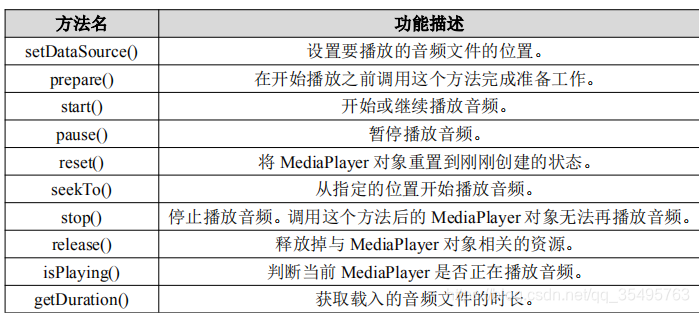
用 MediaPlayer 类来实现的,它对多种格式的音频文件提供了非常全面的控制方法,从而使得播放音乐的工作变得十分简单。
常用方法的使用
实例
package com.example.administrator.playaudiotest;
import android.app.Activity;
import android.media.MediaPlayer;
import android.os.Bundle;
import android.os.Environment;
import android.util.Log;
import android.view.View;
import android.widget.Button;
import java.io.File;
import java.io.IOException;
public class MainActivity extends Activity implements View.OnClickListener {
private Button play;
private Button stop;
private Button pause;
private MediaPlayer mediaPlayer;
@Override
protected void onCreate(Bundle savedInstanceState) {
super.onCreate(savedInstanceState);
setContentView(R.layout.activity_main);
play = findViewById(R.id.play);
pause = findViewById(R.id.pause);
stop = findViewById(R.id.stop);
mediaPlayer = new MediaPlayer();
play.setOnClickListener(this);
pause.setOnClickListener(this);
pause.setOnClickListener(this);
initMediaPlay();
}
private void initMediaPlay() {
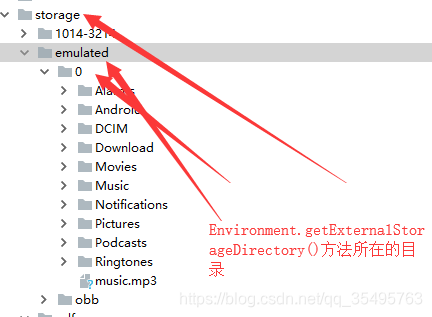
Log.d("Environment.getExtralDir:", "initMediaPlay: "+Environment.getExternalStorageDirectory().getAbsolutePath());
File file = new File(Environment.getExternalStorageDirectory(), "music.mp3");
try {
mediaPlayer.setDataSource(file.getPath());
Log.d("filePath:", "initMediaPlay: " +
file.getAbsolutePath());
mediaPlayer.prepare();
} catch (IOException e) {
e.printStackTrace();
}
}
@Override
public void onClick(View v) {
switch (v.getId()) {
case R.id.play:
if (!mediaPlayer.isPlaying()) {
mediaPlayer.start();
}
break;
case R.id.pause:
if (mediaPlayer.isPlaying()) {
mediaPlayer.pause();
}
break;
case R.id.stop:
if (mediaPlayer.isPlaying()) {
mediaPlayer.reset();
initMediaPlay();
}
default:
break;
}
}
@Override
protected void onDestroy() {
super.onDestroy();
if (mediaPlayer != null) {
mediaPlayer.stop();
mediaPlayer.release();
}
}
}
Environment.getExternalStorageDirectory()的路径问题的解决
如何播放视频的功能的实现
使用 VideoView 类来实现播放视频
xml 文件
<?xml version="1.0" encoding="utf-8"?>
<LinearLayout xmlns:android="http://schemas.android.com/apk/res/android"
    android:layout_width="match_parent"
    android:layout_height="match_parent"
    android:orientation="vertical">

    <VideoView
        android:id="@+id/video_view"
        android:layout_width="match_parent"
        android:layout_height="500dp" />
    <LinearLayout
        android:layout_width="match_parent"
        android:layout_height="wrap_content"
        android:orientation="horizontal">

        <Button
            android:id="@+id/play"
            android:text="Play"
            android:layout_width="0dp"
            android:layout_height="wrap_content"
            android:layout_weight="1" />

        <Button
            android:id="@+id/pause"
            android:layout_width="0dp"
            android:text="Pause"
            android:layout_height="wrap_content"
            android:layout_weight="1" />

        <Button
            android:text="replay"
            android:id="@+id/replay"
            android:layout_width="0dp"
            android:layout_height="wrap_content"
            android:layout_weight="1" />
    </LinearLayout>
</LinearLayout>
java 文件
public class MainActivity extends Activity implements View.OnClickListener {
      private VideoView videoView;
      private Button play;
      private Button pause;
      private Button replay;
    @Override
    protected void onCreate(Bundle savedInstanceState) {
        super.onCreate(savedInstanceState);
        requestWindowFeature(getWindow().FEATURE_NO_TITLE);
        setContentView(R.layout.activity_main);
        videoView = findViewById(R.id.video_view);
        play = findViewById(R.id.play);
        pause = findViewById(R.id.pause);
        replay = findViewById(R.id.replay);
        pause.setOnClickListener(this);
        play.setOnClickListener(this);
        replay.setOnClickListener(this);
        initVideoPath();
    }

    private void initVideoPath() {
        File file = new File(Environment.getExternalStorageDirectory(), "movie.mp4");
        videoView.setVideoPath(file.getAbsolutePath());
    }

    @Override
    public void onClick(View v) {
        switch (v.getId()) {
            case R.id.play:
                if (!videoView.isPlaying()) {
                    videoView.start();
                }
                break;
            case R.id.pause:
                if (videoView.isPlaying()) {
                    videoView.pause();

                }
                break;
            case R.id.replay:
                if (videoView.isPlaying()) {
                    videoView.resume();
                }
                break;
                default:
                    break;
        }
    }

    @Override
    protected void onDestroy() {
        super.onDestroy();
        if (videoView != null) {
            videoView.suspend();
        }
    }
}
补充说明此方法只能在sdk <24的情况下使用,在sdk >=24(Nougat)的情况下,不能使用此方法
报以下的错误
MediaPlayer: Couldn’t open /storage/emulated/0/movie.mp4: java.io.FileNotFoundException: No content provider: /storage/emulated/0/movie.mp4
需要使用content provider 来进行实现
参考回答二