版权声明:★Study hard and make progress every day.☺★ https://blog.csdn.net/qq_38225558/article/details/86614096
可参考Mybatis-Plus官方文档学习更多:https://baomidou.oschina.io/mybatis-plus-doc/#/generate-code
下面分享一个最近在springboot项目使用到的代码生成器 Mybatis-Plus
1、导入依赖:
<!--springboot-web支持: 1、web mvc; 2、restful; 3、jackjson支持; 4、aop ...-->
<dependency>
    <groupId>org.springframework.boot</groupId>
    <artifactId>spring-boot-starter-web</artifactId>
</dependency>
<!--springboot测试-->
<dependency>
    <groupId>org.springframework.boot</groupId>
    <artifactId>spring-boot-starter-test</artifactId>
    <scope>test</scope>
</dependency>
<!-- springboot热部署所需依赖包 -->
<dependency>
    <groupId>org.springframework.boot</groupId>
    <artifactId>spring-boot-devtools</artifactId>
    <scope>runtime</scope>
</dependency>
<!--lombok支持:简化代码-getter/setter、toString等代码-->
<dependency>
    <groupId>org.projectlombok</groupId>
    <artifactId>lombok</artifactId>
    <optional>true</optional>
</dependency>
<!--mysql数据库支持-->
<dependency>
    <groupId>mysql</groupId>
    <artifactId>mysql-connector-java</artifactId>
    <scope>runtime</scope>
</dependency>
<!--mybatis-plus支持 -》 Mybatis-Plus学习官方文档:https://baomidou.oschina.io/mybatis-plus-doc/#/quick-start-->
<dependency>
    <groupId>com.baomidou</groupId>
    <artifactId>mybatis-plus-boot-starter</artifactId>
    <version>2.2.0</version>
</dependency>
<!--模板引擎-->
<dependency>
    <groupId>org.apache.velocity</groupId>
    <artifactId>velocity-engine-core</artifactId>
    <version>2.0</version>
</dependency>
2、配置:
①代码生成器的配置

#此处为本项目src所在路径(代码生成器输出路径),注意一定是当前项目所在的目录哟
OutputDir=E:\\IDEA-workspace\\IT_zhengqing\\ZQ_PROJECT\\zq_blog\\src\\main\\java
#mapper.xml SQL映射文件目录
OutputDirXml=E:\\IDEA-workspace\\IT_zhengqing\\ZQ_PROJECT\\zq_blog\\src\\main\\resources
#放接口
OutputDirBase=E:\\IDEA-workspace\\IT_zhengqing\\ZQ_PROJECT\\zq_blog\\src\\main\\java
#设置作者
author=zhengqing
#自定义包路径
parent=com.zhengqing.blog

#mysql数据库连接信息
jdbc.driver=com.mysql.jdbc.Driver
jdbc.url=jdbc:mysql:///zq_blog
jdbc.user=root
jdbc.pwd=root
② 项目启动端口、连接数据库以及mybatis-plus配置

server:
  port: 8080 # 访问端口
  tomcat:
    uri-encoding: utf-8

spring:
  # 连接mysql配置----------------------------------------------------------------------------------
  datasource:
    driver-class-name: com.mysql.jdbc.Driver
    url: jdbc:mysql://127.0.0.1:3306/zq_blog?useUnicode=true&characterEncoding=utf-8&useSSL=false  # 本地测试
#    url: jdbc:mysql://服务器ip地址:3306/zq_blog?useUnicode=true&characterEncoding=utf-8  # 上线环境
    username: root
    password: root

# 这里注意如果启动类中加了扫包注解@MapperScan, 这里可不要下面这个配置
mybatis-plus:  # Mybatis-Plus学习官方文档:https://baomidou.oschina.io/mybatis-plus-doc/#/quick-start
  mapper-locations: classpath:com/zhengqing/blog/mapper/*Mapper.xml
  type-aliases-package: com.zhengqing.blog.bean #别名
3、启动类 加注解:
@Configuration
@SpringBootApplication
@MapperScan("com.zhengqing.blog.mapper") //扫描com.zhengqing.blog.mapper包下的接口和xml
public class BlogApplication {
    public static void main(String[] args) {
        SpringApplication.run(BlogApplication.class, args);
    }
}
4、自定义的模板:
package ${package.Controller};

import ${package.Service}.${table.serviceName};
import ${package.Entity}.${entity};
import com.zhengqing.blog.query.${entity}Query;
import com.zhengqing.blog.util.AjaxResult;
import com.zhengqing.blog.util.PageList;
import com.baomidou.mybatisplus.plugins.Page;
import org.springframework.beans.factory.annotation.Autowired;
import org.springframework.web.bind.annotation.*;
import java.util.List;

@RestController
@RequestMapping("/${table.entityPath}")
public class ${entity}Controller {
    @Autowired
    public ${table.serviceName} ${table.entityPath}Service;

    /**
     * 保存、修改 【区分id即可】
     * @param ${table.entityPath}  传递的实体
     * @return Ajaxresult转换结果
     */
    @RequestMapping(value="/save",method= RequestMethod.POST)
    public AjaxResult save(@RequestBody ${entity} ${table.entityPath}){
        try {
            if(${table.entityPath}.getId()!=null){
                    ${table.entityPath}Service.updateById(${table.entityPath});
            }else{
                    ${table.entityPath}Service.insert(${table.entityPath});
            }
            return AjaxResult.me();
        } catch (Exception e) {
            e.printStackTrace();
            return AjaxResult.me().setMessage("保存对象失败!"+e.getMessage());
        }
    }

    //删除对象信息
    @RequestMapping(value="/{id}",method=RequestMethod.DELETE)
    public AjaxResult delete(@PathVariable("id") Long id){
        try {
            ${table.entityPath}Service.deleteById(id);
            return AjaxResult.me();
        } catch (Exception e) {
            e.printStackTrace();
            return AjaxResult.me().setMessage("删除对象失败!"+e.getMessage());
        }
    }

    //获取用户
    @RequestMapping(value = "/{id}",method = RequestMethod.GET)
    public ${entity} get(@PathVariable("id")Long id)
    {
        return ${table.entityPath}Service.selectById(id);
    }


    //查看所有的员工信息
    @RequestMapping(value = "/list",method = RequestMethod.GET)
    public List<${entity}> list(){
        return ${table.entityPath}Service.selectList(null);
    }


    /**
    * 分页查询数据:
    * @param query 查询对象
    * @return PageList 分页对象
    */
    @RequestMapping(value = "/json",method = RequestMethod.POST)
    public PageList<${entity}> json(@RequestBody ${entity}Query query) {
        Page<${entity}> page = new Page<${entity}>(query.getPage(),query.getRows());
        page = ${table.entityPath}Service.selectPage(page);
        return new PageList<${entity}>(page.getTotal(),page.getRecords());
    }
}
package com.zhengqing.blog.query;

/**
 * @author ${author}
 * @since ${date}
 */
public class ${table.entityName}Query extends BaseQuery{  }
5、代码生成器:
package com.zhengqing.blog.util;

import com.baomidou.mybatisplus.generator.AutoGenerator;
import com.baomidou.mybatisplus.generator.InjectionConfig;
import com.baomidou.mybatisplus.generator.config.*;
import com.baomidou.mybatisplus.generator.config.converts.MySqlTypeConvert;
import com.baomidou.mybatisplus.generator.config.po.TableInfo;
import com.baomidou.mybatisplus.generator.config.rules.DbType;
import com.baomidou.mybatisplus.generator.config.rules.NamingStrategy;
import java.util.*;

public class GenerateCode {

    public static void main(String[] args) throws InterruptedException {
        //用来获取Mybatis-Plus.properties文件的配置信息
        ResourceBundle rb = ResourceBundle.getBundle("zq_blog"); //TODO 配置文件信息
        AutoGenerator mpg = new AutoGenerator();
        // 全局配置
        GlobalConfig gc = new GlobalConfig();
        gc.setOutputDir(rb.getString("OutputDir"));
        gc.setFileOverride(true);
        gc.setActiveRecord(true);// 开启 activeRecord 模式
        gc.setEnableCache(false);// XML 二级缓存
        gc.setBaseResultMap(true);// XML ResultMap
        gc.setBaseColumnList(false);// XML columList
        gc.setAuthor(rb.getString("author"));
        mpg.setGlobalConfig(gc);
        // 数据源配置
        DataSourceConfig dsc = new DataSourceConfig();
        dsc.setDbType(DbType.MYSQL);
        dsc.setTypeConvert(new MySqlTypeConvert());
        dsc.setDriverName(rb.getString("jdbc.driver"));
        dsc.setUsername(rb.getString("jdbc.user"));
        dsc.setPassword(rb.getString("jdbc.pwd"));
        dsc.setUrl(rb.getString("jdbc.url"));
        mpg.setDataSource(dsc);
        // 策略配置
        StrategyConfig strategy = new StrategyConfig();
        strategy.setTablePrefix(new String[] { "t_" });// 此处可以修改为您的表前缀
        strategy.setNaming(NamingStrategy.underline_to_camel);// 表名生成策略 t_user_xxx UserXxx
        strategy.setInclude(new String[]{"t_user"}); // TODO 需要生成的表
        mpg.setStrategy(strategy);
        // 包配置
        PackageConfig pc = new PackageConfig();
        pc.setParent(rb.getString("parent"));
        pc.setController("controller");
        pc.setService("service");
        pc.setServiceImpl("service.impl");
        pc.setEntity("bean");
        pc.setMapper("mapper");
        mpg.setPackageInfo(pc);

        // 注入自定义配置,可以在 VM 中使用 cfg.abc 【可无】
        InjectionConfig cfg = new InjectionConfig() {
            @Override
            public void initMap() {
                Map<String, Object> map = new HashMap<String, Object>();
                map.put("abc", this.getConfig().getGlobalConfig().getAuthor() + "-rb");
                this.setMap(map);
            }
        };

        List<FileOutConfig> focList = new ArrayList<FileOutConfig>();

        // 调整 bean 生成目录演示
        focList.add(new FileOutConfig("/templates/entity.java.vm") {
            @Override
            public String outputFile(TableInfo tableInfo) {
                return rb.getString("OutputDirBase")+ "/com/zhengqing/blog/bean/" + tableInfo.getEntityName() + ".java";
            }
        });

        // 调整 query 生成目录演示
        focList.add(new FileOutConfig("/templates/query.java.vm") {
            @Override
            public String outputFile(TableInfo tableInfo) {
                return rb.getString("OutputDirBase")+ "/com/zhengqing/blog/query/" + tableInfo.getEntityName() + "Query.java";
            }
        });
        cfg.setFileOutConfigList(focList);
        mpg.setCfg(cfg);

        //controller配置
        focList.add(new FileOutConfig("/templates/controller.java.vm") {
            @Override
            public String outputFile(TableInfo tableInfo) {
                return rb.getString("OutputDir")+ "/com/zhengqing/blog/controller/" + tableInfo.getEntityName() + "Controller.java";
            }
        });
        cfg.setFileOutConfigList(focList);
        mpg.setCfg(cfg);

        // 调整 xml 生成目录演示
        focList.add(new FileOutConfig("/templates/mapper.xml.vm") {
            @Override
            public String outputFile(TableInfo tableInfo) {
                return rb.getString("OutputDirXml")+ "/com/zhengqing/blog/mapper/" + tableInfo.getEntityName() + "Mapper.xml";
            }
        });
        cfg.setFileOutConfigList(focList);
        mpg.setCfg(cfg);

        // 自定义模板配置,可以 copy 源码 mybatis-plus/src/main/resources/templates 下面内容修改,
        // 放置自己项目的 src/main/resources/templates 目录下, 默认名称一下可以不配置,也可以自定义模板名称
        TemplateConfig tc = new TemplateConfig();
        tc.setService("/templates/service.java.vm");
        tc.setServiceImpl("/templates/serviceImpl.java.vm");
        tc.setEntity(null);
        tc.setMapper("/templates/mapper.java.vm");
        tc.setController(null);
        tc.setXml(null);
        // 如上任何一个模块如果设置 空 OR Null 将不生成该模块。
        mpg.setTemplate(tc);

        // 执行生成
        mpg.execute();
    }

}
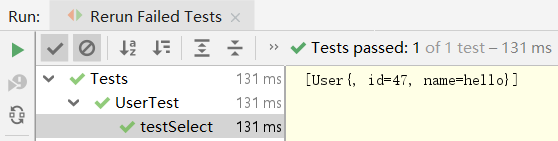
5、运行测试:
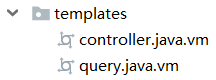
最后我的项目中会自动生成如下文件:

测试:
@RunWith(SpringRunner.class)
//标识这是一个spring测试,指定入口【从哪儿加载spring配置文件】和应用类型,它就会扫描入口类子子孙孙包的bean
@SpringBootTest(classes = BlogApplication.class)
public class UserTest {

    @Autowired
    private IUserService userService;

    @Test
    public void testSelect() throws Exception{
        List<User> users = userService.selectList(null);
        System.out.println(users);
    }

}