一、简介
1、了解nginx特性
请参考,https://www.cnblogs.com/zhangxingeng/p/10150955.html
2、LNMP:linux+nginx+mysql+php
3、什么是php-fpm
先提一下fastCGI,可以将http服务器和脚本解析服务器分开,同时再脚本解析服务器上启动一个或多个脚本解析守护进程,http遇到动态请求就交给fastCGI处理。
php-fpm即php-Fastcgi Process Manager,php-fpm是 FastCGI 的实现,并提供了进程管理的功能。进程包含 master 进程和 worker 进程两种进程。master 进程只有一个,负责监听端口,接收来自 Web Server 的请求,而 worker 进程则一般有多个(具体数量根据实际需要配置),每个进程内部都嵌入了一个 PHP 解释器,是 PHP 代码真正执行的地方。
4、nginx和php-fpm有两种通信方式:tcp socket和unix socket。tcp socket可以跨主机配置nginx+php-fpm,unix socket是同一主机进程间通信的一种方式,数据的进出都是在内核中进行,效率比tcp socket高,要求php-fpm开启sock监听,且不能跨主机配置nginx+php-fpm。因此,如果nginx+php-fpm在同一主机上是,建议使用unix socket的连接通信方式。之后测试非同一主机的实验。
5、测试环境
测试部署同一台主机
 1 [root@web1 html]# rpm -qa php-fpm
 2 php-fpm-5.4.16-46.el7.x86_64
 3 [root@web1 html]# rpm -qa php
 4 php-5.4.16-46.el7.x86_64
 5 [root@web1 html]# rpm -qa nginx
 6 nginx-1.12.2-2.el7.x86_64
 7 [root@web1 html]# cat /etc/centos-release
 8 CentOS Linux release 7.3.1611 (Core)
 9 [root@web1 html]# rpm -qa maraidb
10 [root@web1 html]# rpm -qa mariadb
11 mariadb-5.5.60-1.el7_5.x86_64
12 [root@web1 html]#
5、架构原理

6、nginx+php-fpm原理,c/s架构
nginx本身不会对php进行解析,php页面得请求nginx将交给fastCGI进程监听(ip+端口)或(unix sock)由php-fpm作为动态解析服务器处理后返给nginx,其实现在看到nginx就是个反代,nginx通过反向代理功能将动态请求转像php-fpm,实现了对php解析得支持。
wrapper,fastCGI用于启动一个程序的程序,这个wrapper绑定在某个固定socket上,如果端口或者文件socket,当nginx将CGI请求发送给这个socket的时候,通过fastCGI接口,wrapper接受到请求,然后派生出一个新的线程,这个线程调用解释器或者外部程序处理脚本并读取饭后数据;接着,wrapper再将饭后的数据通过fastCGI接口,沿着固定的socket传递给nginx,最后,nginx将返回的数据发送给客户端。
二、开始yum部署
#准备好源,我这里已经准备好epel源
#关闭selinux
#关闭firewall
1、安装nginx
yum install nginx -y
启动nginx,并设置开机自启
1 [root@web1 ~]# systemctl start nginx     #启动
2 [root@web1 ~]# systemctl enable nginx    #开机启动
3 [root@web1 ~]# netstat -untlp |grep 80    #查看监听端口
4 tcp 0 0 0.0.0.0:80 0.0.0.0:* LISTEN 51794/nginx: master
5 tcp6 0 0 :::80 :::* LISTEN 51794/nginx: master
1#查看版本
[root@web1 ~]# rpm -qa nginx
2 nginx-1.12.2-2.el7.x86_64
查看一下效果

2、安装php
yum install -y php php-devel php-fpm php-mysql php-common php-devel php-gd libjpeg* php-imap php-ldap php-odbc php-pear php-xml php-xmlrpc php-mbstring php-mcrypt php-bcmath php-mhash libmcrypt libmcrypt-devel3、开启php-fpm
1 [root@web1 ~]# systemctl start php-fpm
2 [root@web1 ~]# systemctl enable php-fpm
3 Created symlink from /etc/systemd/system/multi-user.target.wants/php-fpm.service to /usr/lib/systemd/system/php-fpm.service.
4、安装数据库,这里安装mariadb,和依赖
yum install mariadb mariadb-server mariadb-libs mariadb-devel
1 [root@web1 ~]# systemctl start mariadb
2 [root@web1 ~]# systemctl enable mariadb
3 Created symlink from /etc/systemd/system/multi-user.target.wants/mariadb.service to /usr/lib/systemd/system/mariadb.service.
4 [root@web1 ~]# netstat -untlp |grep 3306

tcp        0      0 0.0.0.0:3306            0.0.0.0:*               LISTEN      25117/mysqld
[root@web1 ~]#
三、配置
1、nginx与php-fpm交互这里使用unix socket
vim /etc/php-fpm.d/www.conf
1 listen = /dev/shm/php-cgi.sock
2 listen.owner = nobody
3 listen.group = nobody
4 user = nginx
5 group = nginx
2、创建nginx服务器location,站点配置文件
vim /etc/nginx/conf.d/default.conf
 1 server{
 2 listen 80; #监听81端口
 3 #server_name default.com www.default.com; #绑定域名 default.com 和 www.default.com
 4 server_name 192.168.216.239;
 5 index index.html index.htm index.php; #设置首页文件,越前优先级越高
 6 charset utf-8; #设置网页编码
 7
 8 root  /usr/share/nginx/html; #设置站点根目录
 9
10 #运行 PHP
11 location ~ .*\.php$
12 {
13        # fastcgi_pass  127.0.0.1:9000 #默认使用9000端口和PHP通信
14 fastcgi_pass  unix:/dev/shm/php-fpm.sock; #使用 unix sock 和PHP通信,需要和php-fpm配置文件一致
15 fastcgi_index index.php;
16 #fastcgi_param DOCUMENT_ROOT  /usr/share/nginx/html; #PHP 文档根目录
17 fastcgi_param   SCRIPT_FILENAME $document_root$fastcgi_script_name; #PHP 脚本目录
18 include fastcgi_params;
19 try_files $uri = 404;
20 }
21
22 #设置文件过期时间
23 location ~ .*\.(gif|jpg|jpeg|png|bmp|swf|flv|mp3|wma)$
24 {
25 expires  30d;
26 }
27
28 #设置文件过期时间
29 location ~ .*\.(js|css)$
30 {
31 expires  12h;
32 }
33
34 #设置文件访问权限
35 #location ~* /templates(/.*)\.(bak|html|htm|ini|old|php|tpl)$ {
36 #allow 127.0.0.1;
37 #deny all;
38 #}
39
40 #设置文件访问权限
41 #location ~* \.(ftpquota|htaccess|htpasswd|asp|aspx|jsp|asa|mdb)?$ {
42 #deny all;
43 #}
44
45 #保存日志
46 #access_log /var/log/nginx/default-access.log main;
47 #error_log /var/log/nginx/default-error.log crit;
48 }
说明
这里的路径是/dev/shm,这是将内存化为虚拟磁盘用的,效率比磁盘速度高得多,这里测试使用内存为虚拟磁盘得unix socket
运行一下看看效果,不出意外应该包502 bad gateway得错误或者设置了error_page 会出现下面如图得error
1 #       location / {
2 #               root    /usr/share/nginx/html;
3 #               index index.php index.html index.htm;
4 #       }
5 #       error_page 404  /404.html;
6 #       error_page 505 502 503 504      /50x.html;
7 #       location = /50x.html {
8 #               root    /usr/share/nginx/html;
9 #       }

这个错误是配置得时候范了个小错误,难免有瑕疵,请看
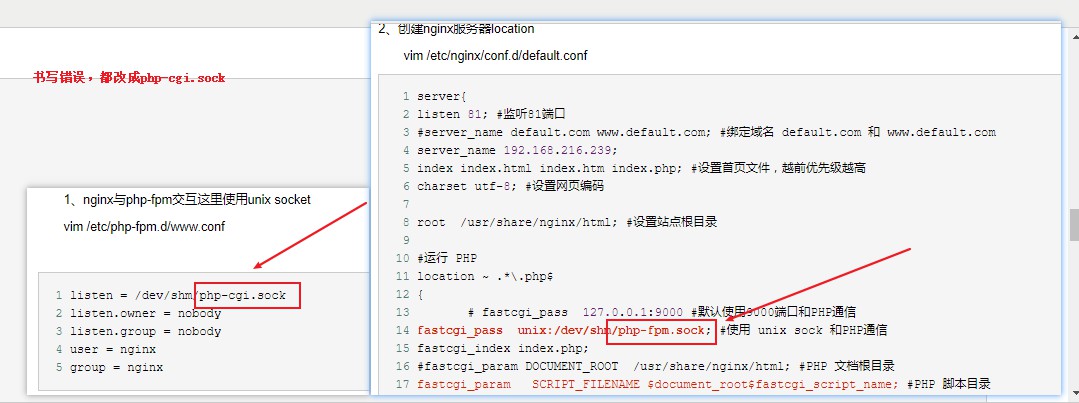
vim /etc/nginx/conf.d/default.conf
fastcgi_pass unix:/dev/shm/php-fpm.sock;
纠正过来我们重启nginx和php-fpm,在访问一下看看,没问题,成功了

3、修改php.ini的配置
#测试可以不改
vim /etc/php.ini
cgi.fix_pathinfo=1 #将注释去掉,开启PHP的pathinfo伪静态功能。
max_execution_time = 0 #脚本运行的最长时间,默认30秒
max_input_time = 300#脚本可以消耗的时间,默认60秒
memory_limit = 256M#脚本运行最大消耗的内存,根据你的需求更改数值,默认128M
post_max_size = 100M #单提交的最大数据,此项不是限制上传单个文件的大小,而是针对整个表单的提交数据进行限制的。限制范围包括表单提交的所有内容.例如:发表贴子时,贴子标题,内容,附件等…默认8M
upload_max_filesize = 10M#上载文件的最大许可大小 ,默认2M
3、测试mysql
需要新建一个index.php来测试,我们备份,然后新建
cd /usr/share/nginx/html
mv index.php index.php.backup
vim /usr/share/nginx/html/index.php
 1 [root@web1 html]# vim index.php
 2
 3 <?php
 4         $conn = mysql_connect('192.168.216.239','test','111111');
 5         if ($conn)
 6                 echo succ;
 7         else
 8                 echo fail;
 9         mysql_close()
10 ?>
还需要创建root密码,并创建可以远程登陆得test用户
mysql -uroot -p
1 MariaDB [(none)]> set password for root@localhost = password('111111');
2
3 MariaDB [(none)]> create user 'test'@'%' identified by'111111';
4
5 MariaDB [(none)]> flush privileges;
6
7
见证一下
