目的
对于单片机来说串口是最常用的功能之一,本文将对Arduino core for the ESP32的串口使用做个说明。
基本使用
ESP32有三个串口,分别是Serial、Serial1、Serial2,下面对基本使用做个示范:
使用演示
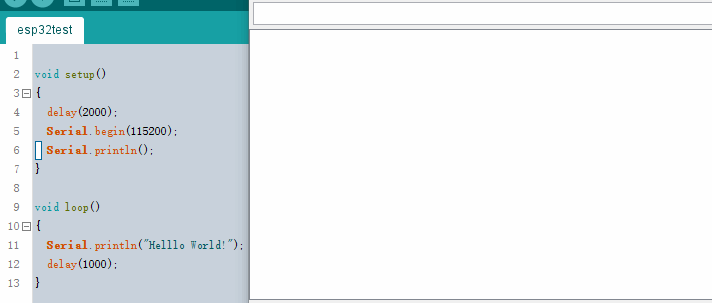
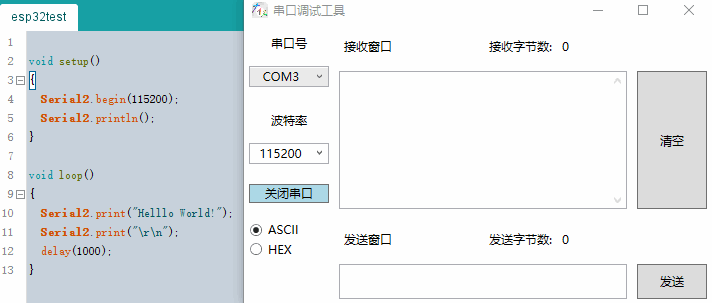
上面所演示的是串口最常用的功能,print和println方法常用来向上位机打印输出信息,Serial在上电时会输出模块基本信息;
参考链接
https://www.arduino.cc/reference/en/language/functions/communication/serial/
https://blog.csdn.net/iracer/article/details/50334041
https://github.com/espressif/arduino-esp32/blob/master/cores/esp32/Print.h
https://github.com/espressif/arduino-esp32/blob/master/cores/esp32/Print.cpp
注1:Arduino core for the ESP32和Arduino原版的串口有所差异,无法完全套用;
注2:同Arduino原版的串口一样Serial、Serial1、Serial2是在HardwareSerial.h中被声明的HardwareSerial对象,所以详细用法也可以参考HardwareSerial库(见下文);
存在的问题
问题描述
使用Serial1(U1TXD=GPIO10,U1RXD=GPIO9)时程序无法正常运行。
产生原因
查询乐鑫官方《ESP32 技术规格书》和ESP32模块的技术规格书可以知道ESP32的GPIO6~11一般用于连接外部Flash芯片,而ESP32的程序都是在这上面的,但是Serial1默认使用了GPIO9和10,从而导致程序崩溃:

解决方法
ESP32片上功能模组所发出的信号可映射到任何 GPIO管脚,使用Arduino core for the ESP32中自带的HardwareSerial库就可以将串口RX映射到几乎所有IO口上,TX映射到GPIO0~31上(没有全部进行测试)。
参考链接
https://quadmeup.com/arduino-esp32-and-3-hardware-serial-ports/
https://hackaday.com/2017/08/17/secret-serial-port-for-arduinoesp32/
https://www.espressif.com/zh-hans/products/hardware/esp32/resources
HardwareSerial库使用
使用演示
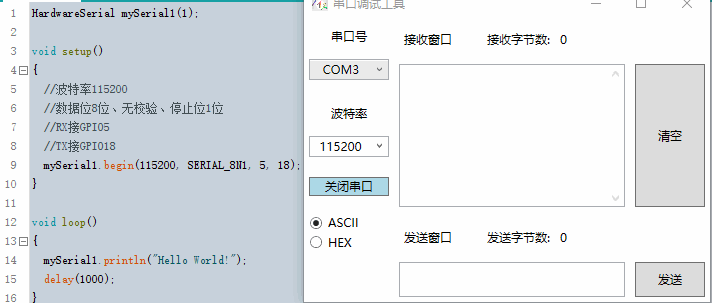
上图中通过HardwareSerial库实现了对串口1的使用,具体说明见下文。
详细说明
使用HardwareSerial库需要先声明一个对象,例如上文图中的HardwareSerial mySerial1(1);;
HardwareSerial类在声明对象时接收一个输入参数(0、1、2),分别代表Serial、Serial1、Serial2;
声明对象后就可以按一般串口的方法使用了,方法说明如下:
-
void begin(unsigned long baud, uint32_t config=SERIAL_8N1, int8_t rxPin=-1, int8_t txPin=-1, bool invert=false, unsigned long timeout_ms = 20000UL);
使能串口,参数如下:
baud:串口波特率,该值写0则会进入自动侦测波特率程序;
config:串口参数,默认SERIAL_8N1为8位数据位、无校验、1位停止位;
rxPin:接收管脚针脚号;
txPin:发送管脚针脚号;
invert:翻转逻辑电平,串口默认高电平为1、低电平为0;
timeout_ms:自动侦测波特率超时时间,如果超过该时间还未获得波特率就不会使能串口; -
void end();
失能串口,释放资源; -
void updateBaudRate(unsigned long baud);
重新设置波特率; -
int available(void);
返回接收缓存可读取字节数; -
int availableForWrite(void);
ESP32默认有128字节的硬件TX FIFO,该方法返回TX FIFO空闲字节数; -
int peek(void);
返回接收缓存中第一个字节数据,但并不从中删除它; -
int read(void);
返回接收缓存中第一个字节数据,读取过的数据将从接收缓存中清除; -
void flush(void);
等待串口收发完毕; -
size_t write(uint8_t);
写数据到TX FIFO,在发送FIFO中的数据会自动输出到TX端口上;
该方法有很多重载,可以用来发送字符串、长整型、整形;
如果TX FIFO已满,则该方法将阻塞; -
size_t write(const uint8_t *buffer, size_t size);
写数据到TX FIFO,如果发送FIFO已满,则该方法将阻塞; -
uint32_t baudRate();
返回当前串口波特率; -
size_t setRxBufferSize(size_t);
设置接收缓存大小(默认为256字节);
ESP32默认有128字节的硬件RX FIFO,在RX FIFO收到数据后会移送到上面的接收缓存中; -
void setDebugOutput(bool);
设置该串口打印Debug信息(默认为0,失能后也会置为0);这个方法是用来设置从哪个串口打印的,需要在Arduino IDE>工具中启用Debug才会真正打印信息;
除上面方法外,因为继承自Stream类所以也可以用该类的方法:如size_t readBytes(char *buffer, size_t length);和size_t readBytes(uint8_t *buffer, size_t length)等。
参考链接
https://github.com/espressif/arduino-esp32/blob/master/cores/esp32/HardwareSerial.h
https://github.com/espressif/arduino-esp32/blob/master/cores/esp32/HardwareSerial.cpp
https://github.com/espressif/arduino-esp32/blob/master/cores/esp32/esp32-hal-uart.h
https://github.com/espressif/arduino-esp32/blob/master/cores/esp32/esp32-hal-uart.c
https://www.qutaojiao.com/2452.html
总结
ESP32拥有三个串口,并且串口可以映射到大部分GPIO口上,这将为开发带来更多的可能性。