装备了两台linux主机
在两台主机上均安装了 docker
在两台主机的docker上均安装了nginx和mysql ,同时安装了docker容器的可视化管理工具 portainer/portainer
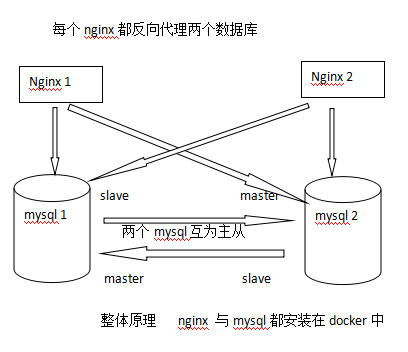
首先实现 mysql的主主备份
其中的 master_log_file master_log_pos 是通过查询得到的
查询命令为show master status
在这之前应该打开二进制日志 配置好
在配置工程中鸣谢 以下博客给予的帮助
主主复制相关博客
https://www.cnblogs.com/ygqygq2/p/6045279.html 2016
https://www.cnblogs.com/zhenyuyaodidiao/p/4635458.html MySQL Replication
https://www.cnblogs.com/wclwcw/p/6281608.html
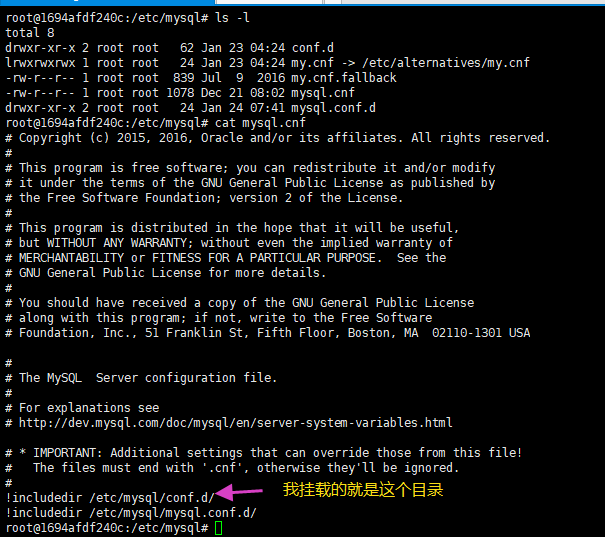
1 .docker中安装mysql实现配置文件的挂载
//启动mysql5.6 容器 挂载配置文件和 数据存储目录 两台机子的docker可以运行
docker run -d -p 3309:3306 --privileged=true  \
 -v /docker/mysql/mysql-5.6/conf/mysql.conf.d:/etc/mysql/mysql.conf.d  \    挂载的配置目录
 -v /docker/mysql/mysql-5.6/data:/var/lib/mysql \         挂载的数据存储目录
 -e MYSQL_ROOT_PASSWORD=密码   \
 --name mysql56b mysql:5.6
如何查询 本机作为主节点的日志状态
Last login: Fri Jan 25 19:33:22 2019 from 111.203.45.3

-- 进入容器中
[root@hd49 ~]# docker exec -it mysql56b /bin/bash

-- 进入mysql命令行
root@1694afdf240c:/# mysql -uroot -p数据库密码
Warning: Using a password on the command line interface can be insecure.
Welcome to the MySQL monitor.  Commands end with ; or \g.
Your MySQL connection id is 15
Server version: 5.6.43-log MySQL Community Server (GPL)

Copyright (c) 2000, 2019, Oracle and/or its affiliates. All rights reserved.

Oracle is a registered trademark of Oracle Corporation and/or its
affiliates. Other names may be trademarks of their respective
owners.

Type 'help;' or '\h' for help. Type '\c' to clear the current input statement.

-- 查询本机器作为 master的日志情况
mysql> show master status
    -> ;
+------------------+----------+--------------+------------------+-------------------+
| File             | Position | Binlog_Do_DB | Binlog_Ignore_DB | Executed_Gtid_Set |
+------------------+----------+--------------+------------------+-------------------+
| mysql-bin.000004 |     1201 |              |                  |                   |
+------------------+----------+--------------+------------------+-------------------+
1 row in set (0.00 sec)

-- 结尾用 \G 的话会更加清晰
mysql> show master status\G
*************************** 1. row ***************************
             File: mysql-bin.000004
         Position: 1201
     Binlog_Do_DB:
 Binlog_Ignore_DB:
Executed_Gtid_Set:
1 row in set (0.00 sec)

mysql>
通过命令实现互为主从
-- 进入到两台机器的 mysql容器的命令行界面

--进容器的 命令
docker exec -it  容器id  /bin/bash

--通过一下命令
 mysql -u用户名  -p密码 进入到mysq的命令行界面


-- 在 A 机器上创建 B 机子可以登录的账户
GRANT replication slave ON *.* TO '用户名a'@'%' IDENTIFIED BY '密码a';
flush privileges;

-- 在 B 机器上创建 A 机器可以登录的账户
GRANT replication slave ON *.* TO '用户名b'@'%' IDENTIFIED BY '密码b';
flush privileges;  --
-- 给 A 安排master  他的主是 B
change master to master_host='ip b',master_port=3309,master_user='用户名b',master_password='密码b',master_log_file='mysql-bin.000004',master_log_pos=408;
-- 给 B 安排maser  他的主是 A
change master to master_host='ip a',master_port=3309,master_user='用户名a',master_password='密码b',master_log_file='mysql-bin.000004',master_log_pos=419;
查看配置成功后查看本机作为从节点的状态
命令为 show slave status\G
mysql> show slave status\G
*************************** 1. row ***************************
               Slave_IO_State: Waiting for master to send event
                  Master_Host: 主节点的ip
                  Master_User: sijiu
                  Master_Port: 3309
                Connect_Retry: 60
              Master_Log_File: mysql-bin.000004
          Read_Master_Log_Pos: 1326
               Relay_Log_File: mysqld-relay-bin.000002
                Relay_Log_Pos: 1201
        Relay_Master_Log_File: mysql-bin.000004
             Slave_IO_Running: Yes
            Slave_SQL_Running: Yes
              Replicate_Do_DB:
          Replicate_Ignore_DB:
           Replicate_Do_Table:
       Replicate_Ignore_Table:
      Replicate_Wild_Do_Table:
  Replicate_Wild_Ignore_Table:
                   Last_Errno: 0
                   Last_Error:
                 Skip_Counter: 0
          Exec_Master_Log_Pos: 1326
              Relay_Log_Space: 1375
              Until_Condition: None
               Until_Log_File:
                Until_Log_Pos: 0
           Master_SSL_Allowed: No
           Master_SSL_CA_File:
           Master_SSL_CA_Path:
              Master_SSL_Cert:
            Master_SSL_Cipher:
               Master_SSL_Key:
        Seconds_Behind_Master: 0
Master_SSL_Verify_Server_Cert: No
                Last_IO_Errno: 0
                Last_IO_Error:
               Last_SQL_Errno: 0
               Last_SQL_Error:
  Replicate_Ignore_Server_Ids:
             Master_Server_Id: 2
                  Master_UUID: b8378125-1faf-11e9-b17a-0242ac110003
             Master_Info_File: /var/lib/mysql/master.info
                    SQL_Delay: 0
          SQL_Remaining_Delay: NULL
      Slave_SQL_Running_State: Slave has read all relay log; waiting for the slave I/O thread to update it
           Master_Retry_Count: 86400
                  Master_Bind:
      Last_IO_Error_Timestamp:
     Last_SQL_Error_Timestamp:
               Master_SSL_Crl:
           Master_SSL_Crlpath:
           Retrieved_Gtid_Set:
            Executed_Gtid_Set:
                Auto_Position: 0
1 row in set (0.00 sec)
启动nginx容器
启动命令为
docker run -d -p 8091:80  -p 3307:3306 --name nginx_a   nginx
其中nginx_a 为容器名
8091映射容器内端口80
3307映射容器内端口3306  3306为stream中的listen监听端口
先进入容器把配置文件拷贝出来 把拷贝出的配置文件修改后替换掉容器内的配置文件
采用以下命令 用外部的配置文件替换掉容器内的
docker cp nginx.conf nginx_a:/etc/nginx/
替换文件后进入容器中 重启nginx
nginx -s reload
nginx.conf的内容如下
[root@hd50 nginx-1.15.8]# cat nginx.conf

user  nginx;
worker_processes  1;

error_log  /var/log/nginx/error.log warn;
pid        /var/run/nginx.pid;


events {
    worker_connections  1024;
}


http {
    include       /etc/nginx/mime.types;
    default_type  application/octet-stream;

    log_format  main  '$remote_addr - $remote_user [$time_local] "$request" '
                      '$status $body_bytes_sent "$http_referer" '
                      '"$http_user_agent" "$http_x_forwarded_for"';

    access_log  /var/log/nginx/access.log  main;

    sendfile        on;
    #tcp_nopush     on;

    keepalive_timeout  65;

    #gzip  on;

    include /etc/nginx/conf.d/*.conf;
}
# 相比原来添加了 stream模块
stream {
    upstream mysql {
        server ip1:3309 weight=5;
        server ip2:3309 weight=5;
    }
    server {
        listen 3306 ;# 数据库服务器监听端口
        proxy_connect_timeout 10s;
        proxy_timeout 300s; # 设置客户端和代理之间的超时时间,如果5分钟内没有操作将自动断开
        proxy_pass mysql;
    }
}
鸣谢
https://jingyan.baidu.com/article/0320e2c102fcc11b87507b17.html
https://www.cnblogs.com/trydoit/p/7129039.html