Spring Boot(二)之与Mybatis结合使用
这是使用的是mybatis的xml方式,还有注解的方式
1.创建项目
1.1 创建一个Project

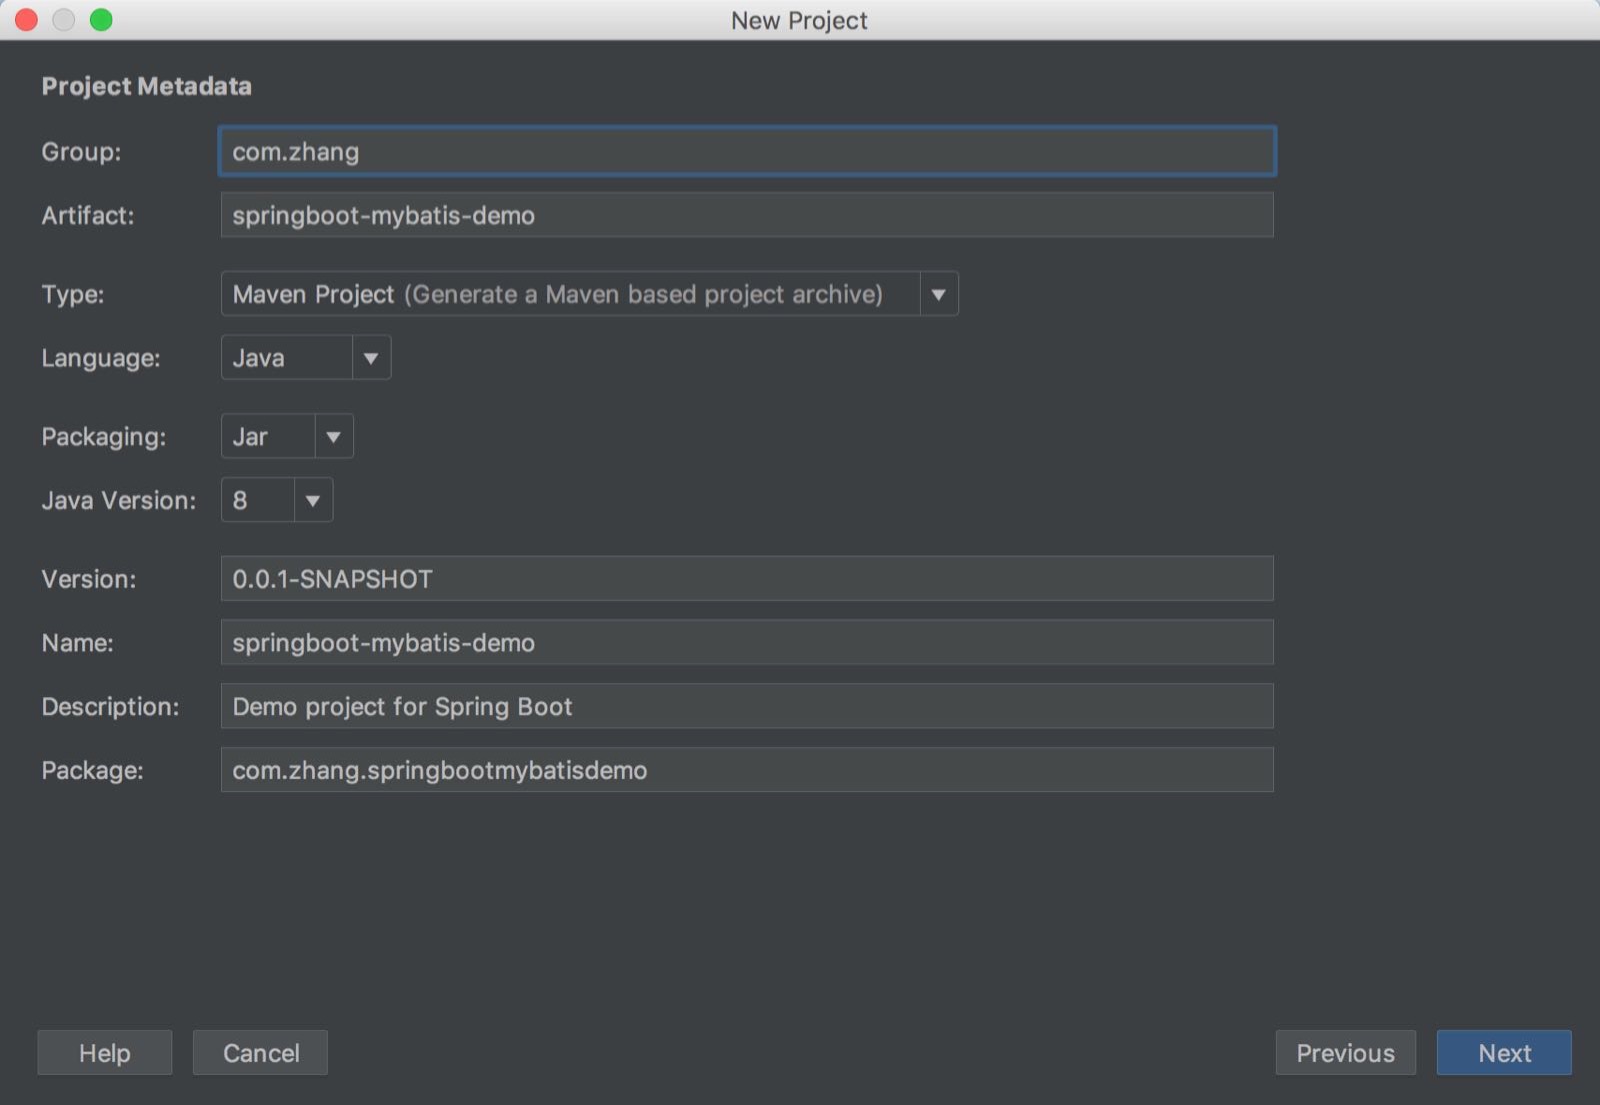
1.2 编辑Project Metadata
1.3 添加Web程序和SQL程序
添加Web程序
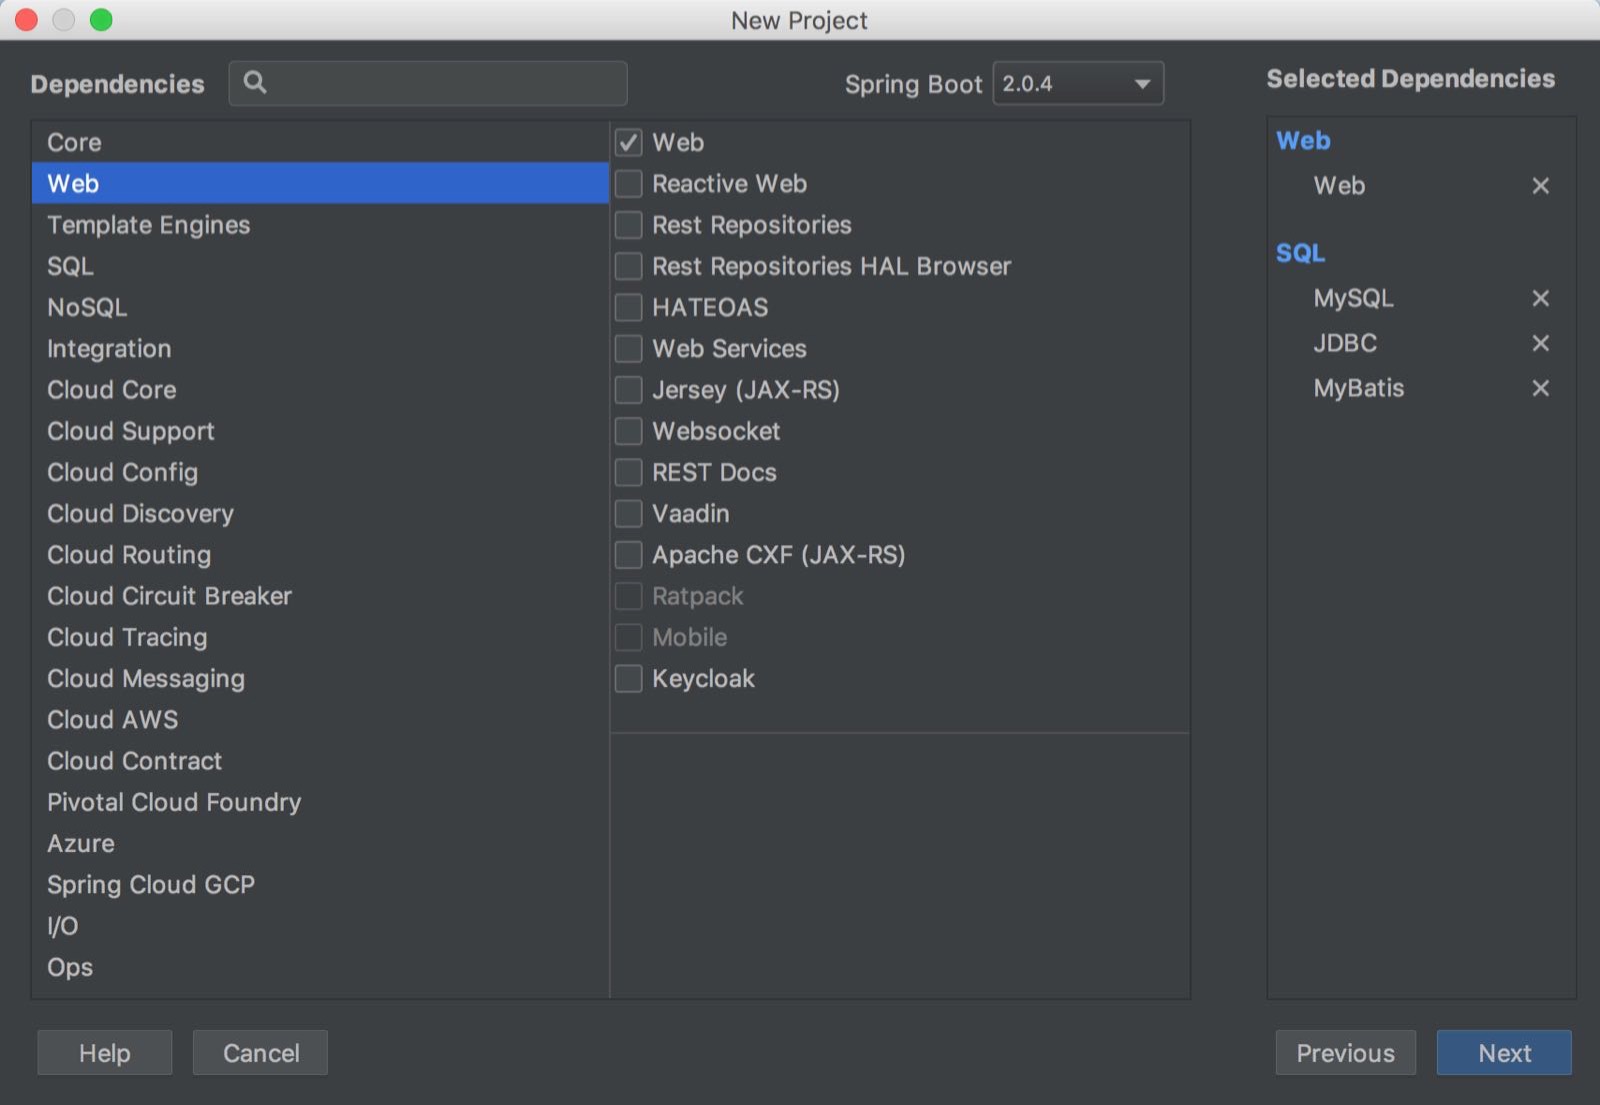
勾选Web程序
添加SQL程序
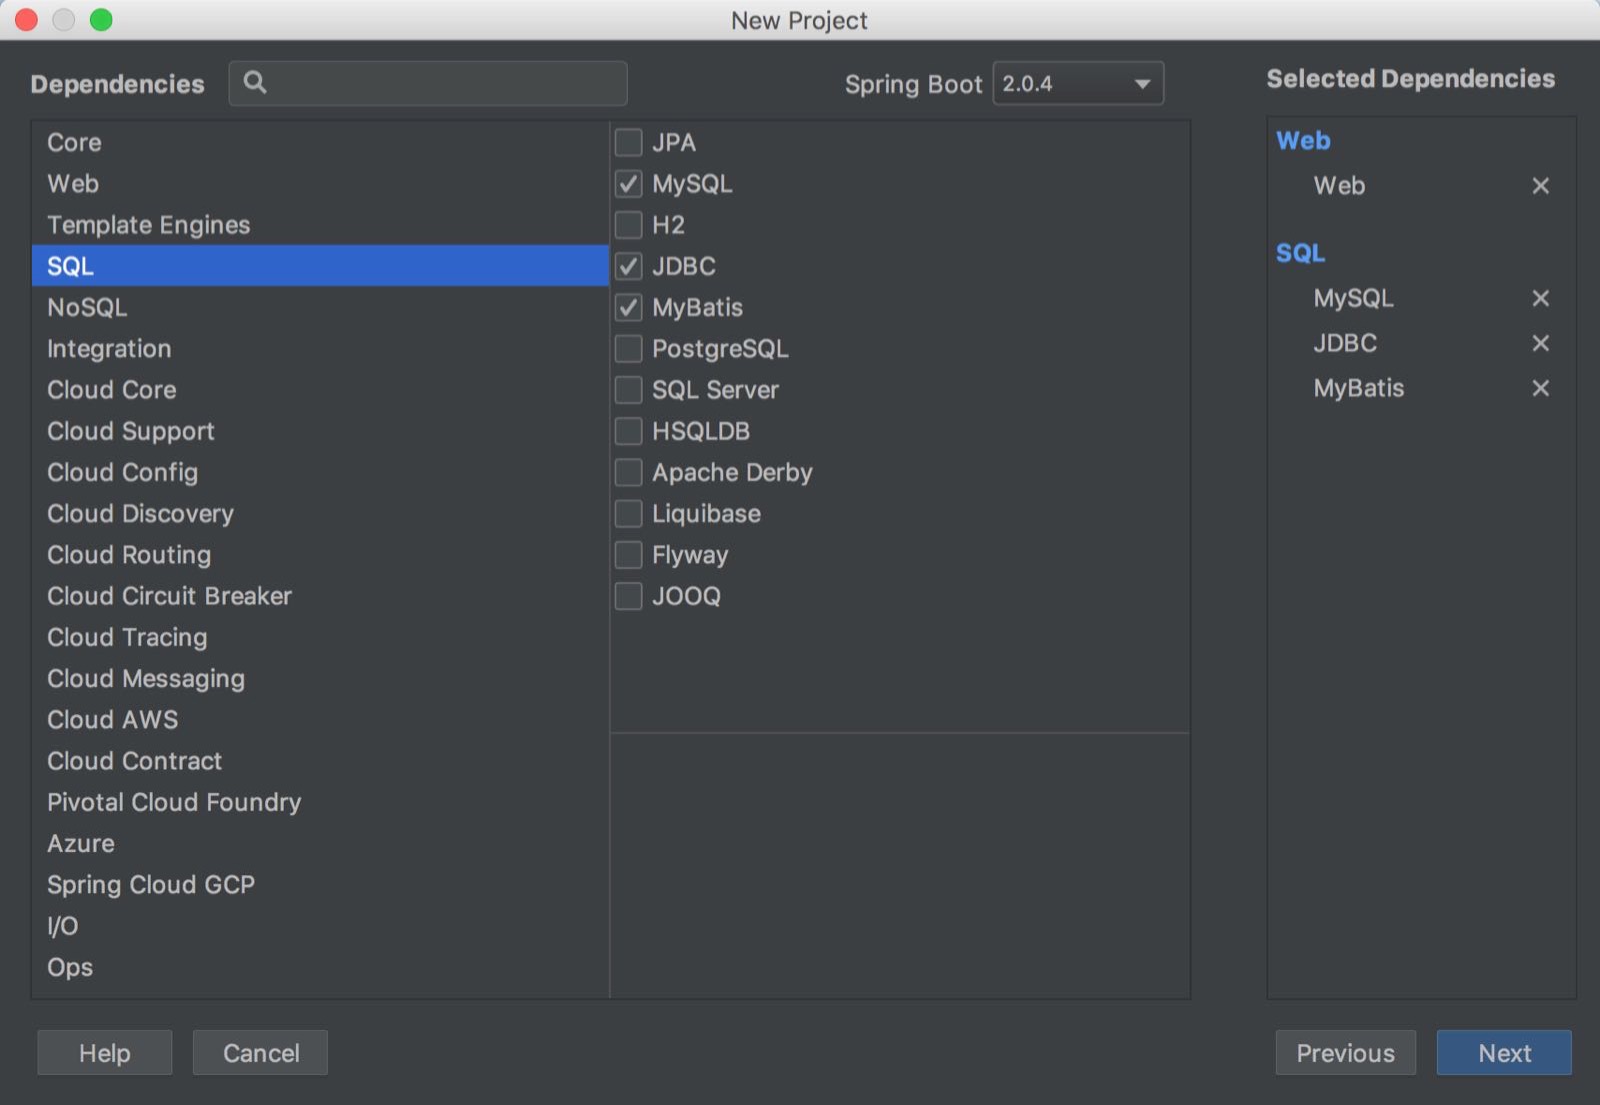
勾选MySQL,JDBC,MyBatis三项
点击Next
1.4 选择项目路径
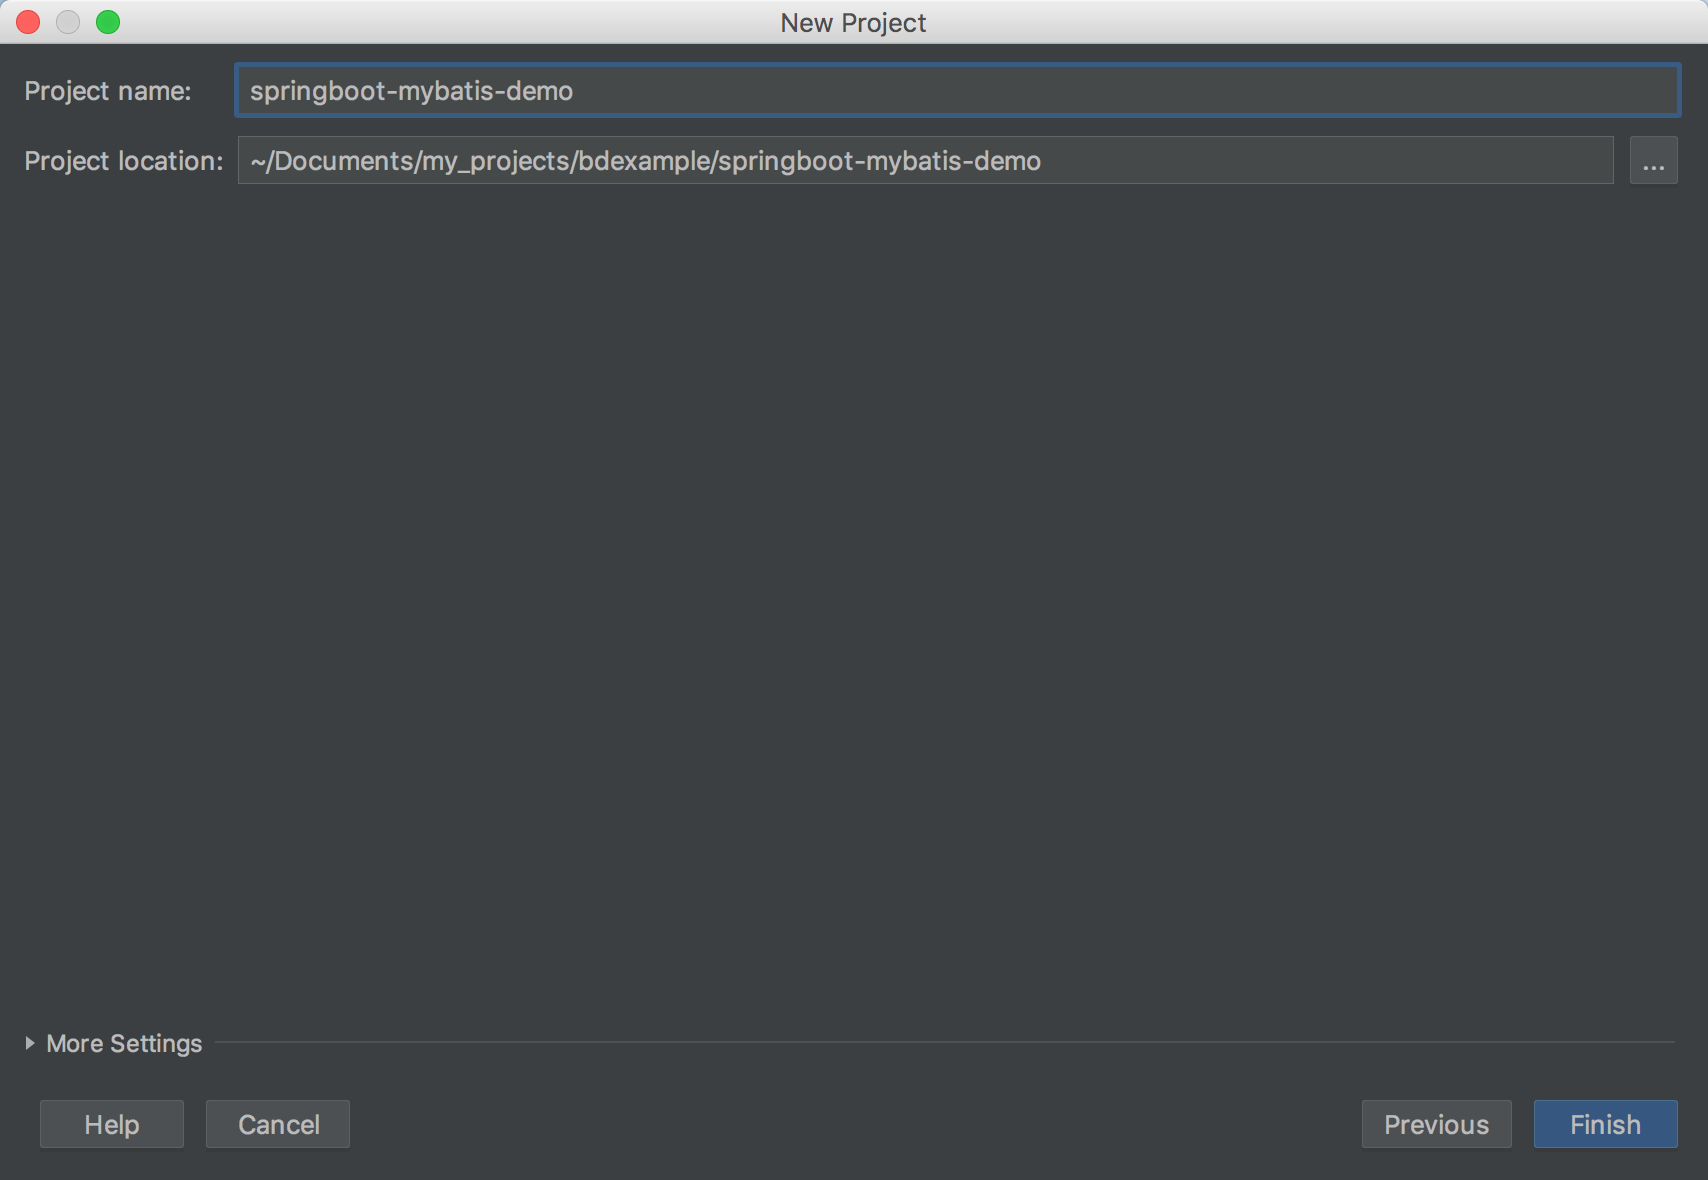
点击Finish,项目创建完成
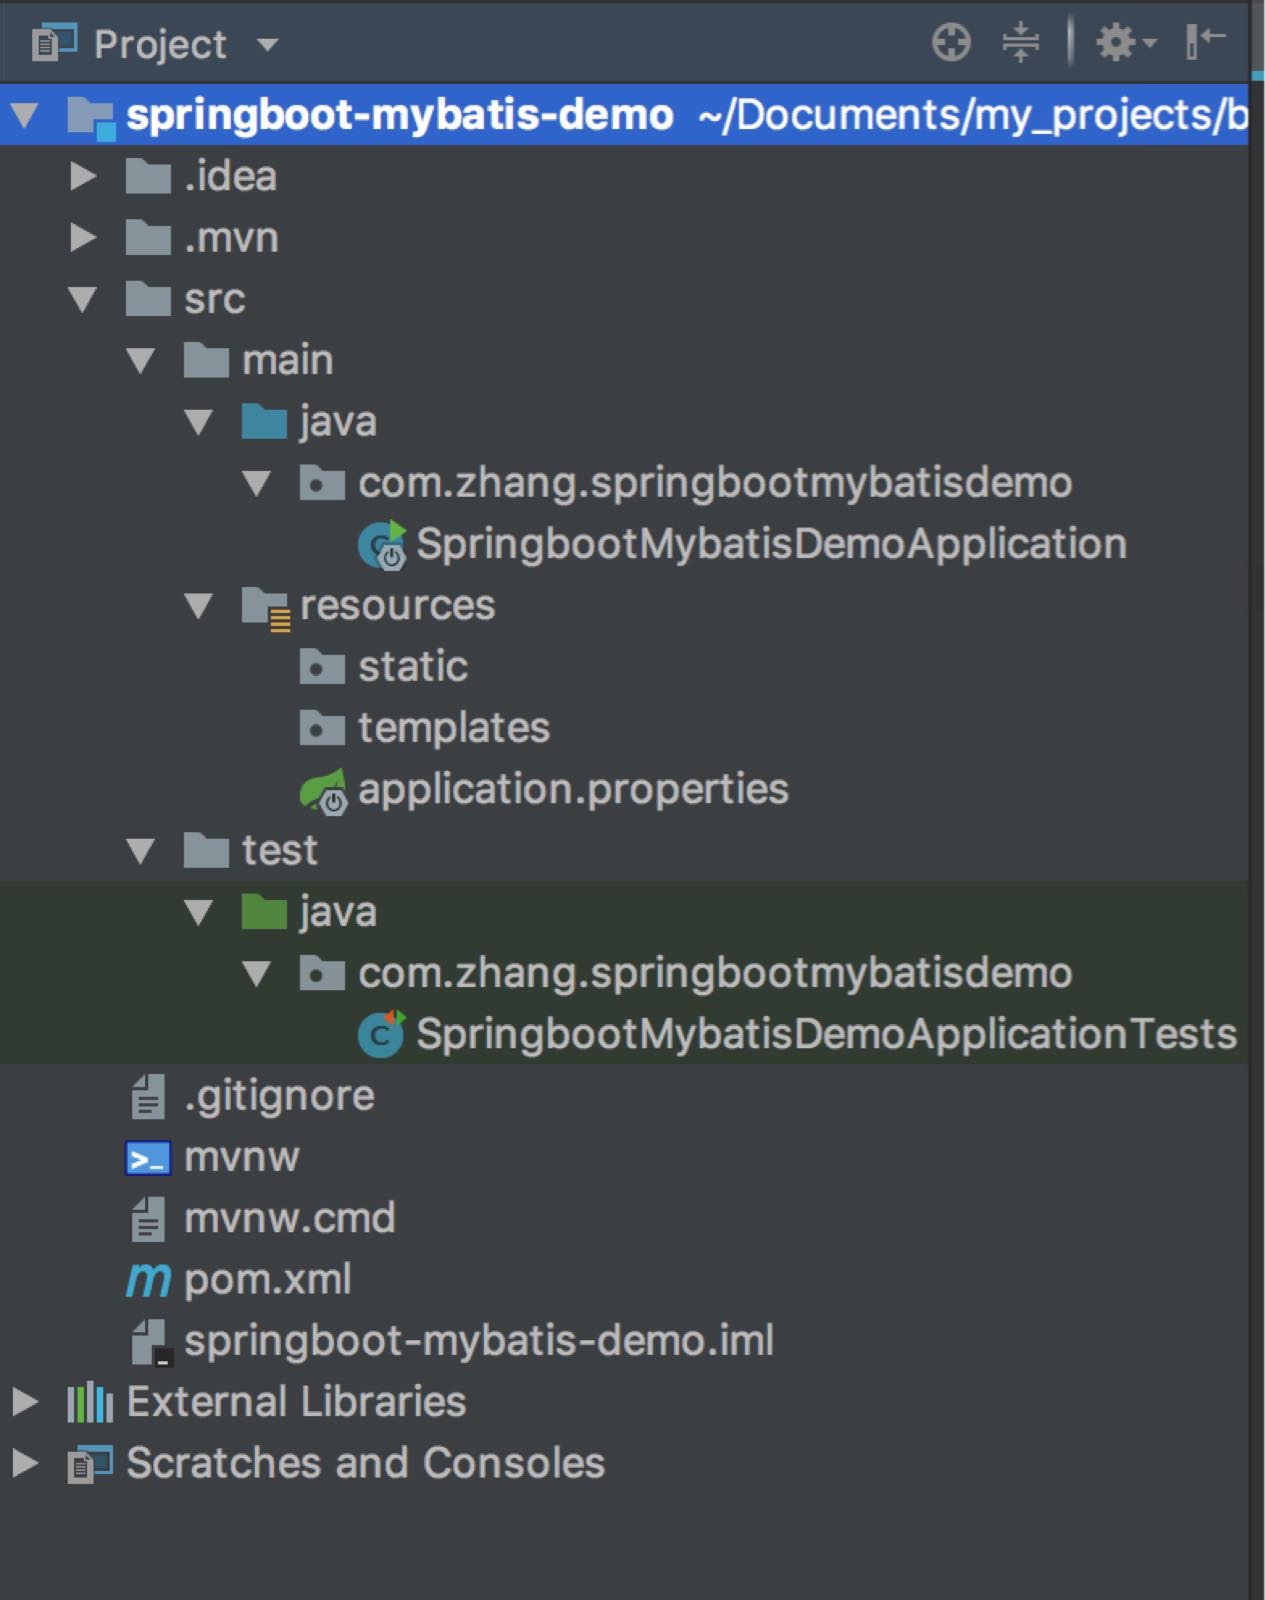
1.5 创建项目完成
项目目录结构
2.pom.xml依赖
在项目创建完成,会在pom.xml文件中生成对应的依赖和build插件。如下:
<?xml version="1.0" encoding="UTF-8"?>
<project xmlns="http://maven.apache.org/POM/4.0.0" xmlns:xsi="http://www.w3.org/2001/XMLSchema-instance"
         xsi:schemaLocation="http://maven.apache.org/POM/4.0.0 http://maven.apache.org/xsd/maven-4.0.0.xsd">
    <modelVersion>4.0.0</modelVersion>

    <groupId>com.zhang</groupId>
    <artifactId>springboot-mybatis-demo</artifactId>
    <version>0.0.1-SNAPSHOT</version>
    <!--以jar包的形式,如果改为war,就是打出来的包是war形式,后面会专门介绍如果打成war-->
    <packaging>jar</packaging>

    <name>springboot-mybatis-demo</name>
    <description>Demo project for Spring Boot</description>

    <parent>
        <groupId>org.springframework.boot</groupId>
        <artifactId>spring-boot-starter-parent</artifactId>
        <version>2.0.4.RELEASE</version>
        <relativePath/> <!-- lookup parent from repository -->
    </parent>

    <properties>
        <project.build.sourceEncoding>UTF-8</project.build.sourceEncoding>
        <project.reporting.outputEncoding>UTF-8</project.reporting.outputEncoding>
        <java.version>1.8</java.version>
    </properties>

    <dependencies>
        <dependency>
            <groupId>org.springframework.boot</groupId>
            <artifactId>spring-boot-starter-jdbc</artifactId>
        </dependency>
        <dependency>
            <groupId>org.springframework.boot</groupId>
            <artifactId>spring-boot-starter-web</artifactId>
        </dependency>
        <dependency>
            <groupId>org.mybatis.spring.boot</groupId>
            <artifactId>mybatis-spring-boot-starter</artifactId>
            <version>1.3.2</version>
        </dependency>

        <dependency>
            <groupId>mysql</groupId>
            <artifactId>mysql-connector-java</artifactId>
            <scope>runtime</scope>
        </dependency>
        <dependency>
            <groupId>org.springframework.boot</groupId>
            <artifactId>spring-boot-starter-test</artifactId>
            <scope>test</scope>
        </dependency>
    </dependencies>

    <build>
        <plugins>
            <plugin>
                <groupId>org.springframework.boot</groupId>
                <artifactId>spring-boot-maven-plugin</artifactId>
            </plugin>
        </plugins>
    </build>

</project>
除此之外,我们还需要添加其他的依赖(也可以不使用的),如:
<!-- alibaba的druid数据库连接池 -->
<dependency>
    <groupId>com.alibaba</groupId>
    <artifactId>druid-spring-boot-starter</artifactId>
    <version>1.1.9</version>
</dependency>关于alibaba的druid数据库连接池,大家可以自行百度
3.application.yml配置编写
将application.properties文件重命名为application.yml(个人喜好)
编译application.yml,添加配置
server:
  port: 8080

spring:
    datasource:
        name: mysql_test
        type: com.alibaba.druid.pool.DruidDataSource
        #druid相关配置
        druid:
          #监控统计拦截的filters
          filters: stat
          driver-class-name: com.mysql.jdbc.Driver
          #基本属性
          url: jdbc:mysql://localhost:3306/test?useUnicode=true&characterEncoding=UTF-8&allowMultiQueries=true
          username: root
          password: root
          #配置初始化大小/最小/最大
          initial-size: 1
          min-idle: 1
          max-active: 20
          #获取连接等待超时时间
          max-wait: 60000
          #间隔多久进行一次检测,检测需要关闭的空闲连接
          time-between-eviction-runs-millis: 60000
          #一个连接在池中最小生存的时间
          min-evictable-idle-time-millis: 300000
          validation-query: SELECT 'x'
          test-while-idle: true
          test-on-borrow: false
          test-on-return: false
          #打开PSCache,并指定每个连接上PSCache的大小。oracle设为true,mysql设为false。分库分表较多推荐设置为false
          pool-prepared-statements: false
          max-pool-prepared-statement-per-connection-size: 20


# mybatis
mybatis:
  mapper-locations: classpath:mapper/*.xml
  type-aliases-package: com.zhang.springbootmybatisdemo.domain
mapper-locations:配置mapper文件的路径
type-aliases-package:配置domain对象路径
4.创建Controller,Service,Dao,Domain实例
4.1 创建Controller
@RestController
@RequestMapping("/user")
public class UserController {

    @Autowired
    private UserService userService;

    @PostMapping("/add")
    public int add(@RequestBody User user) {
        return userService.addUser(user);
    }

    @ResponseBody
    @PostMapping("/search")
    public User searchById(@RequestBody User user) {
        return userService.searchById(user.getUserId());
    }

    @ResponseBody
    @PostMapping("/searchall")
    public List<User> searchAll() {
        return userService.searchAll();
    }

}
4.2 创建Service
@Component
public interface UserService {
    int addUser(User user);

    User searchById(String userId);

    List<User> searchAll();
}
@Component: 在UserService上添加Component注解,防止UserController中的userService属性自动注入是出现编译错误。
ServiceImpl的实现类
@Service(value = "userService")
public class UserServiceImpl implements UserService {

    @Autowired
    private UserDao userDao;

    @Override
    public int addUser(User user) {
        return userDao.add(user);
    }

    @Override
    public User searchById(String userId) {
        return userDao.searchById(userId);
    }

    @Override
    public List<User> searchAll() {
        return userDao.searchAll();
    }
}
@Service(value = “userService”):指定UserController中userService参数的实现对象。
4.3 编写User
public class User {
    private String userId;
    private String username;
    private String password;
    ...
    // 省略 get set
}
4.4 编写UserDao
@Component
public interface UserDao {
    int add(User user);
    User searchById(String userId);
    List<User> searchAll();
}
这里需要注意一个问题,需要在启动类SpringbootMybatisDemoApplication上面加上一个MappingScan的注解,在程序是,扫描dao中的类。
@SpringBootApplication
@MapperScan("com.zhang.springbootmybatisdemo.dao")
public class SpringbootMybatisDemoApplication {

    public static void main(String[] args) {
        SpringApplication.run(SpringbootMybatisDemoApplication.class, args);
    }
}
额外注意:@MapperScan(“com.zhang.springbootmybatisdemo.dao”)
5.编写Mapping的xml
<?xml version="1.0" encoding="UTF-8" ?>
<!DOCTYPE mapper PUBLIC "-//mybatis.org//DTD Mapper 3.0//EN" "http://mybatis.org/dtd/mybatis-3-mapper.dtd" >
<mapper namespace="com.zhang.springbootmybatisdemo.dao.UserDao">
    <sql id="BASE_TABLE">
        tb_user
    </sql>

    <sql id="BASE_COLUMN">
        user_id,username,password
    </sql>

    <!--因为mysql的表字段和User对象的字段不一致,所以需要转换匹配-->
    <resultMap id="BaseResultMap" type="com.zhang.springbootmybatisdemo.domain.User">
        <result column="user_id" property="userId" jdbcType="VARCHAR"/>
        <result column="username" property="username" jdbcType="VARCHAR"/>
        <result column="password" property="password" jdbcType="VARCHAR"/>
    </resultMap>

    <insert id="add" parameterType="com.zhang.springbootmybatisdemo.domain.User">
      insert into
      tb_user(user_id,username,password)
      values(#{userId,jdbcType=VARCHAR},#{username,jdbcType=VARCHAR},#{password,jdbcType=VARCHAR})
    </insert>

    <!--resultMap 是将返回的结果进行mapping匹配,如果mysql和User的字段一致,那么可以直接使用 resultType="User" 直接返回-->
    <select id="searchById" parameterType="java.lang.String" resultMap="BaseResultMap">
        SELECT
        <include refid="BASE_COLUMN"/>
        FROM
        <include refid="BASE_TABLE"/>
        WHERE user_id = #{userId,jdbcType=VARCHAR}
    </select>

    <select id="searchAll" resultMap="BaseResultMap">
        SELECT
        <include refid="BASE_COLUMN"/>
        FROM
        <include refid="BASE_TABLE"/>
    </select>
</mapper>
这里需要当心,指定参数的全路径名称是否正确。
6.测试运行
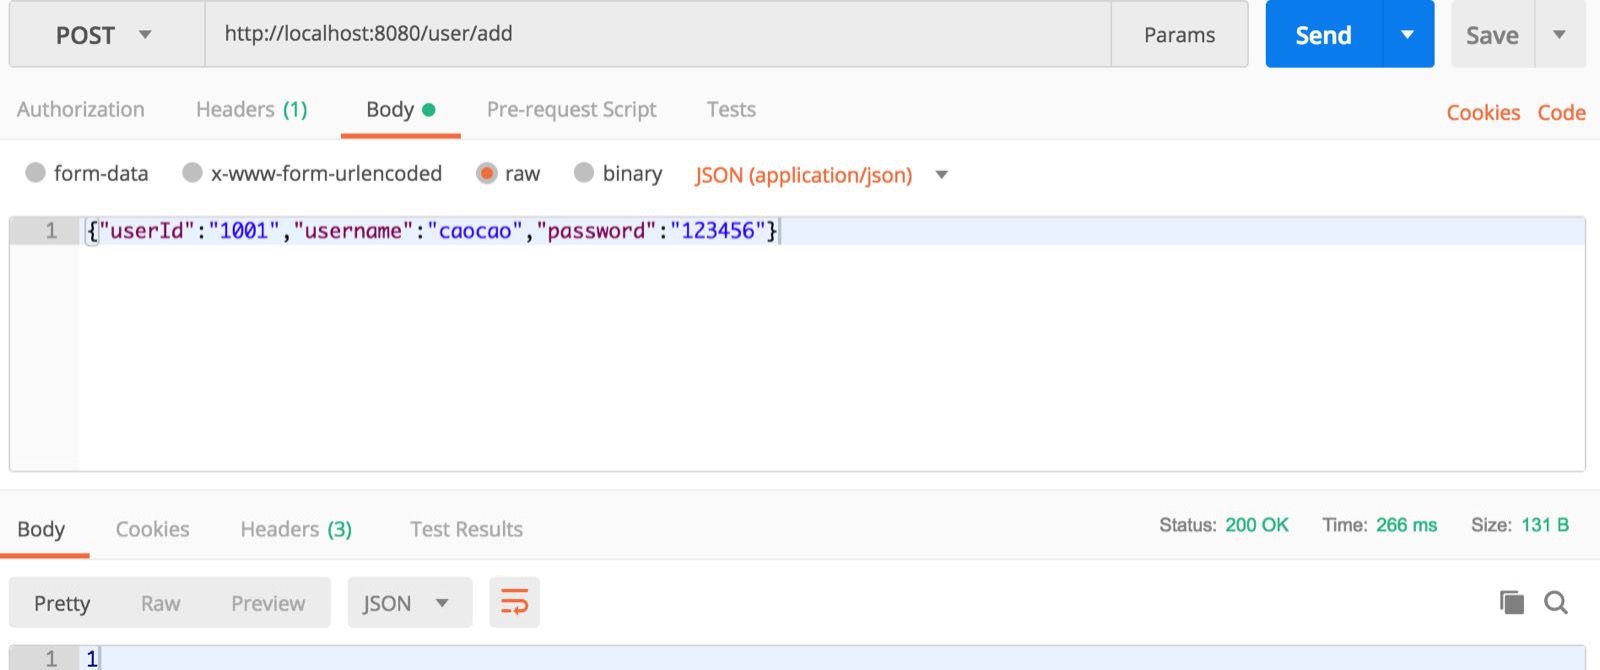
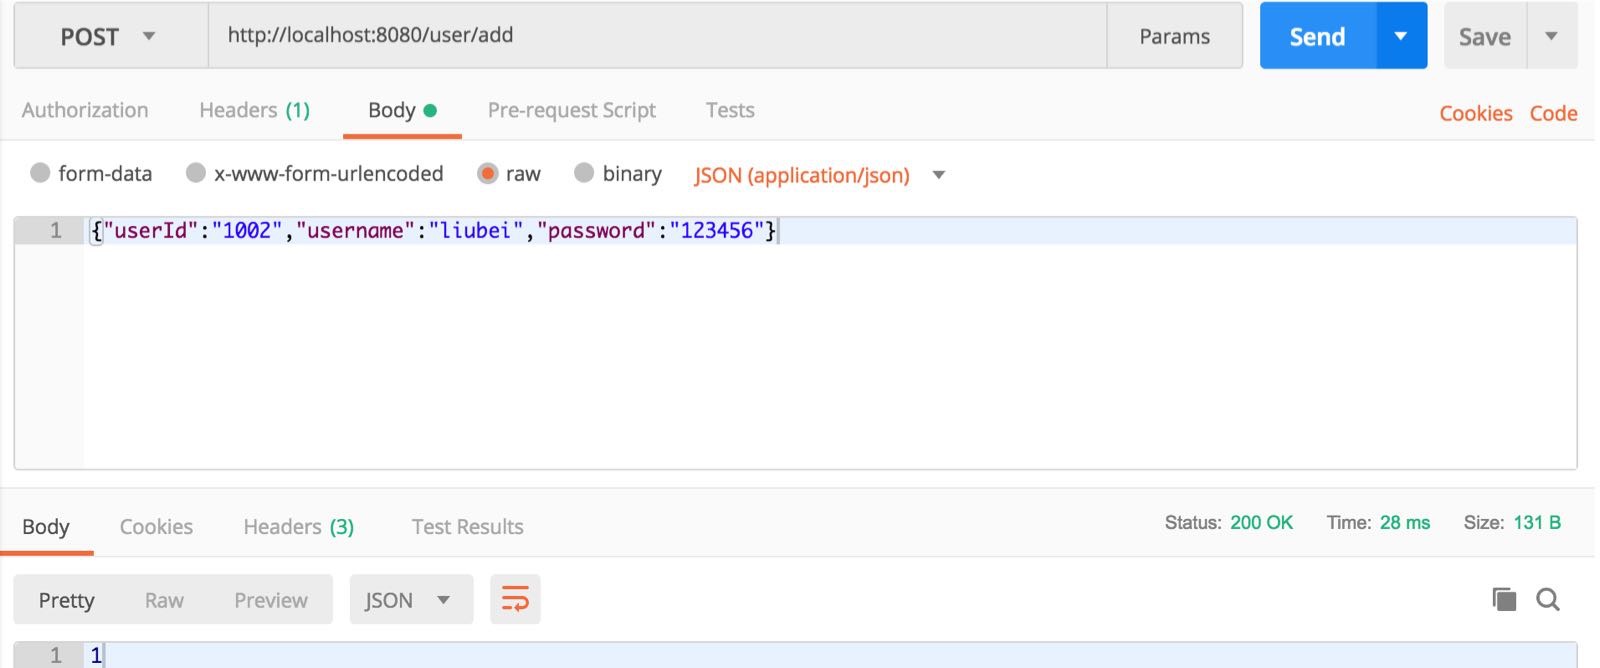
6.1 插入数据,如下
插入数据1:
插入数据2:
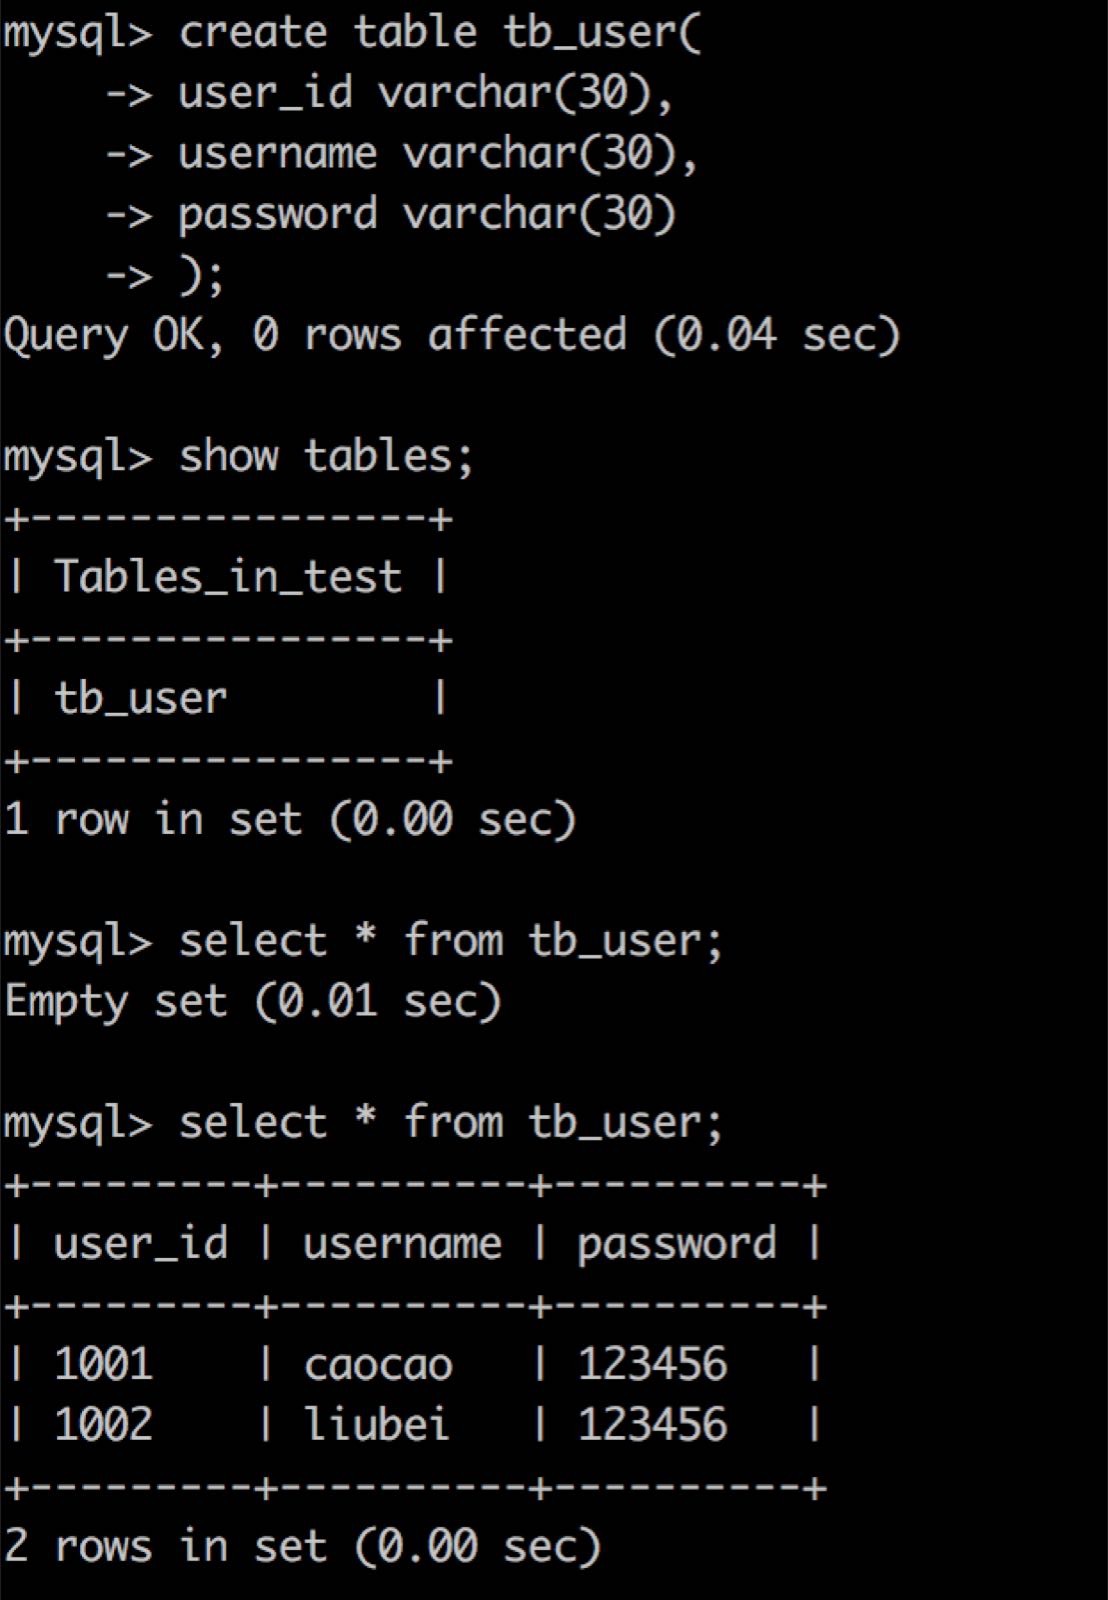
查询mysql
6.2 查询数据,如下
指定userId查询

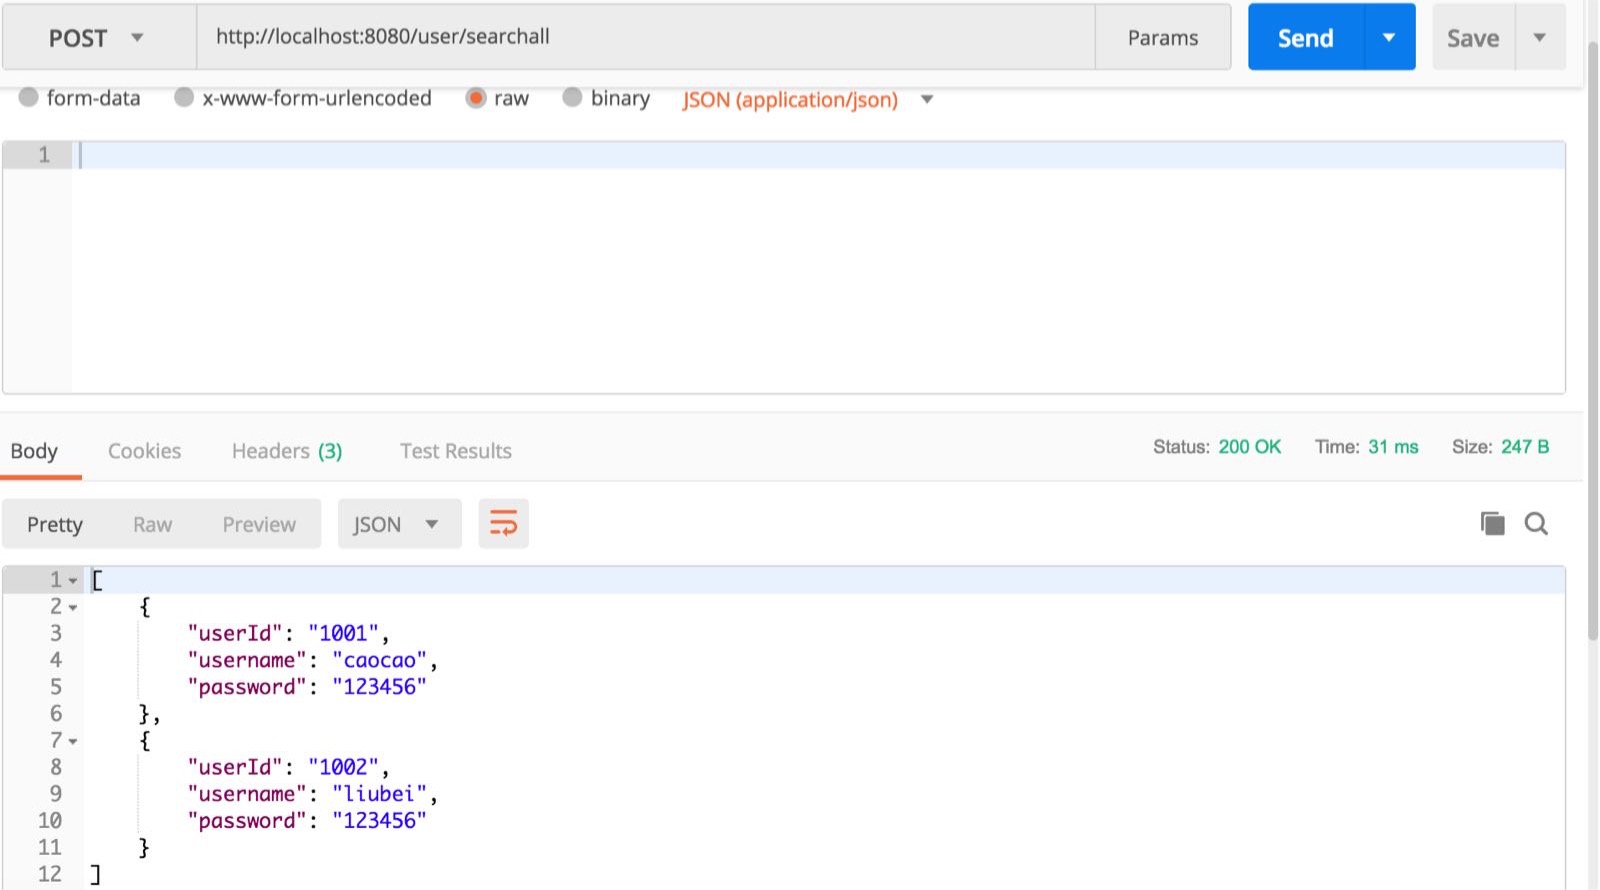
查询所有数据
这里基本上将Spring Boot与Mybatis的结合实现了。