Bean的装配,也就是bean对象在容器中的创建。然后容器根据我们的代码需求,将Bean对象传递过来。
这里有三种装配方式:
- 默认装配方式
- 动态工厂方式
- 静态工厂方式
先看项目结构:

先给出applicationContext
<?xml version="1.0" encoding="UTF-8"?>
<beans xmlns="http://www.springframework.org/schema/beans"
    xmlns:xsi="http://www.w3.org/2001/XMLSchema-instance"
    xsi:schemaLocation="
        http://www.springframework.org/schema/beans
        http://www.springframework.org/schema/beans/spring-beans.xsd">

    <!-- 注册Service-->
    <bean id="myService" class="com.fdd.service.SomeServiceImpl"/>

</beans>
第一步创建接口:ISomeService
package com.fdd.service;

public interface ISomeService {
	public void doSome();
	public void doOther();
}
第二步:创建实现类
public class SomeServiceImpl implements ISomeService {
	//添加无参构造器
	public SomeServiceImpl() {
		System.out.println("无参构造器:SomeServiceImpl实现类");
	}

	public void doSome() {
		System.out.println("doSome实现");
	}

	public void doOther() {
		System.out.println("doOther实现");
	}
}
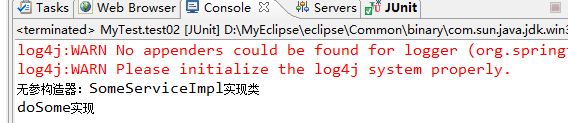
第三步:测试
public class MyTest {

	@Test
	public void test02(){
		//创建容器对象,记载Spring配置文件,会从类路径下面查找文件也就是src下面
		ApplicationContext ac= new ClassPathXmlApplicationContext("applicationContext.xml");


		ISomeService service = (ISomeService) ac.getBean("myService");
		service.doSome();
	}

}
一、默认装配方式
代码通过getBean方式从容器中获取指定的Bean实例,容器首先会调用Bean类的无参构造器,创建空值的实例对象。
z在上面代码的基础之上直接运行:
二、动态工厂方式
有些时候,项目需要使用工厂来创建Bean实例,而不能像前面例子中似的,直接由Spring容器来装配。
1、首先创建一个工厂类
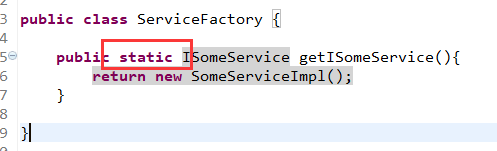
public class ServiceFactory {

	public ISomeService getISomeService(){
		return new SomeServiceImpl();
	}

}
2、在配置文件中配置该工厂
<?xml version="1.0" encoding="UTF-8"?>
<beans xmlns="http://www.springframework.org/schema/beans"
    xmlns:xsi="http://www.w3.org/2001/XMLSchema-instance"
    xsi:schemaLocation="
        http://www.springframework.org/schema/beans
        http://www.springframework.org/schema/beans/spring-beans.xsd">

    <!-- 注册工厂-->
    <bean id="myService" class="com.fdd.service.ServiceFactory"/>

</beans>
注意到这里我们配置的是工厂,而不是bean。这是因为我们的bean是通过工厂来创建的。
3、修改测试类
        @Test
	public void test01(){
		//创建容器对象,记载Spring配置文件,会从类路径下面查找文件也就是src下面
		ApplicationContext ac= new ClassPathXmlApplicationContext("applicationContext.xml");
		//从Spring容器中获取该工厂
		ServiceFactory factory=(ServiceFactory) ac.getBean("myFactory");
		//通过factory获取service
		ISomeService service=factory.getISomeService();
		service.doSome();
	}
4、改进
我们可以看到,我们在工厂中需要去new一个bean。这样做没有降低代码之间的耦合度,所以我们希望通过配置文件,在工厂中声明这个bean
<?xml version="1.0" encoding="UTF-8"?>
<beans xmlns="http://www.springframework.org/schema/beans"
    xmlns:xsi="http://www.w3.org/2001/XMLSchema-instance"
    xsi:schemaLocation="
        http://www.springframework.org/schema/beans
        http://www.springframework.org/schema/beans/spring-beans.xsd">

    <!-- 注册工厂-->
    <bean id="myFactory" class="com.fdd.service.ServiceFactory"/>
	<bean id="someService" factory-bean="myFactory" factory-method="getISomeService"></bean>
</beans>
此时我们就不需要获取Factory了,我们直接从容器中获取Service
	@Test
	public void test01(){
		//创建容器对象,记载Spring配置文件,会从类路径下面查找文件也就是src下面
		ApplicationContext ac= new ClassPathXmlApplicationContext("applicationContext.xml");
		//通过factory获取service
		ISomeService service=(ISomeService) ac.getBean("someService");
		service.doSome();
		service.doOther();
	}
三、静态工厂方式
使用静态工厂创建bean,不需要工厂的实例,
然后修改主配置文件
<?xml version="1.0" encoding="UTF-8"?>
<beans xmlns="http://www.springframework.org/schema/beans"
    xmlns:xsi="http://www.w3.org/2001/XMLSchema-instance"
    xsi:schemaLocation="
        http://www.springframework.org/schema/beans
        http://www.springframework.org/schema/beans/spring-beans.xsd">

    <!-- 注册service-->
	<bean id="someService" class="com.fdd.service.ServiceFactory"
			factory-method="getISomeService">
	</bean>
</beans>
四、容器中bean的作用域
当通过Spring容器来创建一个bean实例的时候,不仅可以完成bean的实例化,还可以通过scope属性来制定bean的作用域。Spring支持5中作用域:
- singleton:单态模式。也就是说在整个Spring容器中,使用singleton定义的bean将是单例的,只有一个实例。这也是默认的。
- prototype:原型模式。也就是说每次使用getBean方法获取的同一个<bean/>对象都是一个新的实例。
- request:对于每次HTTP请求,都会产生一个不同的bean实例
- session:对于不同的session,都会产生一个新的实例、
- global session:每一个全局的session对应一个bean实例。这是在集群中使用的。
需要注意的是:
- singleton:表示该bean是在容器中被创建时候就已经被装配好了
- prototype:bean实例是在代码中使用到的时候才进行装配的
接下来测试一下作用域:
<?xml version="1.0" encoding="UTF-8"?>
<beans xmlns="http://www.springframework.org/schema/beans"
    xmlns:xsi="http://www.w3.org/2001/XMLSchema-instance"
    xsi:schemaLocation="
        http://www.springframework.org/schema/beans
        http://www.springframework.org/schema/beans/spring-beans.xsd">

    <!-- 注册service-->
	<bean id="someService1" class="com.fdd.service.SomeServiceImpl"  scope="singleton"/>
	<bean id="someService2" class="com.fdd.service.SomeServiceImpl" scope="prototype"/>


</beans>
然后修改测试代码:
	@Test
	public void test01(){
		//创建容器对象,记载Spring配置文件,会从类路径下面查找文件也就是src下面
		ApplicationContext ac= new ClassPathXmlApplicationContext("applicationContext.xml");

		//service使用的是singleton
		ISomeService service1=(ISomeService) ac.getBean("someService1");
		ISomeService service2=(ISomeService) ac.getBean("someService1");
		System.out.println("service1=service2 ?  "+(service1==service2));

		//service使用的是prototype
		ISomeService service3=(ISomeService) ac.getBean("someService2");
		ISomeService service4=(ISomeService) ac.getBean("someService2");
		System.out.println("service3=service4 ?  "+(service3==service4));

	}
接下来看结果:

五、bean后处理器
bean后处理器是一种特殊的bean,容器中所有的bean在初始化时候,均会自动执行该类的两个方法。由于该bean是由其他bean自动调用执行,不是自己手动调用,因此这个bean不需要id属性
如果我们需要自定义bean,我们就需要实现BeanPostProcessor接口,这个接口中含有两个方法,分别在bean初始化完毕之前和之后执行。最后返回一个增强的bean,也就是添加了自己处理的bean
看一个例子,我们在之前的例子上进行修改、现在我们有两个bean,StudentServiceImpl和TeacherServiceImpl都实现了ISomeService接口。现在我们队StudentServiceImpl进行增强。
package com.fdd.service;

//这个是需要增强的类
public class StudentServiceImpl implements ISomeService {

	public void doSome() {
		System.out.println(this.getClass().getSimpleName()+",执行了doSome方法");
	}

	public void doOther() {
		System.out.println(this.getClass().getSimpleName()+",执行了doOther方法");
	}

}
然后是TeacherServiceImpl
package com.fdd.service;

public class TeacherServiceImpl implements ISomeService {

	public void doSome() {
		System.out.println(this.getClass().getSimpleName()+",执行了doSome方法");
	}

	public void doOther() {
		System.out.println(this.getClass().getSimpleName()+",执行了doOther方法");
	}

}
然后我们创建自己的bean后置器
public class MyBeanPostProcessor implements BeanPostProcessor {


	public Object postProcessBeforeInitialization(Object bean, String beanName)
			throws BeansException {
		//即使不对bean进行增强,也要是方法返回bean,不能为默认的null
		//否则将抛出空指针异常
		return bean;
	}

	public Object postProcessAfterInitialization(final Object bean, String beanName)
			throws BeansException {
		//在这里我们增强的是StudentServiceImpl
		if("studentService".equals(beanName)){
			Object proxy=Proxy.newProxyInstance(bean.getClass().getClassLoader(), bean.getClass().getInterfaces(),
					new InvocationHandler() {

						public Object invoke(Object proxy, Method method, Object[] args)
								throws Throwable {
							if("doSome".equals(method.getName())){
								System.out.println("目标方法开始执行的时间"+System.currentTimeMillis());
								//执行目标方法
								Object result=method.invoke(bean, args);
								System.out.println("目标方法结束执行的时间"+System.currentTimeMillis());
								return result;
							}
							return method.invoke(bean, args);
						}

					});
			//将增强之后的代理返回
			return proxy;
		}
		return bean;
	}
}
最后在我们的配置文件中声明后处理器
<?xml version="1.0" encoding="UTF-8"?>
<beans xmlns="http://www.springframework.org/schema/beans"
    xmlns:xsi="http://www.w3.org/2001/XMLSchema-instance"
    xsi:schemaLocation="
        http://www.springframework.org/schema/beans
        http://www.springframework.org/schema/beans/spring-beans.xsd">

    <!-- 注册service-->
	<bean id="studentService" class="com.fdd.service.StudentServiceImpl"  />
	<bean id="teacherService" class="com.fdd.service.TeacherServiceImpl"/>
	<bean class="com.fdd.service.MyBeanPostProcessor"></bean>

</beans>
修改测试类:
	@Test
	public void test01(){
		//创建容器对象,记载Spring配置文件,会从类路径下面查找文件也就是src下面
		ApplicationContext ac= new ClassPathXmlApplicationContext("applicationContext.xml");

		//service使用的是singleton
		ISomeService studentService=(ISomeService) ac.getBean("studentService");
		//这个是增强的方法
		studentService.doSome();
		studentService.doOther();
		System.out.println("===============================");
		ISomeService teacherService=(ISomeService) ac.getBean("teacherService");
		teacherService.doSome();
		teacherService.doOther();
	}
看运行结果:

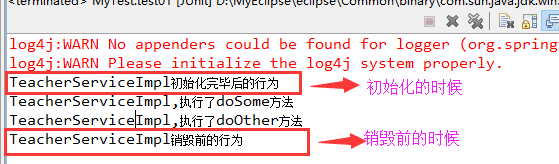
六、定制bean的生命始末
我们可以在配置文件中声明一个bean,在刚刚初始化的时候的行为,也可以声明销毁前的行为
比如我们在上面的TeacherServiceImpl实现类中声明
<?xml version="1.0" encoding="UTF-8"?>
<beans xmlns="http://www.springframework.org/schema/beans"
    xmlns:xsi="http://www.w3.org/2001/XMLSchema-instance"
    xsi:schemaLocation="
        http://www.springframework.org/schema/beans
        http://www.springframework.org/schema/beans/spring-beans.xsd">

    <!-- 注册service-->
	<bean id="studentService" class="com.fdd.service.StudentServiceImpl"  />
	<!-- 在TeacherServiceImpl -->
	<bean id="teacherService" class="com.fdd.service.TeacherServiceImpl"
	init-method="setUp" destroy-method="setDown"/>
	<bean class="com.fdd.service.MyBeanPostProcessor"></bean>

</beans>![]()
需要注意的是,我们如果想要看到销毁方法,需要在调用方法之后,关闭ApplicationContext:
	@Test
	public void test01(){
		//创建容器对象,记载Spring配置文件,会从类路径下面查找文件也就是src下面
		ApplicationContext ac= new ClassPathXmlApplicationContext("applicationContext.xml");

		//service使用的是singleton
		ISomeService teacherService=(ISomeService) ac.getBean("teacherService");
		teacherService.doSome();
		teacherService.doOther();
		((ClassPathXmlApplicationContext)ac).close();
	}
查看运行结果:
七、bean的生命周期
- 调用无参构造器,创建实例对象
- 调用set方法
- 若bean实现了BeanNameAware接口,则会执行接口方法setBeanName(String beanid),使得bean获取其在容器中的id
- 若bean实现了BeanFactoryAware接口,则会执行setBeanFactory(BeanFactory factory),使得bean获取到BeanFactory对象
- 如果注册了Bean后处理器,那么会执行该接口方法postProcessorBeforeIntialization()。
- 如果实现了InitialzingBean接口,就会执行afterPropertiesSet()。这个方法是bean初始化结束的标志
- 若设置了init-method方法,则执行
- 如果注册了Bean后处理器,执行postProcessorAfterIntialization()
- 执行业务方法
- 如果设置了DisposableBean接口,则执行改接口方法destory().
- 如果设置了destory-method方法,则执行