原文地址https://blog.csdn.net/lijing742180/article/details/81157947
原文地址https://blog.csdn.net/zailushangbuting/article/details/70808612
原文地址https://blog.csdn.net/maybe_frank/article/details/79094230
原文地址https://www.cnblogs.com/vv00cc/p/7902693.html
一、响应断言
1、什么是响应断言?
在jmeter中最常用的断言方法是“响应断言”,它是通过检查sampler的请求内容和响应结果中是否匹配指定的字符串来判断结果是否正确。
响应断言简单实用,能够解决工作中的大部分问题。
尤其是在jmeter4.0版本中在响应断言中加入了Request Headers、Request Data,使得能够对请求头和请求体进行断言,满足了多样性的断言需求,非常方便。
2、使用响应断言
响应断言的使用非常简单,通常需要关注如下三点:
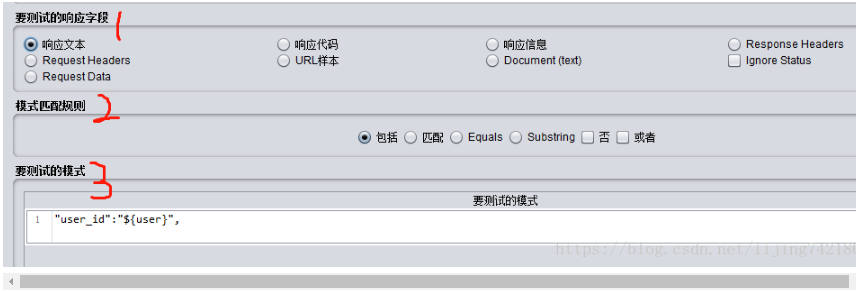
“要测试的响应字段”
指我们要进行断言的内容所在的位置,分为request和response两大块,根据实际情况选择即可(最常用的是响应文本)
“模式匹配规则” (此处提到的1和3对应上图中的数字)
控制上图中的“1”如何匹配“3”
"包括"--1包括3,支持正则;
“匹配”--1完全匹配3,支持正则;
“Equals”--1完全匹配3中的文本内容,不支持正则,且大小写敏感;
“Substring”--1包括3中的文本内容,不支持正则,且大小写敏感;
“否”、“或者”--跟前面四个选项结合使用,分别用于逻辑取反、取或。
“要测试的模式”
这里填写我们要进行断言的内容,可以添加多个模式,可以使用变量、文本、正则表达式(在“包括”和“匹配”模式下)。
二、BeanShell断言
1、什么是BeanShell断言?
BeanShell断言可以使用beanshell脚本来执行断言检查,可以用于更复杂的个性化需求,使用更灵活,功能更强大,但是要能够熟练使用beanshell脚本。
在这里除了可以使用beanshell的内置变量外,主要通过 Failure 和 FailureMessage来设置断言结果。
下面看一个简单的示例:
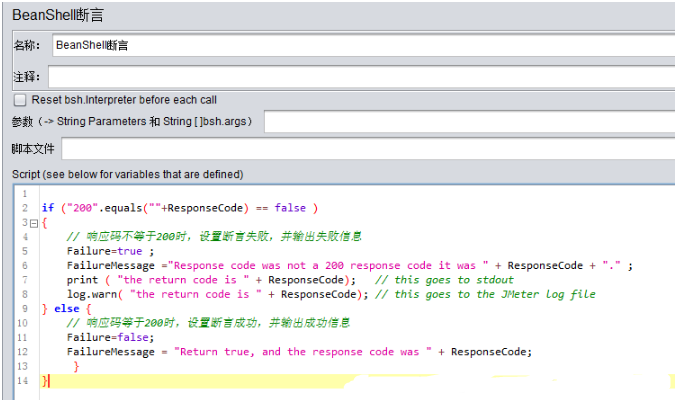
其中脚本内容如下:
if ("200".equals(""+ResponseCode) == false )
{
    // 响应码不等于200时,设置断言失败,并输出失败信息
    Failure=true ;
    FailureMessage ="Response code was not a 200 response code it was " + ResponseCode + "." ;
    print ( "the return code is " + ResponseCode);   // this goes to stdout
    log.warn( "the return code is " + ResponseCode); // this goes to the JMeter log file
} else {
    // 响应码等于200时,设置断言成功,并输出成功信息
    Failure=false;
    FailureMessage = "Return true, and the response code was " + ResponseCode;
     }
}
=============================================================================================================================================
=============================================================================================================================================
2、编写断言判断代码:
if("206".equals("${action_seq_1}") && "3".equals("${trans_status_1}")){
    Failure = false;
    FailureMessage = "交易成功!";
}else if(!"206".equals("${action_seq_1}")){
     Failure = true;
    FailureMessage = "交易类型不正确!";
}else if(!"3".equals("${trans_status_1}")){
    Failure = true;
    FailureMessage = "交易未成功!";
}

=============================================================================================================================================
=============================================================================================================================================
BeanShell是jmeter的解释型脚本语言,和java语法大同小异,并有自己的内置对象和方法可供使用。
vars:操作jmeter的变量:vars.get(String parmStr) 获取jmeter的变量值;vars.put(String key,String value) 把数据存到Jmeter变量中;
prev:获取sample返回的信息,prev.getResponseDataAsString() 获取响应信息;prev.getResponseCode() 获取响应状态吗;
从这里可以参考更多:https://jmeter.apache.org/api/org/apache/jmeter/samplers/SampleResult.html
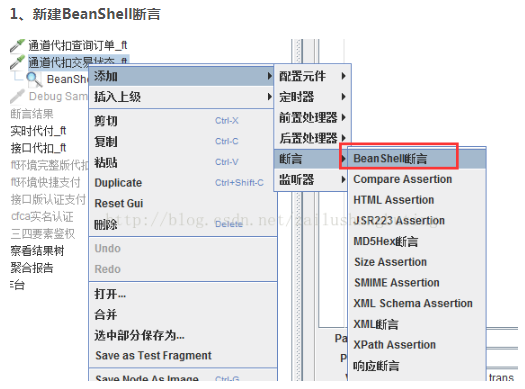
1、添加一个线程组,并依次加上需要的功能组件,右键http请求添加一个BeanShell Assertion。
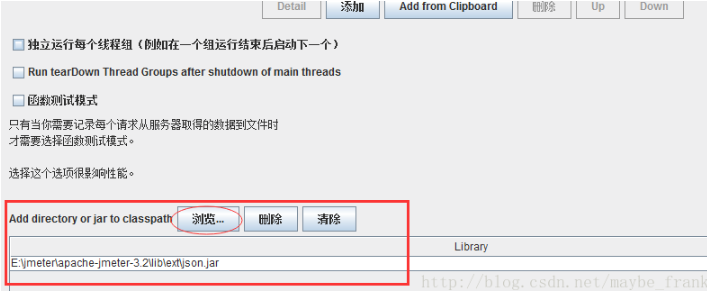
2、我们把json.jar引入,可以拷贝到jmeter的lib\ext目录下,也可以在计划任务引入jar包
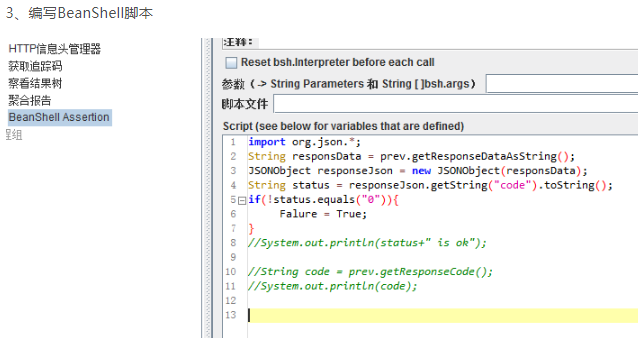
import org.json.*;
String responsData = prev.getResponseDataAsString();
JSONObject responseJson = new JSONObject(responsData);
String status = responseJson.getString("code").toString();
if(!status.equals("0")){
    Falure = True;
}
=============================================================================================================================================
=============================================================================================================================================
解析response中的内容,并把获取到的value传递到后续的request中,常用的方法就是在想要解析response的request上添加后置处理器
本章介绍两种常用的组件
BeanShell PostProcessor
JSON Extractor
下面是具体的操作步骤:
添加后置处理器:BeanShell PostProcessor
获取response中的字符串,并对内容进行判断,当response中包含“The wait operation timed out”或者“Oops. Something went wrong ... sorry”时,都认为该request的response不正确
String response = prev.getResponseDataAsString();
String code = prev.getResponseCode();
log.info("Respnse is " + response);
log.info(code);
int result1 = response.indexOf("The wait operation timed out");
int result2 = response.indexOf("Oops. Something went wrong ... sorry");
if(code == "200" && result1>=0 || result2>=0){
    FailureMessage = "OK,check current";
}
else{
    Failure = true;
    FailureMessage = "ERROR,check error";
}
解析返回的Jason数据,获取name字段的值赋给变量result
{“body”:{“apps”:[{“name”:”111”},{“name”:”222”}]}}
import org.json.*;
脚本中的导入的json包需要自己去网络下载后放到\lib\ext下

String response_data = prev.getResponseDataAsString();
JSONObject data_obj = new JSONObject(response_data);
String apps_str = data_obj.get("body").get("apps").toString();
JSONArray apps_array = new JSONArray(apps_str);
String[] result = new String[apps_array.length()];
for(int i=0;i<apps_array.length();i++){
    JSONObject app_obj = new
    JSONObject(apps_array.get(i).toString());
    String name = app_obj.get("name").toString();
    result[i] = name;
}
vars.put("result", Arrays.toString(result));
添加后置处理器:JSON Extractor
解析返回的Jason数据,获取name字段的值带入参数到后边的request中
{“body”:{“apps”:[{“name”:”111”},{“name”:”222”}]}}
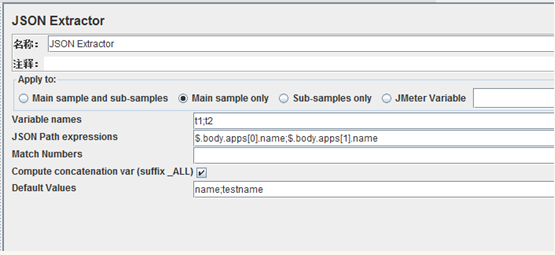
变量t1的值是111,变量t2的值是222