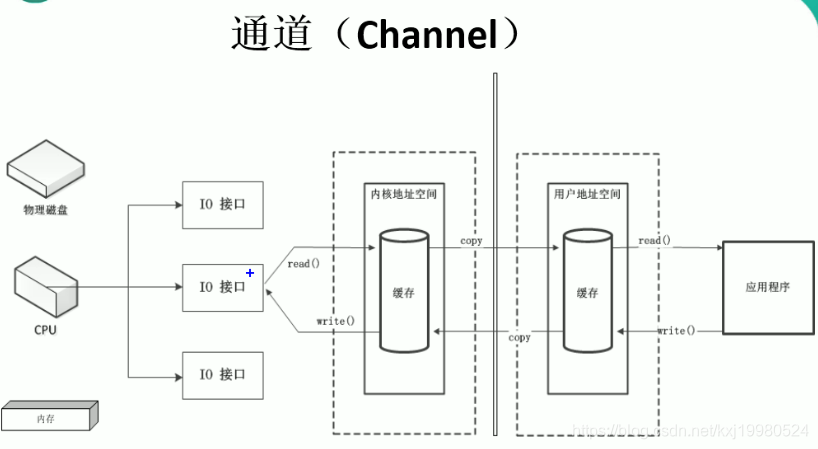
在操作系统最早期的时候,建立通道就是有一个请求过来cpu就直接来处理这些请求,当io请求过多时,cpu占用率就特别大,没工夫干别的事了
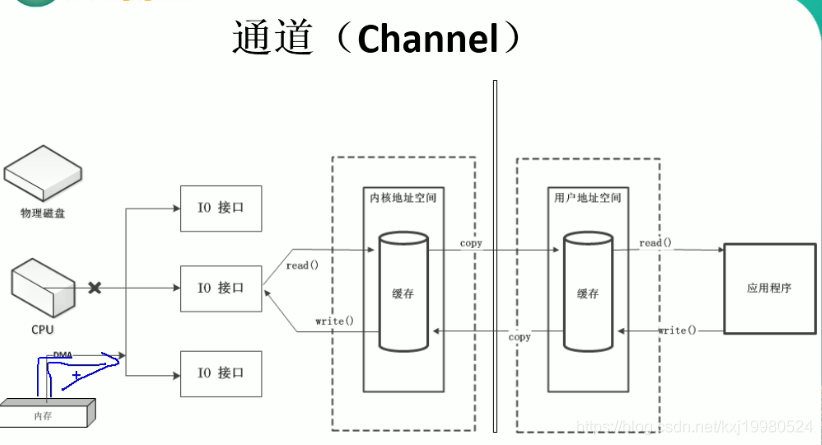
后来的操作系统,当读写请求来的时候,会有个DMA来向cpu申请权限,给了它权限后读写请求就会找dma(直接存储器)来全权处理,这样cpu就有功夫干别的事了,但是还有个问题,当流过多时,dma也会向cpu申请建立多个dma总线,如果dma总线过多,就会造成总线过多的问题,这样也会造成cpu性能的问题.IO流就是使用这种方式的
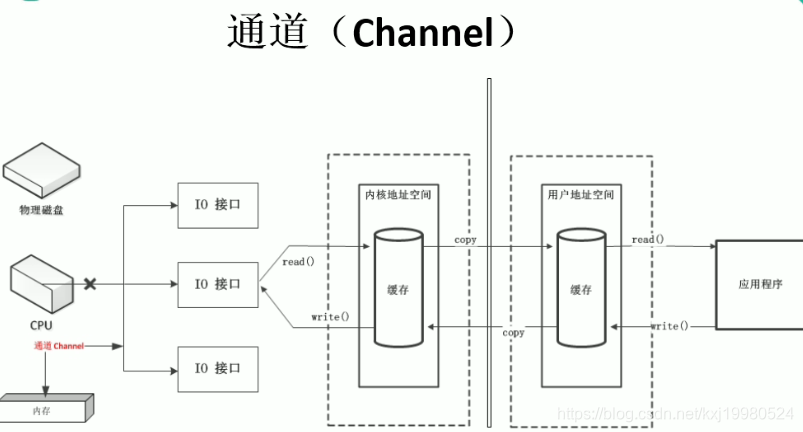
到后来操作系统又有更新,通道是一个完全独立的处理器,专门处理io操作的,不需要跟cpu申请,拥有自己的命令和传输方式,再多的请求它也不用耽误cpu这样才能提高效率,这就是NIO的通道.
下面三个测试案例就是利用通道来复制文件,第一个就是原来的流利用通道复制,后面两种是利用通道结合缓冲区来复制可以拿一个电影大点的来测试,比较会明显.
	//1.利用通道完成文件的复制(非直接缓冲区)
	@Test
	public void test1(){
		FileInputStream fis = null;
		FileOutputStream fos = null;
		//获得通道
		FileChannel inChannel = null;
		FileChannel outChannel = null;
		try {
			fis = new FileInputStream("配置.docx");
			fos = new FileOutputStream("2.docx");

			inChannel = fis.getChannel();
			outChannel = fos.getChannel();

			//分配指定大小的缓冲区
			ByteBuffer buf = ByteBuffer.allocate(1024);

			//将通道中的数据存入缓冲区
			while(inChannel.read(buf)!=-1){
				buf.flip();
				//将缓冲区中的数据写入通道中
				outChannel.write(buf);

				buf.clear();//清空缓冲区
			}
		} catch (FileNotFoundException e) {
			e.printStackTrace();
		} catch (IOException e) {
			e.printStackTrace();
		}finally{
			if(outChannel!=null){
				try {
					outChannel.close();
				} catch (IOException e) {
					// TODO Auto-generated catch block
					e.printStackTrace();
				}
			}if(inChannel!=null){
				try {
					inChannel.close();
				} catch (IOException e) {
					// TODO Auto-generated catch block
					e.printStackTrace();
				}
			}if(fos!=null){
				try {
					fos.close();
				} catch (IOException e) {
					// TODO Auto-generated catch block
					e.printStackTrace();
				}
			}if(fis!=null){
				try {
					fis.close();
				} catch (IOException e) {
					// TODO Auto-generated catch block
					e.printStackTrace();
				}
			}
		}
	}

	//使用直接缓冲区完成文件的复制(内存映射文件)
	@Test
	public void test2() throws IOException{

		long start = System.currentTimeMillis();

		FileChannel inChannel = FileChannel.open(Paths.get("1.jpg","2.jpg"),StandardOpenOption.READ);
		FileChannel outChannel = FileChannel.open(Paths.get("3.jpg","4.jpg"),StandardOpenOption.WRITE,StandardOpenOption.READ,StandardOpenOption.CREATE);

		//内存映射文件
        //下面这是用另一种方式获取缓冲区,和调用方法获取一样,写法不一样,但是这种只使用于
        //ByteBuffer字节缓冲区别的不能用
		MappedByteBuffer inMapBuf = inChannel.map(MapMode.READ_ONLY, 0, inChannel.size());
		MappedByteBuffer outMapBuf = outChannel.map(MapMode.READ_WRITE, 0, inChannel.size());

		//直接对缓冲区进行数据的读写操作
		byte[] bst = new byte[inMapBuf.limit()];
		inMapBuf.get(bst);
		outMapBuf.put(bst);

		long end = System.currentTimeMillis();

		System.out.println(end-start);
		inChannel.close();
		outChannel.close();
	}

	//通道之间的数据传输(直接缓冲区)
	@Test
	public void test3() throws IOException{

		FileChannel inChannel = FileChannel.open(Paths.get("1.jpg"),StandardOpenOption.READ);
		//StandardOpenOption.CREATE_NEW它的意思是有就报错没有就创建
		//StandardOpenOption.CREATE没有就创建有就覆盖
		FileChannel outChannel = FileChannel.open(Paths.get("2.jpg"),StandardOpenOption.WRITE,StandardOpenOption.READ,StandardOpenOption.CREATE);

		//inChannel.transferTo(0, inChannel.size(), outChannel); //这两个方法意思一样,写法不一样
		outChannel.transferFrom(inChannel,0,inChannel.size());


		inChannel.close();outChannel.close();

	}
分散(Scatter)与聚集(Gather),就是使用通道操作缓冲区数组
* 分散读取(Scattering Reads):将通道中的数据分散到多个缓冲区中
* 聚集写入(Gathering Writes):将多个缓冲区中的数据聚集到通道中
	//分散和聚集
	@SuppressWarnings("resource")
	@Test
	public void test4() throws IOException{
		RandomAccessFile raf1 = new RandomAccessFile("1.txt","rw");

		//1.获取通道
		FileChannel channel1 = raf1.getChannel();

		//2.分配直接大小的缓冲区
		ByteBuffer buf1 = ByteBuffer.allocate(100);
		ByteBuffer buf2 = ByteBuffer.allocate(1024);

		//3.分散读取
		ByteBuffer[] bufs = {buf1,buf2};
		channel1.read(bufs);

		for(ByteBuffer bytebuffer:bufs){
			bytebuffer.flip();
		}

		System.out.println(new String(bufs[0].array(),0,bufs[0].limit()));
		System.out.println("-------------");
		System.out.println(new String(bufs[1].array(),0,bufs[1].limit()));

		//4.聚集写入
		RandomAccessFile raf2 = new RandomAccessFile("2.txt","tw");
		FileChannel channel2 = raf2.getChannel();
		channel2.write(bufs);
	}
编码与解码
@Test
	public void test6() throws CharacterCodingException{
		Charset cs1 = Charset.forName("GBK");

		//获取编码器与解码器
		CharsetEncoder ce = cs1.newEncoder();

		//获取解码器
		CharsetDecoder cd = cs1.newDecoder();

		CharBuffer cbuf = CharBuffer.allocate(1024);

		cbuf.put("一二三四五");
		cbuf.flip();
		//编码
		ByteBuffer buf = ce.encode(cbuf);

		//解码

		CharBuffer decode = cd.decode(buf);

		System.out.println(decode.toString());


	}

	//字符串  获取所有的编码名称
	@Test
	public void test5(){
		SortedMap<String, Charset> map = Charset.availableCharsets();

		Set<Entry<String,Charset>> set = map.entrySet();

		for(Entry entry : set){
			System.out.println(entry.getKey()+"---"+entry.getValue());
		}
	}