转发自我的blog:https://rayleeafar.github.io/2019/01/20/yuque/%E8%85%BE%E8%AE%AF%E4%BA%91%E6%9C%8D%E5%8A%A1%E5%99%A8(CVM%E4%B8%BB%E6%9C%BA%20Ubuntu%E7%B3%BB%E7%BB%9F)%E4%B8%80%E4%B8%AA%E5%BC%B9%E6%80%A7%E7%BD%91%E5%8D%A1%E7%BB%91%E5%AE%9A%E5%A4%9A%E4%B8%AAIP%E5%9C%B0%E5%9D%80%E7%9A%84%E6%96%B9%E6%B3%95/
前言:
最近项目需求,需要多个外网ip地址,防止一些梯子或爬虫项目被封。又不想开多个云服务器,浪费资源,正好腾讯云的CVM的弹性网卡支持单网卡多辅助IP,遂以此出发,为云主机绑定了4个不同的外网IP,网上搜到的资源都是教配置Fedora系统的,我用的ubuntu16.04为服务器的系统,有点不同,所以记录下来,希望能对一些朋友有帮助~~
一、创建云主机并绑定弹性网卡
创建云主机后一定要将默认的网卡换成弹性网卡,在左边栏有弹性网卡,点开在CVM的对应地理区域创建弹性网卡,没有绑定会提示收费,点击绑定,选中相应的CVM主机就好,附上不同CVM配置能绑定的IP数量:
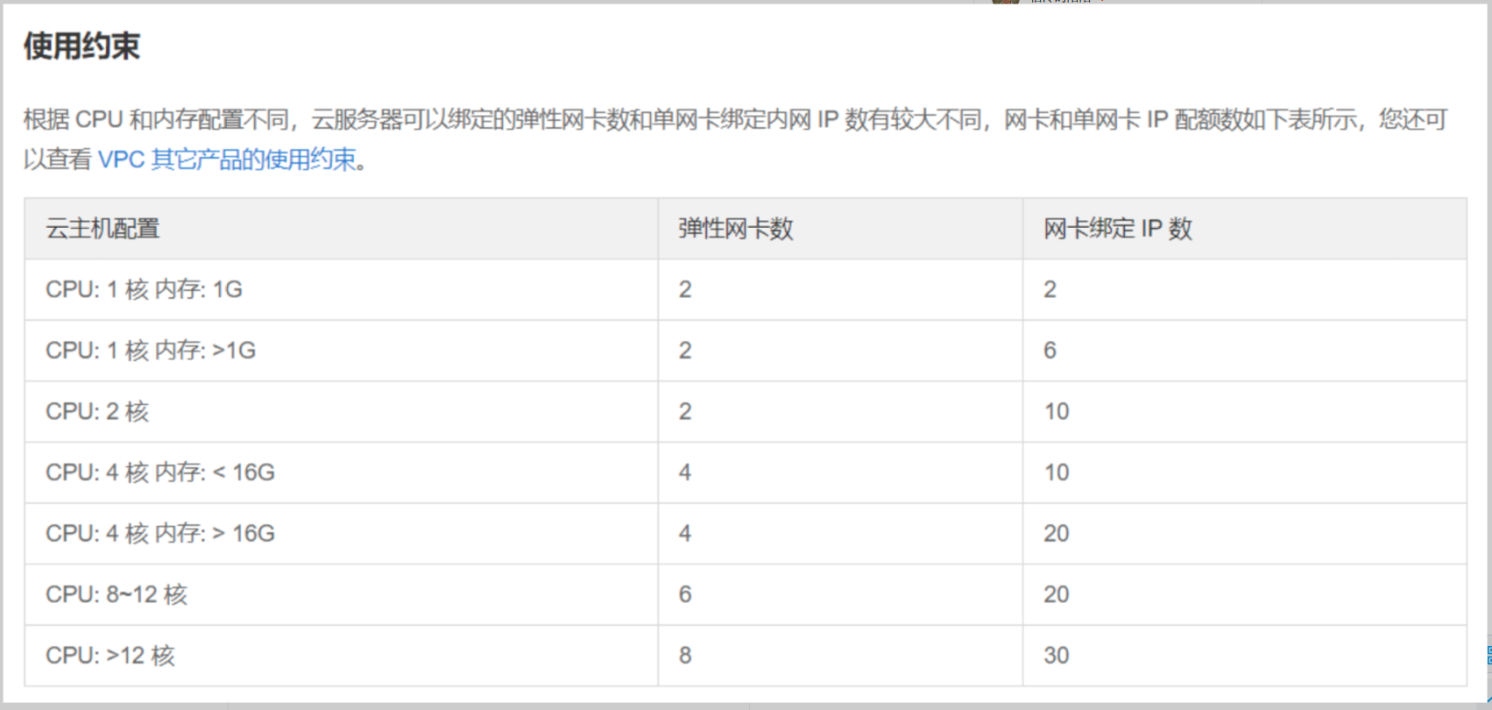
我是1核2G,我绑定了4个IP,舒服,哈哈~~~
修改为弹性网卡后,CVM主机如下显示

主IP地址后面会出现 弹性 两个字哟~~
二、为弹性网卡添加辅助ip
1、先添加内网IP
点击创建的CVM实例名称,进入实例的详细信息页,选择详细页上的弹性网卡tab,进入到下面的页面
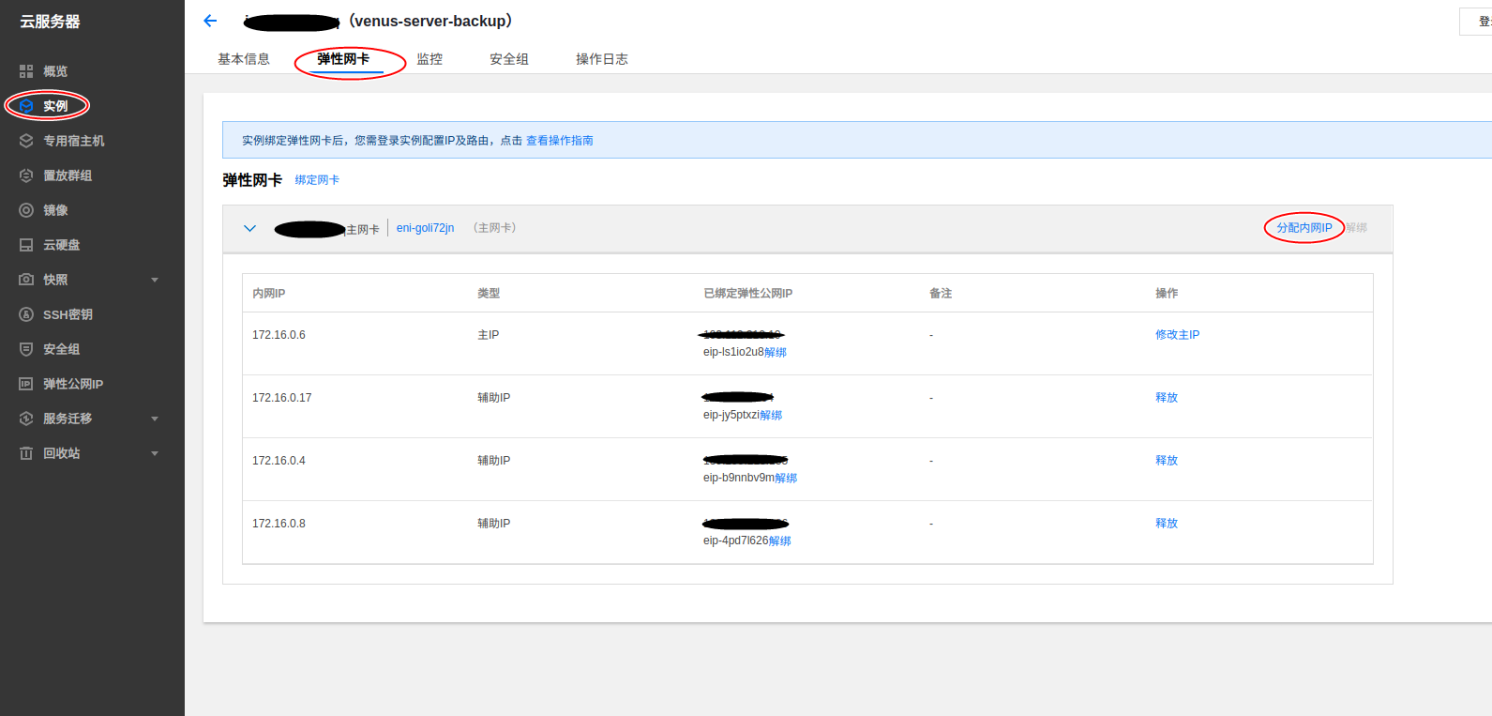
点击右上角分配内网IP,为此网卡添加辅助内网IP,我添加了如下三个,加上主网卡一共4个IP
2、为刚添加的内网IP分配外网IP
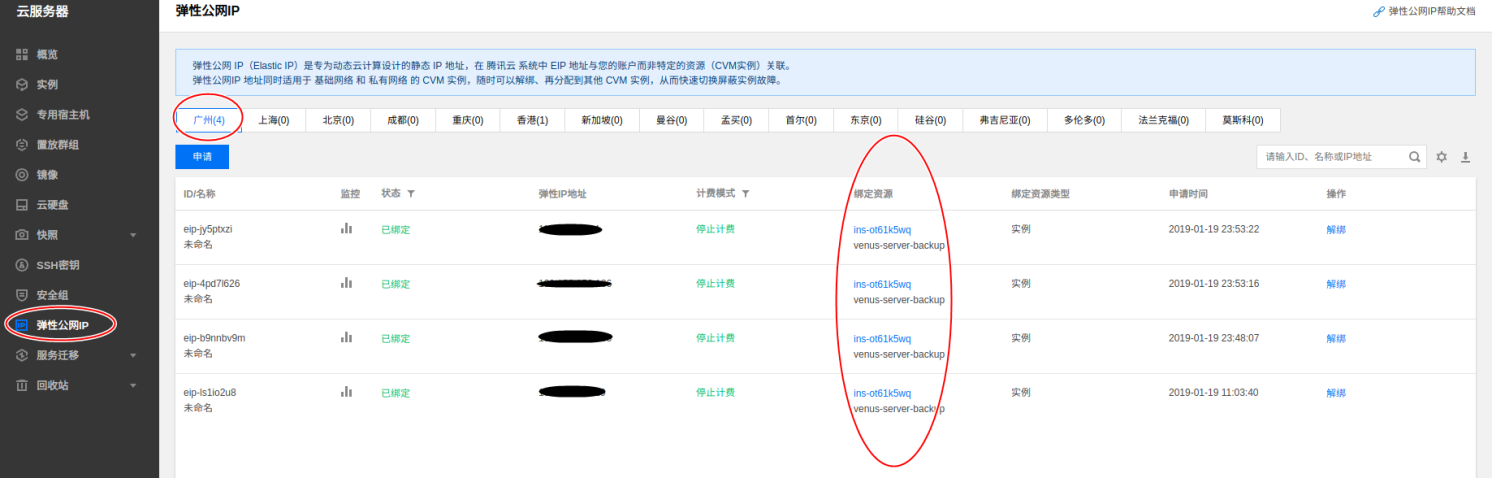
添加完内网IP后,点击左侧菜单栏,到弹性网卡,就是最开始为CVM配置弹性网卡的页面,在CVM对应区域添加3个弹性ip,操作和第一步为CVM添加弹性ip一样,创建好就绑定到CVM上,完成后如下图:
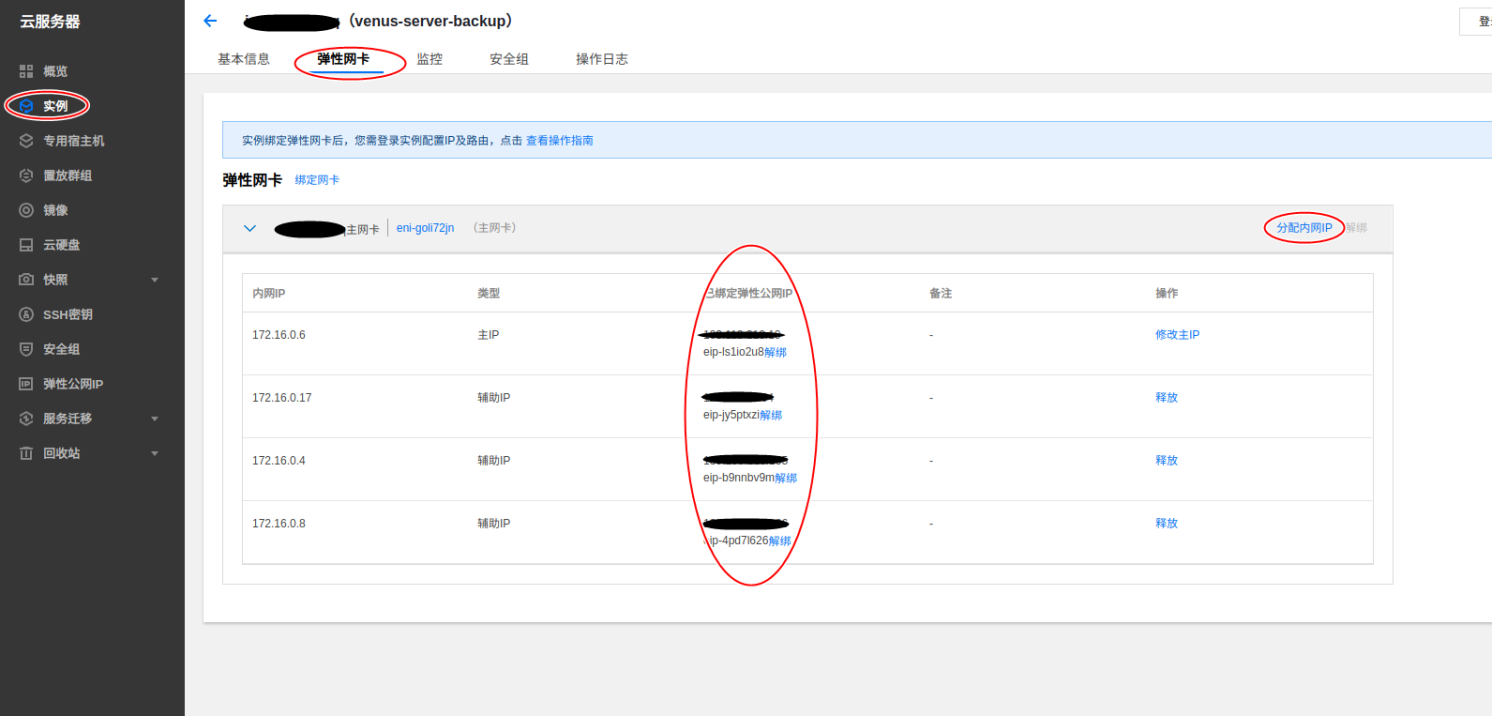
回到刚才实例详情页面就能看到之前添加的内网ip后面出现了刚才添加的公网ip了:
3、腾讯云控制台的操作就完成了
三、Ubuntu系统上的多IP绑定配置
配置相对Fedora是比较简单的:
1、禁用云主机的自动配置
查看网卡配置
cat /etc/network/interfaces.d/50-cloud-init.cfg
>> cat /etc/network/interfaces.d/50-cloud-init.cfg

# This file is generated from information provided by
# the datasource.  Changes to it will not persist across an instance.
# To disable cloud-init's network configuration capabilities, write a file
# /etc/cloud/cloud.cfg.d/99-disable-network-config.cfg with the following:
# network: {config: disabled}
auto lo
iface lo inet loopback

auto eth0
iface eth0 inet dhcp
上面写着要想自定义网络配置需要禁用掉自带的云初始化,方法是创建文件
/etc/cloud/cloud.cfg.d/99-disable-network-config.cfg
并添加如下内容
network: {config: disabled}
那就照做就是:
sudo bash -c "echo 'network: {config: disabled}' > /etc/cloud/cloud.cfg.d/99-disable-network-config.cfg.bk"
2、手动配置我们的网卡信息
主要是修改网络接口配置文件
vim /etc/network/interfaces
需要的内容一定要照着控制台显示的各个内网IP填,网关和子网掩码用
route
查看确认,我一直以为子网掩码用255.255.255.0,结果我一看却是255.255.240.0
>> route
Kernel IP routing table
Destination     Gateway         Genmask         Flags Metric Ref    Use Iface
default         172.16.0.1      0.0.0.0         UG    0      0        0 eth0
172.16.0.0      *               255.255.240.0   U     0      0        0 eth0
添加如下内容
# This file describes the network interfaces available on your system
# and how to activate them. For more information, see interfaces(5).

#source /etc/network/interfaces.d/* 注释掉原来的配置

auto lo
iface lo inet loopback
# The primary network interface
auto eth0
iface eth0 inet static
address 172.16.0.6     #主网卡的内网IP
netmask 255.255.240.0  #子网掩码
gateway 172.16.0.1     #网关,一般为内网第一个.1的IP

# more side ip
auto eth0:1            #辅助IP的网卡名,自己定义,这样写比较表意
iface eth0:1 inet static
address 172.16.0.4     #辅助IP的内网IP
netmask 255.255.240.0
gateway 172.16.0.1

auto eth0:2
iface eth0:2 inet static
address 172.16.0.8
netmask 255.255.240.0
gateway 172.16.0.1

auto eth0:3
iface eth0:3 inet static
address 172.16.0.17
netmask 255.255.240.0
gateway 172.16.0.1
保存退出,基本完工
四、重启查看并测试
>> ifconfig
eth0      Link encap:Ethernet  HWaddr ***********
          inet addr:172.16.0.6  Bcast:172.16.15.255  Mask:255.255.240.0
          UP BROADCAST RUNNING MULTICAST  MTU:1500  Metric:1
          RX packets:87641 errors:0 dropped:0 overruns:0 frame:0
          TX packets:87248 errors:0 dropped:0 overruns:0 carrier:0
          collisions:0 txqueuelen:1000
          RX bytes:5342944 (5.3 MB)  TX bytes:5588316 (5.5 MB)

eth0:1    Link encap:Ethernet  HWaddr ***********
          inet addr:172.16.0.4  Bcast:172.16.15.255  Mask:255.255.240.0
          UP BROADCAST RUNNING MULTICAST  MTU:1500  Metric:1

eth0:2    Link encap:Ethernet  HWaddr ***********
          inet addr:172.16.0.8  Bcast:172.16.15.255  Mask:255.255.240.0
          UP BROADCAST RUNNING MULTICAST  MTU:1500  Metric:1

eth0:3    Link encap:Ethernet  HWaddr ***********
          inet addr:172.16.0.17  Bcast:172.16.15.255  Mask:255.255.240.0
          UP BROADCAST RUNNING MULTICAST  MTU:1500  Metric:1

lo        Link encap:Local Loopback
          inet addr:127.0.0.1  Mask:255.0.0.0
          UP LOOPBACK RUNNING  MTU:65536  Metric:1
          RX packets:0 errors:0 dropped:0 overruns:0 frame:0
          TX packets:0 errors:0 dropped:0 overruns:0 carrier:0
          collisions:0 txqueuelen:1
          RX bytes:0 (0.0 B)  TX bytes:0 (0.0 B)
成功撒花,愉快的开始其它的业务吧~~~~