今天开始学习spring,每天都会将自己学习的一些内容,或是一些总结以博客的形式记录下来,方便自己以后回顾,如果能给他人学习带来丁点的帮助那也是最好不过了。本系列博文的spring学习是基于4.0版本。
spring是什么?spring是一个开源框架,spring为简化企业级应用开发而生,使用spring可以使简单的javabean实现以前只有EJB才能实现的功能。Spring是一个ioc,aop容器框架。spring用于配置bean,并维护bean与bean之间关系的框架。
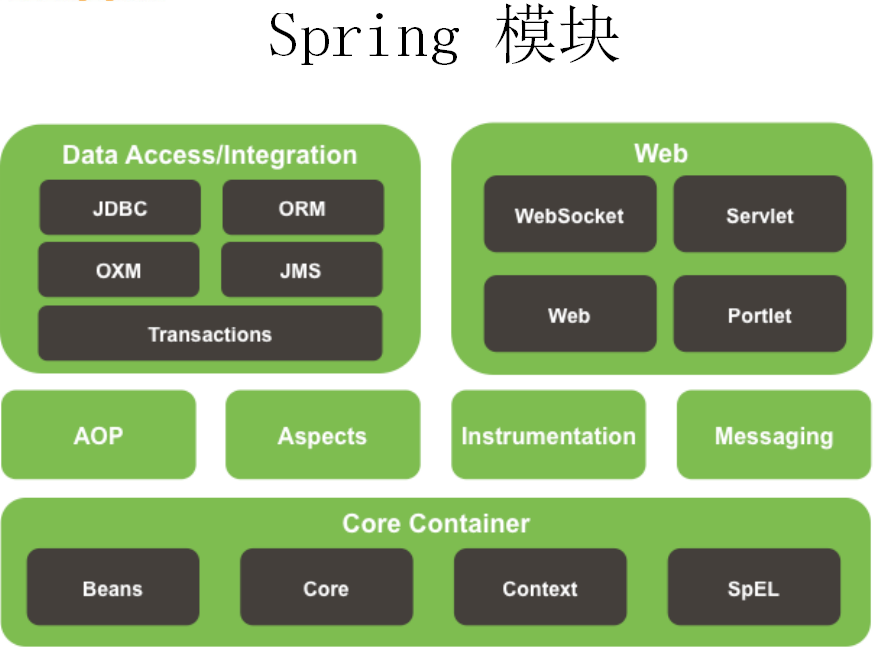
spring的模块
spring简单案例
1,创建一个javaweb工程,目录结构如下:

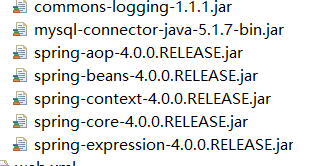
2,导入spring相关的jar包文件
3,创建一个简单的实体类
package com.spring.beans;
public class Student {
private String name;
private Integer age;
private String email;
public String getName() {
return name;
}
public void setName(String name) {
this.name = name;
}
public Integer getAge() {
return age;
}
public void setAge(Integer age) {
this.age = age;
}
public String getEmail() {
return email;
}
public void setEmail(String email) {
this.email = email;
}
@Override
public String toString() {
return "Student [name=" + name + ", age=" + age + ", email=" + email + "]";
}
public void sayHello(){
System.out.println("hello "+name);
}
}
4,配置相关的spring.xml文件
<?xml version="1.0" encoding="UTF-8"?>
<beans xmlns="http://www.springframework.org/schema/beans"
xmlns:xsi="http://www.w3.org/2001/XMLSchema-instance"
xmlns:util="http://www.springframework.org/schema/util"
xmlns:p="http://www.springframework.org/schema/p"
xsi:schemaLocation="http://www.springframework.org/schema/beans http://www.springframework.org/schema/beans/spring-beans.xsd
http://www.springframework.org/schema/util http://www.springframework.org/schema/util/spring-util-4.0.xsd">
<!-- 配置一个bean -->
<!-- 配置的bean需要在beans标签中配置,id属性是配置的bean的唯一标识符 class表示当前配置的bean对应的java类 -->
<bean id="student" class="com.spring.beans.Student">
<!-- porperty表示为配置的bean注入属性值,name属性的值对应实体类中的属性,value表示你想要注入的值 -->
<property name="name" value="onsim" />
<property name="age" value="4" />
<property name="email" value="[email protected]" />
</bean>
</beans>
5,创建一个测试类
package com.spring.test;

import org.springframework.context.ApplicationContext;
import org.springframework.context.support.ClassPathXmlApplicationContext;
package com.spring.test;
import org.springframework.context.ApplicationContext;
import org.springframework.context.support.ClassPathXmlApplicationContext;
import com.spring.beans.Student;
public class Test {
@SuppressWarnings("resource")
public static void main(String[] args) {
//传统方式
/*Student student = new Student();
student.setName("assllon");
student.setAge(25);
student.setEmail("[email protected]");
System.out.println(student);
student.sayHello();*/
//利用spring的方式
//获取spring的核心容器
ApplicationContext applicationContext = new ClassPathXmlApplicationContext("spring.xml");
//根据beanid获取bean实例
Student student = (Student) applicationContext.getBean("student");
System.out.println(student);
student.sayHello();
}
}
6,运行main方法得到相应的结果。

这样一个简单的spring版本的helloworld小程序就完成了。