首先先来看一下,直接从后台读取数据并展示到前端的列表,后端传回的数据是“按商品ID倒序排列”

前端源代码


 1    $('#good_tables').datagrid({
 2         nowrap: true,
 3         autoRowHeight: true,
 4         striped: true,
 5         fitColumns: true,
 6         collapsible: true,
 7         url: 'xxx',
 8         border: false,
 9         idField: 'id',
10         selectOnCheck: true,
11         singleSelect: true,
12         width:'100%' ,
13         resizable:true,
14         columns: [[
15             {
16                 field: 'id',
17                 title: '商品ID',
18                 width: 60,
19                 align: 'center',
20                 formatter: function (value) {
21                     return value+"";
22                 }
23             },
24             {
25                 field: 'goodsName',
26                 title: '商品名称',
27                 width: 120,
28                 align: 'center',
29                 formatter: function (value) {
30                     return value;
31                 }
32             },
33             {
34                 field: 'activity_do',
35                 title: '操作',
36                 width: '15%',
37                 align: 'center',
38                 formatter: function (value, row) {
39                     return'<a href="javascript:delGoods(' + row.id +')" style="color: red">删除</a>';
40                 }
41             }
42         ]],
43         pagination: true,
44         pageSize: 10,
45         rowNumbers: false
46     });
现在,产品们想要在前端随时切换排序方式,想正序,就正序,想倒序就倒序。
当然,我们可以将“排序方式”作为请求参数,向后端再次发送请求,获得相应排序的数据,但是这样太浪费资源了,能在前端解决的问题,就不要拖到后端。
easyUI已经提供了在前端排序的功能,只需要待排序的列上小小的添加几个参数:
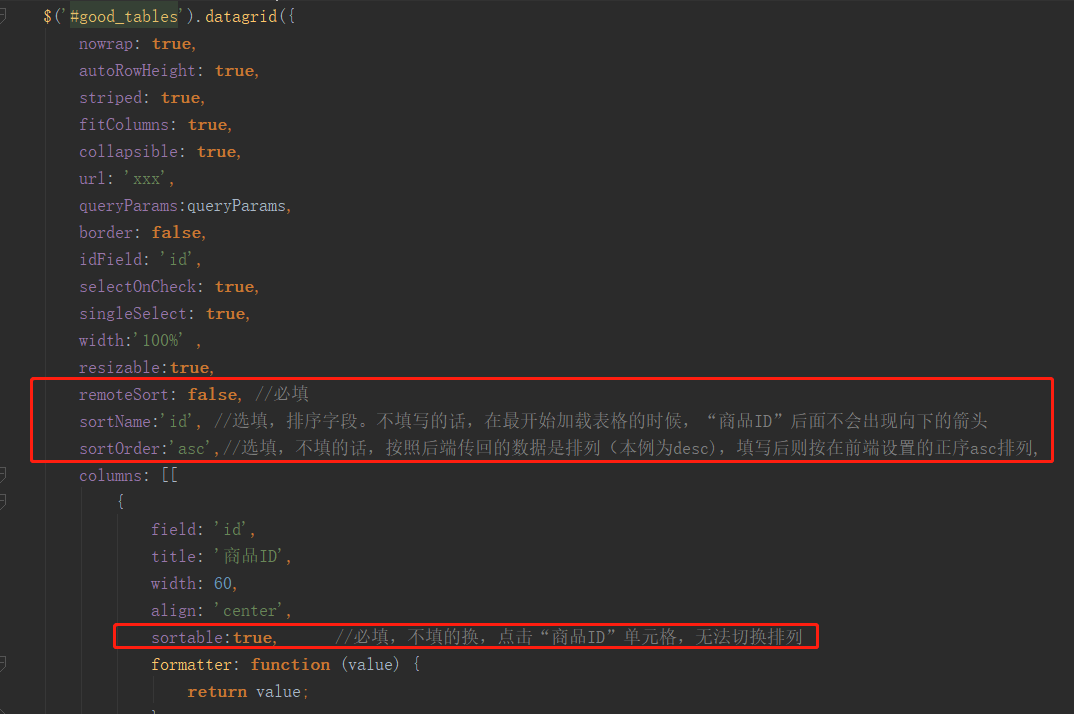
修改后的JS代码:
 1 $('#good_tables').datagrid({
 2         nowrap: true,
 3         autoRowHeight: true,
 4         striped: true,
 5         fitColumns: true,
 6         collapsible: true,
 7         url: 'xxx',
 8         border: false,
 9         idField: 'id',
10         selectOnCheck: true,
11         singleSelect: true,
12         width:'100%' ,
13         resizable:true,
14         remoteSort: false, //必填
15         sortName:'id', //选填,排序字段。不填写的话,在最开始加载表格的时候,“商品ID”后面不会出现向下的箭头
16         sortOrder:'asc',//选填,不填的话,按照后端传回的数据是排列(本例为desc),填写后则按在前端设置的正序asc排列,
17         columns: [[
18             {
19                 field: 'id',
20                 title: '商品ID',
21                 width: 60,
22                 align: 'center',
23                 sortable:true,      //必填,不填的换,点击“商品ID”单元格,无法切换排列
24                 formatter: function (value) {
25                     return value;
26                 }
27             },
28             {
29                 field: 'goodsName',
30                 title: '商品名称',
31                 width: 120,
32                 align: 'center',
33                 formatter: function (value) {
34                     return value;
35                 }
36             },
37             {
38                 field: 'activity_do',
39                 title: '操作',
40                 width: '15%',
41                 align: 'center',
42                 formatter: function (value, row) {
43                     return'<a href="javascript:delGoods(' + row.id +')" style="color: red">删除</a>';
44                 }
45             }
46         ]],
47         pagination: true,
48         pageSize: 10,
49         rowNumbers: false
50     });
效果:
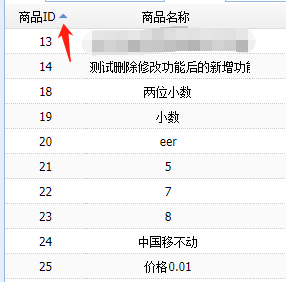
加载列表后:
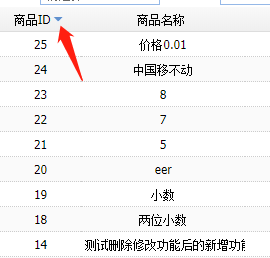
点击向上的箭头:
最后再来看看在切换排序的时候是不是向后台发送了请求吧~
进入开发者模式,点击Network,点击“XHR”清空现在已有的数据
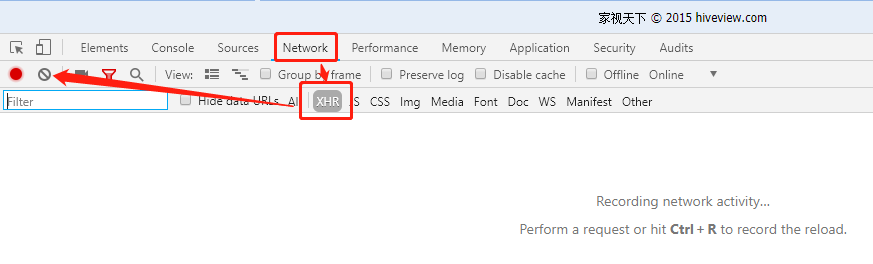
可以看到,现在并没有任何请求记录在册了,接下来就请各位小伙伴随意切换排序吧,若列表仍为空,则说明没有向后端再次发送数据请求。
以上就是小编介绍的如何使用easyUI在前端对数据进行排列,觉得有用的朋友记得点个赞!