代码来自菜鸟教程(直接看菜鸟教程会比看本文章帮助大很多)
http://www.runoob.com/java/java-multithreading.html
声明:本文非常粗浅,因为我也刚刚看到线程这个东西,我也很不懂,不做科普,提供在菜鸟上看到的几段对理解大有裨益的代码。请跟断点踪执行下面一段程序,能看到线程的创建和执行,体会到两个线程互不干扰,还有sleep的作用。
线程的几种状态:
新建状态:
使用 new 关键字和 Thread 类或其子类建立一个线程对象后,该线程对象就处于新建状态。它保持这个状态直到程序 start() 这个线程。
就绪状态:
当线程对象调用了start()方法之后,该线程就进入就绪状态。就绪状态的线程处于就绪队列中,要等待JVM里线程调度器的调度。
运行状态:
如果就绪状态的线程获取 CPU 资源,就可以执行 run(),此时线程便处于运行状态。处于运行状态的线程最为复杂,它可以变为阻塞状态、就绪状态和死亡状态。
阻塞状态:
如果一个线程执行了sleep(睡眠)、suspend(挂起)等方法,失去所占用资源之后,该线程就从运行状态进入阻塞状态。在睡眠时间已到或获得设备资源后可以重新进入就绪状态。可以分为三种:
等待阻塞:运行状态中的线程执行 wait() 方法,使线程进入到等待阻塞状态。
同步阻塞:线程在获取 synchronized 同步锁失败(因为同步锁被其他线程占用)。
其他阻塞:通过调用线程的 sleep() 或 join() 发出了 I/O 请求时,线程就会进入到阻塞状态。当sleep() 状态超时,join() 等待线程终止或超时,或者 I/O 处理完毕,线程重新转入就绪状态。
死亡状态:
一个运行状态的线程完成任务或者其他终止条件发生时,该线程就切换到终止状态。
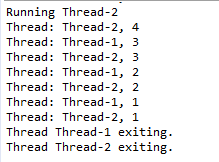
运行起来看到,首先1线程先用构造方法获得了一个名字thread1,然后运行R1.start(),调用start()方法就实例化了这个线程,该线程进入就绪状态,等待调度。然后就去构造和实例化线程2。接着线程1得到了cpu资源,可以执行run()了,就执行里面的代码,遇到sleep的时候就进入阻塞状态,线程1sleep了就开始执行线程2,线程2也遇到了sleep。因为sleep(50)代表50毫秒即0.5秒,这个时候线程1已经sleep超时了,这个时候就可以继续执行线程1了。于是交替线程1,2.最后for循环终止,print run里的一个命令输出一个exiting程序就结束了。
这个是实现了Runnable接口的线程。
package thread;

class RunnableDemo implements Runnable {
	   private Thread t;
	   private String threadName;

	   RunnableDemo( String name) {
	      threadName = name;
	      System.out.println("Creating " +  threadName );
	   }

	   public void run() {
	      System.out.println("Running " +  threadName );
	      try {
	         for(int i = 4; i > 0; i--) {
	            System.out.println("Thread: " + threadName + ", " + i);
	            // 让线程睡眠一会
	            Thread.sleep(50);
	         }
	      }catch (InterruptedException e) {
	         System.out.println("Thread " +  threadName + " interrupted.");
	      }
	      System.out.println("Thread " +  threadName + " exiting.");
	   }

	   public void start () {
	      System.out.println("Starting " +  threadName );
	      if (t == null) {
	         t = new Thread (this, threadName);
	         t.start ();
	      }
	   }


	   public static void main(String args[]) {
	      RunnableDemo R1 = new RunnableDemo( "Thread-1");
	      R1.start();

	      RunnableDemo R2 = new RunnableDemo( "Thread-2");
	      R2.start();
	   }
	}
另一种写法就是继承thread
package thread;

class ThreadDemo extends Thread {
	   private Thread t;
	   private String threadName;

	   ThreadDemo( String name) {
	      threadName = name;
	      System.out.println("Creating " +  threadName );
	   }

	   public void run() {
	      System.out.println("Running " +  threadName );
	      try {
	         for(int i = 4; i > 0; i--) {
	            System.out.println("Thread: " + threadName + ", " + i);
	            // 让线程睡眠一会
	            Thread.sleep(50);
	         }
	      }catch (InterruptedException e) {
	         System.out.println("Thread " +  threadName + " interrupted.");
	      }
	      System.out.println("Thread " +  threadName + " exiting.");
	   }

	   public void start () {
	      System.out.println("Starting " +  threadName );
	      if (t == null) {
	         t = new Thread (this, threadName);
	         t.start ();
	      }
	   }

	   public static void main(String args[]) {
		      ThreadDemo T1 = new ThreadDemo( "Thread-1");
		      T1.start();

		      ThreadDemo T2 = new ThreadDemo( "Thread-2");
		      T2.start();
		   }
	}