SpringMVC+Spring+Mybatis+Maven,SpringMVC是Spring家族的前端框架,具体概念请百度,下面建立工程直接撸
1、SpringMVC的配置和简单测试使用:
- 导入jar包:springmvc所用jar包
工程目录:
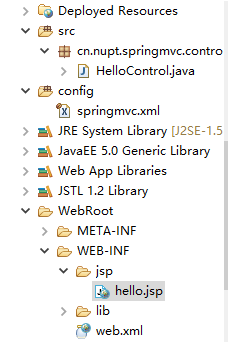
- 编写HelloControl类
package cn.nupt.springmvc.controller;
import org.springframework.stereotype.Controller;
import org.springframework.web.bind.annotation.RequestMapping;
import org.springframework.web.servlet.ModelAndView;
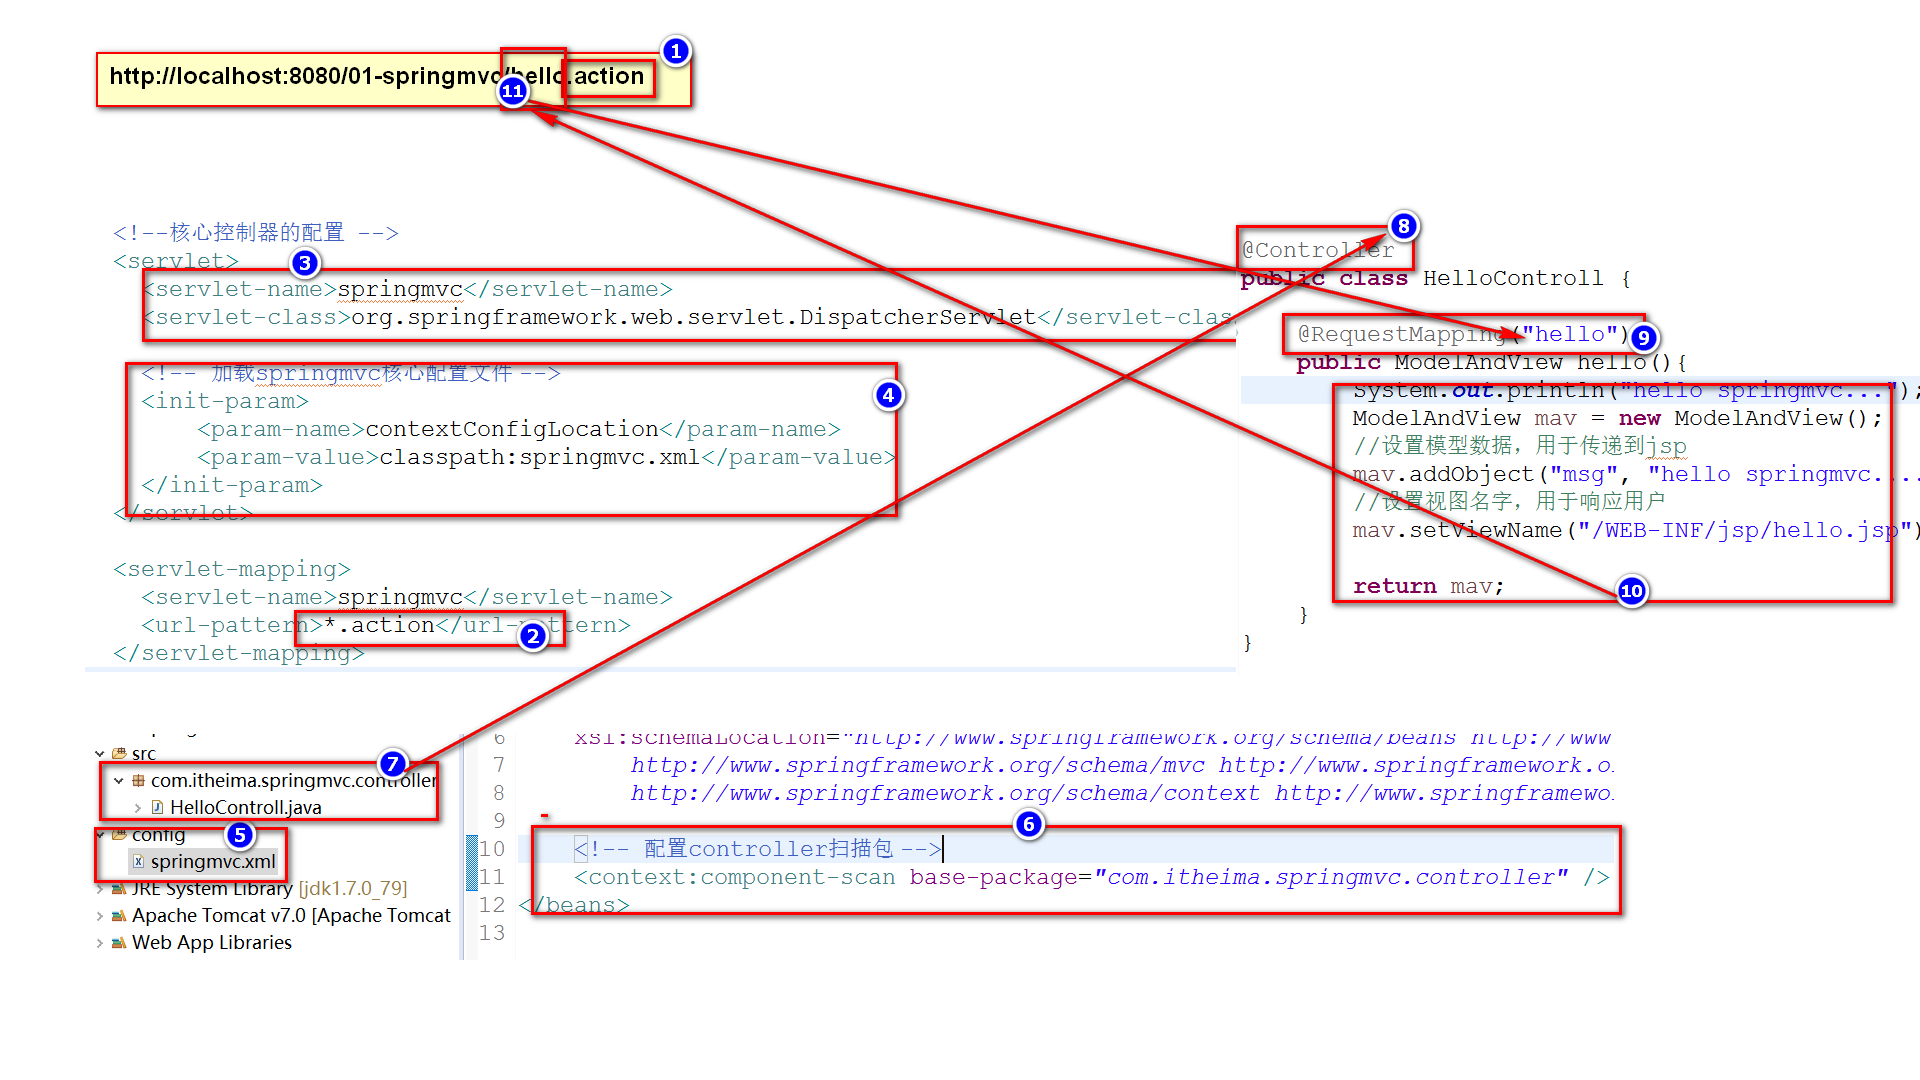
@Controller
public class HelloControl {
@RequestMapping("hello") // 用于绑定请求地址,注:不是下面方法的名字,在地址栏里里面写上hello就会到这个下面的方法里
public ModelAndView hell() {
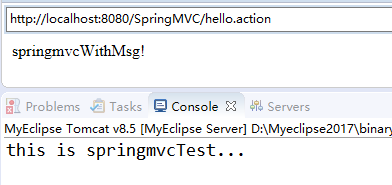
System.out.println("this is springmvcTest...");
ModelAndView mView = new ModelAndView();
// 就跟之前的把对象放入域对象中一样
mView.addObject("msg", "springmvcWithMsg!");
// 就跟之前请求转发一样,注:此时在xml里面配置了前缀和后缀
mView.setViewName("hello");
return mView;
}
}
- 创建显示页面 hello.jsp(这里就是直接打印出我存的信息了)
<body>
	${msg }
</body>
- 创建与配置springmvc.xml核心配置文件
<?xml version="1.0" encoding="UTF-8"?>
<beans xmlns="http://www.springframework.org/schema/beans"
	xmlns:xsi="http://www.w3.org/2001/XMLSchema-instance" xmlns:p="http://www.springframework.org/schema/p"
	xmlns:context="http://www.springframework.org/schema/context"
	xmlns:mvc="http://www.springframework.org/schema/mvc"
	xsi:schemaLocation="http://www.springframework.org/schema/beans http://www.springframework.org/schema/beans/spring-beans-4.0.xsd
        http://www.springframework.org/schema/mvc http://www.springframework.org/schema/mvc/spring-mvc-4.0.xsd
        http://www.springframework.org/schema/context http://www.springframework.org/schema/context/spring-context-4.0.xsd">

	<!-- 配置controller扫描包 -->
	<context:component-scan base-package="cn.nupt.springmvc.controller" />

<!-- 配置处理器映射器 -->
	<!-- <bean class="org.springframework.web.servlet.mvc.method.annotation.RequestMappingHandlerMapping"/> -->
	<!-- 配置处理器适配器-->
	<!-- <bean class="org.springframework.web.servlet.mvc.method.annotation.RequestMappingHandlerAdapter"/> -->

	<!-- 配置注解驱动,相当于同时使用最新处理器映射跟处理器适配器,对json数据响应提供支持 ,就不用再配置前面的了-->
	<mvc:annotation-driven />

	<!-- 配置视图解析器 -->
	<bean class="org.springframework.web.servlet.view.InternalResourceViewResolver">
		<property name="prefix" value="/WEB-INF/jsp/"/>
		<property name="suffix" value=".jsp"/>
	</bean>
</beans>
- 在web.xml中配置前端控制器(就是一个servlet)
<!-- 核心控制器的配置 -->
	<servlet>
		<servlet-name>springmvc</servlet-name>
		<servlet-class>org.springframework.web.servlet.DispatcherServlet</servlet-class>

		<!-- 加载springmvc核心配置文件 -->
		<init-param>
			<param-name>contextConfigLocation</param-name>
			<param-value>classpath:springmvc.xml</param-value>
		</init-param>

	</servlet>
	//配置映射,所有.action后缀的网页
	<servlet-mapping>
		<servlet-name>springmvc</servlet-name>
		<url-pattern>*.action</url-pattern>
	</servlet-mapping>
- 启动项目通过浏览器测试,效果如图
此处附上代码实现流程:
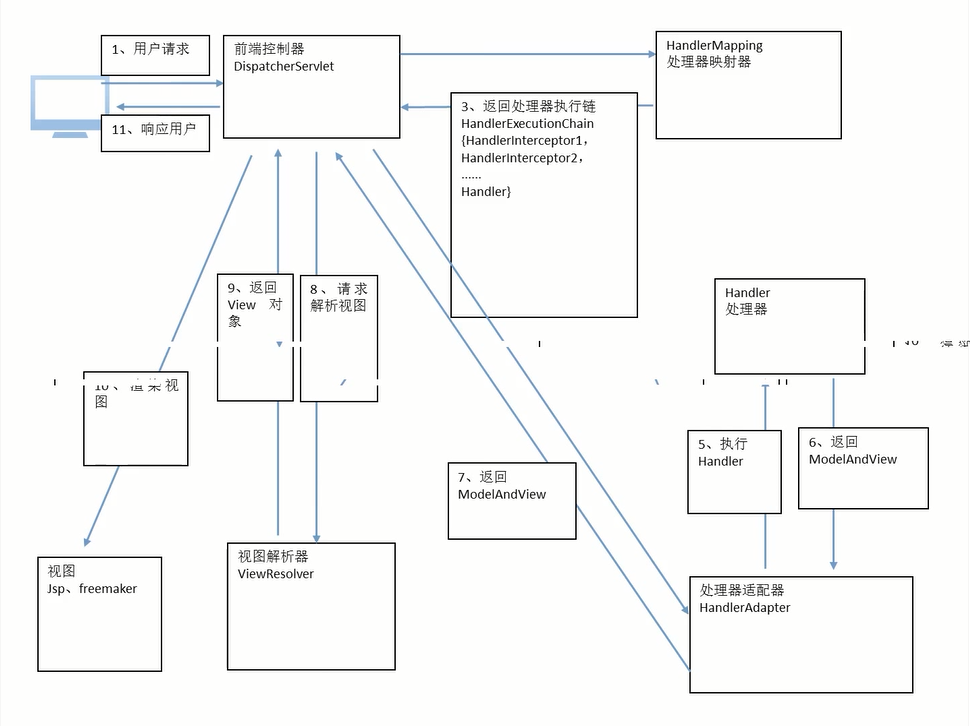
2、SpringMVC的核心架构:、
SpringMVC核心:
- 前端控制器
SpringMVC三大组件:
- 处理器映射器
- 处理器适配器
- 视图解析器