一、Spring Cloud 简介
Spring Cloud 是一个基于Spring Boot 实现的微服务架构开发工具。是一个涉及到服务治理、分布式配置管理、负载均衡、服务容错、API网关、消息总线、服务跟踪等等为一体的微服务架构体系。我们常常听说的Spring Cloud全家桶,就是这个意思,他是一个整体的解决方案,最主要的是,用起特别简单。它主要包含如下组件:
Spring Cloud Netfilx: 核心组件,对多个Netflix OSS 开源组件进行整合
| - Eureka:服务治理,包含服务注册中心、服务注册于服务发现
|- Hystrix: 容错管理
|- Ribbon: 负载均衡
|- Feign : 声明式服务调用组件
|- Zuul: 微服务网关
Spring Cloud Bus: 消息总线,用于传播集群中的状态变化或者事件
Spring Cloud Consul: 服务发现与配置管理工具
Spring Cluod Zookeeper: 基于Zookeeper的服务发现与配置管理组件
Spring Cloud Stream : 通过redis、kafka实现的消费服务,可以通过简单的声明式模型来发送和接收消息
。。。。。。
很多很多,这里就不一一介绍了。
要特别注意:Spring Cloud 并不是微服务,而是Spring 帮我们封装的微服务整体解决方案,就像以前的Spring,SpringBoot一样,只是工具。还有别的办法可以实现微服务。只不过SpringCloud给我们提供的这个方案简单、好用。
二、 一切从服务的治理说起
我们前面的文章已经说了,所谓的微服务,就是把传统单体应用架构以及简单的集群根据实际业务改为一个一个完整的小服务,以便于独立开发、独立维护、独立部署、独立扩展,各个服务之间通过RestFul请求相互调用!
我们的服务刚开始的时候,有可能不会很多,我们可以通过一些静态配置来完成服务的调用,比如配置反向代理,负载均衡。但是,随着业务发展,系统功能越来越复杂,相应的微服务也在不断的增加,我们的配置文件会变得越来越难以维护,而且,随着业务的增长,我们的集群规模、服务的位置、服务的命名都有可能发生变化。如果还是通过手工来配置,极容易出错,搞不好上西线一个新功能,一不小心,在nginx中多写了空格,多加了个子目,nginx挂了,完了,所有服务都掉不通了...诸如此类。(为了不出问题,我每次更改的时候做了备份,检查了又检查,不胜其烦)
因为这个原因,产生了一些服务治理的框架,比如阿里系的Dubbo,当当网的DubboX,还有我们今天要讲的Eureka等等。
1> Eureka 跑起来
在简单的介绍了spring-cloud 以及 我们需要服务治理之后,我们先把Eureka跑起来,然后,我们再说服务治理咱们治理了些啥。
第一步:起一个Eureka服务端(服务注册中心)
作用: 既然是服务治理,我得有个治理中心,这个就是Eureka服务端
起一个Java的Maven工程,引入依赖:
<properties>
        <!--配置默认编码为UTF-8-->
        <project.build.sourceEncoding>UTF-8</project.build.sourceEncoding>
        <!--定义java版本-->
        <java.version>1.8</java.version>
        <!--集中定义依赖版本-->
        <spring-cloud-version>Dalston.SR5</spring-cloud-version>
</properties>

<dependencies>
        <!--引入eureka-server依赖-->
        <dependency>
            <groupId>org.springframework.cloud</groupId>
            <artifactId>spring-cloud-starter-eureka-server</artifactId>
        </dependency>
 </dependencies>

 <dependencyManagement>
        <dependencies>
            <dependency>
                <groupId>io.spring.platform</groupId>
                <artifactId>platform-bom</artifactId>
                <version>Brussels-SR6</version>
                <type>pom</type>
                <scope>import</scope>
            </dependency>
            <!--Spring-Cloud组件-->
            <dependency>
                <groupId>org.springframework.cloud</groupId>
                <artifactId>spring-cloud-dependencies</artifactId>
                <version>${spring-cloud-version}</version>
                <type>pom</type>
                <scope>import</scope>
            </dependency>
        </dependencies>
    </dependencyManagement>


    <!--统一构建文件-->
    <build>
        <finalName>joy-framework</finalName>
        <plugins>
            <!-- Compile Plugin -->
            <plugin>
                <groupId>org.apache.maven.plugins</groupId>
                <artifactId>maven-compiler-plugin</artifactId>
                <version>3.5</version>
                <configuration>
                    <source>${java.version}</source>
                    <target>${java.version}</target>
                    <encoding>${project.build.sourceEncoding}</encoding>
                </configuration>
            </plugin>
            <plugin>
                <groupId>org.apache.maven.plugins</groupId>
                <artifactId>maven-surefire-plugin</artifactId>
                <version>2.9</version>
                <configuration>
                    <skip>true</skip>
                </configuration>
            </plugin>
        </plugins>
    </build>
起一个SpringBoot主类,在其上加上@EnableEurekaServer注解,标识为一个服务注册中心以提供给其他应用进行对话。
/**
 * 服务注册中心
 */
@EnableEurekaServer
@SpringBootApplication
public class EurekaServerApplication {
    public static void main(String[] args) {
        SpringApplication.run(EurekaServerApplication.class, args);
    }
}
在默认设置下,该服务注册中心也会将自己作为客户端来尝试注册它自己,所以我们需要禁用它的客户端注册行为,只需要在application.properties配置文件中增加如下信息:
# 设置服务名
spring.application.name=demo-eureka-server
#设置服务端口
server.port=9001
# eureka配置
eureka.instance.hostname=localhost
#设置不应许将自己注册为eureka客户端
eureka.client.register-with-eureka=false
eureka.client.fetch-registry=false
PS: 这里,特别讲一下
eureka.client.register-with-eureka=false ---- 这一项是设置该服务是否想注册中心注册自己,设置为false表示不注册自己!
eureka.client.register-with-eureka=false ---- 由于注册中心的职责就是维护服务实例,它并不需要去检索服务(让别人主动注册过来就好了),所以,也设置为false.
这两个配置。
这个时候,我们启动工程,然后访问http://localhost:9001/就可以看到下面的页面:

至此,我们的服务注册中心已经跑起来了,是不是很简单!!!这个时候,控制面板中instances currently registered(目前已注册实例)列表为空,表示没有任何实例。
既然有了服务注册中心,那么,我们得有服务给他管理。接下来,我们就来创建一个服务:demo-eureka-first-client.
首先,还是起一个SpringBoot 工程,在pom.xml中加入如下信息:
<dependencies>
        <!--客户端,当然要引入eureka依赖-->
        <dependency>
            <groupId>org.springframework.cloud</groupId>
            <artifactId>spring-cloud-starter-eureka</artifactId>
        </dependency>


        <!--!我们用SpringMvc的restful对外提供服务,所以要引入相关依赖-->
        <dependency>
            <groupId>org.springframework.boot</groupId>
            <artifactId>spring-boot-starter-web</artifactId>
        </dependency>
    </dependencies>

 <!--!省略版本和buil相关内容-->
然后,我们写一个web接口/hello,用来模拟提供服务:
/**
 * 验证web服务
 */
@RestController
public class HelloController {
    @Autowired
    private DiscoveryClient discoveryClient;

    @GetMapping("/hello")
    public @ResponseBody
    String hello() {
        System.out.println("调用hello" + discoveryClient.getServices());
        return "Hello ,First Eureka Client";
    }
}
然后,在应用主类上加上@EnableDiscoveryClient注解,让其能够被当做eureka-client被注册中心发现。
@EnableDiscoveryClient //注解启动一个服务注册中心提供给其他应用进行对话
@SpringBootApplication
public class EurekaClientFirstApplication {
    public static void main(String[] args) {
        SpringApplication.run(EurekaClientFirstApplication.class, args);
    }
}
当然,仅仅能够被发现是远远不够的,接下来,我们还需要再配置文件中配置一下相关信息(主要是告诉应用,我是谁,我在哪里,我要去哪里注册):
#通过spring.application.name属性,我们可以指定微服务的名称后续在调用的时候只需要使用该名称就可以进行服务的访问
spring.application.name=demo-eureka-client-first
#为了在本机上测试区分服务提供方和服务注册中心,使用server.port属性设置不同的端口。
server.port=9011
#关键:定义eureka-server的地址
eureka.client.service-url.defaultZone=http://localhost:9001/eureka/
最后,我们启动SpringBoot应用。
我们会在控制台看到如下打印信息:

这个就表示已经发现了自己,表示注册成功.
而此时,你再看注册中心的控制台,可以发现如下信息:

我们再回到控制台,再注册列表中会看到如下内容:

你点击进去,就会默认调用/info接口,这个时候你就会得到如下信息:

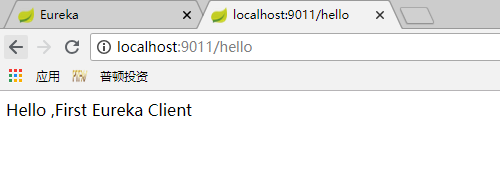
可以看到,我们其实已经进入到了9011这个端口上的服务了,只是默认掉的info接口,这个接口我们没有提供,所以9011上的这个服务报错了。当我们改为hello的时候,就会出现如下信息:
ok,至此,我们一个服务注册中心和一个服务已经开发完成。当然,我们也可以仿照第一个服务,再起一个demo-eureka-client-second服务。笔者在这里就不赘述了,都一样,改个名和端口而已。如果你启动这个服务,那么,就可以在注册中心看到如下内容:

看到了吧,第二个服务也注册进来了。
这样,我们就完成了一个简单的服务治理了。是不是很简单,就是引入依赖,加上注解而已。我们知道,SpringBoot让开发变得简单,而SpringCloud那就是让我们开发微服务变得简单!
这里,我们只起了一个很简单得注册中心和两个简单得不能再简单的服务。
当然,SpringCloud的内容远不止这些,这只是个开始,从这里,咱们就一起开启我们的Spring-Cloud 微服务全家桶的学习之旅吧。
PS: 附上该Demo的git源码:https://gitee.com/top-djlee/demo-spring-cloud.git