转载请标明出处:http://blog.csdn.net/xx326664162/article/details/51508132 文章出自:薛瑄的博客
你也可以查看我的其他同类文章,也会让你有一定的收货!
关于使用Gradle来控制版本和生成不同版本的代码,我总结了三篇文章,网上关于这些知识,都比较零散,我在学习这些的之前,根本不知道还有这样的方法。所以说不知道并不可怕,可怕的是不知道自己不知道。相信这三篇文章,会给你不少灵感
Gradle构建控制Log开关——BuildConfig\自定义
使用 gradle 在编译时动态设置 Android resValue / BuildConfig / Manifes中 < meta-data>变量的值
Gradle编译生成不同的版本,动态设定应用标题 / 应用图标 / 替换常量
写项目的时候经常会遇到以下的情况:
1.需要生成测试版本和正式版本的apk
2.测试版本和正式版本的URL是不一样的
3.测试版本和正式版本的包名需要不一致,这样才能安装到同一部手机上面。
4.不同apk需要应用名不同,图标不同,某些常量不同….
我们经常需要在应用中定义一些常量,当应用正式发布的时候,常常是注释掉测试用的部分,放开正式的部分,就像下面一样:
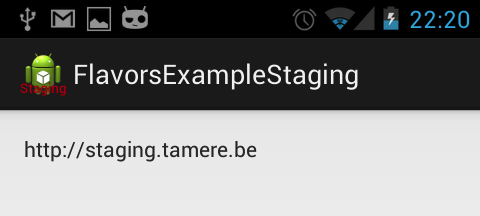
public static String BASE_URL = "http://staging.tamere.be"//public static String BASE_URL = "http://production.tamere.be"
- 1
- 2
上面的步骤是烦躁,无味的,修改一个地方还好,代码越来越多,维护越来复杂,这个时候我们Gradle就闪亮登场了
Build variants介绍
建议阅读这篇博客
build.gradle中可以包括两个节点:buildTypes和productFlavors
buildTypes默认有release和debug两个选项。
我们这里在productFlavors增加production和staging.
buildTypes和productFlavors组合就有下面4个版本了。
ProductionDebugProductionReleaseStagingDebugStagingRelease
- 1
- 2
- 3
- 4
下面使用两种方法实现上面所述的需求:
第一种:新增目录,目录的名称是productFlavors 节点的名称
示例项目
示例项目很简单,在不同的版本中我们需要修改项目名称,项目图标,一些常量:url…,项目可以从Github 下载,效果图如下:

1、build.gradle文件配置如下:
apply plugin: 'com.android.application'android { compileSdkVersion 22 buildToolsVersion "22.0.1" defaultConfig { minSdkVersion 15 targetSdkVersion 22 } buildTypes { release { minifyEnabled false shrinkResources true// proguardFiles 'proguard-project.txt' } debug { minifyEnabled false shrinkResources true } } productFlavors { staging { applicationIdSuffix ".staging" //原作者的github项目使用的是packageName,现在已经不能使用 // packageName "be.tamere.gradlebuildtypesexample.staging" } production { // packageName "be.tamere.gradlebuildtypesexample" } }}dependencies { compile 'com.android.support:appcompat-v7:22.0.0'}
- 1
- 2
- 3
- 4
- 5
- 6
- 7
- 8
- 9
- 10
- 11
- 12
- 13
- 14
- 15
- 16
- 17
- 18
- 19
- 20
- 21
- 22
- 23
- 24
- 25
- 26
- 27
- 28
- 29
- 30
- 31
- 32
- 33
- 34
- 35
- 36
- 37
- 38
- 39
- 40
- 41
修改很简单:核心配置是productFlavors,同时需要注意production和staging,它们需要与后面的目录结构名字一致
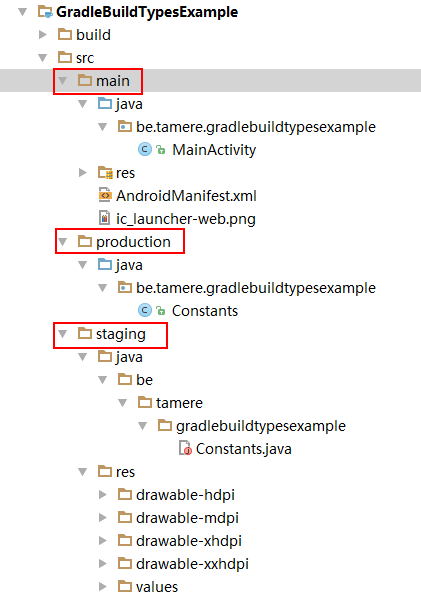
2、为每个Flavor创建对应的文件夹
修改也比较简单,在src下面(main同级的目录)新建production和staging目录,(production和staging是productFlavors中配置的两个节点),分别放入对应的Constants.java。这两个目录的属性和功能与系统默认创建的main是一样的。
总结一下就是:
1.production和staging两个目录,对应着各存放一份Constants.java
2.把应用图标和应用名字信息配置在res目录下面:
- 对staging重新配置了一份ic_launcher.png和string.xml。
- production没配置的话就是用默认main下面的res。
可能有同学会注意到,为什么staging的java文件夹,IDE并没有识别出来,不用担心,这是跟你当前Build Variant的选择有关系
3、不同的依赖
在build.gradle中,使用Flavor名+Compile来规定特定Flavor所需依赖:
dependencies { compile fileTree(dir: 'libs', include: ['*.jar']) compile 'com.android.support:appcompat-v7:22.2.0' productionCompile 'com.android.support:design:22.2.0' stagingCompile 'com.jakewharton:butterknife:6.1.0'}
- 1
- 2
- 3
- 4
- 5
- 6
https://m.oschina.net/blog/404535
http://blog.csdn.net/vivien2004/article/details/50206543
第二种:合并manifest文件
可以通过合并不同的manifest设置不同的icon,app的名称,修改< meta-data>变量等等。
关于manifest文件的合并规则,可参考:
http://my.oschina.net/wolfcs/blog/550127?fromerr=bHHJWN7F
和第一种方法使用同一个示例,AndroidManifest1.xml放在main文件夹和stagingManifest文件夹都可以,只要在build.gradle中指定了正确的路径,项目目录如下:
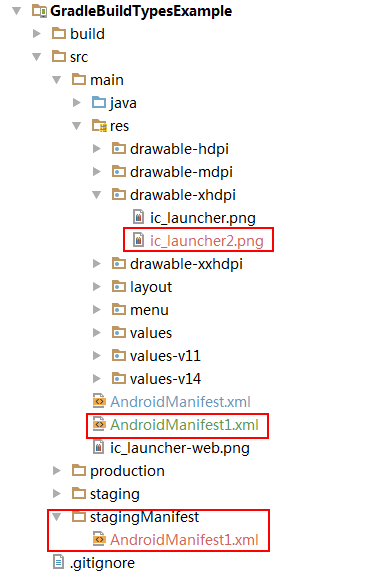
1、修改android:icon、android:label等属性
- 新建Manifest文件并命名为AndroidManifest1.xml
- 将中android:icon、android:label属性配置成不同的值,这属于属性的重定义,需要在manifest中增加tools:replace,代码实例如下:
AndroidManifest1.xml
<?xml version="1.0" encoding="utf-8"?><manifest xmlns:android="http://schemas.android.com/apk/res/android" xmlns:tools="http://schemas.android.com/tools" package="be.tamere.gradlebuildtypesexample" > <application android:allowBackup="true" android:label="@string/app_name" android:icon="@drawable/ic_launcher2" tools:replace="android:label,android:icon" android:theme="@style/AppTheme" > <activity android:name=".MainActivity" android:label="@string/app_name" > <intent-filter> <action android:name="android.intent.action.MAIN" /> <category android:name="android.intent.category.LAUNCHER" /> </intent-filter> </activity> </application></manifest>
- 1
- 2
- 3
- 4
- 5
- 6
- 7
- 8
- 9
- 10
- 11
- 12
- 13
- 14
- 15
- 16
- 17
- 18
- 19
- 20
- 21
- 22
- 23
如果没有这条语句tools:replace="android:label,android:icon",build error会给出以下提示,gradle的error提示还是比较智能的,按照提示中给出的方法就可以解决问题。
Error:Execution failed for task ':GradleBuildTypesExample:processStagingManifestDebugManifest'.> Manifest merger failed : Attribute application@icon value=(@drawable/ic_launcher2) from AndroidManifest.xml:10:9-45 is also present at AndroidManifest.xml:10:9-45 value=(@drawable/ic_launcher). Suggestion: add 'tools:replace="android:icon"' to <application> element at AndroidManifest1.xml:8:5-22:19 to override.
- 1
- 2
- 3
- 4
按照以上步骤一步步操作,最后在cmd工程目录下执行gradle clean、gradle build,build成功后,将apk安装到手机上运行,你会发现不同包名的应用图标都已经更换了,但是桌面上应用名称还都是一样的,这是因为:
applicantion的label :安装和卸载应用时显示的名称
launcher activity的label:App标题和桌面上App的显示名称
2、配置build.gradle
build.gradle的配置中有两处需要新增:
1、 productFlavors 下增加
stagingManifest { applicationIdSuffix ".stagingManifest" }
- 1
- 2
- 3
2、使用sourceSets配置该渠道 的manifest文件
sourceSets { stagingManifest { //manifest.srcFile 'src/stagingManifest/AndroidManifest1.xml' manifest.srcFile 'src/main/AndroidManifest1.xml' //下面这条语句设置无效,自定义Manifest文件,需指定相对路径// manifest.srcFile 'AndroidManifest1.xml' } }
- 1
- 2
- 3
- 4
- 5
- 6
- 7
- 8
下面是build.gradle的全部文件:
apply plugin: 'com.android.application'android { compileSdkVersion 22 buildToolsVersion "22.0.1" defaultConfig { applicationId "com.example.jant" minSdkVersion 15 targetSdkVersion 22 } buildTypes { release { minifyEnabled false shrinkResources true } debug { minifyEnabled false shrinkResources true } } sourceSets { stagingManifest { //manifest.srcFile 'src/stagingManifest/AndroidManifest1.xml' manifest.srcFile 'src/main/AndroidManifest1.xml' //下面这条语句设置无效,自定义Manifest文件,需指定相对路径// manifest.srcFile 'AndroidManifest1.xml' } } productFlavors {// useOldManifestMerger false staging { applicationIdSuffix ".staging"// packageName "be.tamere.gradlebuildtypesexample.staging" } production {// packageName "be.tamere.gradlebuildtypesexample" } stagingManifest { applicationIdSuffix ".stagingManifest" } }}dependencies { compile 'com.android.support:appcompat-v7:22.0.0'}
- 1
- 2
- 3
- 4
- 5
- 6
- 7
- 8
- 9
- 10
- 11
- 12
- 13
- 14
- 15
- 16
- 17
- 18
- 19
- 20
- 21
- 22
- 23
- 24
- 25
- 26
- 27
- 28
- 29
- 30
- 31
- 32
- 33
- 34
- 35
- 36
- 37
- 38
- 39
- 40
- 41
- 42
- 43
- 44
- 45
- 46
- 47
- 48
- 49
- 50
- 51
- 52
- 53
可能出现的错误
将原始manifest中的内容copy到为每个包单独配置的manifest中去,在这里分别命名为:AndroidManifest1.xml。
a.删除AndroidManifest1.xml中配置包名的代码,因为已经在gradle.build中配置过了,不能重复配置。否则,build的时候回提示如下error:
Execution failed for task ':processApp1DebugManifest'.> Manifest merger failed : Overlay manifest:package attribute declared at AndroidManifest1.xml:4:5 value=(com.example.erase1) has a different value=(com.example.erase) declared in main manifest at AndroidManifest.xml:3:5 Suggestion : remove the overlay declaration at AndroidManifest1.xml and place it in the build.gradle: flavorName { applicationId = "com.example.erase1" }
- 1
- 2
- 3
- 4
- 5
- 6
- 7
b.为了解决多个manifest中相同activity重复注册的问题,在gradle.build中增加以下代码:
lintOptions { checkReleaseBuilds false // Or, if you prefer, you can continue to check for errors in release builds, // but continue the build even when errors are found: abortOnError false }
- 1
- 2
- 3
- 4
- 5
- 6
- 7
如果gradle.build里没有这一项,build时会给出error提示:
F:\eclipse-SDK-3.7-win32\workapace\Erase\tests\AndroidManifest2.xml:18: Error: Duplicate registration for activity com.example.erase.MainActivity [DuplicateActivity] android:name="com.example.erase.MainActivity" ~~~~~~~~~~~~~~~~~~~~~~~~~~~~~~~~~~~~~~~~~~~~~ Explanation for issues of type "DuplicateActivity": An activity should only be registered once in the manifest. If it is accidentally registered more than once, then subtle errors can occur, since attribute declarations from the two elements are not merged, so you may accidentally remove previous declarations.1 errors, 0 warnings Wrote HTML report to file:/F:/eclipse-SDK-3.7-win32/workapace/Erase/build/outputs/lint-results-app2Release-fatal.htmlWrote XML report to F:\eclipse-SDK-3.7-win32\workapace\Erase\build\outputs\lint-results-app2Release-fatal.xml:lintVitalApp2Release FAILEDFAILURE: Build failed with an exception.* What went wrong:Execution failed for task ':lintVitalApp2Release'.> Lint found fatal errors while assembling a release target.To proceed, either fix the issues identified by lint, or modify your build script as follows:...android { lintOptions { checkReleaseBuilds false // Or, if you prefer, you can continue to check for errors in release builds, // but continue the build even when errors are found: abortOnError false }}...
- 1
- 2
- 3
- 4
- 5
- 6
- 7
- 8
- 9
- 10
- 11
- 12
- 13
- 14
- 15
- 16
- 17
- 18
- 19
- 20
- 21
- 22
- 23
- 24
- 25
- 26
- 27
- 28
- 29
- 30
- 31
- 32
- 33
- 34
参考:
http://blog.csdn.net/centralperk/article/details/50543113
https://www.zhihu.com/question/22842123/answer/55675046
关注我的公众号,轻松了解和学习更多技术

再分享一下我老师大神的人工智能教程吧。零基础!通俗易懂!风趣幽默!还带黄段子!希望你也加入到我们人工智能的队伍中来!https://blog.csdn.net/jiangjunshow