前言
从学校出来的这半年时间,发现很少有时间可以静下来学习和写博文了,为了保持着学习和分享的习惯,我准备之后每周抽出一部分时间为大家带来一个优秀的Android框架源码阅读后的理解系列博文。
期许:希望可以和大家一起学习好此框架,也希望大家看博文前最好是先了解下框架的基本使用场景和使用方法,有什么问题可以留言给我,交流学习。
当然,再好的博文,也不如自己看一遍源码!
这周为大家带来的是《胖虎谈ImageLoader框架》系列,分析优秀的框架源码能让我们更迅速地提升,大家共勉!!
源码包下载地址:http://download.csdn.net/detail/u011133213/9210765
希望我们尊重每个人的成果,转载请注明出处。
转载于:CSDN 胖虎 , http://blog.csdn.net/ljphhj
正文
ImageLoader框架:
支持多线程图片加载
提供丰富的细节配置,比如线程池大小,HTPP请求项,内存和磁盘缓存,图片显示时的参数配置等等;
提供双缓存(内存和Sdcard缓存)
支持加载过程的监听;
提供图片的个性化显示配置接口;
框架的重要性:读者在读此文前,也许并未使用过ImageLoader框架,但如果你是一个Android应用开发者,我觉得这个框架是你必须要学会使用的。当然如果你阅读了详细的源码后,理解了,应该收获更大。
框架的用处:异步加载图片(本地图片or网络图片), 结合上Android控件:Listview, GridView,ViewPager,Gallery等任何一个你想要显示图片的地方。
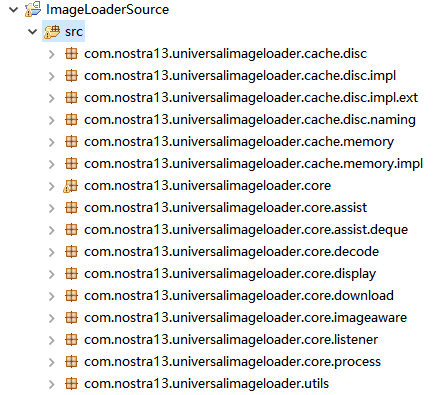
框架中的包结构:
框架使用流程梳理:
为了让大家更容易看清楚整个ImageLoader的使用流程,我先简单归结为以下三步,请务必先看明白这3步再继续往下。
1.开发者使用异步图片加载框架,实例化出ImageLoaderConfiguration对象后,根据自己的需要配置了相应的参数值。(如果开发者需要图片加载显示出来的时候对图片做一些其他统一操作,可以为ImageLoaderConfiguration对象设置一个DisplayImageOptions,当然在第3步中也可以做此设置)
2.ImageLoader.getInstance()获取到单例ImageLoader对象,调用init(ImageLoaderConfiguration)进行ImageLoader中成员变量ImageLoaderConfiguration的初始化。
3.开发者在需要加载图片时,调用ImageLoader.displayImage(String uri, ImageAware imageAware)
居然此博文写到这里,那么这篇博文就不便再继续讲其他内容了,否则感觉有点杂乱了。那么我们来把这3步里面涉及到的类和方法分析下,就结束此博文。
DisplayImageOptions.java :
//加载图片的几种情况显示的图片资源R.drawable.....
//或者Drawable(情况:1.图片为空时  2.图片加载失败时  3.图片加载中)
private final int imageResOnLoading;
private final int imageResForEmptyUri;
private final int imageResOnFail;
private final Drawable imageOnLoading;
private final Drawable imageForEmptyUri;
private final Drawable imageOnFail;

//加载图片前是否要重置view,其实就是ImageView.setImageDrawable(null);
private final boolean resetViewBeforeLoading;

//是否要把图片缓存在内存中
private final boolean cacheInMemory;

//是否要把图片缓存在SDcard上(可以指定缓存位置)
private final boolean cacheOnDisk;

//图片的缩放类型(NONE,NONE_SAFE,IN_SAMPLE_POWER_OF_2,IN_SAMPLE_INT,EXACTLY,EXACTLY_STRETCHED)
private final ImageScaleType imageScaleType;

//这个变量是BitmapFactory.Options类对象
//(图片压缩加载进来这个应该大家都知道,如果不清楚的,可以看我之前关于大图片加载的博文)
private final Options decodingOptions;

//加载前是否要先让线程停止一会儿Thread.sleep(delayBeforeLoading)
private final int delayBeforeLoading;

//图片文件中的Exif信息(大小,方向)是否需要考虑框架帮我们处理
private final boolean considerExifParams;

//开发者是否提供自己额外的下载器
private final Object extraForDownloader;

//图片缓存到内存前(如果没有设置缓存到内存,也会执行)和缓存到内存后执行的两个Process
private final BitmapProcessor preProcessor;
private final BitmapProcessor postProcessor;

//图片显示出来时做的统一操作
//(渐渐显示出来[FadeInBitmapDisplayer],圆角显示[RoundedBitmapDisplayer],普通显示[SimpleBitmapDisplayer])
private final BitmapDisplayer displayer;

//这个Handler和isSyncLoading是为了处理是否到线程池中执行
private final Handler handler;
private final boolean isSyncLoading;
ImageLoaderConfiguration.java :
//因为多处需要使用context.getResources()[如获取屏幕尺寸等],框架作者将其设为final对象
final Resources resources;

//缓存于内存中的图片最大的宽和高
final int maxImageWidthForMemoryCache;
final int maxImageHeightForMemoryCache;

//缓存于SDCard中的图片最大的宽和高
final int maxImageWidthForDiskCache;
final int maxImageHeightForDiskCache;

//保存于SDCard之前执行此Process
final BitmapProcessor processorForDiskCache;

//这两个后面会有一篇博文专门介绍,此处先点一下:
//两个线程池分别为执行加载图片的线程和执行加载缓存于SDcard中图片的线程
//后面还有一个线程池是做分发动作的
//[判断SDCard中有缓存会分发给taskExecutorForCachedImages去执行,否则分发给taskExecutor去执行]
final Executor taskExecutor;
final Executor taskExecutorForCachedImages;

//开发者是否有自定义线程池对象
final boolean customExecutor;
final boolean customExecutorForCachedImages;

//线程池中线程数的最大值
final int threadPoolSize;

//线程池中线程的优先级,默认是5
final int threadPriority;

//线程池中线程的调度方式,LIFO or FIFO[根据自己的需要做设定]
final QueueProcessingType tasksProcessingType;

//内存缓存和SDCard缓存,后面会出一篇博文详细介绍这两种缓存里面的几种策略
final MemoryCache memoryCache;
final DiskCache diskCache;

//下载器(分为:无网络的下载器[NetworkDeniedImageDownloader],
//慢网络时的下载器[SlowNetworkImageDownloader],
//默认的下载器[BaseImageDownloader])
final ImageDownloader downloader;

//框架默认为BaseImageDecoder,主要是用于图片加载入内存中时算出Scale,
//还有显示出来的时候通过Exif信息判断图片是否旋转
final ImageDecoder decoder;

//此为之前提的类,为显示做的一些操作
final DisplayImageOptions defaultDisplayImageOptions;

//两种网络情况时的下载器对象
final ImageDownloader networkDeniedDownloader;
final ImageDownloader slowNetworkDownloader;
介绍到这里,相比对第1步中几个主要涉及到的类,还有类成员中的一些作用大家都有了一定的认知了。那么接下来进行第2步的讲解。
ImageLoader.java:
首先ImageLoader这边我想把这个单例模式的写法稍微提一下,大牛们一笑而过即可。
private volatile static ImageLoader instance;

/** Returns singleton class instance */
public static ImageLoader getInstance() {
    if (instance == null) {
        synchronized (ImageLoader.class) {
            if (instance == null) {
                instance = new ImageLoader();
            }
        }
    }
    return instance;
}

protected ImageLoader() {
}
ImageLoader中值得我们深究的成员变量极少,因为主要的参数信息多数都放在前面介绍的两个类中了,这里我们说下它里面的几个变量和几个方法:
ImageLoader中的几个成员变量:
// init(...) 方法用于初始化此变量值和初始化ImageLoaderEngine
private ImageLoaderConfiguration configuration;
private ImageLoaderEngine engine;

//此变量为默认的图片加载监听回调的对象
private final ImageLoadingListener emptyListener = new SimpleImageLoadingListener();
ImageLoader中的几个主要方法:
//加载图片的方式一:同步加载[代码中其实只是将DisplayImageOptions中的isSyncLoading设置为了true
//最终还是调用loadImage函数]
public Bitmap loadImageSync(String uri, ImageSize targetImageSize, DisplayImageOptions options)

//加载图片的方式二:这种方式可以避免过ImageLoader重复加载同一个Uri但是只调用一次回调监听函数的问题。
//[想知道的,可以看看源码O(∩_∩)O] ,最终其实还是调用displayImage
public void loadImage(String uri,ImageSize targetImageSize,DisplayImageOptions options,
ImageLoadingListener listener, ImageLoadingProgressListener progressListener)

//加载图片的方法三:所有加载图片的函数最终都会调用这个函数
public void displayImage(String uri, ImageAware imageAware, DisplayImageOptions options,
ImageLoadingListener listener, ImageLoadingProgressListener progressListener)
终于要讲解displayImage(……)这个函数了,其实这个函数的阅读过程就是对整个ImageLoader框架的理解分析过程。
ImageLoader.displayImage(……):
public void displayImage(String uri, ImageAware imageAware, DisplayImageOptions options,
    //检查ImageLoaderConfiguration是否初始化(之前第2步调用init就是为了初始化这个值)
    checkConfiguration();

    //ImageAware可以理解为等价于你传入的ImageView,只不过它里面对ImageView做了个包装,
    //相当于ImageView的包装类,内部把ImageView做为WeakReference<View>弱引用保存,
    //因此此ImageView可被GC回收,所以存在有当图片加载结束,或者未开始加载前ImageView被回收,
    //就无需做即将进行的操作,省去资源消耗
    if (imageAware == null) {
        throw new IllegalArgumentException(ERROR_WRONG_ARGUMENTS);
    }

    //传入的参数如果不需要对Image Loading时做监听,
    //那么默认赋值为emptyListener,内部回调函数里没有任何操作
    if (listener == null) {
        listener = emptyListener;
    }

    //没有传入指定的DisplayImageOptions,就用ImageLoaderConfiguration赋值时的这个对象值为准。
    if (options == null) {
        options = configuration.defaultDisplayImageOptions;
    }

    //如果传入的要加载的图片的URI是空的,引擎取消显示这个图片的任务,
    //并做出一些相应的动作
    //(如果开发者指定了没有该图片要显示默认图片等)
    if (TextUtils.isEmpty(uri)) {
        engine.cancelDisplayTaskFor(imageAware);
        listener.onLoadingStarted(uri, imageAware.getWrappedView());
        if (options.shouldShowImageForEmptyUri()) {
            imageAware.setImageDrawable(options.getImageForEmptyUri(configuration.resources));
        } else {
            imageAware.setImageDrawable(null);
        }
        listener.onLoadingComplete(uri, imageAware.getWrappedView(), null);
        return;
    }

    //计算这个图片的大小(如果ImageView的大小小于定义的最大宽和高,
    //那么就用ImageView的大小作为该图片的大小)
    ImageSize targetSize = ImageSizeUtils.defineTargetSizeForView(imageAware,
    configuration.getMaxImageSize());

    //图片在内存中缓存是以Map<String, Reference<Bitmap>>的形式存储的,
    //因此需要定义一种方式来生成一个唯一可以标示图片的Key,
    //作者采用了URI_W*H的方式作为Key值。
    String memoryCacheKey = MemoryCacheUtils.generateKey(uri, targetSize);
    engine.prepareDisplayTaskFor(imageAware, memoryCacheKey);

    listener.onLoadingStarted(uri, imageAware.getWrappedView());

    //先到内存中查询是否已经存在此Key值对应的Bitmap
    Bitmap bmp = configuration.memoryCache.get(memoryCacheKey);

    //图片存在&&没被回收,显示出来。
    //(这里需要做一些操作:即之前提到的几个类中说的,
    //比如在图片加载入内存后做的操作,
    //还有就是把图片显示到控件的Task任务submit到taskExecutorForCachedImages线程池中去排队执行)
    if (bmp != null && !bmp.isRecycled()) {
        L.d(LOG_LOAD_IMAGE_FROM_MEMORY_CACHE, memoryCacheKey);

        if (options.shouldPostProcess()) {
            ImageLoadingInfo imageLoadingInfo = new ImageLoadingInfo(uri, imageAware, targetSize,
            memoryCacheKey,options, listener, progressListener, engine.getLockForUri(uri));
            //内存中存在有此图片,只需要执行ProcessAndDisplayImageTask任务即可
            ProcessAndDisplayImageTask displayTask = new ProcessAndDisplayImageTask(engine, bmp,
            imageLoadingInfo,defineHandler(options));
            if (options.isSyncLoading()) {
                displayTask.run();
            } else {
                //提给taskExecutorForCachedImages线程池去执行
                engine.submit(displayTask);
            }
        } else {
            options.getDisplayer().display(bmp, imageAware, LoadedFrom.MEMORY_CACHE);
            listener.onLoadingComplete(uri, imageAware.getWrappedView(), bmp);
        }
    } else {
        if (options.shouldShowImageOnLoading()) {
            imageAware.setImageDrawable(options.getImageOnLoading(configuration.resources));
        } else if (options.isResetViewBeforeLoading()) {
            imageAware.setImageDrawable(null);
        }

        ImageLoadingInfo imageLoadingInfo = new ImageLoadingInfo(uri, imageAware, targetSize,
        memoryCacheKey,options, listener, progressListener, engine.getLockForUri(uri));

        //内存中没有此图片,需要执行LoadAndDisplayImageTask任务,
        //这个LoadAndDisplayImageTask是整个ImageLoader的核心,下篇博文会详细讲解
        LoadAndDisplayImageTask displayTask = new LoadAndDisplayImageTask(engine,
        imageLoadingInfo,defineHandler(options));
        if (options.isSyncLoading()) {
            displayTask.run();
        } else {
            engine.submit(displayTask);
        }
    }
}
总结
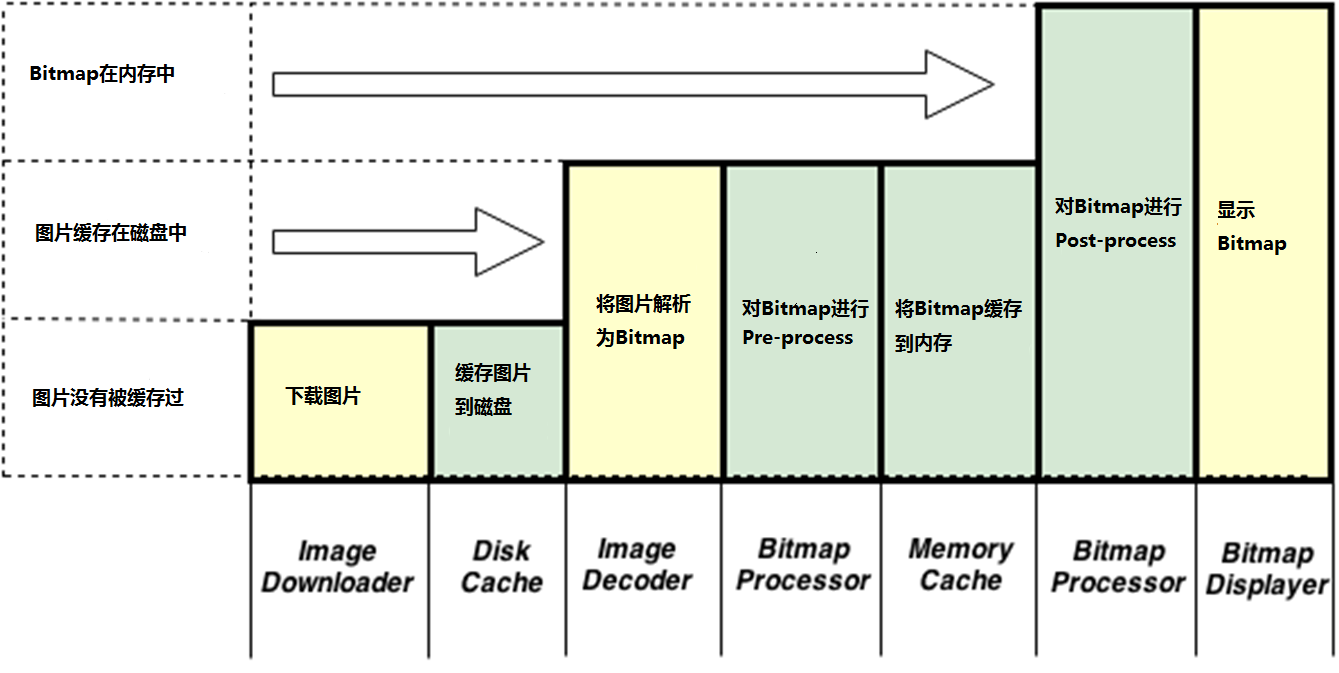
其实这篇博文旨在将ImageLoader的基本流程简单梳理,并没有更深入地介绍ImageLoader中的内存和SDcard缓存的机制,线程池的调度机制等知识,之后的几篇系列博文会陆续将这些知识点补上,本文最后贴张ImageLoader官方提供的流程图片,大家看完此博文后,可以对照下此图来做一个理解。