CentOS7.2 64位yum安装与配置MySQL
1、配置YUM源
在MySQL官网中下载YUM源rpm安装包:https://dev.mysql.com/downloads/repo/yum/
下载mysql源安装包
shell> wget http://dev.mysql.com/get/mysql57-community-release-el7-8.noarch.rpm
安装mysql源
shell> yum localinstall mysql57-community-release-el7-8.noarch.rpm
检查mysql源是否安装成功
shell> yum repolist enabled | grep "mysql.*-community.*"

看到上图所示表示安装成功。
2、安装MySQL
shell> yum install mysql-community-server
3、启动MySQL服务
shell> systemctl start mysqld
查看MySQL的启动状态
shell> systemctl status mysqld
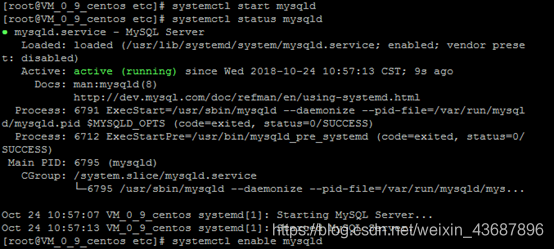
4、开机启动
shell> systemctl enable mysqld
shell> systemctl daemon-reload
5、修改root本地登录密码
mysql安装完成之后,在/var/log/mysqld.log文件中给root生成了一个默认密码。通过下面的方式找到root默认密码,然后登录mysql进行修改:
shell> grep 'temporary password' /var/log/mysqld.log

shell> mysql -u root -p
mysql> ALTER USER 'root'@'localhost' IDENTIFIED BY 'MyNewpassword10024!';
注意:mysql5.7默认安装了密码安全检查插件(validate_password),默认密码检查策略要求密码必须包含:大小写字母、数字和特殊符号,并且长度不能少于8位。否则会提示ERROR 1819 (HY000): Your password does not satisfy the current policy requirements错误,如下图所示:

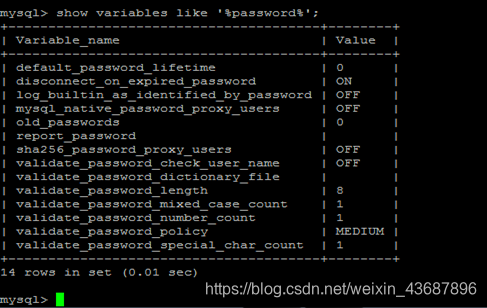
通过msyql环境变量可以查看密码策略的相关信息:
mysql> show variables like '%password%';
MySQL官网密码策略详细说明:
http://dev.mysql.com/doc/refman/5.7/en/validate-password-options-variables.html#sysvar_validate_password_policy
6、相关命令
启动nginx服务
systemctl start nginx.service
设置开机自启动
systemctl enable nginx.service
停止开机自启动
systemctl disable nginx.service
查看服务当前状态
systemctl status nginx.service
重新启动服务
systemctl restart nginx.service
查看所有已启动的服务
systemctl list-units --type=service