数据迁移
在实际的软件产品开发过程当中,由于软件的不停迭代和升级,或者是一些商业上,战略上的策略调整,我们的系统总是有可能会遇到需要从一个数据库产品迁移到另一个数据库上的场景。这意味着我们不得不将以前的数据迁移到新的数据库上去,因为我们不可能因为搬迁平台而丢掉数据,尤其是在数据越发重要的今天。
Spring Batch简介
spring batch是spring提供的一个数据处理框架,企业领域中的许多应用程序都需要对数据进行批量处理。
一个典型的批处理应用程序大致如下:
- 从数据库,文件或队列中读取大量记录。
- 以某种方式处理数据。
- 以修改之后的形式写回数据。
其对应的示意图如下:

Spring Batch中的一些概念介绍
spring batch的一个总体的架构如下:
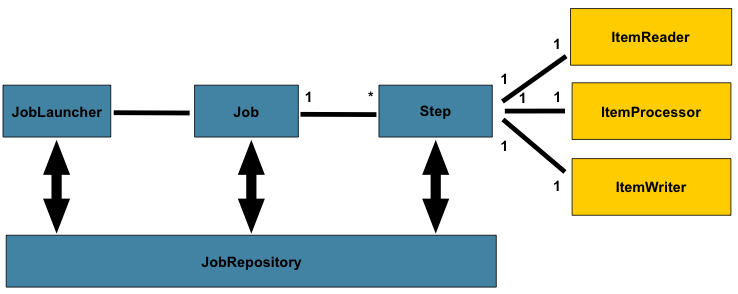
在spring batch中一个job可以定义很多的步骤step,在每一个step里面可以定义其专属的ItemReader用于读取数据,ItemProcesseor用于处理数据,ItemWriter用于写数据,而每一个定义的job则都在JobRepository里面,我们可以通过JobLauncher来启动某一个job。
chunk 处理流程
spring batch提供了让我们按照chunk处理数据的能力,一个chunk的示意图如下:

它的意思就和图示的一样,由于我们一次batch的任务可能会有很多的数据读写操作,因此一条一条的处理并向数据库提交的话效率不会很高,因此spring batch提供了chunk这个概念,我们可以设定一个chunk size,spring batch 将一条一条处理数据,但不提交到数据库,只有当处理的数据数量达到chunk size设定的值得时候,才一起去commit.
java的实例定义代码如下:
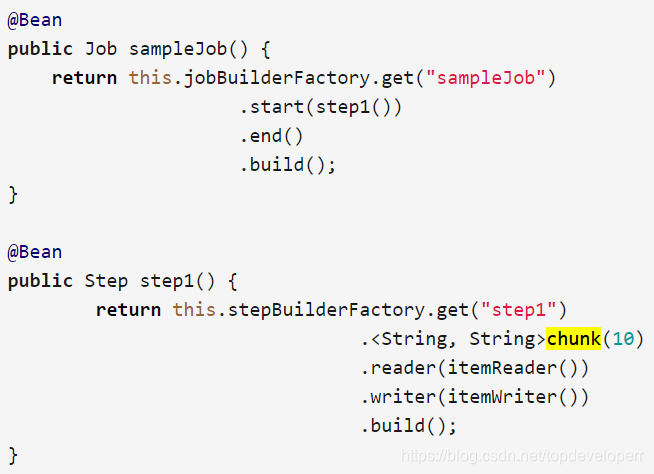
在上面这个step里面,chunk size被设为了10,当ItemReader读的数据数量达到10的时候,这一批次的数据就一起被传到itemWriter,同时transaction被提交。
skip策略和失败处理
一个batch的job的step,可能会处理非常大数量的数据,难免会遇到出错的情况,出错的情况虽出现的概率较小,但是我们不得不考虑这些情况,因为我们做数据迁移最重要的是要保证数据的最终一致性。spring batch当然也考虑到了这种情况,并且为我们提供了相关的技术支持,请看如下bean的配置:
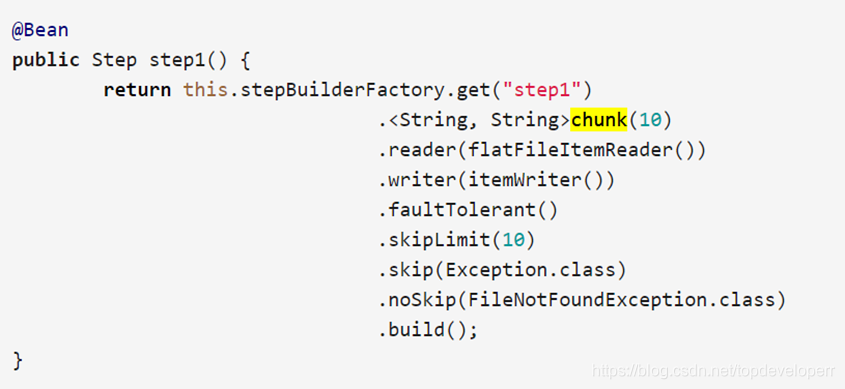
我们需要留意这三个方法,分别是skipLimit(),skip(),noSkip(),
skipLimit方法的意思是我们可以设定一个我们允许的这个step可以跳过的异常数量,假如我们设定为10,则当这个step运行时,只要出现的异常数目不超过10,整个step都不会fail。
skip方法我们可以指定我们可以跳过的异常,因为有些异常的出现,我们是可以忽略的。
noSkip方法的意思则是指出现这个异常我们不想跳过,因此这种异常出现一次时,计数器就会加一,直到达到上限。
Spring Batch实例
下面这个例子基于spring boot和maven,实现的功能是从file当中读取数据,同时写入到另一个文件里面。在实际做数据迁移的时候,只需要将代码当中读取数据,写数据的相应逻辑替换即可,流程和框架是一样的。
maven依赖如下:
<project xmlns="http://maven.apache.org/POM/4.0.0" xmlns:xsi="http://www.w3.org/2001/XMLSchema-instance"
    xsi:schemaLocation="http://maven.apache.org/POM/4.0.0 http://maven.apache.org/xsd/maven-4.0.0.xsd">
    <modelVersion>4.0.0</modelVersion>
    <groupId>io.spring.cloud.dataflow.ingest</groupId>
    <artifactId>ingest</artifactId>
    <version>1.0.0.BUILD-SNAPSHOT</version>
    <parent>
        <groupId>org.springframework.boot</groupId>
        <artifactId>spring-boot-starter-parent</artifactId>
        <version>2.0.0.RELEASE</version>
    </parent>
    <properties>
        <java.version>1.8</java.version>
        <maven.compiler.plugin.version>3.7.0</maven.compiler.plugin.version>
        <spring.cloud.task.version>1.2.2.RELEASE</spring.cloud.task.version>
        <checkstyle.config.location>checkstyle.xml</checkstyle.config.location>
        <checkstyle.plugin.version>2.17</checkstyle.plugin.version>
    </properties>
    <dependencies>
        <dependency>
            <groupId>org.springframework.boot</groupId>
            <artifactId>spring-boot-starter-batch</artifactId>
        </dependency>
        <dependency>
            <groupId>com.h2database</groupId>
            <artifactId>h2</artifactId>
        </dependency>
        <dependency>
            <groupId>org.springframework.cloud</groupId>
            <artifactId>spring-cloud-task-core</artifactId>
            <version>${spring.cloud.task.version}</version>
        </dependency>
        <dependency>
            <groupId>org.springframework.cloud</groupId>
            <artifactId>spring-cloud-task-batch</artifactId>
            <version>${spring.cloud.task.version}</version>
        </dependency>
        <dependency>
            <groupId>junit</groupId>
            <artifactId>junit</artifactId>
            <scope>test</scope>
        </dependency>
        <dependency>
            <groupId>org.hsqldb</groupId>
            <artifactId>hsqldb</artifactId>
            <scope>test</scope>
        </dependency>
    </dependencies>
    <build>
        <plugins>
            <plugin>
                <groupId>org.springframework.boot</groupId>
                <artifactId>spring-boot-maven-plugin</artifactId>
            </plugin>
            <plugin>
                <groupId>org.apache.maven.plugins</groupId>
                <artifactId>maven-compiler-plugin</artifactId>
                <version>${maven.compiler.plugin.version}</version>
                <configuration>
                    <source>${java.version}</source>
                    <target>${java.version}</target>
                    <testSource>${java.version}</testSource>
                    <testTarget>${java.version}</testTarget>
                    <compilerArgument>-Xlint:all</compilerArgument>
                </configuration>
            </plugin>
        </plugins>
    </build>
    <repositories>
        <repository>
            <id>repository.spring.milestone</id>
            <name>Spring Milestone Repository</name>
            <url>http://repo.spring.io/milestone</url>
        </repository>
    </repositories>
    <pluginRepositories>
        <pluginRepository>
            <id>spring-milestones</id>
            <name>Spring Milestones</name>
            <url>https://repo.spring.io/milestone</url>
            <snapshots>
                <enabled>false</enabled>
            </snapshots>
        </pluginRepository>
    </pluginRepositories>
    <reporting>
        <plugins>
            <plugin>
                <groupId>org.apache.maven.plugins</groupId>
                <artifactId>maven-checkstyle-plugin</artifactId>
                <version>${checkstyle.plugin.version}</version>
            </plugin>
        </plugins>
    </reporting>
</project>
启动类Application如下:
@EnableTask
@SpringBootApplication
public class Application {
	public static void main(String[] args) throws Exception {
		SpringApplication.run(Application.class, args);
	}
}
在启动类的注解当中我们加上了注解@EnableTask,这个注解可以让我们使用spring cloud data flow的功能。关于spring cloud data flow 的功能可以参考后面的部分内容。
Batch批处理的核心逻辑定义如下:
/*
 * Copyright 2018 the original author or authors.
 *
 * Licensed under the Apache License, Version 2.0 (the "License");
 * you may not use this file except in compliance with the License.
 * You may obtain a copy of the License at
 *
 *        http://www.apache.org/licenses/LICENSE-2.0
 *
 * Unless required by applicable law or agreed to in writing, software
 * distributed under the License is distributed on an "AS IS" BASIS,
 * WITHOUT WARRANTIES OR CONDITIONS OF ANY KIND, either express or implied.
 * See the License for the specific language governing permissions and
 * limitations under the License.
 */

package io.spring.cloud.dataflow.ingest.config;

import io.spring.cloud.dataflow.ingest.domain.Person;
import io.spring.cloud.dataflow.ingest.listner.JobCompletionNotificationListener;
import io.spring.cloud.dataflow.ingest.mapper.fieldset.PersonFieldSetMapper;
import io.spring.cloud.dataflow.ingest.processor.PersonItemProcessor;
import javax.sql.DataSource;

import io.spring.cloud.dataflow.ingest.processor.PersonItemProcessor2;
import org.springframework.batch.core.Job;
import org.springframework.batch.core.Step;
import org.springframework.batch.core.configuration.annotation.EnableBatchProcessing;
import org.springframework.batch.core.configuration.annotation.JobBuilderFactory;
import org.springframework.batch.core.configuration.annotation.StepBuilderFactory;
import org.springframework.batch.core.configuration.annotation.StepScope;
import org.springframework.batch.core.launch.support.RunIdIncrementer;
import org.springframework.batch.item.ItemProcessor;
import org.springframework.batch.item.ItemStreamReader;
import org.springframework.batch.item.ItemWriter;
import org.springframework.batch.item.database.JdbcBatchItemWriter;
import org.springframework.batch.item.database.builder.JdbcBatchItemWriterBuilder;
import org.springframework.batch.item.file.FlatFileItemWriter;
import org.springframework.batch.item.file.builder.FlatFileItemReaderBuilder;

import org.springframework.batch.item.file.transform.BeanWrapperFieldExtractor;
import org.springframework.batch.item.file.transform.DelimitedLineAggregator;
import org.springframework.beans.factory.annotation.Autowired;
import org.springframework.beans.factory.annotation.Value;
import org.springframework.context.annotation.Bean;
import org.springframework.context.annotation.Configuration;
import org.springframework.core.io.ClassPathResource;
import org.springframework.core.io.FileSystemResource;
import org.springframework.core.io.ResourceLoader;

/**
 * Class used to configure the batch job related beans.
 *
 * @author Chris Schaefer
 */
@Configuration
@EnableBatchProcessing
public class BatchConfiguration {
	private final DataSource dataSource;
	private final ResourceLoader resourceLoader;
	private final JobBuilderFactory jobBuilderFactory;
	private final StepBuilderFactory stepBuilderFactory;

	@Autowired
	public BatchConfiguration(final DataSource dataSource, final JobBuilderFactory jobBuilderFactory,
			final StepBuilderFactory stepBuilderFactory,
			final ResourceLoader resourceLoader) {
		this.dataSource = dataSource;
		this.resourceLoader = resourceLoader;
		this.jobBuilderFactory = jobBuilderFactory;
		this.stepBuilderFactory = stepBuilderFactory;
	}


	@Bean
	@StepScope
	public ItemStreamReader<Person> reader() throws Exception {
		return new FlatFileItemReaderBuilder<Person>()
				.name("reader")
				.resource(new ClassPathResource("data.csv"))
				.delimited()
				.names(new String[] {"firstName", "lastName"})
				.fieldSetMapper(new PersonFieldSetMapper())
				.build();
	}

	@Bean
	public ItemProcessor<Person, Person> processor() {
		return new PersonItemProcessor();
	}

	@Bean
	public ItemProcessor<Person, Person> processor2() {
		return new PersonItemProcessor2();
	}

	@Bean
	public ItemWriter<Person> writer() {
		return new JdbcBatchItemWriterBuilder<Person>()
			.beanMapped()
			.dataSource(this.dataSource)
			.sql("INSERT INTO people (first_name, last_name) VALUES (:firstName, :lastName)")
			.build();
	}


	@Bean
	public ItemWriter<Person> writerToFile() {
		//Create writer instance
		FlatFileItemWriter<Person> writer = new FlatFileItemWriter<>();

		//Set output file location
		writer.setResource(new FileSystemResource("output/outputData.csv"));

		//All job repetitions should "append" to same output file
		writer.setAppendAllowed(true);

		//Name field values sequence based on object properties
		writer.setLineAggregator(new DelimitedLineAggregator<Person>() {
			{
				setDelimiter(",");
				setFieldExtractor(new BeanWrapperFieldExtractor<Person>() {
					{
						setNames(new String[] { "firstName", "lastName" });
					}
				});
			}
		});
		return writer;
	}

	@Bean
	public Job ingestJob(JobCompletionNotificationListener listener) throws Exception {
		return jobBuilderFactory.get("ingestJob")
			.incrementer(new RunIdIncrementer()).listener(listener)
			.flow(step1()).next(step2())
			.end()
			.build();
	}

	@Bean
	public Step step1() throws Exception {
		return stepBuilderFactory.get("ingest")
			.<Person, Person>chunk(10)
			.reader(reader())
			.processor(processor())
			//.writer(writer())
			.writer(writerToFile())
			.build();
	}

	@Bean
	public Step step2() throws Exception {
		return stepBuilderFactory.get("step2")
				.<Person, Person>chunk(10)
				.reader(reader())//get the data from anywhere in the reader bean
				.processor(processor2())//do the process for the data with the logic defined in processor bean process2
				//.writer(writer())//write the processed data into the as the writer bean defined,
				.writer(writerToFile())
				.build();
	}
}
上面的代码是spring batch的核心实现,定义了batch的job和step,以及数据源等信息,实现了写入到文件,或者是写入数据库的功能,同时定义了两个迁移过程的两个step,两个step将按照我们指定的顺序执行。每一个step的reader,processor,和writer都可以是自己独有的逻辑。如果我们想把数据写入到数据库或者是从数据库读数据,则只需要定义好对应的DataSource信息,然后再reader和writer里指定DataSource和sql语句即可。
model类的代码如下:
public class Person {
	private final String firstName;
	private final String lastName;

	public Person(final String firstName, final String lastName) {
		this.firstName = firstName;
		this.lastName = lastName;
	}

	public String getFirstName() {
		return firstName;
	}

	public String getLastName() {
		return lastName;
	}

	@Override
	public String toString() {
		return "First name: " + firstName + " , last name: " + lastName;
	}
}
Mapper类如下
import io.spring.cloud.dataflow.ingest.domain.Person;

import org.springframework.batch.item.file.mapping.FieldSetMapper;
import org.springframework.batch.item.file.transform.FieldSet;

/**
 * Maps the provided FieldSet into a Person object.
 *
 */
public class PersonFieldSetMapper implements FieldSetMapper<Person> {
	@Override
	public Person mapFieldSet(FieldSet fieldSet) {
		String firstName = fieldSet.readString(0);
		String lastName = fieldSet.readString(1);

		return new Person(firstName, lastName);
	}
}
Mapper类的功能主要是作为一个数据的载体,我们使用java技术将数据从数据源读取到之后,数据是存放到结果集ResultSet当中的,需要有一个地方去接收它,并把这条数据转化成我们需要的格式或者是方便我们处理的格式等。
两个step的简单处理逻辑分别定义如下:
public class PersonItemProcessor implements ItemProcessor<Person, Person> {
	private static final Logger LOGGER = LoggerFactory.getLogger(PersonItemProcessor.class);

	@Override
	public Person process(Person person) throws Exception {
		String firstName = person.getFirstName().toUpperCase();
		String lastName = person.getLastName().toUpperCase();

		Person processedPerson = new Person(firstName, lastName);

		LOGGER.info("Processed: " + person + " into: " + processedPerson);

		return processedPerson;
	}
}
import io.spring.cloud.dataflow.ingest.domain.Person;
import org.slf4j.Logger;
import org.slf4j.LoggerFactory;
import org.springframework.batch.item.ItemProcessor;

public class PersonItemProcessor2 implements ItemProcessor<Person, Person> {

    private static final Logger log = LoggerFactory.getLogger(PersonItemProcessor.class);

    @Override
    public Person process(final Person person) throws Exception {
        final String firstName = (person.getFirstName()+" step2").toUpperCase();
        final String lastName = (person.getLastName()+" step2").toUpperCase();

        final Person transformedPerson = new Person(firstName, lastName);

        log.info("Converting (" + person + ") into (" + transformedPerson + ")");

        //test the exception case
       /* if(firstName.equals("JANE STEP2")){
            throw new RuntimeException("I am a exception");
        }*/
        return transformedPerson;
    }

}
整个job的listener定义如下:
import io.spring.cloud.dataflow.ingest.domain.Person;
import org.slf4j.Logger;
import org.slf4j.LoggerFactory;
import org.springframework.batch.core.BatchStatus;
import org.springframework.batch.core.JobExecution;
import org.springframework.batch.core.listener.JobExecutionListenerSupport;
import org.springframework.beans.factory.annotation.Autowired;
import org.springframework.jdbc.core.JdbcTemplate;
import org.springframework.stereotype.Component;

@Component
public class JobCompletionNotificationListener extends JobExecutionListenerSupport {

    private static final Logger log = LoggerFactory.getLogger(JobCompletionNotificationListener.class);

    private final JdbcTemplate jdbcTemplate;

    @Autowired
    public JobCompletionNotificationListener(JdbcTemplate jdbcTemplate) {
        this.jdbcTemplate = jdbcTemplate;
    }

    @Override
    public void afterJob(JobExecution jobExecution) {
        if(jobExecution.getStatus() == BatchStatus.COMPLETED) {
            log.info("!!! JOB FINISHED! Time to verify the results");

            jdbcTemplate.query("SELECT first_name, last_name FROM people",
                    (rs, row) -> new Person(
                            rs.getString(1),
                            rs.getString(2))
            ).forEach(person -> log.info("Found <" + person + "> in the database."));
        }
    }
}
整个job的listener的功能是在job执行完成之后去执行的一段逻辑,在整个job执行完成之后,我们也许需要执行迁移数据验证等功能,就可以放在这个地方做,除了job执行完之后的listener之外,spring batch还提供了非常丰富的listener来满足我们的需求,比如在read数据的前后,write数据的前后,process数据的前后,我们都是可以定义listener去做我们需要的事情的。
spring cloud data flow
spring cloud data flow也是spring的一个子项目,用于管理各种数据流,它还提供了一个图形化界面供我们使用,spring batch的job也可以注册在spring cloud data flow上。在本地的安装使用流程如下。
使用wget命令下载两个jar包
wget http://repo.spring.io/release/org/springframework/cloud/spring-cloud-dataflow-server-local/1.7.3.RELEASE/spring-cloud-dataflow-server-local-1.7.3.RELEASE.jarwget http://repo.spring.io/release/org/springframework/cloud/spring-cloud-dataflow-shell/1.7.3.RELEASE/spring-cloud-dataflow-shell-1.7.3.RELEASE.ja
在下载好之后,进入jar包所在目录,直接使用命令启动。
先启动server
java -jar spring-cloud-dataflow-server-local-1.7.3.RELEASE.jar再启动shell
java -jar spring-cloud-dataflow-shell-1.7.3.RELEASE.jar启动完成之后,如果shell的窗口显示server unknown,则我们可以通过以下命令指定它的server端口:
dataflow config server+(server地址)我们可以直接在shell里使用command执行app的注册,销毁查看等操作,也可以通过spring cloud data flow 提供的一个dashboard来管理我们的task,dashboard默认的端口号是http://localhost:9393/dashboard,在浏览器打开之后,将看到如下的界面:

由于当前我们没有注册任何app和jobs,所以这里什么也没有,我们可以直接在dashboard上添加app,也可以在命令行在task shell里通过如下命令注册app:
app register --type source --name my-app --uri file://root/apps/my-app.jar在spring cloud data flow里我们可以管理我们的APP,控制他们的启动,检测job的运行状况等,这些数据会被保存在数据库里,
默认情况下,spring cloud data flow server会使用一个h2内存数据库存储我们定义的job等任务,我们也可以配置使用其他数据库。关于spring cloud data flow的更多内容,这里就不做过多的介绍,可以参考spring的官方文档。遇到问题可以自己google解决。