Android的消息机制主要是指Handler的运行机制,Handler是Android消息机制上层接口的实现,它的运行需要Message、MessageQueue和Looper的支撑,下面就来分别介绍它们的实现原理。
1、Message源码解析
首先来了解一下Message,它是消息的载体,Handler传递的消息必须按照Message格式来传递,实现了Parcelable接口,所以进程间通信也可以使用message。
public final class Message implements Parcelable {
    public int what;
    public int arg1;
    public int arg2;
    public Object obj;
    //使用Messager来进行进程间通信时需要用到
    public Messenger replyTo;
    public int sendingUid = -1;
    ...
    /** @hide */
    //线程同步锁
    public static final Object sPoolSync = new Object();
    //Message池是一个链表的实现
    private static Message sPool;
    private static int sPoolSize = 0;
    //Message里有个池的概念,这个就是池里允许的最大数量
    private static final int MAX_POOL_SIZE = 50;
    //得到一个Message对象,系统建议的方案。
    public static Message obtain() {
        synchronized (sPoolSync) {
            if (sPool != null) {
                Message m = sPool;
                sPool = m.next;
                m.next = null;
                m.flags = 0; // clear in-use flag
                sPoolSize--;
                return m;
            }
        }
        return new Message();
    }
    ...
    //释放Message对象
    public void recycle() {
        ...
        recycleUnchecked();
    }

    //释放Message对象
    void recycleUnchecked() {
        // Mark the message as in use while it remains in the recycled object pool.
        // Clear out all other details.
        flags = FLAG_IN_USE;
        what = 0;
        arg1 = 0;
        arg2 = 0;
        obj = null;
        replyTo = null;
        sendingUid = -1;
        when = 0;
        target = null;
        callback = null;
        data = null;
        //如果未达到池的最大容量就放入池中,否则等待被gc回收吧
        synchronized (sPoolSync) {
            if (sPoolSize < MAX_POOL_SIZE) {
                next = sPool;
                sPool = this;
                sPoolSize++;
            }
        }
    }
    //将o里的信息copy到当前Message
    public void copyFrom(Message o) {
        this.flags = o.flags & ~FLAGS_TO_CLEAR_ON_COPY_FROM;
        this.what = o.what;
        this.arg1 = o.arg1;
        this.arg2 = o.arg2;
        this.obj = o.obj;
        this.replyTo = o.replyTo;
        this.sendingUid = o.sendingUid;

        if (o.data != null) {
            this.data = (Bundle) o.data.clone();
        } else {
            this.data = null;
        }
    }

    //是否是异步消息
    public boolean isAsynchronous() {
        return (flags & FLAG_ASYNCHRONOUS) != 0;
    }
    //将消息设置为异步消息
    public void setAsynchronous(boolean async) {
        if (async) {
            flags |= FLAG_ASYNCHRONOUS;
        } else {
            flags &= ~FLAG_ASYNCHRONOUS;
        }
    }
    ...
}
上面就是精简版的Message源码,还是比较简单的,最重要就是有一个Message池的实现,它通过obtain()来得到一个Message对象(从链表中删除一个对象),通过recycle()方法来添加一个Message对象(系统自动调用,不需要我们手动调用)。这样就不用每次都去创建一个新的Message对象,达到节省内存的目的。所以都应该通过Message m=Meesgae.obtain()来获得一个Message对象。
2、消息队列工作原理
消息队列在Android中指的是MessageQueue,MessageQueue主要包含两个操作:插入和读取。读取操作本身会伴随着删除操作,插入和读取对应的方法分别是enqueueMessage和next,其中enqueueMessage的作用是往消息队列中插入一条消息,而next的作用是从消息队列中取出一条消息并将其从消息队列中移除。尽管MessageQueue被称为消息队列,但它的内部实现并不是用的队列,实际上它是通过一个单链表的数据结构来维护消息队列表,单链表在插入和删除上比较有优势。
public final class MessageQueue {
    ...
    //消息队列的阻塞唤醒机制,具体实现采用了Linux下的epoll机制
    private native static long nativeInit();
    private native static void nativeDestroy(long ptr);
    private native void nativePollOnce(long ptr, int timeoutMillis); /*non-static for callbacks*/
    private native static void nativeWake(long ptr);
    private native static boolean nativeIsPolling(long ptr);
    private native static void nativeSetFileDescriptorEvents(long ptr, int fd, int events);
    //从MessageQueue中获取消息,如果拿不到就阻塞
    Message next() {
        ...
        for (;;) {
            if (nextPollTimeoutMillis != 0) {
                Binder.flushPendingCommands();
            }

            nativePollOnce(ptr, nextPollTimeoutMillis);

            synchronized (this) {
                // Try to retrieve the next message.  Return if found.
                final long now = SystemClock.uptimeMillis();
                Message prevMsg = null;
                Message msg = mMessages;
                if (msg != null && msg.target == null) {
                    // Stalled by a barrier.  Find the next asynchronous message in the queue.
                    do {
                        prevMsg = msg;
                        msg = msg.next;
                    } while (msg != null && !msg.isAsynchronous());
                }
                if (msg != null) {
                    if (now < msg.when) {
                        // Next message is not ready.  Set a timeout to wake up when it is ready.
                        nextPollTimeoutMillis = (int) Math.min(msg.when - now, Integer.MAX_VALUE);
                    } else {
                        // Got a message.
                        mBlocked = false;
                        if (prevMsg != null) {
                            prevMsg.next = msg.next;
                        } else {
                            mMessages = msg.next;
                        }
                        msg.next = null;
                        msg.markInUse();
                        return msg;
                    }
                } else {
                    // No more messages.
                    nextPollTimeoutMillis = -1;
                }
                ...
            }

            // Run the idle handlers.
            // We only ever reach this code block during the first iteration.
            for (int i = 0; i < pendingIdleHandlerCount; i++) {
                final IdleHandler idler = mPendingIdleHandlers[i];
                mPendingIdleHandlers[i] = null; // release the reference to the handler

                boolean keep = false;
                try {
                    keep = idler.queueIdle();
                } catch (Throwable t) {
                    Log.wtf(TAG, "IdleHandler threw exception", t);
                }

                if (!keep) {
                    synchronized (this) {
                        mIdleHandlers.remove(idler);
                    }
                }
            }
            ...
        }
    }
    //在MessageQueue中插入了一个Message,并且未设置target。它的作用是插入一个消息屏障,这个屏障之后的所有同步消息都不会被执行,即使时间已经到了也不会执行。
    private int postSyncBarrier(long when) {
        // Enqueue a new sync barrier token.
        // We don't need to wake the queue because the purpose of a barrier is to stall it.
        synchronized (this) {
            final int token = mNextBarrierToken++;
            final Message msg = Message.obtain();
            msg.markInUse();
            msg.when = when;
            msg.arg1 = token;

            Message prev = null;
            Message p = mMessages;
            if (when != 0) {
                while (p != null && p.when <= when) {
                    prev = p;
                    p = p.next;
                }
            }
            if (prev != null) { // invariant: p == prev.next
                msg.next = p;
                prev.next = msg;
            } else {
                msg.next = p;
                mMessages = msg;
            }
            return token;
        }
    }
    //MessageQueue中插入Message
    boolean enqueueMessage(Message msg, long when) {
        ...

        synchronized (this) {
            if (mQuitting) {
                ...
                msg.recycle();
                return false;
            }

            msg.markInUse();
            msg.when = when;
            Message p = mMessages;
            boolean needWake;
            if (p == null || when == 0 || when < p.when) {
                // New head, wake up the event queue if blocked.
                msg.next = p;
                mMessages = msg;
                needWake = mBlocked;
            } else {
                // Inserted within the middle of the queue.  Usually we don't have to wake
                // up the event queue unless there is a barrier at the head of the queue
                // and the message is the earliest asynchronous message in the queue.
                needWake = mBlocked && p.target == null && msg.isAsynchronous();
                Message prev;
                for (;;) {
                    prev = p;
                    p = p.next;
                    if (p == null || when < p.when) {
                        break;
                    }
                    if (needWake && p.isAsynchronous()) {
                        needWake = false;
                    }
                }
                msg.next = p; // invariant: p == prev.next
                prev.next = msg;
            }
            ...
        }
        return true;
    }
    ...
    //移除某个Message,并将这个Message放入Message池中
    void removeMessages(Handler h, int what, Object object) {
        if (h == null) {
            return;
        }

        synchronized (this) {
            Message p = mMessages;

            // Remove all messages at front.
            while (p != null && p.target == h && p.what == what
                   && (object == null || p.obj == object)) {
                Message n = p.next;
                mMessages = n;
                //将Message放入Message池
                p.recycleUnchecked();
                p = n;
            }

            // Remove all messages after front.
            while (p != null) {
                Message n = p.next;
                if (n != null) {
                    if (n.target == h && n.what == what
                        && (object == null || n.obj == object)) {
                        Message nn = n.next;
                        //将Message放入Message池
                        n.recycleUnchecked();
                        p.next = nn;
                        continue;
                    }
                }
                p = n;
            }
        }
    }
    ...
    //回调接口,用于发现线程何时阻塞等待更多消息。也就是当空闲时候回调。当线程空闲时回调此接口
    public static interface IdleHandler {
        //返回false,就删除该回调
        boolean queueIdle();
    }
    ...
}
从上面可以看出MessageQueue是一个比较底层的类了,其阻塞-唤醒机制(关于阻塞-唤醒机制可以阅读深入理解 MessageQueue)是采用Linux下的epoll来实现的,epoll是Linux下多路复用IO接口select/poll的增强版本,关于epoll资料可以参考Linux IO模式及 select、poll、epoll详解这篇文章,其实Java中的NIO也是一种多路复用IO的实现。
在Looper里都是调用next来返回一个消息,如果没有更多消息了,就会调用IdleHandler这个接口来处理一些不着急的任务。IdleHandler一般用的比较少,但是还有有应用场景的,比如LeakCanary里就会用用到,也可以参考你知道android的MessageQueue.IdleHandler吗?这篇文章。向MessageQueue中插入一条消息是通过enqueueMessage方法来实现的,逻辑很简单,找到与目标Message的when接近节点,然后将Message插入链表即可,这实际上就进行了进行了排序。
上面分析next方法时漏掉了一点,开发中用的也比较少,就是如果msg.target为null,则找出第一个异步消息的情况,那么什么时候为null尼?那就是调用postSyncBarrier方法的时候,这个方法直接在MessageQueue中插入了一个Message,并且未设置target。它的作用是插入一个消息屏障,这个屏障之后的所有同步消息都不会被执行,即使时间已经到了也不会执行。可以通过removeSyncBarrier来移除这个屏障,参数是postSyncBarrier方法的返回值。这些方法是隐藏的或者是私有的,具体应用场景可以查看ViewRootImpl中的scheduleTraversals方法,它在绘图之前会插入一个消息屏障,绘制之后移除。回到next方法,如果发现了一个消息屏障,会循环找出第一个异步消息(如果有异步消息的话),所有同步消息都将忽略(平常发送的一般都是同步消息),可以通过setAsynchronous设置为异步消息,一般很少用到,但在LeakCanary中就有具体应用,具体可以参考LeakCanary源码分析这篇文章。然后拿到Message直接返回即可。关于MessageQueue深入理解可以阅读深入理解 MessageQueue这篇文章。
3、Looper工作原理
每个Looper循环器对应一个MessageQueue,每个线程对应一个Looper,所以Looper都是存在ThreadLocal中。
public final class Looper {
    //存储每个线程所对应的Looper
    static final ThreadLocal<Looper> sThreadLocal = new ThreadLocal<Looper>();
    //主线程的Looper
    private static Looper sMainLooper;  // guarded by Looper.class
    final MessageQueue mQueue;
    final Thread mThread;
    ...
    //创建Looper,一般在子线程会调用
    public static void prepare() {
        prepare(true);
    }
    //创建Looper,一般在子线程会调用
    private static void prepare(boolean quitAllowed) {
        if (sThreadLocal.get() != null) {
            throw new RuntimeException("Only one Looper may be created per thread");
        }
        sThreadLocal.set(new Looper(quitAllowed));
    }

    //创建主线程的Looper,已在ActivityThread中调用
    public static void prepareMainLooper() {
        prepare(false);
        synchronized (Looper.class) {
            if (sMainLooper != null) {
                throw new IllegalStateException("The main Looper has already been prepared.");
            }
            sMainLooper = myLooper();
        }
    }

    //返回主线程所对应的Looper
    public static Looper getMainLooper() {
        synchronized (Looper.class) {
            return sMainLooper;
        }
    }
    public static void loop() {
        //拿到Looper
        final Looper me = myLooper();
        //拿到MessageQueue
        final MessageQueue queue = me.mQueue;
        for (;;) {
            Message msg = queue.next(); // might block
            if (msg == null) {
                // No message indicates that the message queue is quitting.
                //消息返回null就退出
                return;
            }
            ...
            try {
                //将消息分发给对应的Handler
                msg.target.dispatchMessage(msg);
            } finally {
                ...
            }
            ...
            //回收Message对象
            msg.recycleUnchecked();
        }
    }
    ...
    //返回当前线程所对应的Looper
    public static @Nullable Looper myLooper() {
        return sThreadLocal.get();
    }
    //判断是否在Looper所在线程
    public boolean isCurrentThread() {
        return Thread.currentThread() == mThread;
    }
    //返回Looper所在的线程
    public @NonNull Thread getThread() {
        return mThread;
    }

    //返回当前Looper对应的MessageQueue
    public @NonNull MessageQueue getQueue() {
        return mQueue;
    }
    ...
}
上面就是Looper的源码精简版,还是比较简单的,主要是通过Looper.prepare来创建一个Looper并将创建的对象放入ThreadLocal<Looper> sThreadLocal = new ThreadLocal<Looper>()中。那么ThreadLocals(参考理解Java中的ThreadLocal)是什么尼?这里简单介绍下,ThreadLocal是一个线程内部的数据存储类,通过它可以在指定的线程中存储数据,也只有在指定线程中可以获取到存储的数据,对于其它线程就无法获取,这就保证了每个线程里只会有一个唯一的Looper循环器。然后通过loop方法拿到Message,最后交给Handler的dispatchMessage来分发。在Looper类的开始地方有一段注释,意思就是在子线程里使用Handler的话,需在在子线程创建一个Looper,否则Handler在子线程无法使用。
class LooperThread extends Thread {
        public Handler mHandler;
        public void run() {
            Looper.prepare();
            mHandler = new Handler() {
                public void handleMessage(Message msg) {
                    // process incoming messages here
                }
            };
            Looper.loop();
            mHandler.setMessage();
        }
    }
在子线程通过Looper.prepare创建Looper后,还需要调用Looper.loop来使Looper跑起来,不断的从MessageQueue从获取消息。而我们在主线程没有调用Looper.prepare与Looper.loop这两个方法却也能够使用Handler,这是为什么尼?原来在ActivityThread中,系统已经帮我们调用了这两个方法。也就是说UI线程中的Looper已有系统给我们创建好了。
public static void main(String[] args) {
        ...
        Looper.prepareMainLooper();
        ActivityThread thread = new ActivityThread();
        thread.attach(false);

        if (sMainThreadHandler == null) {
            sMainThreadHandler = thread.getHandler();
        }
        ...
        Looper.loop();
    }
上面代码是不是很熟悉啊,在java里就代表程序的入口。在Android里也一样,是android程序的入口,在这里就看到了Looper.prepareMainLooper()及Looper.loop()这两个方法,也就是说在UI线程里,系统帮我们创建了一个Looper循环器,当这个Looper退出时,当前应用也就关闭了。
4、Handler工作原理
Handler的工作主要是消息的发送与接收,每个Handler对应一个Looper,消息的发送可以通过post的一系列方法以及send的一些列方法来实现,post的一系列方法最终也是通过send的一些列方法来实现的。
    public final boolean post(Runnable r)
    {
       return  sendMessageDelayed(getPostMessage(r), 0);
    }
    public final boolean sendMessageDelayed(Message msg, long delayMillis)
    {
        if (delayMillis < 0) {
            delayMillis = 0;
        }
        return sendMessageAtTime(msg, SystemClock.uptimeMillis() + delayMillis);
    }
    public boolean sendMessageAtTime(Message msg, long uptimeMillis) {
        MessageQueue queue = mQueue;
        if (queue == null) {
            ...
            return false;
        }
        return enqueueMessage(queue, msg, uptimeMillis);
    }
    private boolean enqueueMessage(MessageQueue queue, Message msg, long uptimeMillis) {
        msg.target = this;
        if (mAsynchronous) {
            msg.setAsynchronous(true);
        }
        return queue.enqueueMessage(msg, uptimeMillis);
    }
可以发现,Handler发送消息仅仅是向MessageQueue中插入了一条消息,MessageQueue的next方法就会返回这条消息给Looper,Looper接收到消息后就交给Handler来处理,这时就会调用Handler的dispatchMessage来处理消息。
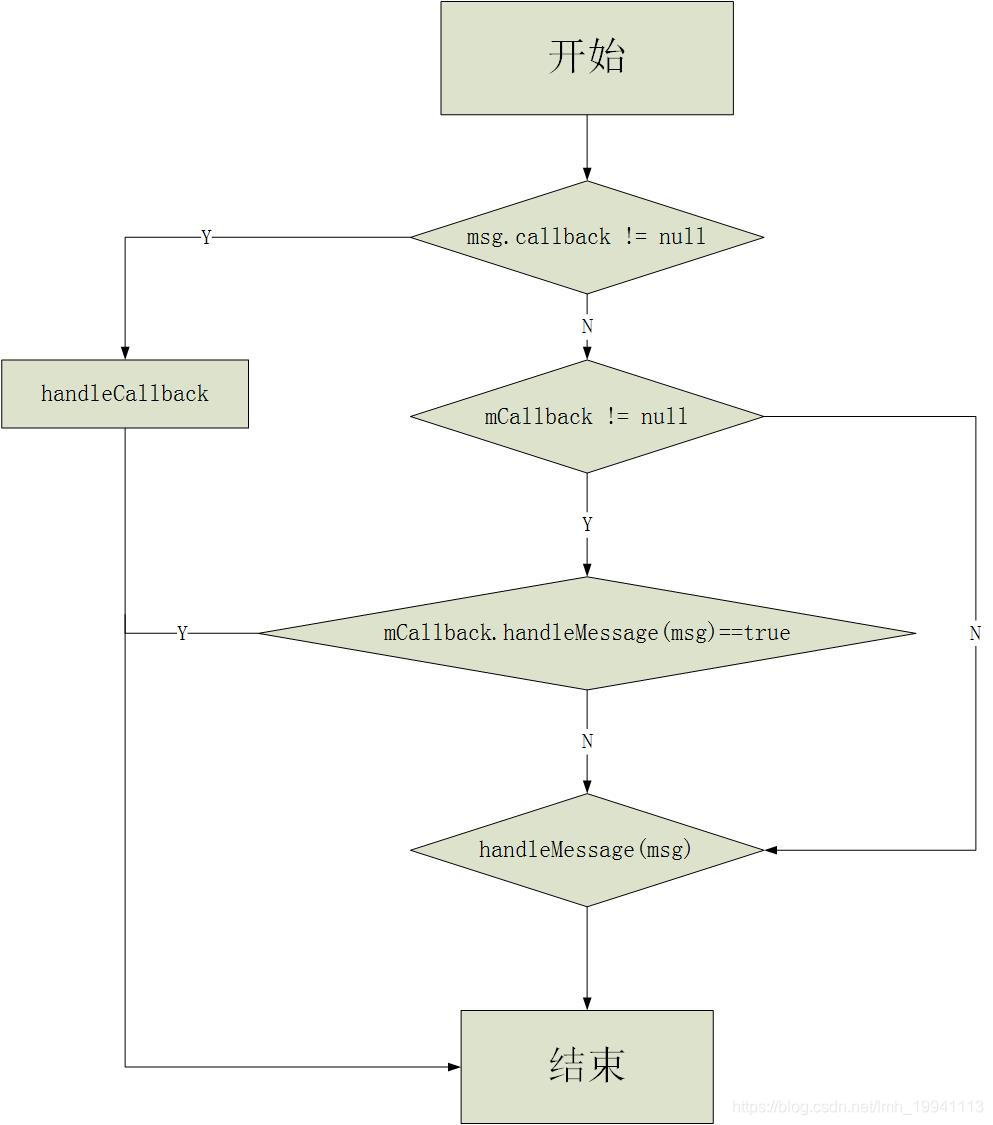
    //Message消息的分发,可以看出Message的消息分发还是有优先级的
    public void dispatchMessage(Message msg) {
        if (msg.callback != null) {//优先级最高,最先分发到msg.callback
            handleCallback(msg);
        } else {
            if (mCallback != null) {
                if (mCallback.handleMessage(msg)) {//优先级其次
                    return;
                }
            }
            handleMessage(msg);//最后
        }
    }
dispatchMessage代码还是比较简单的,整体流程图如下。
5、总结
到此Android消息机制就分析完毕,其实Android消息机制应用层还是比较简单的,就是通过Handler来发送、处理消息,Looper不断的从MessageQueue里获取消息并交给Handler来处理,MessageQueue比较底层,主要是消息队列(就一链表)的维持、阻塞-唤醒机制的实现,最后感谢《Android艺术探索》这本书。
【参考资料】
android 利用Handler机制中SyncBarrier的特性实现预加载
Android Asynchronous Message(异步消息)
Android源码分析之MessageQueue
深入理解 MessageQueue
Linux IO模式及 select、poll、epoll详解