在上一章,我讲解了React+node+express相应的框架搭建,一个项目只有一个前端框架够么,当然不够啦!!!
所以这节我们就来讲后台springboot框架的搭建和相关原理吧~~~版本(2.1.1)
1.搭建Springboot所需要的前提
①JDK8-JDK11
②Maven3.3+ 或 Gradle4.4+版本(我的随笔内用的都是Maven)
③Tomcat9.0 或 Jetty 9.4 或 Undertow 2.0
2. 到底什么是Springboot么,让我们来看下图
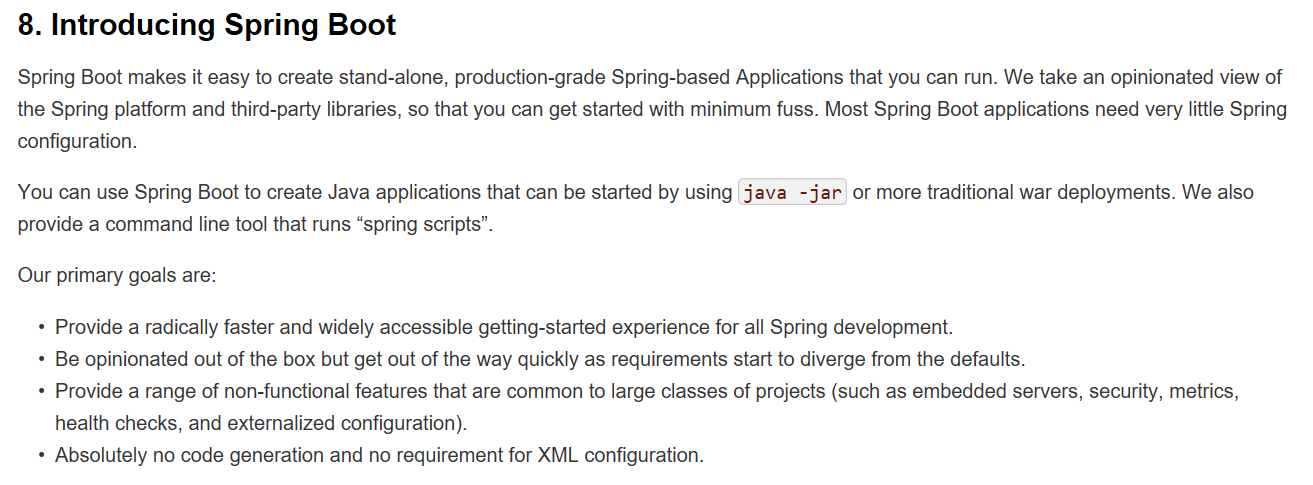
意思就是: Springboot是Spring框架的集成,相比Spring框架, 除了拥有Spring的功能外, Springboot配置无疑会更加轻松简单。另外默认情况生成的包为jar包,我们以java -jar相应的指令启动服务。
另外透露一点:以Springboot为基础的SpringCloud目前是微服务的首选框架~~
3. 让我们开始搭建吧
①首先我们在IDE里面建立一个Maven project, 本地命名为对应的maven.example
②更换Pom的内容: 以下为内容:
<?xml version="1.0" encoding="UTF-8"?>
<project xmlns="http://maven.apache.org/POM/4.0.0"
    xmlns:xsi="http://www.w3.org/2001/XMLSchema-instance"
    xsi:schemaLocation="http://maven.apache.org/POM/4.0.0 http://maven.apache.org/xsd/maven-4.0.0.xsd">
  <modelVersion>4.0.0</modelVersion>

    <groupId>maven</groupId>
    <artifactId>example</artifactId>
    <version>0.0.1-SNAPSHOT</version>
    <packaging>jar</packaging>

    <!-- Inherit defaults from Spring Boot -->
    <parent>
        <groupId>org.springframework.boot</groupId>
        <artifactId>spring-boot-starter-parent</artifactId>
        <version>2.1.1.RELEASE</version>
    </parent>

    <!-- Add typical dependencies for a web application -->
    <dependencies>
        <dependency>
            <groupId>org.springframework.boot</groupId>
            <artifactId>spring-boot-starter-web</artifactId>
        </dependency>
        <dependency>
            <groupId>junit</groupId>
            <artifactId>junit</artifactId>
            <version>4.12</version>
            <scope>test</scope>
        </dependency>
    </dependencies>

    <!-- Package as an executable jar -->
    <build>
        <plugins>
            <plugin>
                <groupId>org.springframework.boot</groupId>
                <artifactId>spring-boot-maven-plugin</artifactId>
            </plugin>
        </plugins>
    </build>
</project>
关于部分模块的作用,我们这里需要讲述一下。
 <!-- Inherit defaults from Spring Boot -->
    <parent>
        <groupId>org.springframework.boot</groupId>
        <artifactId>spring-boot-starter-parent</artifactId>
        <version>2.1.1.RELEASE</version>
    </parent>
如图,即该project继承了spring-boot-starter-parent, 那么spring-boot-starter-parent提供了什么功能呢?
Ⅰ: 它以JAVA 1.8做默认编译器
Ⅱ: 它以UTF-8作为编码格式
Ⅲ: 从spring-boot-dependencies pom继承的依赖管理部分,它允许我们省略这些依赖的<version>标记。(可看“spring-boot-starter-web”对应的dependency就省略了<version>标记)。当要升级springboot本身时,有对应依赖关系的包会一同升级。
Ⅳ: 智能的resource过滤; 智能的插件配置(如git commind id、exec plugin等)
Ⅴ: 对application.properties、application.yml等文件的智能过滤与利用
  <!-- Package as an executable jar -->
    <build>
        <plugins>
            <plugin>
                <groupId>org.springframework.boot</groupId>
                <artifactId>spring-boot-maven-plugin</artifactId>
            </plugin>
        </plugins>
    </build>
如图,即如果编译完程序,最后是要以jar形式去运行的话,则一定要加入此块内容,否则会报错。
    <!-- Add typical dependencies for a web application -->
    <dependencies>
        <dependency>
            <groupId>org.springframework.boot</groupId>
            <artifactId>spring-boot-starter-web</artifactId>
        </dependency>
        <dependency>
            <groupId>junit</groupId>
            <artifactId>junit</artifactId>
            <version>4.12</version>
            <scope>test</scope>
        </dependency>
    </dependencies>
如图,即引入spring-boot默认公共类包和junit相对类包。
③建立不同层的package,如图(注:controller、entity、mapper等package要建立在maven.example该package层内):
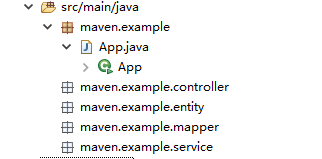
这几层package的作用是什么呢?
controller: 负责路由
entity: model层
mapper: mybatis相应的SQL操作层
service: controller调用的service层
以上四层的用法我会在之后的章节讲解,其余各位可再根据业务自己建立对应的package层
④在maven.example的package下的App.java里写下这段代码:
package maven.example;

import org.springframework.boot.SpringApplication;
import org.springframework.boot.autoconfigure.SpringBootApplication;
import org.springframework.boot.web.servlet.support.SpringBootServletInitializer;


@SpringBootApplication
public class App extends SpringBootServletInitializer{

    public static void main(String[] args) throws Exception {

        SpringApplication.run(App.class, args);
    }
}
⑤关于@SpringBootApplication标签
@ SpringBootApplication注释等同于使用@Configuration,@EnableAutoConfiguration和@CommponentScan及其默认属性
@ EnableAutoConfiguration:启用Spring Boot的自动配置机制
@ ComponentScan:在应用程序所在的包上启用@Component 扫描
@Configuration:允许在上下文中注册额外的bean或导入额外的配置类
关于注释详细的解释会在以后的章节讲明
⑥关于main函数
main(String[] args) throws Exception {
SpringApplication.run(App.class, args);
}
我们的主要方法通过调用run来委托Spring Boot的Spring Application类SpringApplication从我们的应用程序中引导Spring,从而启动它 ,然后启动自动配置的Tomcat web服务器,我们需要将App.class作为参数传递给run方法,以告诉SpringApplication它是主要的Spring组件,args数组也被传递以公开所有命令行参数
⑦编译启动服务:
打开控制台,进到项目的根目录处,执行以下语句:mvn spring-boot:run
执行成功后如图:
  .   ____          _            __ _ _
 /\\ / ___'_ __ _ _(_)_ __  __ _ \ \ \ \
( ( )\___ | '_ | '_| | '_ \/ _` | \ \ \ \
 \\/  ___)| |_)| | | | | || (_| |  ) ) ) )
  '  |____| .__|_| |_|_| |_\__, | / / / /
 =========|_|==============|___/=/_/_/_/
 :: Spring Boot ::  (v2.1.1.RELEASE)
....... . . .
....... . . . (log output here)
....... . . .
今天咱就暂时写到这啦, 下章会写上前端通过ajax与springboot框架的通信相关的内容