版权声明:本文为博主原创文章,未经博主允许不得转载。 https://blog.csdn.net/u011171125/article/details/85144957
Spring学习 第一节
开始使用
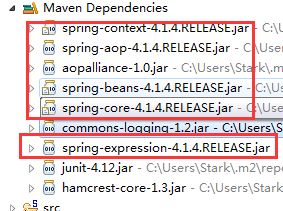
Maven添加Spring依赖
	<!-- https://mvnrepository.com/artifact/org.springframework/spring-context -->
	<dependency>
	    <groupId>org.springframework</groupId>
	    <artifactId>spring-context</artifactId>
	    <version>4.1.4.RELEASE</version>
	</dependency>
	<!-- https://mvnrepository.com/artifact/junit/junit -->
	<dependency>
	    <groupId>junit</groupId>
	    <artifactId>junit</artifactId>
	    <version>4.12</version>
	    <scope>test</scope>
	</dependency>
使用XML配置文件通过属性注入Bean
- 创建一个
HelloWorld.java类package com.fafa.spring.beans; public class HelloWorld { private String name; public String getName() { return name; } public void setName2(String name) { System.out.println("setName2:" + name); this.name = name; } public void hello() { System.out.println("Hello: " + name); } public HelloWorld(){ System.out.println("HelloWorld's constructor..."); } } - 在src目录下创建Spring配置文件
applicationContext.xml
创建一个id为helloWorld的bean,class为HelloWorld类所在的包,使用property节点来设置注入的setter名称和值,即name2对应的setter方法为setName2,参数值为Spring。<?xml version="1.0" encoding="UTF-8"?> <beans xmlns="http://www.springframework.org/schema/beans" xmlns:xsi="http://www.w3.org/2001/XMLSchema-instance" xmlns:util="http://www.springframework.org/schema/util" xmlns:p="http://www.springframework.org/schema/p" xsi:schemaLocation="http://www.springframework.org/schema/beans http://www.springframework.org/schema/beans/spring-beans.xsd http://www.springframework.org/schema/util http://www.springframework.org/schema/util/spring-util-4.1.xsd"> <!-- 配置Bean class: bean的全类名,通过反射的方式在IOC容器中创建bean,所以要求Bean中必须要有无参数的构造器 id: 标识容器中的Bean, id唯一。 通过setter方法注入,最常用的方式 --> <bean id="helloWorld" class="com.fafa.spring.beans.HelloWorld"> <property name="name2" value="Spring"></property> </bean> </beans> Junit单元测试
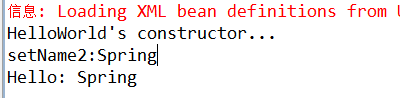
第一步,在只加载package com.fafa.test; import org.junit.Test; import org.springframework.context.ApplicationContext; import org.springframework.context.support.ClassPathXmlApplicationContext; import com.fafa.spring.beans.HelloWorld; public class HelloTest { @Test public void testHelloWorld(){ // 1.创建Spring的IOC容器对象 // ApplicationContext代表IOC容器 // ClassPathXmlApplicationContext:是ApplicationContext接口的实现类,该实现类从类路径下加载配置文件 ApplicationContext applicationContext = new ClassPathXmlApplicationContext("classpath*:applicationContext.xml"); // 2.从IOC容器中获取Bean实例 // 利用id定位到IOC容器中的bean HelloWorld helloWorld = (HelloWorld) applicationContext.getBean("helloWorld"); // 利用类型返回IOC容器中的Bean,但要求IOC容器中只能有一个该类型的Bean //HelloWorld helloWorld = applicationContext.getBean(HelloWorld.class); // 3.调用hello方法 helloWorld.hello(); } }ClassPathXmlApplicationContext的时候进行测试,可以发现IOC容器已经初始化了默认的构造函数,创建了Bean实例,结果如下:
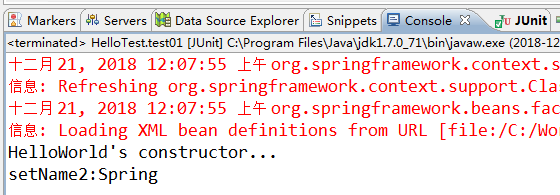
第二步,再使用getBean方法获取创建好的Bean实例,可以使用HelloWorld.class反射的方式获取,也可以使用id获取。第三步,调用hello()方法,得到结果:
通过构造方法来配置Bean的属性
- 创建一个
Car.java类:package com.fafa.spring.beans; public class Car { private String brand; private String crop; private double price; private int maxSpeed; public String getBrand() { return brand; } public void setBrand(String brand) { this.brand = brand; } public String getCrop() { return crop; } public void setCrop(String crop) { this.crop = crop; } public double getPrice() { return price; } public void setPrice(double price) { this.price = price; } public int getMaxSpeed() { return maxSpeed; } public void setMaxSpeed(int maxSpeed) { this.maxSpeed = maxSpeed; } public Car(String brand, String crop, double price) { super(); this.brand = brand; this.crop = crop; this.price = price; } public Car(String brand, String crop, int maxSpeed) { super(); this.brand = brand; this.crop = crop; this.maxSpeed = maxSpeed; } @Override public String toString() { return "Car [brand=" + brand + ", crop=" + crop + ", price=" + price + ", maxSpeed=" + maxSpeed + "]"; } } - 在配置文件中添加一个
bean
bean的id为car,使用constructor-arg进行构造方法依次注入到对应的参数中,可以使用index指定参数位置,type指定参数的数据类型:<!-- 通过构造方法来配置Bean的属性 --> <bean id="car" class="com.fafa.spring.beans.Car"> <constructor-arg value="Audi" index="0"/> <constructor-arg value="ShangHai" index="1"/> <constructor-arg value="90" type="int"/> </bean> - 创建一个名为
testCar()的测试方法:@Test public void testCar(){ ApplicationContext applicationContext = new ClassPathXmlApplicationContext("classpath*:applicationContext.xml"); Car car = (Car) applicationContext.getBean("car"); System.out.println(car); }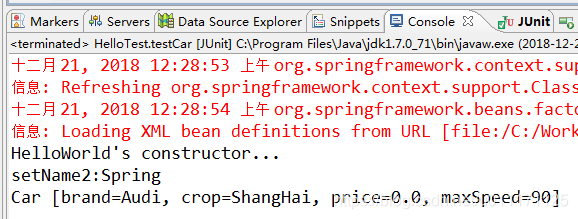
此时由于xml中指定了第三个参数的类型为int,注入时会匹配到参数类型,会区分重载的构造器。 - 指定类型以区分重载的构造器
如果字面值包含特殊字符,可以使用<![CDATA[]]>包裹起来,构造方法注入时也可以选择通过子节点的方式设置
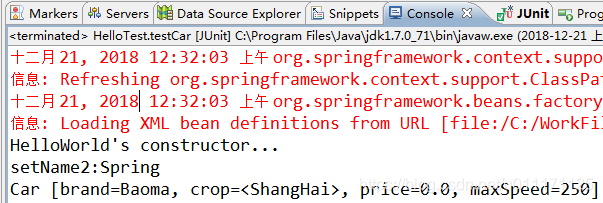
此时获取<!-- 使用构造器注入属性值可以指定参数的位置index和参数type的类型,以区分重载的构造器 --> <bean id="car2" class="com.fafa.spring.beans.Car"> <constructor-arg value="Baoma" type="java.lang.String"/> <!-- 如果字面值包含特殊字符,可以使用<![CDATA[]]>包裹起来 --> <!-- 属性值也可以通过子节点的方式设置 --> <constructor-arg type="java.lang.String"> <value><![CDATA[<ShangHai>]]></value> </constructor-arg> <constructor-arg type="int"> <value>250</value> </constructor-arg> </bean>id为car2的bean,测试得到的结果为:
Bean的引用
-
再创建一个
Person.java类,其中包含Car类,以测试如何引用另一个bean作为参数:package com.fafa.spring.beans; public class Person { private String name; private int age; private Car car; public String getName() { return name; } public void setName(String name) { this.name = name; } public int getAge() { return age; } public void setAge(int age) { this.age = age; } public Car getCar() { return car; } public void setCar(Car car) { this.car = car; } @Override public String toString() { return "Person [name=" + name + ", age=" + age + ", car=" + car + "]"; } public Person() { } public Person(String name, int age, Car car) { super(); this.name = name; this.age = age; this.car = car; } } -
在xml中添加一个id为
person的bean:<bean id="person" class="com.fafa.spring.beans.Person"> <property name="name" value="Tom"></property> <property name="age" value="24"></property> <!-- 可以使用property 的 ref 属性简历bean之间的引用关系 --> <!-- <property name="car" ref="car2"></property> --> <!-- <property name="car"> <ref bean="car2"/> </property> --> <!-- 内部bean,不能被外部引用,只能在内部使用 --> <property name="car"> <bean id="car3" class="com.fafa.spring.beans.Car"> <constructor-arg value="Ford"/> <constructor-arg value="Changan"/> <constructor-arg value="200000" type="double"/> </bean> </property> <property name="car.maxSpeed" value="260"></property> </bean> -
测试结果:
	@Test
	public void testPerson(){
		// 1.创建Spring的IOC容器对象
		ApplicationContext applicationContext = new ClassPathXmlApplicationContext("classpath*:applicationContext.xml");
		Person person = (Person) applicationContext.getBean("person");
		System.out.println(person);
	}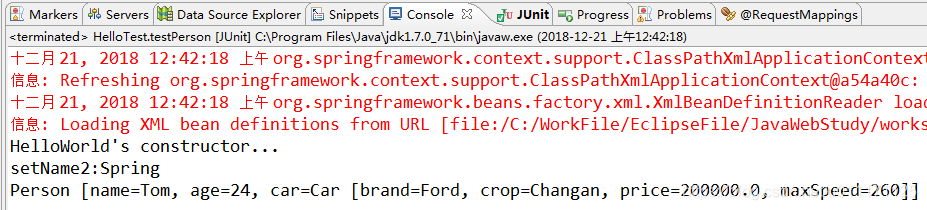
-
再添加一个
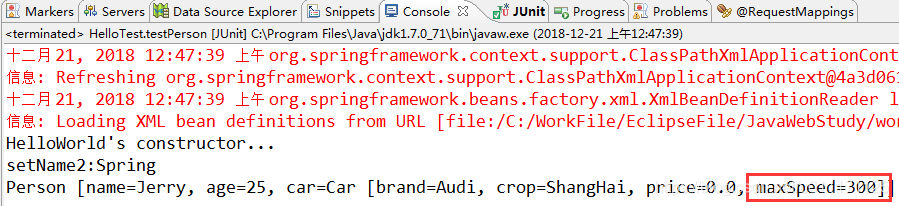
person2的bean,以测试参数引用,级联属性:<bean id="person2" class="com.fafa.spring.beans.Person"> <constructor-arg value="Jerry"></constructor-arg> <constructor-arg value="25"></constructor-arg> <!-- <constructor-arg ref="car"></constructor-arg> --> <!-- 测试赋值 null <null/>专有标记--> <!-- <constructor-arg><null/></constructor-arg> --> <constructor-arg ref="car"></constructor-arg> <!-- 为级联属性赋值 .注意:属性需要先初始化后才可以为级联属性赋值,否则会有异常,和Struts2不同--> <property name="car.maxSpeed" value="300"></property> </bean>此时maxSpeed变成了300
小结
本次主要以XML配置文件的方式,使用setter方法和构造方法的方式注入Bean属性,构造方法使用
index和type来区分对应重载的构造器及字面值中的特殊符号可以使用<![CDATA[]]>包裹起来。