为了确定是否因为SELinux导致的问题,可先执行:
setenforce 0 (临时禁用掉SELinux)
getenforce (得到结果为Permissive)
如果问题消失了,基本可以确认是SELinux造成的权限问题,需要通过正规的方式来解决权限问题。
android KK 4.4 版本后,Google 默认启用了SELinux, 并会把SELinux 审查异常打印在kernel log 或者 android log(L 版本)中,对应的关键字是: “avc: denied” 或者”avc: denied”
案例1
| audit(0.0:67): avc: denied { write } for path="/dev/block/vold/93:96" dev="tmpfs" ino=/1263 scontext=u:r:kernel:s0 tcontext=u:object_r:block_device:s0 tclass=blk_file permissive=0 |
分析过程:
缺少什么权限: { write }权限,
谁缺少权限: scontext=u:r:kernel:s0
对哪个文件缺少权限:tcontext=u:object_r:block_device
什么类型的文件: tclass=blk_file
完整的意思: kernel进程对block_device类型的blk_file缺少write权限。
解决方法:找到kernel.te这个文件,加入以下内容:
| allow kernel block_device:blk_file write; |
make install clean后重新编译,刷boot.img才会生效。
案例2
| audit(0.0:53): avc: denied { execute } for path="/data/data/com.mofing/qt-reserved-files/plugins/platforms/libgnustl_shared.so" dev="nandl" ino=115502 scontext=u:r:platform_app:s0 tcontext=u:object_r:app_data_file:s0 tclass=file permissive=0 |
分析过程:
缺少什么权限: { execute}权限,
谁缺少权限: scontext = u:r:platform_app:s0
对哪个文件缺少权限:tcontext = u:object_r:app_data_file
什么类型的文件: tclass= file
完整的意思: platform_app进程对app_data_file类型的file缺少execute权限。
解决方法:找到platform_app.te这个文件,加入以下内容:
| allow platform_app app_data_file:file execute; |
make install clean后重新编译,刷boot.img才会生效。
案例3
| audit(1444651438.800:8): avc: denied { search } for pid=158 comm="setmacaddr" name="/" dev="nandi" ino=1 scontext=u:r:engsetmacaddr:s0 tcontext=u:object_r:vfat:s0 tclass=dir permissive=0 |
解决方法 :engsetmacaddr.te
| allow engsetmacaddr vfat:dir { search write add_name create }; 或者 allow engsetmacaddr vfat:dir create_dir_perms; |
(create_dir_perms包含search write add_name create可参考external/sepolicy/global_macros的定义声明)
案例4
| audit(1441759284.810:5): avc: denied { read } for pid=1494 comm="sdcard" name="0" dev="nandk" ino=245281 scontext=u:r:sdcardd:s0 tcontext=u:object_r:system_data_file:s0 tclass=dir permissive=0 |
解决方法 :sdcardd.te
| allow sdcardd system_data_file:dir read; 或者 |
(rw_dir_perms包含read write,可参考external/sepolicy/global_macros的定义声明)
要加入的权限很多时,可以用中括号,比如:
allow engsetmacaddr vfat:dir { search write add_name create};
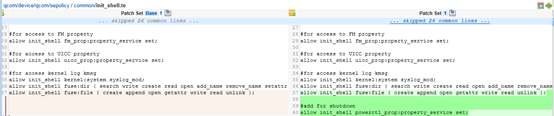
解决过的问题:
报错:
avc: denied { set } for property=sys.powerctl scontext=u:r:init_shell:s0 tcontext=u:object_r:powerctl_prop:s0 tclass=property_service
解决办法:
在sepolicy路径下init_shell.te中添加权限设置
6. 高级进阶
以上基本是对已经存在的进程增加权限,但对第三方进程改如何新增一个全新的te文件并赋予权限呢?
以写mac地址的setmacaddr执行文件为例(这个执行档android原生不存在,自行添加的):
在init.xxx.rc中如下服务:
| service engsetmacaddr /system/bin/setmacaddr /data/misc/wifi/wifimac.txt class main disabled oneshot |
1. 在device/softwinner/astar-common/sepolicy/file_contexts中,参考其他进程声明一个scontext:
| …… /system/bin/install-recovery.sh u:object_r:install_recovery_exec:s0 /system/bin/dex2oat u:object_r:dex2oat_exec:s0 /system/bin/patchoat u:object_r:dex2oat_exec:s0 /system/bin/setmacaddr u:object_r:engsetmacaddr_exec:s0 |
指定setmacaddr的路径,并指定一个名字,一定要以service名+_exec结尾
2.参考其.te文件在device/softwinner/astar-common/sepolicy/file_contexts 创建engsetmacaddr.te文件,内容如下:
| type engsetmacaddr, domain; type engsetmacaddr_exec, exec_type, file_type;
allow engsetmacaddr system_file:file { execute_no_trans}; |
以上赋予的权限全部是根据avc denied的log缺什么一步一步补什么来的。
驱动创建了一个新的设备节点,即使权限是777,android层也是没有访问权限的。
下面以一个/dev/wifi_bt节点为示范,让此节点被用户空间的system_server进程访问。
1. 编辑devicesoftwinner/astar-common/sepolicy/device.te,仿照这个文件里的写法,定义一个dev_type类型的wifi_bt_device设备:
| type misc_block_device, dev_type; type private_block_device, dev_type; …… type wf_bt_device, dev_type; |
2. 编辑file_contexts.te,将/dev/wf_bt节点声明为第1步定义的wf_bt_device:
| /dev/block/by-name/misc u:object_r:misc_block_device:s0 /dev/block/by-name/alog u:object_r:log_block_device:s0 /dev/block/by-name/private u:object_r:private_block_device:s0 # We add here /dev/wf_bt u:object_r:wf_bt_device:s0 |
3. 在system_server.te,根据dmesg | grep avc允许system_server对wf_bt_device这个节点可读可写:
| # Read/Write to /proc/net/xt_qtaguid/ctrl and and /dev/xt_qtaguid. allow system_server qtaguid_proc:file rw_file_perms; allow system_server qtaguid_device:chr_file rw_file_perms; …… allow system_server wf_bt_device:chr_file rw_file_perms; |
其他进程如需访问/dev/wf_bt节点,依样画葫芦,增加对wf_bt_device的权限即可。