Tensorflow object detection API是基于tensorflow的开源框架,可以用于搭建、训练、使用object detection服务。
object_detection隶属于Tensorflow models下的research,在下载object_detection的同时,建议下载整个models,有些包并不在object_detection中,而是在同级目录下。
安装教程
object_detection API依赖于包protobuf、pillow、lxml、jupyter、matplotlib。
这些包在安装的过程中有很大可能回报错,其中最可能是linux系统没有安装gcc,或者gcc版本过低或过高。
Tensorflow Object Detection API使用Protobufs来配置模型和训练参数。在使用框架之前,必须编译Protobuf库。这应该通过从下载解压的models/目录运行以下命令来完成:
protoc object_detection/protos/*.proto –python_out=.当在本地运行时,models /和slim目录应该附加到PYTHONPATH。在查阅了很多资料后,大概有以下几种方法:
1. 在python的site-package中添加.pth文件,将models和slim文件路径添加
2. 在python代码中添加
import sys
sys.path.append('models路径')
sys.path.append('slim路径')
以上安装完毕
安装测试
可以通过运行以下命令来测试是否正确安装了Tensorflow Object Detection API:
python object_detection / builders / model_builder_test.pyMSCOCO模型测试
MSCOCO是Microsoft下的coco数据集。有多种物品及其标记,教程中给了SSDmobilenet的模型下载(据说ssd_mobilenet是最快的,但精度最低)
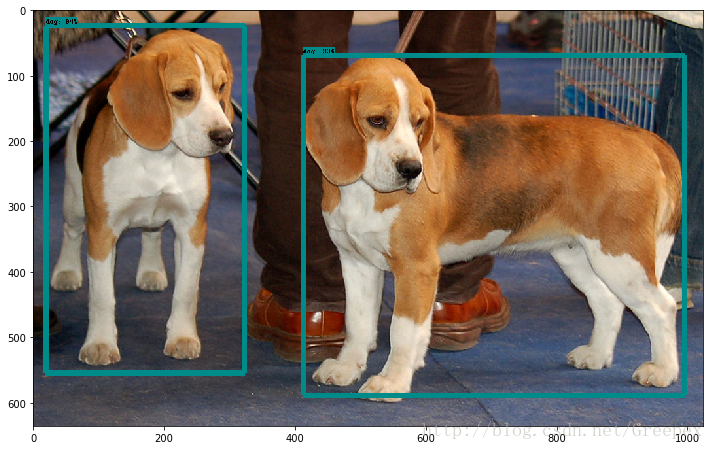
测试代码位于object_detection文件中的object_detection_tutorial.ipynb
(.ipynb使用notebook打开)。里面有很详细的教程。测试图像结果为:
视频实现
安装python-opencv(使用apt-get会很简单)后,目前实现的是单线程的物体检测,以下是全部代码:
import numpy as np
import os
import six.moves.urllib as urllib
import sys
import tarfile
import tensorflow as tf
import zipfile
from collections import defaultdict
from io import StringIO
from matplotlib import pyplot as plt
from PIL import Image
if tf.__version__ < '1.4.0':
raise ImportError('Please upgrade your tensorflow installation to v1.4.* or later!')
# This is needed to display the images.
%matplotlib inline
# This is needed since the notebook is stored in the object_detection folder.
sys.path.append("..")
from utils import label_map_util
from utils import visualization_utils as vis_util
# What model to download.
MODEL_NAME = 'ssd_mobilenet_v1_coco_2017_11_17'
MODEL_FILE = MODEL_NAME + '.tar.gz'
DOWNLOAD_BASE = 'http://download.tensorflow.org/models/object_detection/'
# Path to frozen detection graph. This is the actual model that is used for the object detection.
PATH_TO_CKPT = MODEL_NAME + '/frozen_inference_graph.pb'
# List of the strings that is used to add correct label for each box.
PATH_TO_LABELS = os.path.join('data', 'mscoco_label_map.pbtxt')
NUM_CLASSES = 90
#如果是已经下载好的模型,可以注释掉这一段
opener = urllib.request.URLopener()
opener.retrieve(DOWNLOAD_BASE + MODEL_FILE, MODEL_FILE)
tar_file = tarfile.open(MODEL_FILE)
for file in tar_file.getmembers():
file_name = os.path.basename(file.name)
if 'frozen_inference_graph.pb' in file_name:
tar_file.extract(file, os.getcwd())
detection_graph = tf.Graph()
with detection_graph.as_default():
od_graph_def = tf.GraphDef()
with tf.gfile.GFile(PATH_TO_CKPT, 'rb') as fid:
serialized_graph = fid.read()
od_graph_def.ParseFromString(serialized_graph)
tf.import_graph_def(od_graph_def, name='')
label_map = label_map_util.load_labelmap(PATH_TO_LABELS)
categories = label_map_util.convert_label_map_to_categories(label_map, max_num_classes=NUM_CLASSES, use_display_name=True)
category_index = label_map_util.create_category_index(categories)
def load_image_into_numpy_array(image):
(im_width, im_height) = image.size
return np.array(image.getdata()).reshape(
(im_height, im_width, 3)).astype(np.uint8)
#以下是修改教程后的代码,和教程有所区别
import cv2
cap = cv2.VideoCapture(0) # 打开0号摄像头
success = True
font = cv2.FONT_HERSHEY_SIMPLEX
with detection_graph.as_default():
with tf.Session(graph=detection_graph) as sess:
# Definite input and output Tensors for detection_graph
image_tensor = detection_graph.get_tensor_by_name('image_tensor:0')
# Each box represents a part of the image where a particular object was detected.
detection_boxes = detection_graph.get_tensor_by_name('detection_boxes:0')
# Each score represent how level of confidence for each of the objects.
# Score is shown on the result image, together with the class label.
detection_scores = detection_graph.get_tensor_by_name('detection_scores:0')
detection_classes = detection_graph.get_tensor_by_name('detection_classes:0')
num_detections = detection_graph.get_tensor_by_name('num_detections:0')
def returnimage(image_np):
image_np_expanded = np.expand_dims(image_np, axis=0)
# Actual detection.
(boxes, scores, classes, num) = sess.run(
[detection_boxes, detection_scores, detection_classes, num_detections],
feed_dict={image_tensor: image_np_expanded})
# Visualization of the results of a detection.
vis_util.visualize_boxes_and_labels_on_image_array(
image_np,
np.squeeze(boxes),
np.squeeze(classes).astype(np.int32),
np.squeeze(scores),
category_index,
use_normalized_coordinates=True,
line_thickness=8)
return np.array(image)
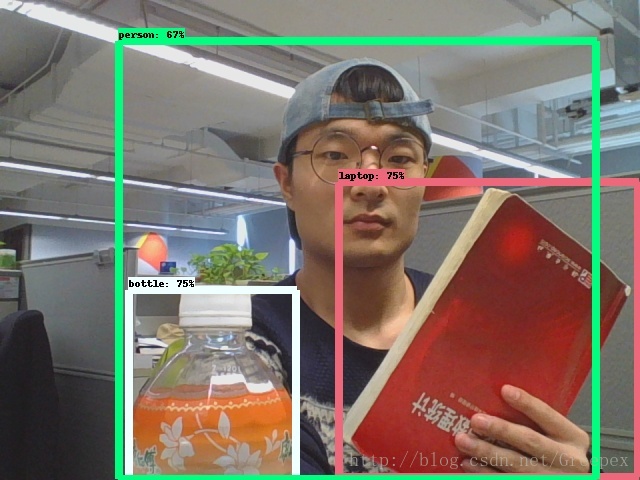
while success:
success, image = cap.read()
image = returnimage(image)
cv2.imshow("test", image)
if cv2.waitKey(1) & 0xFF == ord('q'):
cv2.imwrite('test.jpg',image)
break
cap.release()
cv2.destroyAllWindows()运行结果截图: