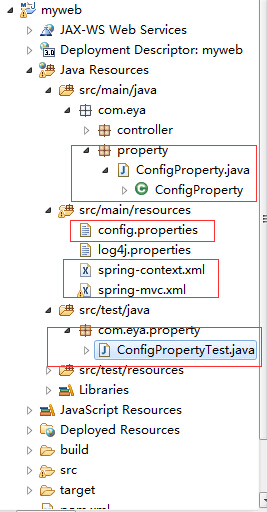
先看看工作目录,然后再来讲解
1、建立config.properties,我的config.properties内容如下:
author_name=luolin
project_info=该项目主要是用于写一些demo
2、配置Spring配置文件,读取properties文件,并设置编码格式。大家从我的项目结构图中可以看到我用了两个Spring的配置文件,其实在spring-context.xml中没有配置其他内容,只是配置扫描com.eya.property这个包,大家可能会有疑问为何包的扫描不直接在spring-mvc.xml中配置成扫描com.eya就可以了。其实这是一个习惯问题,不同的东西做不同的事情,在 spring-mvc.xml中我只配置了去扫描com.eya.controller这个包。
<!-- 使用注解注入properties中的值 -->
    <bean id="setting"
        class="org.springframework.beans.factory.config.PropertiesFactoryBean">
        <property name="locations">
            <list>
                <value>classpath:config.properties</value>
            </list>
        </property>
        <!-- 设置编码格式 -->
        <property name="fileEncoding" value="UTF-8"></property>
    </bean>
3、编写和 config.properties文件中的值对应的ConfigProperty.java文件。加上注解@Comopnent("configProperty")将该类交给Spring容器管理,且指定该组件的名称为configProperty。
这里说明一下,在使用@Value 注解的时候,其内部的格式是#{beanID[propertyKey]},这里的beanID是在第二步中配置PropertiesFactoryBean的时候指定的id值,propertyKey是和config.properties中的key对应。
/**
 *
 */
package com.eya.property;

import org.springframework.beans.factory.annotation.Value;
import org.springframework.stereotype.Component;

/**
 * config.properties文件映射类
 * @author luolin
 *
 * @version $id:ConfigProperty.java,v 0.1 2015年8月7日 下午2:10:44 luolin Exp $
 */
@Component("configProperty")
public class ConfigProperty {

    /** 作者名字 */
    @Value("#{setting[author_name]}")
    private String authorName;
    /** 项目信息 */
    @Value("#{setting[project_info]}")
    private String projectInfo;

    /**
     * @return the authorName
     */
    public String getAuthorName() {
        return authorName;
    }

    /**
     * @param authorName the authorName to set
     */
    public void setAuthorName(String authorName) {
        this.authorName = authorName;
    }

    /**
     * @return the projectInfo
     */
    public String getProjectInfo() {
        return projectInfo;
    }

    /**
     * @param projectInfo the projectInfo to set
     */
    public void setProjectInfo(String projectInfo) {
        this.projectInfo = projectInfo;
    }

}
4、编写单元测试,测试是否注入成功。这里用的是Junit4 + Spring注解的方式,当做是练习。
/**
 *
 */
package com.eya.property;


import javax.annotation.Resource;

import org.junit.Test;
import org.junit.runner.RunWith;
import org.springframework.test.context.ContextConfiguration;
import org.springframework.test.context.junit4.SpringJUnit4ClassRunner;

/**
 * JUnit4 + Spring 注解进行单元测试,测试通过Spring注解获得Properties文件的值
 * @author luolin
 *
 * @version $id:ConfigPropertyTest.java,v 0.1 2015年8月7日 下午2:21:26 luolin Exp $
 */
@RunWith(SpringJUnit4ClassRunner.class)
@ContextConfiguration(locations={"classpath:spring-mvc.xml","classpath:spring-context.xml"})
public class ConfigPropertyTest {

    @Resource(name = "configProperty")
    private ConfigProperty configProperty;

    /**
     * 测试Spring注解获取properties文件的值
     */
    @Test
    public void test() {
        System.out.println(configProperty.getAuthorName());
        System.out.println(configProperty.getProjectInfo());
    }

}
运行结果如图:

期间出现了乱码的问题,由于我把config.properties的编码改成了UTF-8,开始没有在配置Spring文件的时候指定编码,所以乱码了,后来我看了下PropertiesFactoryBean的源代码,在它的父类中找到了设置编码的属性,设置成对应的编码就可以了。