预处理是指编译器在进行第一遍扫描之前所做的工作,其由预处理程序负责完成。
目标
- 了解预处理命令的功能
- 掌握宏定义及其使用
- 掌握文件包含的使用
- 掌握常用的编译预处理命令
预处理命令
预处理就是对源文件进行编译前,先对预处理部分进行处理,然后对处理后的代码进行编译。
预处理命令:#define,#error,#if,#else,#elif,#endif,#ifdef,#ifndef,#undef,#line和#pragma。
上述命令可以划分为
- 文件包含(#include):作为文件的引用组合源程序正文。
- 条件编译(#if,#endif,#ifdef,#ifndef,#undef等):进行编译时进行有选择的挑选,注释掉一些指定的代码。
- 布局控制(#progma):为编译程序提供非常规的控制流信息
- 宏替换(#define):定义符号常量、函数功能、重新命名、字符串的拼接等功能。
宏
宏(macro)是一种以相同的源语言执行预定义指令序列的指令。
宏概述
用一个标识符来表示一个字符串,称为宏。被定义为宏的标识符称为宏名。在编译预处理时,对程序中出现的宏名,都用宏定义中的字符串去代换,称为宏代换或宏展开。
不带参数的宏定义
一般形式:
#define 标识符 字符串标识符为所定义的宏名
字符串可以使常数,表达式,格式串等。
#include "stdafx.h"
#include<iostream>
#include <iomanip>
#define M (y*y+3*y)//定义不带参数的宏
using namespace std;
int _tmain(int argc, _TCHAR* argv[])
{
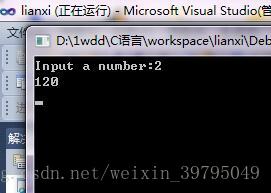
int s,y;
cout<<"Input a number:";
cin>>y;
s=3*M +4*M +5*M;//使用宏
cout<<s<<endl;
getchar();
getchar();
return 0;
}
取消宏
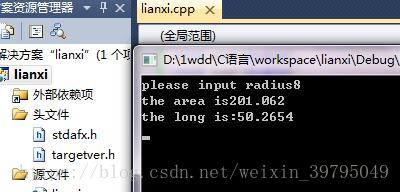
C++中终止作用域的命令是#undef。如果要求宏定义只在一个函数中起作用。就可以在函数定义之前定义宏,在函数结束后结束宏。
该例子中定义的宏只在main()函数中起作用,而在两个函数sout和lout中则无效。
#include "stdafx.h"
#include<iostream>
#define PI 3.14159

using namespace std;

void sout(double);
void lout(double);

int _tmain(int argc, _TCHAR* argv[])
{
    double radius,s,l;
    cout<<"please input radius";
    cin>>radius;
    s=PI*radius*radius;
    sout(s);
    l=2*PI*radius;
    lout(l);

    getchar();
    getchar();
    return 0;
}

#undef PI//取消宏
void sout(double r)
{
    r = PI*r/PI;
    cout<<"the area is"<<r<<endl;
}
void lout(double r)
{
    cout<<"the long is:"<<r<<endl;
}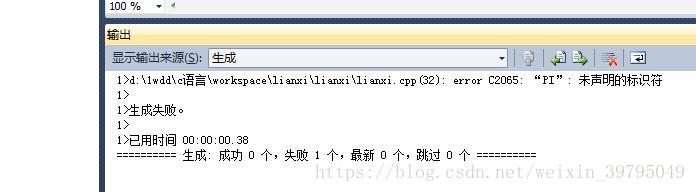
当注释掉 #undef PI//取消宏 时生成结果
#include "stdafx.h"
#include<iostream>
#define OK 100
using namespace std;


int _tmain(int argc, _TCHAR* argv[])
{
    cout<<"OK";
    cout<<endl;

    getchar();
    getchar();
    return 0;
}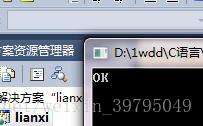
上述代码定义了宏OK,并在main()函数中使用了OK,但因为其被双引号括起来了,使预处理程序并没有对该宏进行代换,因此其输出也并不是宏定义的值100,而是字符串OK。
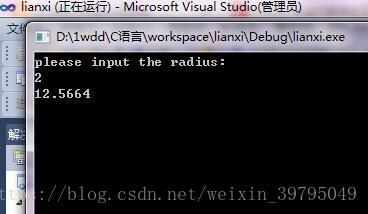
宏嵌套
宏定义中允许嵌套,即在宏定义中字符串中可以使用已经定义的宏名,在宏展开时由预处理程序层层代换。
#include "stdafx.h"
#include<iostream>
#define PI 3.1415926    //定义宏PI
#define S PI*y*y    //PI是已经定义的宏名

using namespace std;

int _tmain(int argc, _TCHAR* argv[])
{
    int y;
    cout<<"please input the radius:"<<endl;
    cin>>y;
    cout<<S<<endl;//使用宏S

    getchar();
    getchar();
    return 0;
}
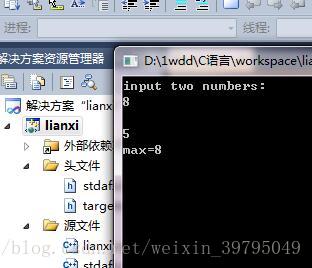
带参数的宏定义
在宏定义中的参数是形式参数,在宏调用中的参数是实际参数。
一般格式:
#define 宏名(形参表) 字符串在字符串中含有各个形参,带参数的宏调用一般形式为
宏名(实参表)
- 例
#include "stdafx.h"
#include<iostream>
#define MAX(a,b)(a>b)?a:b   //定义带参数的宏

using namespace std;

int _tmain(int argc, _TCHAR* argv[])
{
    int x,y,max;
    cout<<"input two numbers:"<<endl;
    cin>>x>>y;
    max =MAX(x,y);
    cout<<"max="<<max<<endl;//使用宏MAX(a,b)

    getchar();
    getchar();
    return 0;
}
2.实参是表达式。
#include "stdafx.h"
#include<iostream>
#define SQ(y) (y)*(y)   //定义带参数的宏

using namespace std;

int _tmain(int argc, _TCHAR* argv[])
{
    int a,sq;
    cout<<"input a numbers:"<<endl;
    cin>>a;
    sq =SQ(a+1);
    cout<<"sq="<<sq<<endl;//使用宏

    getchar();
    getchar();
    return 0;
}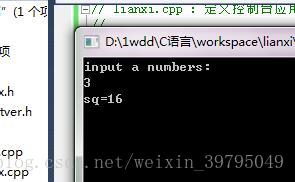
宏展开得到的语句为:
sq=(a+1)*(a+1)
对于括号放在不同的位置,在宏展开时会得到不同的语句
3.宏定义中去掉括号
#include "stdafx.h"
#include<iostream>
#define SQ(y) y*y //定义带参数的宏
using namespace std;
int _tmain(int argc, _TCHAR* argv[])
{
int a,sq;
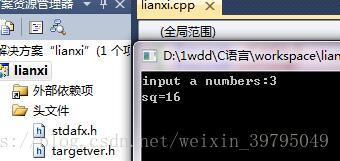
cout<<"input a numbers:";
cin>>a;
sq =SQ(a+1);
cout<<"sq="<<sq<<endl;//使用宏
getchar();
getchar();
return 0;
}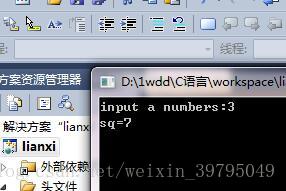
宏展开得到的语句为:
sq=a+1*a+1
4.宏定义上加上括号,宏调用语句改成16/SQ(a+1)
#include "stdafx.h"
#include<iostream>
#define SQ(y) (y)*(y) //定义带参数的宏
using namespace std;
int _tmain(int argc, _TCHAR* argv[])
{
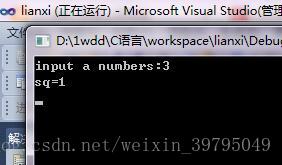
int a,sq;
cout<<"input a numbers:";
cin>>a;
sq =16/SQ(a+1);
cout<<"sq="<<sq<<endl;//使用宏
getchar();
getchar();
return 0;
}
宏展开得到的语句为
sq=16/(a+1)*(a+1)
5.给宏整体加上括号
#include "stdafx.h"
#include<iostream>
#define SQ(y) ((y)*(y)) //定义带参数的宏

using namespace std;


int _tmain(int argc, _TCHAR* argv[])
{
    int a,sq;
    cout<<"input a numbers:";
    cin>>a;
    sq =16/SQ(a+1);
    cout<<"sq="<<sq<<endl;//使用宏

    getchar();
    getchar();
    return 0;
}
内联函数
内联函数也称为内嵌函数,当在一个函数的定义或声明前加上关键字inline则就把该函数定义为内联函数,主要用于解决程序的运行效率。
例该例定义了一个内联函数abs()用于求一个整数的绝对值,再在主函数中调用该内联函数。
#include "stdafx.h"
#include<iostream>
using namespace std;
inline int abs(int x) //定义内联函数abs
{
return x<0?-x:x; //输出一个整数的绝对值
}
int _tmain(int argc, _TCHAR* argv[])
{
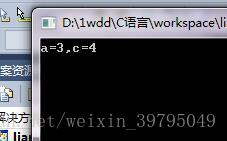
int a,b=3,c,d=-4;
a=abs(b);//调用函数
c=abs(d);//调用函数
cout<<"a="<<a<<",c="<<c<<endl;
getchar();
getchar();
return 0;
}
内联函数和普通函数调用得到的结果是相同的,但是其内部的执行时不同的,调用内联函数时,编译系统直接将内联函数代码替换到主函数调用的地方,普通函数则是通过参数传递,将函数的结果返回到主函数。
宏与函数的区别
函数调用时要把实参表达式的值求出来再赋予形参,而宏代换中对实参表达式不做计算直接地代换。这导致了即使把同一表达式用函数处理与用宏处理,两者的结果可能是不同的。
例a
#include "stdafx.h"
#include<iostream>
using namespace std;
int SQ(int);
int _tmain(int argc, _TCHAR* argv[])
{
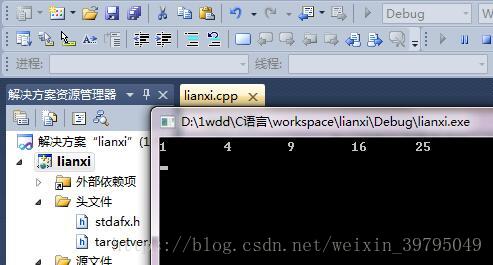
int i =1;
while(i<=5)
cout<<SQ(i++)<<"\t";
cout<<endl;
getchar();
getchar();
return 0;
}
int SQ(int y)
{
return ((y)*(y));
}
例b
// lianxi.cpp : 定义控制台应用程序的入口点。
//


#include "stdafx.h"
#include<iostream>
#define SQ(y) ((y)*(y))

using namespace std;


int _tmain(int argc, _TCHAR* argv[])
{
    int i =1;
    while(i<=5)
        cout<<SQ(i++)<<"\t";
    cout<<endl;

    getchar();
    getchar();
    return 0;
}
例a中函数调用把实参i值传给形参y后自增1,然后输出函数值,因而要循环5次。
例b中宏调用时,只做代换。SQ(i++)被代换为((i++)*(i++))。每次循环后i的值会增加2。
文件包含
文件包含是指一个C++源程序中将另一个C++源程序包含进来。通过#include预处理命令实现。
#include命令
文件包含命令。其意义是把尖括号<>或引号”“内指定的文件包含到本程序来,称为本程序的一部分。被包含的文件通常是与系统提供的,其扩展名为.h也称为头文件或首部文件。
一般形式:
#include "文件名"
或者
#include <文件名>
使用尖括号表示去在包含文件目录中去找。
使用双引号表示首先在当前的源文件目录中查找,若未找到才到包含目录中取寻找。
合理使用文件包含
文件包含的 作用是在系统编译之前,将包含文件中的内容复制到当前文件的当前位置之后,再进行编译。
//file1.cpp
//
#include "stdafx.h"
double Add(double a,double b)
{
    return a+b;
}

//file2.cpp

#include "stdafx.h"
#include<iostream>
#include "file1.cpp"//包含file1.cpp文件

using namespace std;


int _tmain(int argc, _TCHAR* argv[])
{
    double a,b;
    double e,f;
    a=3;
    b=2;
    e=Add(a,2);
    f=Add(b+1,2);
    cout<<e<<"\t"<<f<<endl;

    getchar();
    getchar();
    return 0;
}
例:
如果在程序中需要使用数据库函数,在文件中加入如下代码
#include <math.h>
或
#include "math.h"区别在于:遇到#include <math.h>命令时系统从默认的头文件目录中查找文件math.h文件;而遇到#include "math.h"时系统首先从当前的目录搜索,如果没有找到在默认的头文件目录中查找文件math.h文件。
条件编译
条件编译可以按不同的条件去编译不同的程序部分。
#ifdef形式
#ifdef形式是指该形式的第一个编译命令为#ifdef形式,这种形式结构如下
#ifdef形式 标识符
    程序段1
#else
    程序段2
#endif编译功能是如果标识符已被#define命令定义过,对程序段1进行编译,否则对程序段2进行编译。如果没有程序段2(其为空)则本形式中的#else可以没有。即可以改为
#ifdef形式 标识符
    程序段1
#endif
例:
// lianxi.cpp : 定义控制台应用程序的入口点。
//
//file2.cpp
#include "stdafx.h"
#include<iostream>
#define PI 3.1415926
using namespace std;
int _tmain(int argc, _TCHAR* argv[])
{
double radius,sr,a,ss;
#ifdef PI
{
cout<<"please input radius:"<<endl;
cin>>radius;
sr=PI*radius*radius;
cout<<"the circle area is"<<"\t"<<sr<<endl;
}
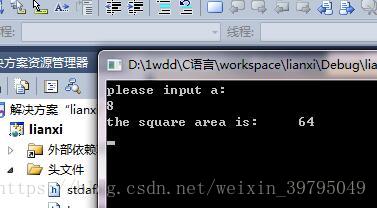
#else
{
cout<<"please input a:"<<endl;
cin>>a;
ss=a*a;
cout<<"the square area is:"<<"\t"<<ss<<endl;
}
#endif
getchar();
getchar();
return 0;
}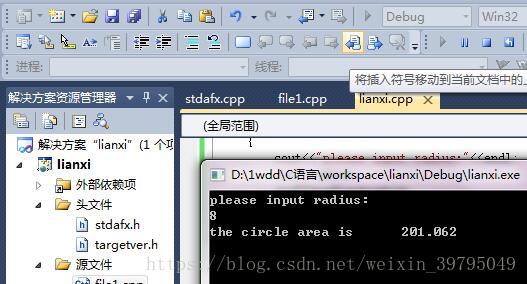
因为PI 已经在第一行定义了,所以编译第一个程序块的语句。
如果注释掉就会运行第二个程序块的语句。结果为
#ifndef形式
#ifndef形式是指该形式的第一个编译命令为#ifndef形式,这样的形式结构如下
#ifndef 标识符
    程序段1
#else
    程序段2
#endif#ifndef形式与第一种形式的区别是将“ifdef”改为了“ifndef”,其功能是,如果标识符未被#define命令定义过,则对程序段1进行编译,否则对程序段2进行编译。
#if形式
#if形式是指该形式的第一个编译命令为#if,结构如下
#if 常量表达式
    程序段1
#else
    程序段2
#endif
这种形式的条件编译结构功能是,如果常量表达式的值为真(非0),则对程序段1进行编译,否则对程序段2进行编译,因此其可以使程序在不同条件下,完成不同的功能。
// lianxi.cpp : 定义控制台应用程序的入口点。
//
#include "stdafx.h"
#include<iostream>
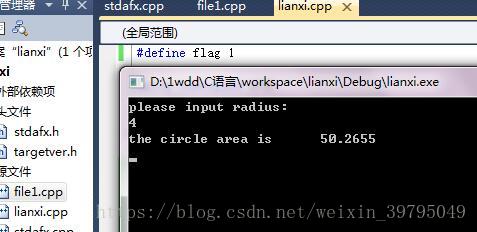
#define flag 1
using namespace std;
int _tmain(int argc, _TCHAR* argv[])
{
#if flag
{
double radius,sr;
cout<<"please input radius:"<<endl;
cin>>radius;
sr=3.1415926*radius*radius;
cout<<"the circle area is"<<"\t"<<sr<<endl;
}
#else
{
double a,ss;
cout<<"please input a :"<<endl;
cin>>a;
ss=a*a;
cout<<"the square area is"<<"\t"<<ss<<endl;
}
#endif
getchar();
getchar();
return 0;
}
其他命令
#error命令
‘#error’指令用于程序的调试,在编译中遇到#error指令就停止编译。一般形式
#error 出错信息提供#error命令的目的是保证程序时按照用户所设想的那样编译。系统编译程序时,只要遇到#error就会跳出一个编译错误,用户就可以知道程序是否正常执行。
#line命令
#line命令用于控制行号,一般在发布错误和警告信息时使用。当出错时显示文件中的行数及希望显示的文件名。命令的格式为:
#line number "filename"此处的number是将会赋给下一行的新行数,其后面的行数从这一点出个递增。filename是一个可选参数,用来替换自此以后出错时显示的文件名,直到有另外一个#line指令替换它或直到文件末尾。
例如
#line 1 "assigning variable"
int a?;
这段代码将会产生一个错误,显示为在文件“assigning variable”,line1.
参考:《21天学通C++》作者:刘蕾