不靠谱的朱先生又来了,今天是周五,我又出现了!好了,不为自己多解释,上周没发文章,其实我写了,只是没有发出来而已……机智ovo。
上周写的文章是关于GreenDao全面解析,其实当时是想写一个关于数据库的系列文章,后来一共就写了两篇,SQlite全面解析和GreenDao全面解析。至于原先计划的编写LitePal, Realm,wcdb的介绍文章可能要推后了,因为现在计划是先把FFmpeg这一系列的文章给写出来,毕竟我的主修的是音视频开发!在学习FFmpeg的过程中,我想以这篇文章作为这个系列的第一篇!ok,让我们一块学习如何在Android中编辑调用C语言及如何编译成so库供其他项目调用,以及最后如何使用别人项目中so库文件?
大家在使用学习使用so库的时候遇到什么问题,欢迎在我的公众号aserbao给我留言,无偿服务!同时,欢迎大家来加入微信群二维码讨论群,一起讨论Android开发技术!群二维码定时在我公众号更新!

好了,在学习这篇文章之前,请查看下如下几个问题(本文主要解决的问题列表):
- 你知道Android 如何调用C代码?
- 你知道如何生成so文件?
- 你知道如何同时生成多个so文件?
- 你知道如何将多个so文件合并成一个so文件?
- 你知道如何调用so库文件?
- 你知道如何查看so中的类名,路径和方法名?
好了,看了上面问题无论你知道几个,我都建议你看下这篇文章,因为毕竟写了那么久,麻烦帮我看下有没有写错的地方,最后无论好坏,帮忙点评下,最后点个赞就再好不过了!
最后,温馨提示:未成年人(未满18周岁),本文内容可能会引起你的不适,请在家长的陪伴下进行观看!
文章目录
编译环境
- Android Studio 3.0.1
- macOS Mojava 10.14
- android-ndk-r16b-darwin-x86_64.zip
如何生成so文件?
Android 中生成so文件的方式有三种,第一种是通过ndk来编写so库文件(官方在下个Android Studio将删除这种方式,不建议使用)。第二种是通过ndk-build来生成so文件;第三种是通过CMake来编译生成so文件。我们着重讲解后面两种;别问我为什么,脑壳疼,谁让第一种即将被淘汰了呢!
1. 通过ndk 编译生成so(已弃用)
通过Ndk来生成so文件,我之前有写过关于此种实现的文章:NDK快速集成秘籍但是自Android Studio 3.0.1之后,使用这种方式会给如下提示,建议使用Cmake或者ndk-build集成;
Error: Flag android.useDeprecatedNdk is no longer supported and will be removed in the next version of Android Studio.  Please switch to a supported build system.
Consider using CMake or ndk-build integration. For more information, go to:
 https://d.android.com/r/studio-ui/add-native-code.html#ndkCompile
 To get started, you can use the sample ndk-build script the Android
 plugin generated for you at:
 /Users/aserbao/aserbao/code/code/github/functions/audioAndvideo/ffmpeg/TestNDK/app/build/intermediates/ndk/debug/Android.mk
Alternatively, you can use the experimental plugin:
 https://developer.android.com/r/tools/experimental-plugin.html
To continue using the deprecated NDK compile for another 60 days, set
android.deprecatedNdkCompileLease=1541041326840 in gradle.properties
2. 通过ndk-build编译生成so库
1. ndk-build编译单个so库
ndk-build编写so文件和ndk编写步骤上差不多,区别在于: ndk-build不需要gradle.properties文件中添加android.useDeprecatedNdk=true, 且ndk-build需要编写Android.mk文件,下面是生成的步骤:
- 创建一个调用本地方法的类文件;
新建一个项目,在MainActivity同级目录下创建CallUtils类;(路径随意,命名随意,这一步主要是为了生成对应的.h文件)我的CallUtils类代码
public class CallUtils {
    static {
        System.loadLibrary("use_ndk_build");
    }
    public static native String callSimpleInfo();
}
- 生成对应的.h代码,找到CallUtils类的路径,输入如下命令,生成对应的.h文件:
 javac CallUtils.java

 javac -h . CallUtils.java// java jdk 1.8以后删除javah命令了,所以我这里使用javac -h替代,如果可以使用javah可以直接使用
- 将.h文件重命名use_ndk_build.c并剪贴至jni目录下(没有请在app目录下新建jni),代码如下:
#include <jni.h>
JNIEXPORT jstring JNICALL Java_com_aserbao_aserbaosandroid_functions_how_1create_1so_useNdkBuild_CallUtils_callSimpleInfo
  (JNIEnv *env, jclass ojb){//注意这个地方声明env和ojb,不然会报错。
     return (*env) -> NewStringUTF(env,"Hello, I'm an info come from use ndk-build");
  };
- 在jni目录下创建Android.mk文件,并输入:
LOCAL_PATH := $(call my-dir)
include $(CLEAR_VARS)
# 导出的so库名字
LOCAL_MODULE := use_ndk_build
# 对应的c代码
LOCAL_SRC_FILES := jni/use_ndk_build.c
include $(BUILD_SHARED_LIBRARY)
- 在jni目录下创建Application.mk文件,内容如下:
生成对于架构下的so包,如果只需要生成armeabi-v7a下的so包,就只输入APP_ABI := armeabi-v7a 就行;
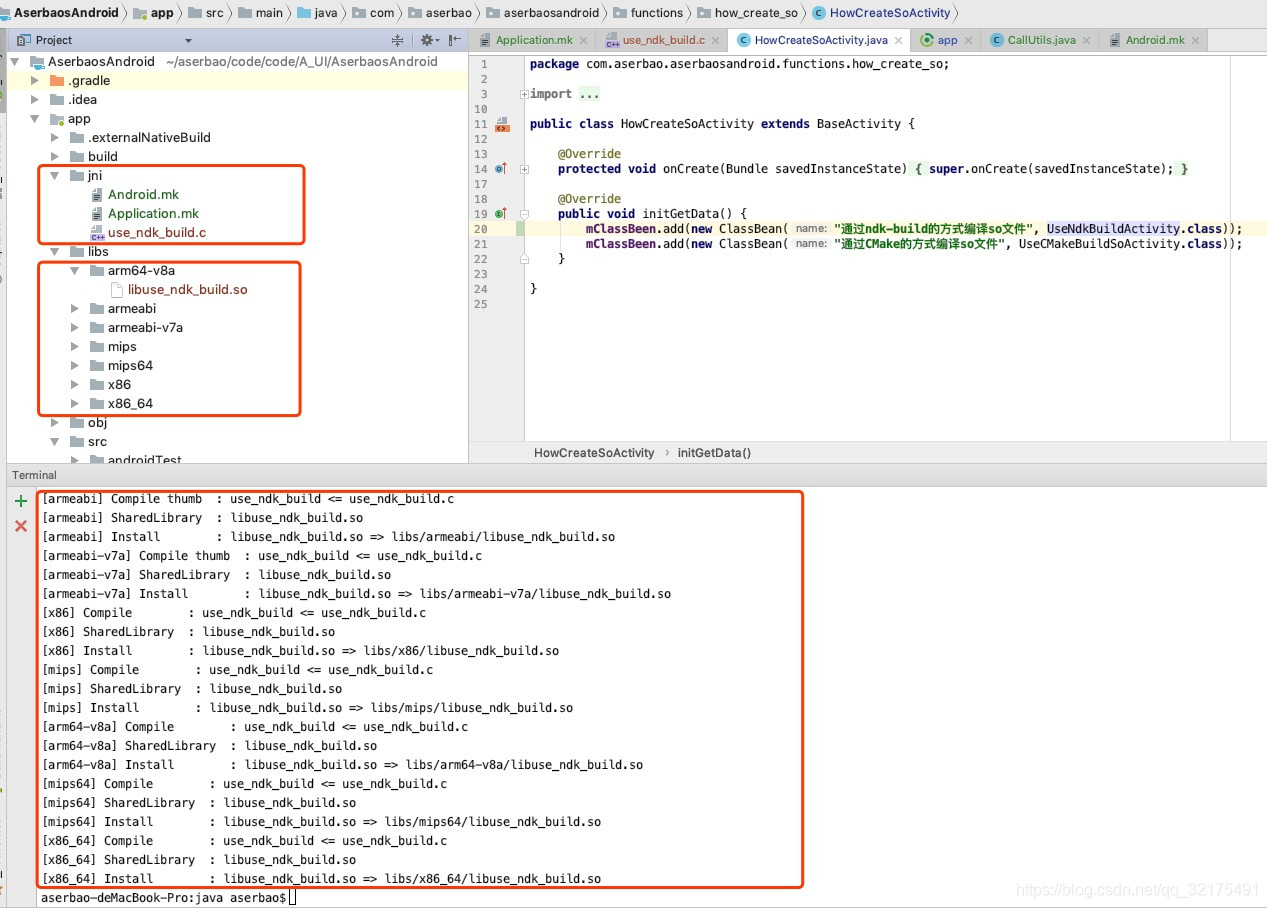
APP_ABI := armeabi armeabi-v7a x86 mips arm64-v8a mips64 x86 x86_64
-
打开Terminal,运行ndk-build命令
输入ndk-build命令后,就可以到libs目录下查看编译生成的so库文件 -
调用so库文件:
so库文件生成后,我们需要在app.gradle中声明so库的路径 :
android{
……
 sourceSets{
        main{
            jniLibs.srcDirs = ['libs'] // 声明路径
        }
    }
}
- ok,大功告成,直接调用之前创建的CallUtils类中的callSimpleInfo方法;
1. ndk-build编译多个so库
上面我们已经通过ndk-build生成了当个so库了,但是如何同时生成多个so库呢?我们只编写多个c代码源文件 并修改Android.mk就可以了!
- 之前我们编写了use_ndk_build.c文件,我们再编写一个use_ndk_build2.c文件,代码如下:
#include <jni.h>
JNIEXPORT jstring JNICALL Java_com_aserbao_aserbaosandroid_functions_how_1create_1so_useNdkBuild_CallUtils_callSimpleInfo2
  (JNIEnv *env, jclass ojb){
     return (*env) -> NewStringUTF(env,"I'm an info come from use libuse_ndk_build2.so");
  };
- 在Android.mk文件下再添加一个模块,修改后的Android.mk代码:
LOCAL_PATH := $(call my-dir)
include $(CLEAR_VARS)
# 导出的so库名字
LOCAL_MODULE := use_ndk_build
# 对应的c代码
LOCAL_SRC_FILES := use_ndk_build.c
include $(BUILD_SHARED_LIBRARY)

include $(CLEAR_VARS)
LOCAL_MODULE := use_ndk_build2
LOCAL_SRC_FILES := use_ndk_build2.c
include $(BUILD_SHARED_LIBRARY)
- 打开Terminal,运行ndk-build命令,成功后,libs每个CPU目录下就能看到libuse_ndk_build.so和libuse_ndk_build2.so两个so库文件了!大功告成。
关于Android.mk的使用介绍我计划重新写了一篇文章进行说明;
3. ndk-build将多个.c / .c++ 文件编译成一个so
前面多个so文件我们在Android.mk中添加多个模块,如果多个.c / .c++ 编译成一个so,我们只需要将多个c源码文件放到LOCAL_SRC_FILES 目录下即可。
实现:修改Android.mk里面的:LOCAL_SRC_FILES := 文件1.c 文件2.c,文件名和文件名之间需要添加空格,不然会报错!运行ndk-build,就会发现只有一个so库文件了!
3. 通过CMake编译生成so库文件
1. CMake编译单个so库
通过CMake编译so文件最简单的例子就是通过Android Studio创建一个InClude C++ support的项目,后面Exceptions Support(-fexception)和Runtime Type Information Support(-frtti)均打上勾;创建完成,编译运行一下项目。找到app/build/intermediates/cmake/debug文件夹,在这里我们可以找到刚刚通过CMake生成的对应so文件;
如果不是新项目,如何在原有项目中通过CMake来实现对C的支持,我们简单分如下几步:
- 前面的步骤和通过ndk-build生成so库文件一直,同样的方法生成.h 文件,这里就不多重复了!生成.h文件后, 在main目录下创建cpp文件夹,复制.h文件到cpp目录下,并重命名为aserbao-one-lib.cpp。代码如下:
#include <jni.h>
#include <string>
JNIEXPORT jstring JNICALL Java_com_aserbao_aserbaosandroid_functions_how_1create_1so_useCmake_AserbaoUtils_getSimpleInfoFromOne
        (JNIEnv *env, jclass){
    std::string hello = "这是来自第一个包的信息,请注意查收……";
    return env->NewStringUTF(hello.c_str());
};
- 创建CMakeList.txt文件;修改成自己关于cpp的文件路径(文中的src/main/cpp/aserbao-one-lib.cpp)及生成的so库名(文中的 use_cmake_build);
# For more information about using CMake with Android Studio, read the
# documentation: https://d.android.com/studio/projects/add-native-code.html

# Sets the minimum version of CMake required to build the native library.

cmake_minimum_required(VERSION 3.4.1)

# Creates and names a library, sets it as either STATIC
# or SHARED, and provides the relative paths to its source code.
# You can define multiple libraries, and CMake builds them for you.
# Gradle automatically packages shared libraries with your APK.

add_library( # Sets the name of the library.
            use_cmake_build
             # Sets the library as a shared library.
             SHARED
             # Provides a relative path to your source file(s).
             src/main/cpp/aserbao-one-lib.cpp )

# Searches for a specified prebuilt library and stores the path as a
# variable. Because CMake includes system libraries in the search path by
# default, you only need to specify the name of the public NDK library
# you want to add. CMake verifies that the library exists before
# completing its build.

find_library( # Sets the name of the path variable.
              log-lib
              # Specifies the name of the NDK library that
              # you want CMake to locate.
              log )

# Specifies libraries CMake should link to your target library. You
# can link multiple libraries, such as libraries you define in this
# build script, prebuilt third-party libraries, or system libraries.

target_link_libraries( # Specifies the target library.
                       use_cmake_build

                       # Links the target library to the log library
                       # included in the NDK.
                       ${log-lib} )
- 在app.gradle中声明CMakeLists.txt路径及配置需要生成的CPU类型,配置如下:
android{
	……
	defaultConfig{
		……
		externalNativeBuild {
            cmake {
                cppFlags "-frtti -fexceptions"
                abiFilters"armeabi","armeabi-v7a","arm64-v8a","mips","mips64","x86","x86_64"
            }
        }
	}
	externalNativeBuild {
        cmake {
            path "CMakeLists.txt"
        }
    }
}
- 编译运行项目;编译完成到app/build/intermediates/cmake/debug目录下,就能看到编译完成的so库文件了!
1. CMake编译多个so库
上面我们有使用ndk-build同时编写过多个so库文件,其实CMake的同时编写多个so原理是一样的,添加cpp代码,修改CMakeLists.txt的文件。
编写c文件代码就不多介绍了,代码可以下载文章的项目进行查看:
简单讲解下CMakeLists.txt的修改,复制一份add_library(……)和target_link_libraries(……)修改其对应的库名字和c代码路径即可,修改后的CMakeLists.txt如下:
cmake_minimum_required(VERSION 3.4.1)
add_library( # Sets the name of the library.
             use_cmake_build

             # Sets the library as a shared library.
             SHARED

             # Provides a relative path to your source file(s).
             src/main/cpp/num_one/aserbao-one-lib.cpp )

add_library( # Sets the name of the library.
             use_cmake_build2

             # Sets the library as a shared library.
             SHARED

             # Provides a relative path to your source file(s).
             src/main/cpp/num_two/aserbao-two-lib.cpp )


find_library( # Sets the name of the path variable.
              log-lib

              # Specifies the name of the NDK library that
              # you want CMake to locate.
              log )

target_link_libraries( # Specifies the target library.
                       use_cmake_build

                       # Links the target library to the log library
                       # included in the NDK.
                       ${log-lib} )

target_link_libraries( # Specifies the target library.
                       use_cmake_build2

                       # Links the target library to the log library
                       # included in the NDK.
                       ${log-lib} )
OK,重新build项目,在app/build/intermediates/cmake/debug目录对应的CPU目录下就能看到libuse_cmake_build.so和libuse_cmake_build2.so文件
大功告成!
3. 使用CMake将多个c / c++源码编译成一个so
前面讲过ndk-build如何将多个c源码编译成一个so,其实CMake的编译生成一个so的原理也是一样的,就是将在原本的.cpp路径后面再添加其他的.cpp路径,留言文件之间用空格键隔开!
//只需要修改add_library下的c代码路径:
add_library( # Sets the name of the library.
             use_cmake_build

             # Sets the library as a shared library.
             SHARED
             # Provides a relative path to your source file(s).
             src/main/cpp/num_one/aserbao-one-lib.cpp src/main/cpp/num_two/aserbao-two-lib.cpp)
修改完成,重新编译,查看so库!一气呵成,大功告成!
如何调用so文件?
封装对应的路径类文件到指定目录下
简单说下原理:首先我们编译的C代码方法命名:Java_路径_类名_方法名;我们在编译成so文件之后,只有在路径下的类名才能调用到so里面的方法。
下面我们来举例说明:
这是我的本地访问类CallUtils的路径:com.aserbao.aserbaosandroid.functions.how_create_so.useNdkBuild.CallUtils;
对应的c代码中的方法为:
#include <jni.h>
JNIEXPORT jstring JNICALL Java_com_aserbao_aserbaosandroid_functions_how_1create_1so_useNdkBuild_CallUtils_callSimpleInfo
  (JNIEnv *env, jclass ojb){
     return (*env) -> NewStringUTF(env,"Hello, I'm an info come from use ndk-build");
  };
所以编译生成的so库文件只有com_aserbao_aserbaosandroid_functions_how_1create_1so_useNdkBuild路径下的CallUtils才能调用!
所以我们其他项目中调用so库的时候,必须要创建对应的访问类CallUtils,且其路径和so中定义的路径一致。即上文中的com.aserbao.aserbaosandroid.functions.how_create_so.useNdkBuild.CallUtils。
ok,搞定,大功告成,不过这种方式的局限性很高,每次调用一个so库文件,都需要创建不同的路径调用文件,所以,为了方便,我们可以通过生成可执行jar的方式来调用so库文件。
so文件的Java类封装成可执行的jar文件
前面在ndk-build创建so文件的时候,我们有创建一个类CallUtils,我们基于此基础来进行:
- 我们在其目录下运行javac CallUtils.java 命令,生成CallUtils.class文件;
- 我们在java目录下创建名为MANIFEST.MF的文件。并编辑器内容为:
Main-Class: com.aserbao.aserbaosandroid.functions.how_create_so.useNdkBuild.CallUtils
- 打开Termainal,切换到java目录下。输入
jar cvfm aserbao.jar MANIFEST.MF com/aserbao/aserbaosandroid/functions/how_create_so/useNdkBuild/CallUtils.class
- 运行成功后,在java目录下会生成一个aserbao.jar的文件,这个文件就是我们的可执行jar文件。现在我们将生成的so文件和这个jar文件移到任意一个项目的libs中,刷新下项目,我们就可以通过CallUtils来调用生成的so文件内容了!nice,结束。
注意:
- MANIFEST.MF的命名必须是MANIFEST.MF;
- MANIFEST.MF的内容组成为:M(必须大写)ain-C(必须大写)lass:(空格)包名.类名(必须回车换行)
- 运行的类名必须是当前类生成的对应.class文件
如何查看so库中的方法
上面我们讲了如何调用so库,其中必不可少的部分是C代码声明的路径及调用类名和方法名。但是当我们只拿到so库文件,没有其他任何信息,我们如何拿到so库中声明的方法路径及可调用的类名呢?下面我们简单讲解下:
在linux下查看动态库和静态库:
//静态库用
ar -t YourFile
//动态库用
nm -D YourFile
比如我要查看我自己编译生成的libuse_ndk_build.so库中的方法,我们可以到其目录下运行如下命令:
nm -D libuse_ndk_build.so
得到的返回结果如下:
000000000000062c T Java_com_aserbao_aserbaosandroid_functions_how_1create_1so_useNdkBuild_CallUtils_callSimpleInfo
0000000000000640 T Java_com_aserbao_aserbaosandroid_functions_how_1create_1so_useNdkBuild_CallUtils_callSimpleInfo2
……
两个方法都显示出来了,nice,我们根据路径编译对应的类文件及方法名就可以调用这个so了,前面已经讲过了,这里就不多说了!
项目地址
AserbaosAndroid
aserbao的个人Android总结项目,希望这个项目能成为最全面的Android开发学习项目,这是个美好的愿景,项目中还有很多未涉及到的地方,有很多没有讲到的点,希望看到这个项目的朋友,如果你在开发中遇到什么问题,在这个项目中没有找到对应的解决办法,希望你能够提出来,给我留言或者在项目github地址提issues,我有时间就会更新项目没有涉及到的部分!项目会一直维护下去。当然,我希望是Aserbao’sAndroid 能为所有Android开发者提供到帮助!也期望更多Android开发者能参与进来,只要你熟悉Android某一块,都可以将你的代码pull上分支供大家学习!
总结
没啥好总结的,搞得我脑壳疼!写一篇文章容易嘛,还要搞清楚各个点,有问题还要帮忙解决,没啥好总结的!好了,就这样。如果关注我的朋友在开发过程中遇到相关问题可以在公众号给我留言,知无不言。撤了撤了……