前段时间发现Android Studio在新建 Activity 的时候,默认生成的布局文件的根布局变成了 ConstraintLayout ,不过由于以前的几种布局文件都是用习惯了,所以往往都是直接修改根布局,最近觉得有必要学习一下这种布局的使用,毕竟 google 都推荐使用,所以就把我了解到的一些东西分享一下,希望可以帮助到对 ConstraintLayout 感兴趣的朋友~
Android Studio 默认生成的布局文件如下:
<?xml version="1.0" encoding="utf-8"?>
<android.support.constraint.ConstraintLayout
    xmlns:android="http://schemas.android.com/apk/res/android"
    xmlns:app="http://schemas.android.com/apk/res-auto"
    xmlns:tools="http://schemas.android.com/tools"
    android:layout_width="match_parent"
    android:layout_height="match_parent"
    tools:context=".MainActivity"
    tools:layout_editor_absoluteY="89dp">

</android.support.constraint.ConstraintLayout>简单的理解,ConstraintLayout 布局的使用方法就是给其中的子视图添加一系列约束,从而使自视图展示在屏幕的特定位置。
对于要添加的每一个约束我们可以简单的理解为有一个橡皮筋在拉着我们的视图,从而使视图展现在某个位置。
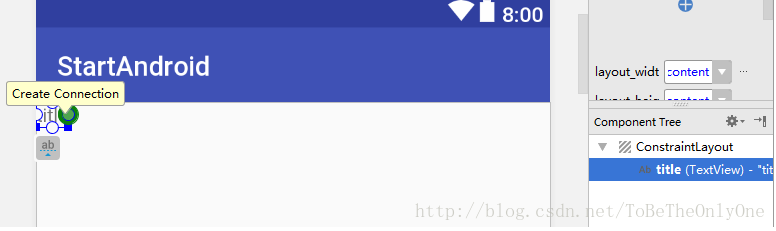
我们先向其中添加一个TextView 试一试,推荐使用 图形布局工具 来对ConstraintLayout 进行布局以及修改,因为这样比较直观方便。
添加一个TextView之后的布局文件如下:
<?xml version="1.0" encoding="utf-8"?>
<android.support.constraint.ConstraintLayout
    xmlns:android="http://schemas.android.com/apk/res/android"
    xmlns:app="http://schemas.android.com/apk/res-auto"
    xmlns:tools="http://schemas.android.com/tools"
    android:layout_width="match_parent"
    android:layout_height="match_parent"
    tools:context="com.tobetheonlyone.startandroid.MainActivity"
    tools:layout_editor_absoluteY="89dp">

    <TextView
        android:id="@+id/title"
        android:layout_width="wrap_content"
        android:layout_height="wrap_content"
        android:text="title"/>
</android.support.constraint.ConstraintLayout>
由代码可以看出我们除了修改了 id ,其他什么都没有添加,即未添加任何约束,运行后 TextView 显示在左上角,现在我们添加一个约束试一试~
如下图,点击视图树中的 TextView,然后鼠标移到预览界面的 TextView 中会出现四个圆圈,这四个圆圈分别是用来创建四个方向的约束的,点击右边的原点:
然后向右拖动到右边界,这样就创建了右边的约束,TextView 自动就跑到了视图的右边,如下图:

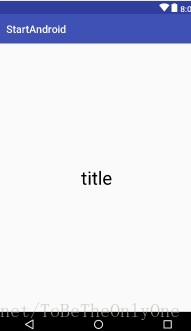
同样的,如果对一个视图只添加向下的约束,那么视图就会显示在屏幕的底部,其他的也同理。如果我们把 TextView 上下左右都添加约束,那么 TextView 会显示在屏幕中间,效果如下:
此时再看我们的布局文件如下:
<?xml version="1.0" encoding="utf-8"?>
<android.support.constraint.ConstraintLayout
    xmlns:android="http://schemas.android.com/apk/res/android"
    xmlns:app="http://schemas.android.com/apk/res-auto"
    xmlns:tools="http://schemas.android.com/tools"
    android:layout_width="match_parent"
    android:layout_height="match_parent"
    tools:context="com.tobetheonlyone.startandroid.MainActivity"
    tools:layout_editor_absoluteY="89dp">

    <TextView
        android:id="@+id/title"
        android:layout_width="wrap_content"
        android:layout_height="wrap_content"
        android:layout_marginBottom="8dp"
        android:layout_marginEnd="16dp"
        android:layout_marginStart="8dp"
        android:layout_marginTop="8dp"
        android:text="title"
        android:textColor="@android:color/black"
        android:textSize="35sp"
        app:layout_constraintBottom_toBottomOf="parent"
        app:layout_constraintEnd_toEndOf="parent"
        app:layout_constraintStart_toStartOf="parent"
app:layout_constraintTop_toTopOf="parent"</android.support.constraint.ConstraintLayout>这时候,TextView 多了一些属性,margin 之类的属性在其他布局中都用到过,就不多做阐述,主要是最后四行代码:
        app:layout_constraintBottom_toBottomOf="parent"
        app:layout_constraintEnd_toEndOf="parent"
        app:layout_constraintStart_toStartOf="parent"
        app:layout_constraintTop_toTopOf="parent"
这是我们以前不曾用过的,这四个属性都是以 layout_ 开头。凡是以layout_ 开头的属性都属于布局参数。与其他属性不同的是,组件的布局参数 都是用于告诉父布局如何安排自己,我们也已经用过许多这样的属性,如layout_width 和 layout_height。
约束的名字分别是 constraintBottom,constraintEnd,constraintStart,constraintTop,分别代表TextView 的底部约束,右边的约束,左边的约束和顶部约束。
最后,属性以 to...of="parent" 作为结束,表示约束是连接到父组件,即ConstraintLayout 中的。
