Spring MVC
Spring MVC简介
Spring web mvc和Struts2都属于表现层的框架,它是Spring框架的一部分。Spring Web MVC是一种基于Java的实现了Web MVC设计模式的请求驱动类型的轻量级Web框架,即使用了MVC架构模式的思想,将web层进行职责解耦,基于请求驱动指的就是使用请求-响应模型,框架的目的就是帮助我们简化开发,Spring MVC大大简化了我们日常Web开发。
Struts2和SpringMVC对比
1、springmvc的入口是一个servlet即前端控制器,而struts2入口是一个filter过滤器。

2、springmvc是基于方法开发(一个url对应一个方法),请求参数传递到方法的形参,可以设计为单例或多例(建议单例),struts2是基于类开发,传递参数是通过类的属性,只能设计为多例。

3、Struts采用值栈存储请求和响应的数据,通过OGNL存取数据, springmvc通过参数解析器是将request请求内容解析,并给方法形参赋值,将数据和视图封装成ModelAndView对象,最后又将ModelAndView中的模型数据通过request域传输到页面。Jsp视图解析器默认使用jstl。
- 1
- 2
- 3
- 4
- 5
- 6
优点
√让我们能非常简单的设计出干净的Web层和薄薄的Web层;

√进行更简洁的Web层的开发;

√天生与Spring框架集成(如IoC容器、AOP等);

√提供强大的约定大于配置的契约式编程支持;

√能简单的进行Web层的单元测试;

√支持灵活的URL到页面控制器的映射;

√非常容易与其他视图技术集成,如Velocity、FreeMarker等等,因为模型数据不放在特定的API里,而是放在一个Model里(Map数据结构实现,因此很容易被其他框架使用);

√非常灵活的数据验证、格式化和数据绑定机制,能使用任何对象进行数据绑定,不必实现特定框架的API;

√提供一套强大的JSP标签库,简化JSP开发;

√支持灵活的本地化、主题等解析;

√更加简单的异常处理;

√对静态资源的支持;

√支持Restful风格。
- 1
- 2
- 3
- 4
- 5
- 6
- 7
- 8
- 9
- 10
- 11
- 12
- 13
- 14
- 15
- 16
- 17
- 18
- 19
- 20
- 21
- 22
- 23
- 24
- 25
- 26
Spring MVC架构
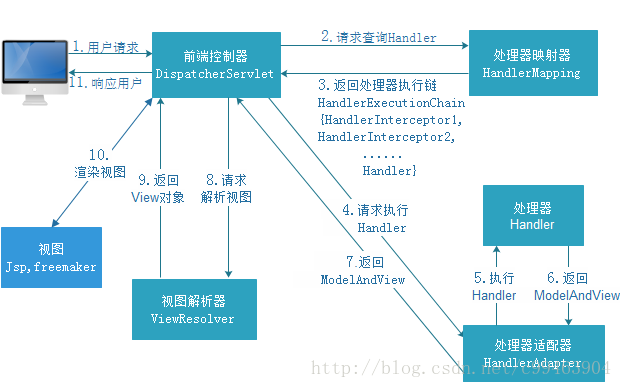
1、  用户发送请求至前端控制器DispatcherServlet,前端控制器收到请求后自己不进行处理,而是调用处理器映射器。

2、  DispatcherServlet收到请求后调用HandlerMapping处理器映射器。HandlerMapping将会把请求映射为HandlerExecutionChain对象(包含一个Handler处理器(页面控制器)对象、多个HandlerInterceptor拦截器)对象。

3、  处理器映射器根据请求url找到具体的处理器,生成处理器对象及处理器拦截器(如果有则生成)一并返回给DispatcherServlet。

4、  DispatcherServlet通过HandlerAdapter处理器适配器调用处理器

5、  执行处理器(Controller,也叫后端控制器)。返回执行结果,封装在ModelAndView中

6、  DispatcherServlet将ModelAndView传给ViewReslover视图解析器, ViewResolver将把逻辑视图名解析为具体的View,通过这种策略模式,很容易更换其他视图技术;

7、  ViewReslover解析后返回具体View

8、  DispatcherServlet对View进行渲染视图(即将对象模型的数据填充至视图中)。此处的Model实际是一个Map数据结构,因此很容易支持其他视图技术;

9、  DispatcherServlet将结果响应给用户
- 1
- 2
- 3
- 4
- 5
- 6
- 7
- 8
- 9
- 10
- 11
- 12
- 13
- 14
- 15
- 16
- 17
- 18
Spring MVC入门
通过前面的流程分析,我们可以看出具体的核心开发步骤,具体的开发就围绕以下几点:
1、  DispatcherServlet在web.xml中的部署描述,从而拦截请求到Spring Web MVC
2、  HandlerMapping的配置,从而将请求映射到处理器
3、  HandlerAdapter的配置,从而支持多种类型的处理器
4、  ViewResolver的配置,从而将逻辑视图名解析为具体视图技术
5、  处理器(页面控制器)的配置,从而进行功能处理
- 1
- 2
- 3
- 4
- 5
- 6
1.创建Web项目,导入Spring核心包和Spring-web-mvc.jar,还有依赖包commons-logging.jar
- 1
2.在web.xml中配置前端控制器

<?xml version="1.0" encoding="UTF-8"?>
<web-app xmlns:xsi="http://www.w3.org/2001/XMLSchema-instance" xmlns="http://java.sun.com/xml/ns/javaee" xsi:schemaLocation="http://java.sun.com/xml/ns/javaee http://java.sun.com/xml/ns/javaee/web-app_2_5.xsd" id="WebApp_ID" version="2.5">
  <display-name>SringMVCDemo</display-name>
  <welcome-file-list>
    <welcome-file>index.html</welcome-file>
    <welcome-file>index.htm</welcome-file>
    <welcome-file>index.jsp</welcome-file>
    <welcome-file>default.html</welcome-file>
    <welcome-file>default.htm</welcome-file>
    <welcome-file>default.jsp</welcome-file>
  </welcome-file-list>

  <!--配置前端控制器-->
  <servlet>
        <servlet-name>springmvc</servlet-name>
        <servlet-class>org.springframework.web.servlet.DispatcherServlet</servlet-class>
        <!--指定配置文件-->
        <init-param>
            <param-name>contextConfigLocation</param-name>
            <param-value>classpath:springmvc.xml</param-value>
        </init-param>
  </servlet>
  <servlet-mapping>
        <servlet-name>springmvc</servlet-name>
        <!--拦截所有action请求-->
        <url-pattern>*.action</url-pattern>
  </servlet-mapping>
</web-app>


自此请求已交给Spring Web MVC框架处理,因此我们需要配置Spring的配置文件,默认DispatcherServlet会加载WEB-INF/[DispatcherServlet的Servlet名字]-servlet.xml配置文件。但也可以直接通过<init-param>来指定配置文件
- 1
- 2
- 3
- 4
- 5
- 6
- 7
- 8
- 9
- 10
- 11
- 12
- 13
- 14
- 15
- 16
- 17
- 18
- 19
- 20
- 21
- 22
- 23
- 24
- 25
- 26
- 27
- 28
- 29
- 30
- 31
- 32
- 33
3.配置springmvc配置文件
<?xml version="1.0" encoding="UTF-8"?>
<beans xmlns="http://www.springframework.org/schema/beans"
    xmlns:xsi="http://www.w3.org/2001/XMLSchema-instance" xmlns:p="http://www.springframework.org/schema/p"
    xmlns:context="http://www.springframework.org/schema/context"
    xmlns:mvc="http://www.springframework.org/schema/mvc"
    xsi:schemaLocation="http://www.springframework.org/schema/beans http://www.springframework.org/schema/beans/spring-beans-4.0.xsd
        http://www.springframework.org/schema/mvc http://www.springframework.org/schema/mvc/spring-mvc-4.0.xsd
        http://www.springframework.org/schema/context http://www.springframework.org/schema/context/spring-context-4.0.xsd">

    <!-- 配置映射器,表示将请求的URL和Bean名字映射,如URL为 “/hello”,则Spring配置文件必须有一个名字为“/hello”的Bean -->
    <bean class="org.springframework.web.servlet.handler.BeanNameUrlHandlerMapping"/>

    <!-- 配置适配器,表示所有实现了org.springframework.web.servlet.mvc.Controller接口的Bean可以作为Spring Web MVC中的处理器。如果需要其他类型的处理器可以通过实现HadlerAdapter来解决 -->
    <bean class="org.springframework.web.servlet.mvc.SimpleControllerHandlerAdapter"/>

    <!--配置视图解析器-->
    <bean class="org.springframework.web.servlet.view.InternalResourceViewResolver">
        <!--prefix和suffix:查找视图页面的前缀和后缀,比如传进来的逻辑视图名为hello,则该该jsp视图页面应该存放在“WEB-INF/hello.jsp”-->
        <property name="prefix" value="/WEB-INF/"/>
        <property name="suffix" value=".jsp"/>
    </bean>

</beans>
- 1
- 2
- 3
- 4
- 5
- 6
- 7
- 8
- 9
- 10
- 11
- 12
- 13
- 14
- 15
- 16
- 17
- 18
- 19
- 20
- 21
- 22
- 23
- 24
4.实现控制器

//处理器必须实现Controller接口
public class UserController implements Controller {
    public ModelAndView handleRequest(HttpServletRequest arg0, HttpServletResponse arg1) throws Exception {

            ModelAndView mv = new ModelAndView();
           //添加模型数据 可以是任意的POJO对象
           mv.addObject("message", "Hello World!");
           //设置逻辑视图名,视图解析器会根据该名字解析到具体的视图页面
           mv.setViewName("user");
           return mv;
    }
}
- 1
- 2
- 3
- 4
- 5
- 6
- 7
- 8
- 9
- 10
- 11
- 12
- 13
- 14
- 15
5.将处理器添加到springmvc配置文件中
<bean name="/user" class="com.cad.controller.UserController"></bean>
- 1
- 2
6.编写user.jsp

<%@ page language="java" contentType="text/html; charset=UTF-8"
    pageEncoding="UTF-8"%>
        <!DOCTYPE html PUBLIC "-//W3C//DTD HTML 4.01 Transitional//EN" "http://www.w3.org/TR/html4/loose.dtd">
<html>
    <head>
        <meta http-equiv="Content-Type" content="text/html; charset=UTF-8">
        <title>Insert title here</title>
    </head>
    <body>
        <!--${message}:表示显示由HelloWorldController处理器传过来的模型数据。-->
        ${message}
    </body>
</html>
- 1
- 2
- 3
- 4
- 5
- 6
- 7
- 8
- 9
- 10
- 11
- 12
- 13
- 14
- 15
7.进行访问 http://localhost:8080/SringMVCDemo/user
- 1
入门案例做完了,对SpringMVC的流程有了了解,现在来详细介绍。
DispatcherServlet详解
DispatcherServlet是前端控制器设计模式的实现,提供Spring Web MVC的集中访问点,主要负责职责的分派。
配置

 <servlet>
        <servlet-name>springmvc</servlet-name>
        <servlet-class>org.springframework.web.servlet.DispatcherServlet</servlet-class>
        <!--指定配置文件的位置,默认“/WEB-INF/[servlet名字]-servlet.xml”。-->
        <init-param>
            <param-name>contextConfigLocation</param-name>
            <param-value>classpath:springmvc.xml</param-value>
        </init-param>
  </servlet>
  <servlet-mapping>
        <servlet-name>springmvc</servlet-name>
        <url-pattern>/</url-pattern>
  </servlet-mapping>
- 1
- 2
- 3
- 4
- 5
- 6
- 7
- 8
- 9
- 10
- 11
- 12
- 13
- 14
- 15
DispatcherServlet的默认配置在DispatcherServlet.properties(和DispatcherServlet类在一个包下)中,而且是当Spring配置文件中没有指定配置时使用的默认策略。
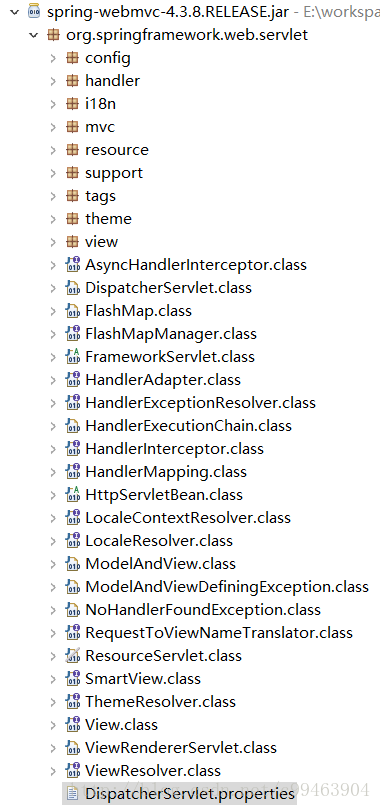
DispatcherServlet在启动时会自动注册这些默认的Bean,无需我们注册,如果我们注册了,默认的将不会注册。因此我们入门案例中的BeanNameUrlHandlerMapping、SimpleControllerHandlerAdapter是不需要我们手动注册的,DispatcherServlet默认会注册这两个Bean。里面还有一些其他的默认Bean,我们可以自行去了解。
接下来我们了解一下Spring MVC需要的那些组件。
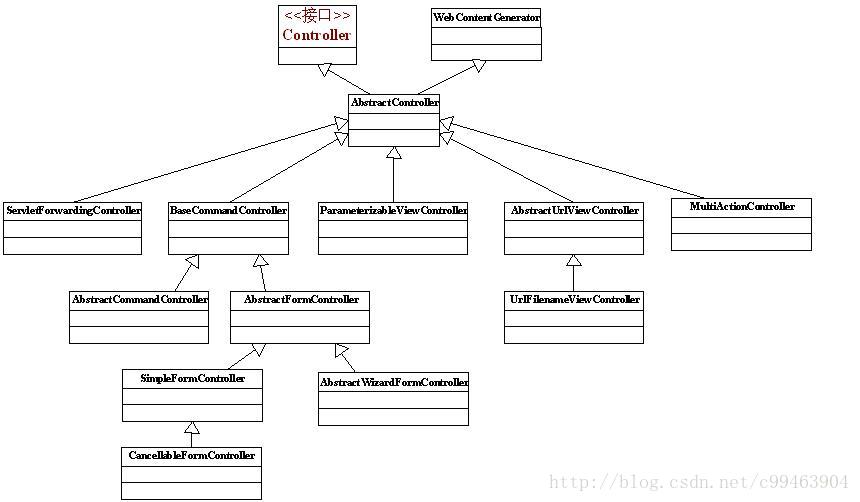
Controller
Controller控制器,其实现在大多数公司已经不推荐使用实现Controller接口的方法来实现Controller,基本都使用注解。但难免还会有一些比较老的系统使用,所以我们大概了解一下。
//控制器接口
public interface Controller {
       ModelAndView handleRequest(HttpServletRequest request, HttpServletResponse response) throws Exception;
}
- 1
- 2
- 3
- 4
控制器接口,只有一个方法handleRequest,用于进行请求的功能处理,处理完请求后返回ModelAndView。Spring 提供了很多Controller接口的实现
这些类接口的详解,可以参考开涛讲解的SpringMVC,讲的非常详细。这里附上链接,就不再细讲。
http://jinnianshilongnian.iteye.com/blog/1752171
SpringMVC注解式开发
Spring2.5之前,我们都是通过实现Controller接口或其实现来定义我们的处理器类。Spring2.5引入注解式处理器支持,通过@Controller 和 @RequestMapping注解定义我们的处理器类。并且提供了一组强大的注解。
Spring2.5需要通过处理器映射DefaultAnnotationHandlerMapping和处理器适配器AnnotationMethodHandlerAdapter来开启支持@Controller 和@RequestMapping注解的处理器。一般不用指定,因为默认的有。
@Controller:用于标识是处理器类;
@RequestMapping:请求到处理器功能方法的映射规则;
@RequestParam:请求参数到处理器功能处理方法的方法参数上的绑定;
@ModelAttribute:请求参数到命令对象的绑定;
@SessionAttributes:用于声明session级别存储的属性,放置在处理器类上,通常列出
模型属性(如@ModelAttribute)对应的名称,则这些属性会透明的保存到session中;
@InitBinder:自定义数据绑定注册支持,用于将请求参数转换到命令对象属性的对应类型;
- 1
- 2
- 3
- 4
- 5
- 6
- 7
- 8
Spring3.1引入新的@Contoller和@RequestMapping注解支持类:处理器映射RequestMappingHandlerMapping和处理器适配器RequestMappingHandlerAdapter组合来代替Spring2.5开始的处理器映射DefaultAnnotationHandlerMapping和处理器适配器AnnotationMethodHandlerAdapter。Spring3.0支持RESTful风格,且又引入了更多注解支持
@CookieValue:cookie数据到处理器功能处理方法的方法参数上的绑定;
@RequestHeader:请求头(header)数据到处理器功能处理方法的方法参数上的绑定;
@RequestBody:请求的body体的绑定(通过HttpMessageConverter进行类型转换);
@ResponseBody:处理器功能处理方法的返回值作为响应体(通过HttpMessageConverter进行类型转换);
@ResponseStatus:定义处理器功能处理方法/异常处理器返回的状态码和原因;
@ExceptionHandler:注解式声明异常处理器;
@PathVariable:请求URI中的模板变量部分到处理器功能处理方法的方法参数上的绑定,
从而支持RESTful架构风格的URI;
- 1
- 2
- 3
- 4
- 5
- 6
- 7
- 8
- 9
SpringMVC注解式开发入门案例
1.配置springmvc配置文件

<?xml version="1.0" encoding="UTF-8"?>
<beans xmlns="http://www.springframework.org/schema/beans"
    xmlns:xsi="http://www.w3.org/2001/XMLSchema-instance" xmlns:p="http://www.springframework.org/schema/p"
    xmlns:context="http://www.springframework.org/schema/context"
    xmlns:mvc="http://www.springframework.org/schema/mvc"
    xsi:schemaLocation="http://www.springframework.org/schema/beans http://www.springframework.org/schema/beans/spring-beans-4.0.xsd
        http://www.springframework.org/schema/mvc http://www.springframework.org/schema/mvc/spring-mvc-4.0.xsd
        http://www.springframework.org/schema/context http://www.springframework.org/schema/context/spring-context-4.0.xsd">

<!--Spring3.1开始的注解 ,映射器和适配器 直接配置处理器映射器和处理器适配器比较麻烦,可以使用注解驱动来加载。SpringMVC使用<mvc:annotation-driven>自动加载RequestMappingHandlerMappingRequestMappingHandlerAdapter-->
<bean class="org.springframework.web.servlet.mvc.method.annotation.RequestMappingHandlerMapping"></bean>
<bean class="org.springframework.web.servlet.mvc.method.annotation.RequestMappingHandlerAdapter"></bean>


<!--视图解析器的配置-->
<bean class="org.springframework.web.servlet.view.InternalResourceViewResolver">
    <property name="prefix" value="/WEB-INF/"/>
    <property name="suffix" value=".jsp"/>
</bean>

<!--只需要将处理器实现类注册到spring配置文件即可,RequestMappingHandlerMapping会自动发现带注解的该类-->
<bean class="com.cad.controller.UserController"></bean>

</beans>
- 1
- 2
- 3
- 4
- 5
- 6
- 7
- 8
- 9
- 10
- 11
- 12
- 13
- 14
- 15
- 16
- 17
- 18
- 19
- 20
- 21
- 22
- 23
- 24
- 25
- 26
2.编写处理类

@Controller
public class UserController  {
    //RequestMapping("hello") 代理该方法的路径
    @RequestMapping("/hello")
    public ModelAndView hello() {
        ModelAndView mv = new ModelAndView();
           //添加模型数据 可以是任意的POJO对象
           mv.addObject("message", "Hello World!");
           //设置逻辑视图名,视图解析器会根据该名字解析到具体的视图页面
           mv.setViewName("user");
           return mv;
    }
}
- 1
- 2
- 3
- 4
- 5
- 6
- 7
- 8
- 9
- 10
- 11
- 12
- 13
- 14
- 15
SpringMVC注解式开发详解
请求映射
我们的http请求信息一般包含六部分信息:
①请求方法,如GET或POST,表示提交的方式;
②URL,请求的地址信息;
③协议及版本;
④请求头信息(包括Cookie信息);
⑤回车换行(CRLF),头信息和请求体之间有空行;
⑥请求内容区(即请求的内容或数据),如表单提交时的参数数据、URL请求参数(?abc=123 ?后边的)等。
- 1
- 2
- 3
- 4
- 5
- 6
- 7
我们可以看到有①、②、④、⑥一般是可变的,因此可以根据这四个可变的来映射到指定的方法
URL路径映射:使用URL映射请求到处理器的功能处理方法;
请求方法映射限定:如限定功能处理方法只处理GET请求;
请求参数映射限定:如限定只处理包含“abc”请求参数的请求;
请求头映射限定:如限定只处理“Accept=application/json”的请求
- 1
- 2
- 3
- 4
- 5
URL映射
@RequestMapping(value={“/test1”, “/user/create”}):多个URL路径可以映射到同一个处理器的功能处理方法。
@RequestMapping(value=”/users/**”):可以匹配“/users/abc/abc”
@RequestMapping(value=”/product?”):可匹配“/product1”或“/producta”
@RequestMapping(value=”/product*”):可匹配“/productabc”或“/product”
SpringMVC还提供了正则表达式风格,模板风格的URL映射,功能非常强大。
请求方法映射限定
@RequestMapping(value=”/hello”,method=RequestMethod.POST):指定此方法只能被post请求访问。
请求参数数据映射限定
@RequestMapping(params=”create”, method=RequestMethod.GET) :表示请求中有“create”的参数名且请求方法为“GET”即可匹配,如可匹配的请求URL“http://×××/parameter1?create”;
@RequestMapping(params=”!create”, method=RequestMethod.GET):表示请求中没有“create”参数名且请求方法为“GET”即可匹配,如可匹配的请求URL“http://×××/parameter1?abc”
@RequestMapping(params=”submitFlag=create”, method=RequestMethod.GET):表示请求中有“submitFlag=create”请求参数且请求方法为“GET”即可匹配,如请求URL为http://×××/parameter2?submitFlag=create;
请求头数据映射限定
@RequestMapping(value=”/header/test1”, headers = “Accept”):表示请求的URL必须为“/header/test1”,且 请求头中必须有Accept参数才能匹配。
@RequestMapping(value=”/header/test3”, headers = “Content-Type=application/json”):表示请求的URL必须为“/header/test3” 且 请求头中必须有“Content-Type=application/json”参数即可匹配。;
SpringMVC强大的参数绑定
SpringMVC为我们提供了很多默认支持的参数类型,只要我们在处理器方法的形参中添加这些参数类型,Spring MVC会自动为这些参数赋值,我们来看一下都有哪些。
ServletRequest/HttpServletRequest 和 ServletResponse/HttpServletResponse
InputStream/OutputStream 和 Reader/Writer :requestBodyIn:获取请求的内容区字节流,等价于request.getInputStream();responseBodyOut:获取相应的内容区字节流,等价于response.getOutputStream()。
WebRequest/NativeWebRequest:WebRequest是Spring Web MVC提供的统一请求访问接口,不仅仅可以访问请求相关数据(如参数区数据、请求头数据,但访问不到Cookie区数据),还可以访问会话和上下文中的数据;NativeWebRequest继承了WebRequest,并提供访问本地Servlet API的方法。
HttpSession
Model、Map、ModelMap:Spring Web MVC 提供Model、Map或ModelMap让我们能去暴露渲染视图需要的模型数据。除了ModelAndView以外,还可以使用Model来向页面传递数据,Model是一个接口,在参数里直接声明model即可。如果使用Model则可以不使用ModelAndView对象,Model对象可以向页面传递数据,View对象则可以使用String返回值替代。
Model
    @RequestMapping("/itemEdit")
    public String queryItemById(HttpServletRequest request, Model model) {
        // 从request中获取请求参数
        String strId = request.getParameter("id");
        Integer id = Integer.valueOf(strId);

        // 根据id查询商品数据
        Item item = this.itemService.queryItemById(id);

        // 把结果传递给页面
        // ModelAndView modelAndView = new ModelAndView();
        // 把商品数据放在模型中
        // modelAndView.addObject("item", item);
        // 设置逻辑视图
        // modelAndView.setViewName("itemEdit");

        // 把商品数据放在模型中
        model.addAttribute("item", item);

        return "itemEdit";
    }
- 1
- 2
- 3
- 4
- 5
- 6
- 7
- 8
- 9
- 10
- 11
- 12
- 13
- 14
- 15
- 16
- 17
- 18
- 19
- 20
- 21
- 22
- 23
ModelMap
ModelMap是Model接口的实现类,也可以通过ModelMap向页面传递数据。
使用Model和ModelMap的效果一样,如果直接使用Model,springmvc会实例化ModelMap

    @RequestMapping("/itemEdit")
    public String queryItemById(HttpServletRequest request, ModelMap model) {
        // 从request中获取请求参数
        String strId = request.getParameter("id");
        Integer id = Integer.valueOf(strId);

        // 根据id查询商品数据
        Item item = this.itemService.queryItemById(id);

        // 把结果传递给页面
        // ModelAndView modelAndView = new ModelAndView();
        // 把商品数据放在模型中
        // modelAndView.addObject("item", item);
        // 设置逻辑视图
        // modelAndView.setViewName("itemEdit");

        // 把商品数据放在模型中
        model.addAttribute("item", item);

        return "itemEdit";
    }
- 1
- 2
- 3
- 4
- 5
- 6
- 7
- 8
- 9
- 10
- 11
- 12
- 13
- 14
- 15
- 16
- 17
- 18
- 19
- 20
- 21
- 22
- 23
- 24
- 25
- 26
- Errors/BindingResult:错误对象。数据验证时使用。
绑定简单类型参数
1.不使用注解情况下,如果参数名称和jsp页面中的表单项的name一样,那么可以直接接收参数。
例如:前端有一参数name为id,直接就可以获取到
@Controller
public class UserController  {
    @RequestMapping(value="/hello")
    public ModelAndView hello(int id) {
            System.out.println(id);
            ModelAndView mv = new ModelAndView();
           //设置逻辑视图名,视图解析器会根据该名字解析到具体的视图页面
           mv.setViewName("user");
           return mv;
    }
}
- 1
- 2
- 3
- 4
- 5
- 6
- 7
- 8
- 9
- 10
- 11
- 12
2.@RequestParam用来绑定单个请求参数值,可以指定一些属性。
value:参数名字,即入参的请求参数名字,这也可以解决表单name和我们的形参名字不一样的情况;

required:是否必须,默认是true,表示请求中一定要有相应的参数,否则将报404错误码;

defaultValue:默认值,表示如果请求中没有同名参数时的默认值。

例如:@RequestParam(value ="itemId", required = true, defaultValue = "1") int  id:将表单项itemId的值赋给id。
- 1
- 2
- 3
- 4
- 5
- 6
- 7
- 8
3.不使用注解情况下,使用对象接收表单数据,请求的参数名称和pojo的属性名称一致,会自动将请求参数赋值给pojo的属性。
4.@ModelAttribute绑定请求参数到对象
    public String test1(@ModelAttribute("user") UserModel user)

    它的作用是将该绑定的命令对象以“user”为名称添加到模型对象中供视图页面展示使用。我们此时可以在视图页面使用${user.username}来获取绑定的命令对象的属性。
- 1
- 2
- 3
- 4
- 5
- 6
5.@CookieValue用于将请求的Cookie数据映射到功能处理方法的参数上。
public String test(@CookieValue(value="JSESSIONID", defaultValue="") String sessionId)
如上配置将自动将JSESSIONID值入参到sessionId参数上,defaultValue表示Cookie中没有JSESSIONID时默认为空。
- 1
- 2
6.@RequestHeader用于将请求的头信息区数据映射到功能处理方法的参数上
@RequestMapping(value="/header")
public String test(
       @RequestHeader("User-Agent") String userAgent,
       @RequestHeader(value="Accept") String[] accepts)

如上配置将自动将请求头“User-Agent”值入参到userAgent参数上,并将“Accept”请求头值入参到accepts参数上。
- 1
- 2
- 3
- 4
- 5
- 6
SpringMVC+Mybatis+Spring案例
需求:页面显示所有商品信息并且提供修改功能。
1.搭建数据库环境

CREATE DATABASE springmvc;
DROP TABLE IF EXISTS `items`;
CREATE TABLE `items` (
  `id` INT(11) NOT NULL AUTO_INCREMENT,
  `name` VARCHAR(32) NOT NULL COMMENT '商品名称',
  `price` FLOAT(10,1) NOT NULL COMMENT '商品定价',
  `detail` TEXT COMMENT '商品描述',
  `pic` VARCHAR(64) DEFAULT NULL COMMENT '商品图片',
  `createtime` DATETIME NOT NULL COMMENT '生产日期',
  PRIMARY KEY (`id`)
) ENGINE=INNODB AUTO_INCREMENT=4 DEFAULT CHARSET=utf8;

-- ----------------------------
-- Records of items
-- ----------------------------
INSERT INTO `items` VALUES ('1', '台式机', '3000.0', '该电脑质量非常好!!!!', NULL, '2016-02-03 13:22:53');
INSERT INTO `items` VALUES ('2', '笔记本', '6000.0', '笔记本性能好,质量好!!!!!', NULL, '2015-02-09 13:22:57');
INSERT INTO `items` VALUES ('3', '背包', '200.0', '名牌背包,容量大质量好!!!!', NULL, '2015-02-06 13:23:02');
- 1
- 2
- 3
- 4
- 5
- 6
- 7
- 8
- 9
- 10
- 11
- 12
- 13
- 14
- 15
- 16
- 17
- 18
- 19
- 20
2.创建Web工程,导入SpringMVC,Mybatis,Spring,Mysql驱动等jar包
- 1
3.通过Mybatis逆向工程生成POJO对象和Mapper接口
- 1

4.配置Spring配置文件,applicationContext.xml

<?xml version="1.0" encoding="UTF-8"?>
<beans xmlns="http://www.springframework.org/schema/beans"
    xmlns:context="http://www.springframework.org/schema/context" xmlns:p="http://www.springframework.org/schema/p"
    xmlns:aop="http://www.springframework.org/schema/aop" xmlns:tx="http://www.springframework.org/schema/tx"
    xmlns:xsi="http://www.w3.org/2001/XMLSchema-instance"
    xsi:schemaLocation="http://www.springframework.org/schema/beans http://www.springframework.org/schema/beans/spring-beans-4.0.xsd
    http://www.springframework.org/schema/context http://www.springframework.org/schema/context/spring-context-4.0.xsd
    http://www.springframework.org/schema/aop http://www.springframework.org/schema/aop/spring-aop-4.0.xsd http://www.springframework.org/schema/tx http://www.springframework.org/schema/tx/spring-tx-4.0.xsd
    http://www.springframework.org/schema/util http://www.springframework.org/schema/util/spring-util-4.0.xsd">

<!-- 配置数据库连接池 -->
<bean id="dataSource" class="com.mchange.v2.c3p0.ComboPooledDataSource">
    <property name="driverClass" value="com.mysql.jdbc.Driver"></property>
    <property name="jdbcUrl" value="jdbc:mysql://localhost:3306/springmvc"></property>
    <property name="user" value="root"></property>
    <property name="password" value="123456"></property>
</bean>

<!-- 配置sqlSession工厂 -->
<bean id="sqlSessionFactory" class="org.mybatis.spring.SqlSessionFactoryBean">
    <!-- 配置核心配置文件 -->
    <property name="configLocation" value="classpath:SqlMapConfig.xml"></property>
    <!-- 配置数据源 -->
    <property name="dataSource" ref="dataSource"></property>
</bean>

<!-- 配置Mapper扫描 -->
<bean class="org.mybatis.spring.mapper.MapperScannerConfigurer">
    <property name="basePackage" value="cn.cad.dao"/>
</bean>

<!-- 配置注解扫描 -->
<context:component-scan base-package="cn.cad" />

</beans>
- 1
- 2
- 3
- 4
- 5
- 6
- 7
- 8
- 9
- 10
- 11
- 12
- 13
- 14
- 15
- 16
- 17
- 18
- 19
- 20
- 21
- 22
- 23
- 24
- 25
- 26
- 27
- 28
- 29
- 30
- 31
- 32
- 33
- 34
- 35
- 36
- 37
5.配置spring-mvc配置文件
<?xml version="1.0" encoding="UTF-8"?>
<beans xmlns="http://www.springframework.org/schema/beans"
    xmlns:xsi="http://www.w3.org/2001/XMLSchema-instance" xmlns:p="http://www.springframework.org/schema/p"
    xmlns:context="http://www.springframework.org/schema/context"
    xmlns:mvc="http://www.springframework.org/schema/mvc"
    xsi:schemaLocation="http://www.springframework.org/schema/beans http://www.springframework.org/schema/beans/spring-beans-4.0.xsd
        http://www.springframework.org/schema/mvc http://www.springframework.org/schema/mvc/spring-mvc-4.0.xsd
        http://www.springframework.org/schema/context http://www.springframework.org/schema/context/spring-context-4.0.xsd">

<!--配置映射器和适配器-->
<bean class="org.springframework.web.servlet.mvc.method.annotation.RequestMappingHandlerMapping"></bean>
<bean class="org.springframework.web.servlet.mvc.method.annotation.RequestMappingHandlerAdapter"></bean>

<!--配置视图解析器-->
<bean class="org.springframework.web.servlet.view.InternalResourceViewResolver">
    <property name="prefix" value="/WEB-INF/"/>
    <property name="suffix" value=".jsp"/>
</bean>

<!--配置Controller扫描-->
<context:component-scan base-package="cn.cad.controller" />

</beans>
- 1
- 2
- 3
- 4
- 5
- 6
- 7
- 8
- 9
- 10
- 11
- 12
- 13
- 14
- 15
- 16
- 17
- 18
- 19
- 20
- 21
- 22
- 23
- 24
6.配置Mybatis核心配置文件

<?xml version="1.0" encoding="UTF-8" ?>
<!DOCTYPE configuration
    PUBLIC "-//mybatis.org//DTD Config 3.0//EN"
    "http://mybatis.org/dtd/mybatis-3-config.dtd">


<configuration>
    <!--什么都不用配置,因为扫描Mapper接口已经在Spring配置文件中配置过-->
</configuration>
- 1
- 2
- 3
- 4
- 5
- 6
- 7
- 8
- 9
- 10
- 11
7.配置Web.xml

<?xml version="1.0" encoding="UTF-8"?>
<web-app xmlns:xsi="http://www.w3.org/2001/XMLSchema-instance" xmlns="http://java.sun.com/xml/ns/javaee" xsi:schemaLocation="http://java.sun.com/xml/ns/javaee http://java.sun.com/xml/ns/javaee/web-app_2_5.xsd" id="WebApp_ID" version="2.5">
  <display-name>SpringMvcMybatisDemo</display-name>
  <welcome-file-list>
    <welcome-file>index.html</welcome-file>
    <welcome-file>index.htm</welcome-file>
    <welcome-file>index.jsp</welcome-file>
    <welcome-file>default.html</welcome-file>
    <welcome-file>default.htm</welcome-file>
    <welcome-file>default.jsp</welcome-file>
  </welcome-file-list>

     <!-- 配置spring配置文件 -->
    <context-param>
        <param-name>contextConfigLocation</param-name>
        <param-value>classpath:applicationContext.xml</param-value>
    </context-param>

    <!-- 使用监听器加载Spring配置文件 -->
    <listener>
        <listener-class>org.springframework.web.context.ContextLoaderListener</listener-class>
    </listener>

    <!-- 配置springmvc前端控制器 -->
    <servlet>
        <servlet-name>springmvc-web</servlet-name>
        <servlet-class>org.springframework.web.servlet.DispatcherServlet</servlet-class>
        <init-param>
            <param-name>contextConfigLocation</param-name>
            <param-value>classpath:springmvc.xml</param-value>
        </init-param>
    </servlet>

    <servlet-mapping>
        <servlet-name>springmvc-web</servlet-name>
        <url-pattern>/</url-pattern>
    </servlet-mapping>

</web-app>
- 1
- 2
- 3
- 4
- 5
- 6
- 7
- 8
- 9
- 10
- 11
- 12
- 13
- 14
- 15
- 16
- 17
- 18
- 19
- 20
- 21
- 22
- 23
- 24
- 25
- 26
- 27
- 28
- 29
- 30
- 31
- 32
- 33
- 34
- 35
- 36
- 37
- 38
- 39
- 40
- 41
7.创建Service层 ItemService

@Service
public class ItemService {
    @Autowired
    private ItemsMapper itemsMapper;

    public List<Items> queryItems(){
        //查询所有Items
        return  itemsMapper.selectByExampleWithBLOBs(null);
    }
}
- 1
- 2
- 3
- 4
- 5
- 6
- 7
- 8
- 9
- 10
- 11
- 12
8.创建Controller
@Controller
public class ItemController {

    @Autowired
    private ItemService itemService;

    @RequestMapping("/itemlist")
    public ModelAndView queryItemList() {
        List<Items> list=itemService.queryItems();
        for(Items i:list) {
            System.out.println(i.getDetail());
        }
        ModelAndView modelAndView=new ModelAndView();
        // 把商品数据放到模型中
        modelAndView.addObject("itemList", list);
        // 设置逻辑视图
        modelAndView.setViewName("itemList");
        return modelAndView;

    }

}
- 1
- 2
- 3
- 4
- 5
- 6
- 7
- 8
- 9
- 10
- 11
- 12
- 13
- 14
- 15
- 16
- 17
- 18
- 19
- 20
- 21
- 22
- 23
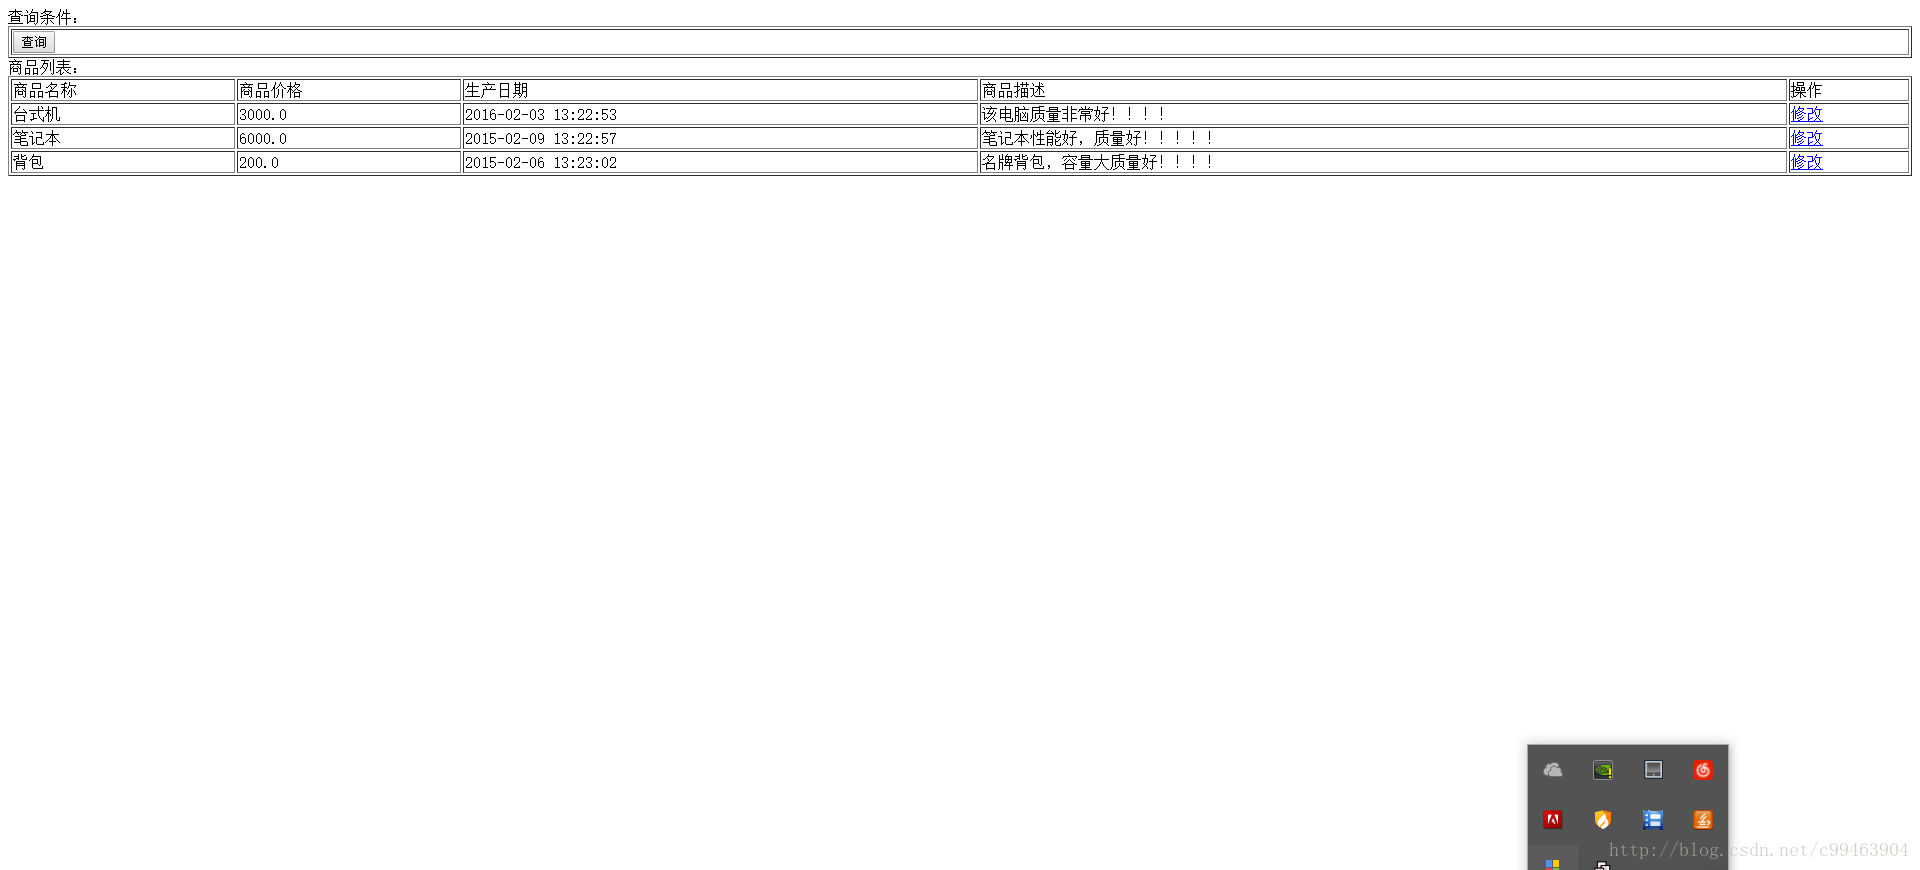
9.编写JSP页面

商品列表:
<table width="100%" border=1>
<tr>
    <td>商品名称</td>
    <td>商品价格</td>
    <td>生产日期</td>
    <td>商品描述</td>
    <td>操作</td>
</tr>
<c:forEach items="${itemList }" var="item">
<tr>
    <td>${item.name }</td>
    <td>${item.price }</td>
    <td><fmt:formatDate value="${item.createtime}" pattern="yyyy-MM-dd HH:mm:ss"/></td>
    <td>${item.detail }</td>

    <td><a href="${pageContext.request.contextPath }/itemEdit.action?id=${item.id}">修改</a></td>
</tr>
</c:forEach>

</table>
- 1
- 2
- 3
- 4
- 5
- 6
- 7
- 8
- 9
- 10
- 11
- 12
- 13
- 14
- 15
- 16
- 17
- 18
- 19
- 20
- 21
- 22
- 23
10.测试一下 http://localhost:8080/SpringMvcMybatisDemo/itemlist
- 1
修改商品信息
1.我们点击修改按钮,跳转到修改页面,然后将商品内容回显,先创建service层

    //根据id查询Items
    public Items selectItemById(int id) {
        return itemsMapper.selectByPrimaryKey(id);
    }

    //根据id更新Items
    public void  updateItemById(Items item) {
        itemsMapper.updateByPrimaryKeySelective(item);
    }
- 1
- 2
- 3
- 4
- 5
- 6
- 7
- 8
- 9
- 10
- 11
2.编写Controller

    //根据提交的Items更新Items
    @RequestMapping("/editItem")
    public ModelAndView updateItem(Items item) {
        itemService.updateItemById(item);
        ModelAndView modelAndView=new ModelAndView();
        modelAndView.setViewName("success");
        return modelAndView;
    }

    //根据id查询Items,并交由页面回显
    @RequestMapping("/itemEdit")
    public ModelAndView selectItem(int id) {
        Items item=itemService.selectItemById(id);
        ModelAndView modelAndView=new ModelAndView();
        modelAndView.addObject("item",item);
        modelAndView.setViewName("editItem");
        return modelAndView;
    }
- 1
- 2
- 3
- 4
- 5
- 6
- 7
- 8
- 9
- 10
- 11
- 12
- 13
- 14
- 15
- 16
- 17
- 18
- 19
- 20
我们发现上面的数据提交到数据库后,出现乱码情况。
解决乱码问题
SpringMVC框架提供了org.springframework.web.filter.CharacterEncodingFilter用于解决POST方式造成的中文乱码问题。
在web.xml中配置

<filter>
    <filter-name>CharacterEncodingFilter</filter-name>
    <filter-class>org.springframework.web.filter.CharacterEncodingFilter</filter-class>
    <init-param>
        <param-name>encoding</param-name>
        <param-value>utf-8</param-value>
    </init-param>
</filter>
<filter-mapping>
    <filter-name>CharacterEncodingFilter</filter-name>
    <url-pattern>/*</url-pattern>
</filter-mapping>
- 1
- 2
- 3
- 4
- 5
- 6
- 7
- 8
- 9
- 10
- 11
- 12
- 13
- 14
Spring MVC
Spring MVC简介
Spring web mvc和Struts2都属于表现层的框架,它是Spring框架的一部分。Spring Web MVC是一种基于Java的实现了Web MVC设计模式的请求驱动类型的轻量级Web框架,即使用了MVC架构模式的思想,将web层进行职责解耦,基于请求驱动指的就是使用请求-响应模型,框架的目的就是帮助我们简化开发,Spring MVC大大简化了我们日常Web开发。
Struts2和SpringMVC对比
1、springmvc的入口是一个servlet即前端控制器,而struts2入口是一个filter过滤器。

2、springmvc是基于方法开发(一个url对应一个方法),请求参数传递到方法的形参,可以设计为单例或多例(建议单例),struts2是基于类开发,传递参数是通过类的属性,只能设计为多例。

3、Struts采用值栈存储请求和响应的数据,通过OGNL存取数据, springmvc通过参数解析器是将request请求内容解析,并给方法形参赋值,将数据和视图封装成ModelAndView对象,最后又将ModelAndView中的模型数据通过request域传输到页面。Jsp视图解析器默认使用jstl。
- 1
- 2
- 3
- 4
- 5
- 6
优点
√让我们能非常简单的设计出干净的Web层和薄薄的Web层;

√进行更简洁的Web层的开发;

√天生与Spring框架集成(如IoC容器、AOP等);

√提供强大的约定大于配置的契约式编程支持;

√能简单的进行Web层的单元测试;

√支持灵活的URL到页面控制器的映射;

√非常容易与其他视图技术集成,如Velocity、FreeMarker等等,因为模型数据不放在特定的API里,而是放在一个Model里(Map数据结构实现,因此很容易被其他框架使用);

√非常灵活的数据验证、格式化和数据绑定机制,能使用任何对象进行数据绑定,不必实现特定框架的API;

√提供一套强大的JSP标签库,简化JSP开发;

√支持灵活的本地化、主题等解析;

√更加简单的异常处理;

√对静态资源的支持;

√支持Restful风格。
- 1
- 2
- 3
- 4
- 5
- 6
- 7
- 8
- 9
- 10
- 11
- 12
- 13
- 14
- 15
- 16
- 17
- 18
- 19
- 20
- 21
- 22
- 23
- 24
- 25
- 26
Spring MVC架构
1、  用户发送请求至前端控制器DispatcherServlet,前端控制器收到请求后自己不进行处理,而是调用处理器映射器。

2、  DispatcherServlet收到请求后调用HandlerMapping处理器映射器。HandlerMapping将会把请求映射为HandlerExecutionChain对象(包含一个Handler处理器(页面控制器)对象、多个HandlerInterceptor拦截器)对象。

3、  处理器映射器根据请求url找到具体的处理器,生成处理器对象及处理器拦截器(如果有则生成)一并返回给DispatcherServlet。

4、  DispatcherServlet通过HandlerAdapter处理器适配器调用处理器

5、  执行处理器(Controller,也叫后端控制器)。返回执行结果,封装在ModelAndView中

6、  DispatcherServlet将ModelAndView传给ViewReslover视图解析器, ViewResolver将把逻辑视图名解析为具体的View,通过这种策略模式,很容易更换其他视图技术;

7、  ViewReslover解析后返回具体View

8、  DispatcherServlet对View进行渲染视图(即将对象模型的数据填充至视图中)。此处的Model实际是一个Map数据结构,因此很容易支持其他视图技术;

9、  DispatcherServlet将结果响应给用户
- 1
- 2
- 3
- 4
- 5
- 6
- 7
- 8
- 9
- 10
- 11
- 12
- 13
- 14
- 15
- 16
- 17
- 18
Spring MVC入门
通过前面的流程分析,我们可以看出具体的核心开发步骤,具体的开发就围绕以下几点:
1、  DispatcherServlet在web.xml中的部署描述,从而拦截请求到Spring Web MVC
2、  HandlerMapping的配置,从而将请求映射到处理器
3、  HandlerAdapter的配置,从而支持多种类型的处理器
4、  ViewResolver的配置,从而将逻辑视图名解析为具体视图技术
5、  处理器(页面控制器)的配置,从而进行功能处理
- 1
- 2
- 3
- 4
- 5
- 6
1.创建Web项目,导入Spring核心包和Spring-web-mvc.jar,还有依赖包commons-logging.jar
- 1
2.在web.xml中配置前端控制器

<?xml version="1.0" encoding="UTF-8"?>
<web-app xmlns:xsi="http://www.w3.org/2001/XMLSchema-instance" xmlns="http://java.sun.com/xml/ns/javaee" xsi:schemaLocation="http://java.sun.com/xml/ns/javaee http://java.sun.com/xml/ns/javaee/web-app_2_5.xsd" id="WebApp_ID" version="2.5">
  <display-name>SringMVCDemo</display-name>
  <welcome-file-list>
    <welcome-file>index.html</welcome-file>
    <welcome-file>index.htm</welcome-file>
    <welcome-file>index.jsp</welcome-file>
    <welcome-file>default.html</welcome-file>
    <welcome-file>default.htm</welcome-file>
    <welcome-file>default.jsp</welcome-file>
  </welcome-file-list>

  <!--配置前端控制器-->
  <servlet>
        <servlet-name>springmvc</servlet-name>
        <servlet-class>org.springframework.web.servlet.DispatcherServlet</servlet-class>
        <!--指定配置文件-->
        <init-param>
            <param-name>contextConfigLocation</param-name>
            <param-value>classpath:springmvc.xml</param-value>
        </init-param>
  </servlet>
  <servlet-mapping>
        <servlet-name>springmvc</servlet-name>
        <!--拦截所有action请求-->
        <url-pattern>*.action</url-pattern>
  </servlet-mapping>
</web-app>


自此请求已交给Spring Web MVC框架处理,因此我们需要配置Spring的配置文件,默认DispatcherServlet会加载WEB-INF/[DispatcherServlet的Servlet名字]-servlet.xml配置文件。但也可以直接通过<init-param>来指定配置文件
- 1
- 2
- 3
- 4
- 5
- 6
- 7
- 8
- 9
- 10
- 11
- 12
- 13
- 14
- 15
- 16
- 17
- 18
- 19
- 20
- 21
- 22
- 23
- 24
- 25
- 26
- 27
- 28
- 29
- 30
- 31
- 32
- 33
3.配置springmvc配置文件
<?xml version="1.0" encoding="UTF-8"?>
<beans xmlns="http://www.springframework.org/schema/beans"
    xmlns:xsi="http://www.w3.org/2001/XMLSchema-instance" xmlns:p="http://www.springframework.org/schema/p"
    xmlns:context="http://www.springframework.org/schema/context"
    xmlns:mvc="http://www.springframework.org/schema/mvc"
    xsi:schemaLocation="http://www.springframework.org/schema/beans http://www.springframework.org/schema/beans/spring-beans-4.0.xsd
        http://www.springframework.org/schema/mvc http://www.springframework.org/schema/mvc/spring-mvc-4.0.xsd
        http://www.springframework.org/schema/context http://www.springframework.org/schema/context/spring-context-4.0.xsd">

    <!-- 配置映射器,表示将请求的URL和Bean名字映射,如URL为 “/hello”,则Spring配置文件必须有一个名字为“/hello”的Bean -->
    <bean class="org.springframework.web.servlet.handler.BeanNameUrlHandlerMapping"/>

    <!-- 配置适配器,表示所有实现了org.springframework.web.servlet.mvc.Controller接口的Bean可以作为Spring Web MVC中的处理器。如果需要其他类型的处理器可以通过实现HadlerAdapter来解决 -->
    <bean class="org.springframework.web.servlet.mvc.SimpleControllerHandlerAdapter"/>

    <!--配置视图解析器-->
    <bean class="org.springframework.web.servlet.view.InternalResourceViewResolver">
        <!--prefix和suffix:查找视图页面的前缀和后缀,比如传进来的逻辑视图名为hello,则该该jsp视图页面应该存放在“WEB-INF/hello.jsp”-->
        <property name="prefix" value="/WEB-INF/"/>
        <property name="suffix" value=".jsp"/>
    </bean>

</beans>
- 1
- 2
- 3
- 4
- 5
- 6
- 7
- 8
- 9
- 10
- 11
- 12
- 13
- 14
- 15
- 16
- 17
- 18
- 19
- 20
- 21
- 22
- 23
- 24
4.实现控制器

//处理器必须实现Controller接口
public class UserController implements Controller {
    public ModelAndView handleRequest(HttpServletRequest arg0, HttpServletResponse arg1) throws Exception {

            ModelAndView mv = new ModelAndView();
           //添加模型数据 可以是任意的POJO对象
           mv.addObject("message", "Hello World!");
           //设置逻辑视图名,视图解析器会根据该名字解析到具体的视图页面
           mv.setViewName("user");
           return mv;
    }
}
- 1
- 2
- 3
- 4
- 5
- 6
- 7
- 8
- 9
- 10
- 11
- 12
- 13
- 14
- 15
5.将处理器添加到springmvc配置文件中
<bean name="/user" class="com.cad.controller.UserController"></bean>
- 1
- 2
6.编写user.jsp

<%@ page language="java" contentType="text/html; charset=UTF-8"
    pageEncoding="UTF-8"%>
        <!DOCTYPE html PUBLIC "-//W3C//DTD HTML 4.01 Transitional//EN" "http://www.w3.org/TR/html4/loose.dtd">
<html>
    <head>
        <meta http-equiv="Content-Type" content="text/html; charset=UTF-8">
        <title>Insert title here</title>
    </head>
    <body>
        <!--${message}:表示显示由HelloWorldController处理器传过来的模型数据。-->
        ${message}
    </body>
</html>
- 1
- 2
- 3
- 4
- 5
- 6
- 7
- 8
- 9
- 10
- 11
- 12
- 13
- 14
- 15
7.进行访问 http://localhost:8080/SringMVCDemo/user
- 1
入门案例做完了,对SpringMVC的流程有了了解,现在来详细介绍。
DispatcherServlet详解
DispatcherServlet是前端控制器设计模式的实现,提供Spring Web MVC的集中访问点,主要负责职责的分派。
配置

 <servlet>
        <servlet-name>springmvc</servlet-name>
        <servlet-class>org.springframework.web.servlet.DispatcherServlet</servlet-class>
        <!--指定配置文件的位置,默认“/WEB-INF/[servlet名字]-servlet.xml”。-->
        <init-param>
            <param-name>contextConfigLocation</param-name>
            <param-value>classpath:springmvc.xml</param-value>
        </init-param>
  </servlet>
  <servlet-mapping>
        <servlet-name>springmvc</servlet-name>
        <url-pattern>/</url-pattern>
  </servlet-mapping>
- 1
- 2
- 3
- 4
- 5
- 6
- 7
- 8
- 9
- 10
- 11
- 12
- 13
- 14
- 15
DispatcherServlet的默认配置在DispatcherServlet.properties(和DispatcherServlet类在一个包下)中,而且是当Spring配置文件中没有指定配置时使用的默认策略。
DispatcherServlet在启动时会自动注册这些默认的Bean,无需我们注册,如果我们注册了,默认的将不会注册。因此我们入门案例中的BeanNameUrlHandlerMapping、SimpleControllerHandlerAdapter是不需要我们手动注册的,DispatcherServlet默认会注册这两个Bean。里面还有一些其他的默认Bean,我们可以自行去了解。
接下来我们了解一下Spring MVC需要的那些组件。
Controller
Controller控制器,其实现在大多数公司已经不推荐使用实现Controller接口的方法来实现Controller,基本都使用注解。但难免还会有一些比较老的系统使用,所以我们大概了解一下。
//控制器接口
public interface Controller {
       ModelAndView handleRequest(HttpServletRequest request, HttpServletResponse response) throws Exception;
}
- 1
- 2
- 3
- 4
控制器接口,只有一个方法handleRequest,用于进行请求的功能处理,处理完请求后返回ModelAndView。Spring 提供了很多Controller接口的实现
这些类接口的详解,可以参考开涛讲解的SpringMVC,讲的非常详细。这里附上链接,就不再细讲。
http://jinnianshilongnian.iteye.com/blog/1752171
SpringMVC注解式开发
Spring2.5之前,我们都是通过实现Controller接口或其实现来定义我们的处理器类。Spring2.5引入注解式处理器支持,通过@Controller 和 @RequestMapping注解定义我们的处理器类。并且提供了一组强大的注解。
Spring2.5需要通过处理器映射DefaultAnnotationHandlerMapping和处理器适配器AnnotationMethodHandlerAdapter来开启支持@Controller 和@RequestMapping注解的处理器。一般不用指定,因为默认的有。
@Controller:用于标识是处理器类;
@RequestMapping:请求到处理器功能方法的映射规则;
@RequestParam:请求参数到处理器功能处理方法的方法参数上的绑定;
@ModelAttribute:请求参数到命令对象的绑定;
@SessionAttributes:用于声明session级别存储的属性,放置在处理器类上,通常列出
模型属性(如@ModelAttribute)对应的名称,则这些属性会透明的保存到session中;
@InitBinder:自定义数据绑定注册支持,用于将请求参数转换到命令对象属性的对应类型;
- 1
- 2
- 3
- 4
- 5
- 6
- 7
- 8
Spring3.1引入新的@Contoller和@RequestMapping注解支持类:处理器映射RequestMappingHandlerMapping和处理器适配器RequestMappingHandlerAdapter组合来代替Spring2.5开始的处理器映射DefaultAnnotationHandlerMapping和处理器适配器AnnotationMethodHandlerAdapter。Spring3.0支持RESTful风格,且又引入了更多注解支持
@CookieValue:cookie数据到处理器功能处理方法的方法参数上的绑定;
@RequestHeader:请求头(header)数据到处理器功能处理方法的方法参数上的绑定;
@RequestBody:请求的body体的绑定(通过HttpMessageConverter进行类型转换);
@ResponseBody:处理器功能处理方法的返回值作为响应体(通过HttpMessageConverter进行类型转换);
@ResponseStatus:定义处理器功能处理方法/异常处理器返回的状态码和原因;
@ExceptionHandler:注解式声明异常处理器;
@PathVariable:请求URI中的模板变量部分到处理器功能处理方法的方法参数上的绑定,
从而支持RESTful架构风格的URI;
- 1
- 2
- 3
- 4
- 5
- 6
- 7
- 8
- 9
SpringMVC注解式开发入门案例
1.配置springmvc配置文件

<?xml version="1.0" encoding="UTF-8"?>
<beans xmlns="http://www.springframework.org/schema/beans"
    xmlns:xsi="http://www.w3.org/2001/XMLSchema-instance" xmlns:p="http://www.springframework.org/schema/p"
    xmlns:context="http://www.springframework.org/schema/context"
    xmlns:mvc="http://www.springframework.org/schema/mvc"
    xsi:schemaLocation="http://www.springframework.org/schema/beans http://www.springframework.org/schema/beans/spring-beans-4.0.xsd
        http://www.springframework.org/schema/mvc http://www.springframework.org/schema/mvc/spring-mvc-4.0.xsd
        http://www.springframework.org/schema/context http://www.springframework.org/schema/context/spring-context-4.0.xsd">

<!--Spring3.1开始的注解 ,映射器和适配器 直接配置处理器映射器和处理器适配器比较麻烦,可以使用注解驱动来加载。SpringMVC使用<mvc:annotation-driven>自动加载RequestMappingHandlerMappingRequestMappingHandlerAdapter-->
<bean class="org.springframework.web.servlet.mvc.method.annotation.RequestMappingHandlerMapping"></bean>
<bean class="org.springframework.web.servlet.mvc.method.annotation.RequestMappingHandlerAdapter"></bean>


<!--视图解析器的配置-->
<bean class="org.springframework.web.servlet.view.InternalResourceViewResolver">
    <property name="prefix" value="/WEB-INF/"/>
    <property name="suffix" value=".jsp"/>
</bean>

<!--只需要将处理器实现类注册到spring配置文件即可,RequestMappingHandlerMapping会自动发现带注解的该类-->
<bean class="com.cad.controller.UserController"></bean>

</beans>
- 1
- 2
- 3
- 4
- 5
- 6
- 7
- 8
- 9
- 10
- 11
- 12
- 13
- 14
- 15
- 16
- 17
- 18
- 19
- 20
- 21
- 22
- 23
- 24
- 25
- 26
2.编写处理类

@Controller
public class UserController  {
    //RequestMapping("hello") 代理该方法的路径
    @RequestMapping("/hello")
    public ModelAndView hello() {
        ModelAndView mv = new ModelAndView();
           //添加模型数据 可以是任意的POJO对象
           mv.addObject("message", "Hello World!");
           //设置逻辑视图名,视图解析器会根据该名字解析到具体的视图页面
           mv.setViewName("user");
           return mv;
    }
}
- 1
- 2
- 3
- 4
- 5
- 6
- 7
- 8
- 9
- 10
- 11
- 12
- 13
- 14
- 15
SpringMVC注解式开发详解
请求映射
我们的http请求信息一般包含六部分信息:
①请求方法,如GET或POST,表示提交的方式;
②URL,请求的地址信息;
③协议及版本;
④请求头信息(包括Cookie信息);
⑤回车换行(CRLF),头信息和请求体之间有空行;
⑥请求内容区(即请求的内容或数据),如表单提交时的参数数据、URL请求参数(?abc=123 ?后边的)等。
- 1
- 2
- 3
- 4
- 5
- 6
- 7
我们可以看到有①、②、④、⑥一般是可变的,因此可以根据这四个可变的来映射到指定的方法
URL路径映射:使用URL映射请求到处理器的功能处理方法;
请求方法映射限定:如限定功能处理方法只处理GET请求;
请求参数映射限定:如限定只处理包含“abc”请求参数的请求;
请求头映射限定:如限定只处理“Accept=application/json”的请求
- 1
- 2
- 3
- 4
- 5
URL映射
@RequestMapping(value={“/test1”, “/user/create”}):多个URL路径可以映射到同一个处理器的功能处理方法。
@RequestMapping(value=”/users/**”):可以匹配“/users/abc/abc”
@RequestMapping(value=”/product?”):可匹配“/product1”或“/producta”
@RequestMapping(value=”/product*”):可匹配“/productabc”或“/product”
SpringMVC还提供了正则表达式风格,模板风格的URL映射,功能非常强大。
请求方法映射限定
@RequestMapping(value=”/hello”,method=RequestMethod.POST):指定此方法只能被post请求访问。
请求参数数据映射限定
@RequestMapping(params=”create”, method=RequestMethod.GET) :表示请求中有“create”的参数名且请求方法为“GET”即可匹配,如可匹配的请求URL“http://×××/parameter1?create”;
@RequestMapping(params=”!create”, method=RequestMethod.GET):表示请求中没有“create”参数名且请求方法为“GET”即可匹配,如可匹配的请求URL“http://×××/parameter1?abc”
@RequestMapping(params=”submitFlag=create”, method=RequestMethod.GET):表示请求中有“submitFlag=create”请求参数且请求方法为“GET”即可匹配,如请求URL为http://×××/parameter2?submitFlag=create;
请求头数据映射限定
@RequestMapping(value=”/header/test1”, headers = “Accept”):表示请求的URL必须为“/header/test1”,且 请求头中必须有Accept参数才能匹配。
@RequestMapping(value=”/header/test3”, headers = “Content-Type=application/json”):表示请求的URL必须为“/header/test3” 且 请求头中必须有“Content-Type=application/json”参数即可匹配。;
SpringMVC强大的参数绑定
SpringMVC为我们提供了很多默认支持的参数类型,只要我们在处理器方法的形参中添加这些参数类型,Spring MVC会自动为这些参数赋值,我们来看一下都有哪些。
ServletRequest/HttpServletRequest 和 ServletResponse/HttpServletResponse
InputStream/OutputStream 和 Reader/Writer :requestBodyIn:获取请求的内容区字节流,等价于request.getInputStream();responseBodyOut:获取相应的内容区字节流,等价于response.getOutputStream()。
WebRequest/NativeWebRequest:WebRequest是Spring Web MVC提供的统一请求访问接口,不仅仅可以访问请求相关数据(如参数区数据、请求头数据,但访问不到Cookie区数据),还可以访问会话和上下文中的数据;NativeWebRequest继承了WebRequest,并提供访问本地Servlet API的方法。
HttpSession
Model、Map、ModelMap:Spring Web MVC 提供Model、Map或ModelMap让我们能去暴露渲染视图需要的模型数据。除了ModelAndView以外,还可以使用Model来向页面传递数据,Model是一个接口,在参数里直接声明model即可。如果使用Model则可以不使用ModelAndView对象,Model对象可以向页面传递数据,View对象则可以使用String返回值替代。
Model
    @RequestMapping("/itemEdit")
    public String queryItemById(HttpServletRequest request, Model model) {
        // 从request中获取请求参数
        String strId = request.getParameter("id");
        Integer id = Integer.valueOf(strId);

        // 根据id查询商品数据
        Item item = this.itemService.queryItemById(id);

        // 把结果传递给页面
        // ModelAndView modelAndView = new ModelAndView();
        // 把商品数据放在模型中
        // modelAndView.addObject("item", item);
        // 设置逻辑视图
        // modelAndView.setViewName("itemEdit");

        // 把商品数据放在模型中
        model.addAttribute("item", item);

        return "itemEdit";
    }
- 1
- 2
- 3
- 4
- 5
- 6
- 7
- 8
- 9
- 10
- 11
- 12
- 13
- 14
- 15
- 16
- 17
- 18
- 19
- 20
- 21
- 22
- 23
ModelMap
ModelMap是Model接口的实现类,也可以通过ModelMap向页面传递数据。
使用Model和ModelMap的效果一样,如果直接使用Model,springmvc会实例化ModelMap

    @RequestMapping("/itemEdit")
    public String queryItemById(HttpServletRequest request, ModelMap model) {
        // 从request中获取请求参数
        String strId = request.getParameter("id");
        Integer id = Integer.valueOf(strId);

        // 根据id查询商品数据
        Item item = this.itemService.queryItemById(id);

        // 把结果传递给页面
        // ModelAndView modelAndView = new ModelAndView();
        // 把商品数据放在模型中
        // modelAndView.addObject("item", item);
        // 设置逻辑视图
        // modelAndView.setViewName("itemEdit");

        // 把商品数据放在模型中
        model.addAttribute("item", item);

        return "itemEdit";
    }
- 1
- 2
- 3
- 4
- 5
- 6
- 7
- 8
- 9
- 10
- 11
- 12
- 13
- 14
- 15
- 16
- 17
- 18
- 19
- 20
- 21
- 22
- 23
- 24
- 25
- 26
- Errors/BindingResult:错误对象。数据验证时使用。
绑定简单类型参数
1.不使用注解情况下,如果参数名称和jsp页面中的表单项的name一样,那么可以直接接收参数。
例如:前端有一参数name为id,直接就可以获取到
@Controller
public class UserController  {
    @RequestMapping(value="/hello")
    public ModelAndView hello(int id) {
            System.out.println(id);
            ModelAndView mv = new ModelAndView();
           //设置逻辑视图名,视图解析器会根据该名字解析到具体的视图页面
           mv.setViewName("user");
           return mv;
    }
}
- 1
- 2
- 3
- 4
- 5
- 6
- 7
- 8
- 9
- 10
- 11
- 12
2.@RequestParam用来绑定单个请求参数值,可以指定一些属性。
value:参数名字,即入参的请求参数名字,这也可以解决表单name和我们的形参名字不一样的情况;

required:是否必须,默认是true,表示请求中一定要有相应的参数,否则将报404错误码;

defaultValue:默认值,表示如果请求中没有同名参数时的默认值。

例如:@RequestParam(value ="itemId", required = true, defaultValue = "1") int  id:将表单项itemId的值赋给id。
- 1
- 2
- 3
- 4
- 5
- 6
- 7
- 8
3.不使用注解情况下,使用对象接收表单数据,请求的参数名称和pojo的属性名称一致,会自动将请求参数赋值给pojo的属性。
4.@ModelAttribute绑定请求参数到对象
    public String test1(@ModelAttribute("user") UserModel user)

    它的作用是将该绑定的命令对象以“user”为名称添加到模型对象中供视图页面展示使用。我们此时可以在视图页面使用${user.username}来获取绑定的命令对象的属性。
- 1
- 2
- 3
- 4
- 5
- 6
5.@CookieValue用于将请求的Cookie数据映射到功能处理方法的参数上。
public String test(@CookieValue(value="JSESSIONID", defaultValue="") String sessionId)
如上配置将自动将JSESSIONID值入参到sessionId参数上,defaultValue表示Cookie中没有JSESSIONID时默认为空。
- 1
- 2
6.@RequestHeader用于将请求的头信息区数据映射到功能处理方法的参数上
@RequestMapping(value="/header")
public String test(
       @RequestHeader("User-Agent") String userAgent,
       @RequestHeader(value="Accept") String[] accepts)

如上配置将自动将请求头“User-Agent”值入参到userAgent参数上,并将“Accept”请求头值入参到accepts参数上。
- 1
- 2
- 3
- 4
- 5
- 6
SpringMVC+Mybatis+Spring案例
需求:页面显示所有商品信息并且提供修改功能。
1.搭建数据库环境

CREATE DATABASE springmvc;
DROP TABLE IF EXISTS `items`;
CREATE TABLE `items` (
  `id` INT(11) NOT NULL AUTO_INCREMENT,
  `name` VARCHAR(32) NOT NULL COMMENT '商品名称',
  `price` FLOAT(10,1) NOT NULL COMMENT '商品定价',
  `detail` TEXT COMMENT '商品描述',
  `pic` VARCHAR(64) DEFAULT NULL COMMENT '商品图片',
  `createtime` DATETIME NOT NULL COMMENT '生产日期',
  PRIMARY KEY (`id`)
) ENGINE=INNODB AUTO_INCREMENT=4 DEFAULT CHARSET=utf8;

-- ----------------------------
-- Records of items
-- ----------------------------
INSERT INTO `items` VALUES ('1', '台式机', '3000.0', '该电脑质量非常好!!!!', NULL, '2016-02-03 13:22:53');
INSERT INTO `items` VALUES ('2', '笔记本', '6000.0', '笔记本性能好,质量好!!!!!', NULL, '2015-02-09 13:22:57');
INSERT INTO `items` VALUES ('3', '背包', '200.0', '名牌背包,容量大质量好!!!!', NULL, '2015-02-06 13:23:02');
- 1
- 2
- 3
- 4
- 5
- 6
- 7
- 8
- 9
- 10
- 11
- 12
- 13
- 14
- 15
- 16
- 17
- 18
- 19
- 20
2.创建Web工程,导入SpringMVC,Mybatis,Spring,Mysql驱动等jar包
- 1
3.通过Mybatis逆向工程生成POJO对象和Mapper接口
- 1
4.配置Spring配置文件,applicationContext.xml

<?xml version="1.0" encoding="UTF-8"?>
<beans xmlns="http://www.springframework.org/schema/beans"
    xmlns:context="http://www.springframework.org/schema/context" xmlns:p="http://www.springframework.org/schema/p"
    xmlns:aop="http://www.springframework.org/schema/aop" xmlns:tx="http://www.springframework.org/schema/tx"
    xmlns:xsi="http://www.w3.org/2001/XMLSchema-instance"
    xsi:schemaLocation="http://www.springframework.org/schema/beans http://www.springframework.org/schema/beans/spring-beans-4.0.xsd
    http://www.springframework.org/schema/context http://www.springframework.org/schema/context/spring-context-4.0.xsd
    http://www.springframework.org/schema/aop http://www.springframework.org/schema/aop/spring-aop-4.0.xsd http://www.springframework.org/schema/tx http://www.springframework.org/schema/tx/spring-tx-4.0.xsd
    http://www.springframework.org/schema/util http://www.springframework.org/schema/util/spring-util-4.0.xsd">

<!-- 配置数据库连接池 -->
<bean id="dataSource" class="com.mchange.v2.c3p0.ComboPooledDataSource">
    <property name="driverClass" value="com.mysql.jdbc.Driver"></property>
    <property name="jdbcUrl" value="jdbc:mysql://localhost:3306/springmvc"></property>
    <property name="user" value="root"></property>
    <property name="password" value="123456"></property>
</bean>

<!-- 配置sqlSession工厂 -->
<bean id="sqlSessionFactory" class="org.mybatis.spring.SqlSessionFactoryBean">
    <!-- 配置核心配置文件 -->
    <property name="configLocation" value="classpath:SqlMapConfig.xml"></property>
    <!-- 配置数据源 -->
    <property name="dataSource" ref="dataSource"></property>
</bean>

<!-- 配置Mapper扫描 -->
<bean class="org.mybatis.spring.mapper.MapperScannerConfigurer">
    <property name="basePackage" value="cn.cad.dao"/>
</bean>

<!-- 配置注解扫描 -->
<context:component-scan base-package="cn.cad" />

</beans>
- 1
- 2
- 3
- 4
- 5
- 6
- 7
- 8
- 9
- 10
- 11
- 12
- 13
- 14
- 15
- 16
- 17
- 18
- 19
- 20
- 21
- 22
- 23
- 24
- 25
- 26
- 27
- 28
- 29
- 30
- 31
- 32
- 33
- 34
- 35
- 36
- 37
5.配置spring-mvc配置文件
<?xml version="1.0" encoding="UTF-8"?>
<beans xmlns="http://www.springframework.org/schema/beans"
    xmlns:xsi="http://www.w3.org/2001/XMLSchema-instance" xmlns:p="http://www.springframework.org/schema/p"
    xmlns:context="http://www.springframework.org/schema/context"
    xmlns:mvc="http://www.springframework.org/schema/mvc"
    xsi:schemaLocation="http://www.springframework.org/schema/beans http://www.springframework.org/schema/beans/spring-beans-4.0.xsd
        http://www.springframework.org/schema/mvc http://www.springframework.org/schema/mvc/spring-mvc-4.0.xsd
        http://www.springframework.org/schema/context http://www.springframework.org/schema/context/spring-context-4.0.xsd">

<!--配置映射器和适配器-->
<bean class="org.springframework.web.servlet.mvc.method.annotation.RequestMappingHandlerMapping"></bean>
<bean class="org.springframework.web.servlet.mvc.method.annotation.RequestMappingHandlerAdapter"></bean>

<!--配置视图解析器-->
<bean class="org.springframework.web.servlet.view.InternalResourceViewResolver">
    <property name="prefix" value="/WEB-INF/"/>
    <property name="suffix" value=".jsp"/>
</bean>

<!--配置Controller扫描-->
<context:component-scan base-package="cn.cad.controller" />

</beans>
- 1
- 2
- 3
- 4
- 5
- 6
- 7
- 8
- 9
- 10
- 11
- 12
- 13
- 14
- 15
- 16
- 17
- 18
- 19
- 20
- 21
- 22
- 23
- 24
6.配置Mybatis核心配置文件

<?xml version="1.0" encoding="UTF-8" ?>
<!DOCTYPE configuration
    PUBLIC "-//mybatis.org//DTD Config 3.0//EN"
    "http://mybatis.org/dtd/mybatis-3-config.dtd">


<configuration>
    <!--什么都不用配置,因为扫描Mapper接口已经在Spring配置文件中配置过-->
</configuration>
- 1
- 2
- 3
- 4
- 5
- 6
- 7
- 8
- 9
- 10
- 11
7.配置Web.xml

<?xml version="1.0" encoding="UTF-8"?>
<web-app xmlns:xsi="http://www.w3.org/2001/XMLSchema-instance" xmlns="http://java.sun.com/xml/ns/javaee" xsi:schemaLocation="http://java.sun.com/xml/ns/javaee http://java.sun.com/xml/ns/javaee/web-app_2_5.xsd" id="WebApp_ID" version="2.5">
  <display-name>SpringMvcMybatisDemo</display-name>
  <welcome-file-list>
    <welcome-file>index.html</welcome-file>
    <welcome-file>index.htm</welcome-file>
    <welcome-file>index.jsp</welcome-file>
    <welcome-file>default.html</welcome-file>
    <welcome-file>default.htm</welcome-file>
    <welcome-file>default.jsp</welcome-file>
  </welcome-file-list>

     <!-- 配置spring配置文件 -->
    <context-param>
        <param-name>contextConfigLocation</param-name>
        <param-value>classpath:applicationContext.xml</param-value>
    </context-param>

    <!-- 使用监听器加载Spring配置文件 -->
    <listener>
        <listener-class>org.springframework.web.context.ContextLoaderListener</listener-class>
    </listener>

    <!-- 配置springmvc前端控制器 -->
    <servlet>
        <servlet-name>springmvc-web</servlet-name>
        <servlet-class>org.springframework.web.servlet.DispatcherServlet</servlet-class>
        <init-param>
            <param-name>contextConfigLocation</param-name>
            <param-value>classpath:springmvc.xml</param-value>
        </init-param>
    </servlet>

    <servlet-mapping>
        <servlet-name>springmvc-web</servlet-name>
        <url-pattern>/</url-pattern>
    </servlet-mapping>

</web-app>
- 1
- 2
- 3
- 4
- 5
- 6
- 7
- 8
- 9
- 10
- 11
- 12
- 13
- 14
- 15
- 16
- 17
- 18
- 19
- 20
- 21
- 22
- 23
- 24
- 25
- 26
- 27
- 28
- 29
- 30
- 31
- 32
- 33
- 34
- 35
- 36
- 37
- 38
- 39
- 40
- 41
7.创建Service层 ItemService

@Service
public class ItemService {
    @Autowired
    private ItemsMapper itemsMapper;

    public List<Items> queryItems(){
        //查询所有Items
        return  itemsMapper.selectByExampleWithBLOBs(null);
    }
}
- 1
- 2
- 3
- 4
- 5
- 6
- 7
- 8
- 9
- 10
- 11
- 12
8.创建Controller
@Controller
public class ItemController {

    @Autowired
    private ItemService itemService;

    @RequestMapping("/itemlist")
    public ModelAndView queryItemList() {
        List<Items> list=itemService.queryItems();
        for(Items i:list) {
            System.out.println(i.getDetail());
        }
        ModelAndView modelAndView=new ModelAndView();
        // 把商品数据放到模型中
        modelAndView.addObject("itemList", list);
        // 设置逻辑视图
        modelAndView.setViewName("itemList");
        return modelAndView;

    }

}
- 1
- 2
- 3
- 4
- 5
- 6
- 7
- 8
- 9
- 10
- 11
- 12
- 13
- 14
- 15
- 16
- 17
- 18
- 19
- 20
- 21
- 22
- 23
9.编写JSP页面

商品列表:
<table width="100%" border=1>
<tr>
    <td>商品名称</td>
    <td>商品价格</td>
    <td>生产日期</td>
    <td>商品描述</td>
    <td>操作</td>
</tr>
<c:forEach items="${itemList }" var="item">
<tr>
    <td>${item.name }</td>
    <td>${item.price }</td>
    <td><fmt:formatDate value="${item.createtime}" pattern="yyyy-MM-dd HH:mm:ss"/></td>
    <td>${item.detail }</td>

    <td><a href="${pageContext.request.contextPath }/itemEdit.action?id=${item.id}">修改</a></td>
</tr>
</c:forEach>

</table>
- 1
- 2
- 3
- 4
- 5
- 6
- 7
- 8
- 9
- 10
- 11
- 12
- 13
- 14
- 15
- 16
- 17
- 18
- 19
- 20
- 21
- 22
- 23
10.测试一下 http://localhost:8080/SpringMvcMybatisDemo/itemlist
- 1
修改商品信息
1.我们点击修改按钮,跳转到修改页面,然后将商品内容回显,先创建service层

    //根据id查询Items
    public Items selectItemById(int id) {
        return itemsMapper.selectByPrimaryKey(id);
    }

    //根据id更新Items
    public void  updateItemById(Items item) {
        itemsMapper.updateByPrimaryKeySelective(item);
    }
- 1
- 2
- 3
- 4
- 5
- 6
- 7
- 8
- 9
- 10
- 11
2.编写Controller

    //根据提交的Items更新Items
    @RequestMapping("/editItem")
    public ModelAndView updateItem(Items item) {
        itemService.updateItemById(item);
        ModelAndView modelAndView=new ModelAndView();
        modelAndView.setViewName("success");
        return modelAndView;
    }

    //根据id查询Items,并交由页面回显
    @RequestMapping("/itemEdit")
    public ModelAndView selectItem(int id) {
        Items item=itemService.selectItemById(id);
        ModelAndView modelAndView=new ModelAndView();
        modelAndView.addObject("item",item);
        modelAndView.setViewName("editItem");
        return modelAndView;
    }
- 1
- 2
- 3
- 4
- 5
- 6
- 7
- 8
- 9
- 10
- 11
- 12
- 13
- 14
- 15
- 16
- 17
- 18
- 19
- 20
我们发现上面的数据提交到数据库后,出现乱码情况。
解决乱码问题
SpringMVC框架提供了org.springframework.web.filter.CharacterEncodingFilter用于解决POST方式造成的中文乱码问题。
在web.xml中配置

<filter>
    <filter-name>CharacterEncodingFilter</filter-name>
    <filter-class>org.springframework.web.filter.CharacterEncodingFilter</filter-class>
    <init-param>
        <param-name>encoding</param-name>
        <param-value>utf-8</param-value>
    </init-param>
</filter>
<filter-mapping>
    <filter-name>CharacterEncodingFilter</filter-name>
    <url-pattern>/*</url-pattern>
</filter-mapping>
- 1
- 2
- 3
- 4
- 5
- 6
- 7
- 8
- 9
- 10
- 11
- 12
- 13
- 14